No-Bake Energy Balls Recipe – Healthy Protein-Packed Snacks Ready in 15 Minutes

Let me introduce you to your new favorite healthy snack that’s about to change your snacking game forever! These No-Bake Energy Balls are little powerhouses of nutrition wrapped up in delicious, bite-sized treats that taste like cookie dough but are actually good for you. Made with wholesome ingredients like oats, nut butter, honey, and mix-ins like chocolate chips or dried fruit, these easy energy bites require zero baking and come together in just 15 minutes.
What makes these protein energy balls so incredibly popular is their perfect balance of convenience, nutrition, and taste. They’re naturally sweet without refined sugar, packed with protein and fiber to keep you satisfied, and portable enough to throw in your gym bag, purse, or lunchbox. Unlike grabbing a candy bar or processed snack, these homemade energy balls give you sustained energy without the crash, making them perfect for busy mornings, pre-workout fuel, after-school snacks, or that 3 PM office slump.
These healthy no-bake energy balls are ideal for meal prep Sundays, back-to-school season, busy weekday mornings, post-workout recovery, hiking trips, or anytime you need a nutritious grab-and-go option. They’re kid-friendly, customizable for different dietary needs, and so delicious that even picky eaters request them. Best of all? They taste like a treat but fuel your body like the superfood snack they truly are!
History / Background
While energy balls might seem like a modern health food trend, the concept of combining nuts, seeds, dried fruits, and natural sweeteners into portable snacks actually dates back thousands of years. Ancient civilizations, including the Greeks and Romans, created similar nutrient-dense foods for athletes and soldiers who needed sustained energy during long journeys or battles. The famous “pemmican” used by Native Americans combined dried meat, rendered fat, and berries into compact, long-lasting energy sources.
The more recent incarnation of energy balls as we know them today emerged from the natural foods movement of the 1960s and 1970s. Health food stores began selling variations of “power balls” or “protein balls” made from dates, nuts, and seeds – often marketed to athletes and health-conscious consumers looking for alternatives to processed energy bars. These early versions were sometimes called “hippie balls” or “granola balls” and were staples in vegetarian and whole foods communities.
The energy ball revolution really took off in the 2000s and 2010s with the rise of food blogs, Pinterest, and the clean eating movement. Home cooks discovered they could easily recreate expensive store-bought energy bars at home for a fraction of the cost. Food bloggers began sharing countless variations, from chocolate peanut butter to lemon coconut to pumpkin spice, making energy balls endlessly customizable and accessible to home cooks everywhere.
What’s particularly special about this recipe format is its incredible adaptability across different dietary needs and preferences. The basic formula of a sticky binder (like nut butter or dates), a base (like oats or nuts), and flavoring agents can be modified for vegan, gluten-free, paleo, keto, or allergen-free diets. This democratization of healthy snacking has made energy balls a staple in American households, school lunchboxes, and gym bags across the country.
Today, these protein-packed energy bites represent the perfect marriage of ancient wisdom about nutrient-dense foods and modern convenience culture. They’re a testament to how simple, whole food ingredients can create something both nourishing and delicious without any fancy equipment or culinary expertise required.
Why You’ll Love This Recipe
These no-bake energy balls are about to become your most-made recipe, and I’m not exaggerating! I’ve been making variations of these for years, and they’re always the first thing to disappear from my fridge. The combination of creamy nut butter, naturally sweet honey, hearty oats, and chocolate chips creates a flavor and texture that’s absolutely irresistible – like eating cookie dough, but actually nutritious!
Here’s why these healthy energy bites will become your new obsession:
- No baking required – Made entirely in one bowl, no oven needed, perfect for summer
- Ready in 15 minutes – Fastest healthy snack you’ll ever make, minimal active time
- Naturally sweetened – Uses honey or maple syrup instead of refined sugar
- Protein-packed – Each ball contains protein from nut butter, oats, and optional protein powder
- Meal prep friendly – Make a batch on Sunday, have snacks all week long
- Kid-approved – Children love these and have no idea they’re eating something healthy
- Customizable endless ways – Change flavors, add-ins, and dietary modifications easily
- Budget-friendly – Costs less than $1 per serving, cheaper than store-bought bars
- Portable perfection – Take them anywhere without refrigeration (for short periods)
- Energy sustaining – Complex carbs and protein provide lasting fuel, no sugar crash
- Allergy-friendly – Easy to adapt for nut-free, gluten-free, or vegan diets
- No special ingredients – Uses pantry staples you probably already have
- Perfect portion control – Pre-portioned bites prevent overeating
- Satisfies sweet cravings – Feels like dessert but nourishes your body
Ingredient Notes
The beauty of these easy energy balls lies in their simple, wholesome ingredients that work together to create the perfect texture and flavor. Let’s break down what makes this recipe so special:
Old-Fashioned Rolled Oats: These provide the bulk and texture of your energy balls, plus fiber, complex carbs, and a mild nutty flavor. They’re the foundation that holds everything together. Use old-fashioned rolled oats, not quick oats (too mushy) or steel-cut (too hard). Substitution: For gluten-free, use certified gluten-free oats. You can also replace half the oats with Rice Krispies cereal for crunchier texture, or use quinoa flakes for higher protein.
Natural Peanut Butter: The creamy nut butter acts as the primary binder and adds protein, healthy fats, and that irresistible flavor. Natural peanut butter (where oil separates on top) works best because it doesn’t contain added sugars or hydrogenated oils that can affect texture. Substitution: Almond butter, cashew butter, or sunflower seed butter (for nut-free) all work beautifully. Avoid overly thick or dry nut butters – add a teaspoon of coconut oil if needed to help binding.
Honey: This natural liquid sweetener binds ingredients together while adding just the right amount of sweetness. Raw honey provides additional enzymes and antioxidants. Substitution: Pure maple syrup works perfectly for vegan energy balls. Agave nectar is another option, though sweeter, so use slightly less. Date syrup adds deeper, caramel-like flavor.
Mini Chocolate Chips: These add pops of chocolatey sweetness throughout and make the balls feel like a treat! Mini chips distribute more evenly than regular-sized. Substitution: Dark chocolate chips for less sugar, dairy-free chips for vegan, cacao nibs for lower sugar and crunch, or dried fruit like cranberries or raisins for different sweetness.
Ground Flaxseed: This nutritional powerhouse adds omega-3 fatty acids, fiber, and helps bind ingredients together. Ground flaxseed (also called flaxseed meal) is more easily digested than whole seeds. Substitution: Chia seeds work wonderfully and add protein. Hemp hearts are another excellent option with complete protein. Wheat germ adds nuttiness (but isn’t gluten-free).
Vanilla Extract: Just a splash enhances all the other flavors and adds warmth. Pure vanilla extract tastes better than imitation. Substitution: Almond extract for different flavor profile, or maple extract to complement maple syrup sweetener.
Optional Add-Ins: This is where you can get creative! Shredded coconut, dried fruit, chopped nuts, protein powder, cocoa powder, cinnamon, sea salt, or other spices all make excellent additions.
Pinch of Salt: Even if using salted nut butter, a small pinch of salt enhances sweetness and balances flavors. Don’t skip this!
Equipment Needed
One of the best things about these no-bake protein balls is how minimal equipment you need – probably just items you already have in your kitchen!
- Large mixing bowl for combining all ingredients
- Wooden spoon or sturdy spatula for mixing (the mixture gets thick!)
- Measuring cups and spoons for accurate ingredient amounts
- Cookie scoop or tablespoon for portioning uniform balls
- Baking sheet or large plate lined with parchment paper for chilling
- Airtight container for storage
- Parchment paper or wax paper to prevent sticking
Optional but helpful:
- Food processor – For making date-sweetened versions or if you prefer ultra-smooth texture
- Small cookie scoop (1-tablespoon size) – Creates perfectly uniform balls every time
- Stand mixer with paddle attachment – Makes mixing easier if making multiple batches
- Kitchen scale – For precise portioning if tracking macros
- Silicone muffin liners – Individual storage for meal prep
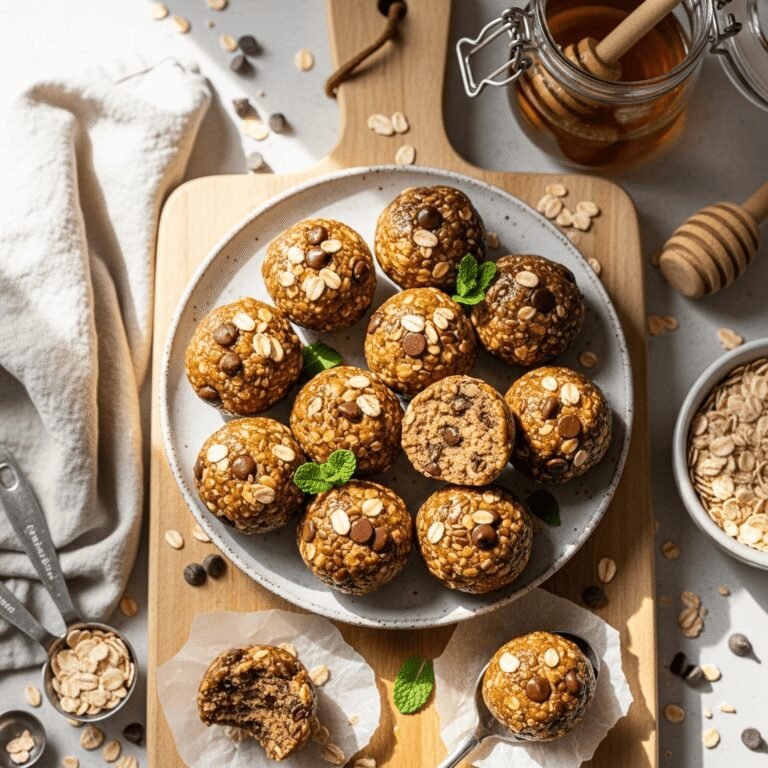
Energy Balls Recipe
These No-Bake Energy Balls are the perfect healthy snack made with oats, peanut butter, honey, and chocolate chips. Ready in just 15 minutes with no baking required, these protein-packed energy bites taste like cookie dough but are actually nutritious and perfect for meal prep!
- Total Time: 15 minutes
- Yield: 20 energy balls 1x
Ingredients
- 1 cup old-fashioned rolled oats (use gluten-free if needed)
- ½ cup natural peanut butter (creamy or crunchy)
- ⅓ cup honey (or pure maple syrup for vegan)
- ½ cup mini chocolate chips (or chopped dark chocolate)
- ⅓ cup ground flaxseed (or chia seeds)
- 1 teaspoon vanilla extract
- Pinch of sea salt (about ⅛ teaspoon)
Optional Add-Ins:
- 2 tablespoons unsweetened shredded coconut
- ¼ cup chopped nuts (almonds, walnuts, pecans)
- 2 tablespoons protein powder
- ¼ cup dried fruit (cranberries, raisins, chopped dates)
- 1 tablespoon cocoa powder
- ½ teaspoon cinnamon
Instructions
- Prepare your workspace: Line a baking sheet or large plate with parchment paper and set aside. This is where you’ll place your rolled energy balls to chill. Make sure you have some counter space cleared for easy rolling.
- Mix the wet ingredients: In a large mixing bowl, combine the peanut butter, honey, and vanilla extract. Stir together with a wooden spoon or sturdy spatula until well blended and smooth. If your peanut butter is very thick or cold from the fridge, you can microwave this mixture for 15-20 seconds to make it easier to mix – but this isn’t necessary.
- Add the dry ingredients: Add the rolled oats, ground flaxseed, chocolate chips, and salt to the bowl with the wet ingredients. If you’re using any optional add-ins like coconut, protein powder, or cinnamon, add them now as well.
- Mix thoroughly: Using your wooden spoon or sturdy spatula, mix everything together until completely combined. The mixture will be thick and slightly sticky – this is exactly what you want! Keep mixing until you don’t see any dry oats and everything is evenly distributed. This might take 1-2 minutes of good stirring.
- Check consistency: The mixture should hold together when you squeeze a bit in your palm. If it seems too dry and crumbly, add more peanut butter or honey, 1 tablespoon at a time. If it’s too wet and sticky, add more oats, 1 tablespoon at a time. The perfect consistency should be moldable but not overly sticky.
- Chill the mixture (optional but recommended): For easier handling, cover the bowl and refrigerate the mixture for 15-30 minutes. This firms up the peanut butter and honey, making the rolling process much less messy. You can skip this step if you’re in a hurry, but chilled mixture is definitely easier to work with.
- Portion the balls: Using a small cookie scoop (about 1 tablespoon) or a regular tablespoon, scoop out portions of the mixture. A 1-tablespoon portion makes perfect bite-sized balls. You should get about 20 balls from this recipe.
- Roll into balls: Take each portion and roll it between your palms to form a smooth, round ball. Apply gentle but firm pressure – you want them compact enough to hold together well. If the mixture sticks to your hands, slightly dampen your palms with water or lightly coat them with coconut oil.
- Arrange on prepared sheet: Place each finished energy ball on your parchment-lined baking sheet, spacing them slightly apart (though they don’t spread, so spacing isn’t critical).
- Final chill: Once all balls are rolled, refrigerate the entire baking sheet for at least 30 minutes. This final chill helps them firm up and hold their shape perfectly. They’ll go from slightly soft to perfectly holdable.
- Store and enjoy: Transfer the chilled energy balls to an airtight container. Store in the refrigerator and enjoy whenever you need a healthy, energizing snack! They’re ready to eat right away or can be stored for up to 2 weeks.
Notes
- Nut butter consistency matters: If your peanut butter is very liquidy, you may need to add an extra 2-3 tablespoons of oats. If it’s very thick and dry, add an extra tablespoon of honey to help binding.
- Make them vegan: Simply substitute maple syrup for honey and use dairy-free chocolate chips.
- Nut-free version: Use sunflower seed butter or tahini instead of peanut butter. Be aware that sunflower seed butter can sometimes turn green due to a reaction with baking soda in some recipes (though this recipe doesn’t contain baking soda).
- Protein boost: Add 2-4 tablespoons of vanilla or chocolate protein powder. You may need to add a bit more honey or peanut butter to compensate for the dryness.
- Rolling tip: If the mixture is too sticky, wet your hands slightly or rub a tiny bit of coconut oil on your palms before rolling each ball.
- Prep Time: 15 minutes
- Cook Time: 0 minutes
- Category: Snack
- Method: No-Bake
- Cuisine: American
- Diet: Gluten Free
Nutrition
- Serving Size: 1 energy ball
- Calories: 95
- Sugar: 7g
- Sodium: 35mg
- Fat: 5g
- Saturated Fat: 1g
- Unsaturated Fat: 3g
- Trans Fat: 0g
- Carbohydrates: 11g
- Fiber: 2g
- Protein: 3g
- Cholesterol: 0mg
Tips & Variations
The versatility of these healthy energy balls makes them endlessly customizable! Here are my favorite flavor variations and adaptations:
Flavor Combinations:
- Chocolate Peanut Butter: Add 2 tablespoons cocoa powder to the base recipe
- Almond Joy: Use almond butter, add shredded coconut and dark chocolate chips
- Lemon Coconut: Add 1 tablespoon lemon zest, ¼ cup coconut, use cashew butter
- Pumpkin Spice: Add 3 tablespoons pumpkin puree, 1 teaspoon pumpkin pie spice
- Cookie Dough: Add ½ teaspoon almond extract, extra chocolate chips, pinch of sea salt
- Cranberry Orange: Add dried cranberries, 1 tablespoon orange zest
- Brownie Bites: Add 3 tablespoons cocoa powder, use dark chocolate chips
- Cinnamon Raisin: Add ½ teaspoon cinnamon, ⅓ cup raisins, use almond butter
Protein Variations:
- Add 2-4 tablespoons vanilla or chocolate protein powder
- Mix in 2 tablespoons collagen peptides for protein boost
- Include hemp hearts for complete plant protein
- Add Greek yogurt powder for tangy protein addition
Dietary Modifications:
- Keto-Friendly: Replace oats with almond flour, use sugar-free chocolate chips, sweeten with monk fruit syrup
- Paleo: Use almond butter, replace oats with almond flour and shredded coconut, sweeten with date paste
- Vegan: Use maple syrup instead of honey, dairy-free chocolate chips
- Nut-Free: Sunflower seed butter, tahini, or coconut butter as base
- Low-Sugar: Reduce honey to ¼ cup, use unsweetened chocolate, add stevia to taste
Texture Variations:
- Add Rice Krispies or puffed quinoa for crunch
- Include chopped nuts for texture contrast
- Mix in cacao nibs for bitter chocolate crunch
- Add crushed pretzels for sweet-salty combination
- Include freeze-dried fruit for intense flavor bursts
Coating Ideas:
- Roll finished balls in shredded coconut
- Coat in cocoa powder for truffle effect
- Roll in crushed freeze-dried strawberries
- Dust with matcha powder
- Roll in finely chopped nuts
Pro Chef Tips
Having made literally hundreds of batches of these no-bake energy bites over the years, I’ve learned some professional secrets that guarantee perfect results every time:
Temperature matters: Room temperature nut butter mixes much more easily than cold. If your peanut butter lives in the fridge, let it sit out for 30 minutes before making energy balls, or microwave it for 15-20 seconds. This makes mixing significantly easier and ensures even distribution throughout.
The moisture balance: Different brands of nut butter have varying oil content, which affects consistency. Natural peanut butter with the oil on top needs that oil stirred in completely. If your mixture seems too dry, add liquid (honey or nut butter) one tablespoon at a time. Too wet? Add oats tablespoon by tablespoon until the texture is right.
Chill before rolling: This is the single most helpful tip! Refrigerating the mixture for 15-30 minutes before rolling makes the process 100 times easier. The fats firm up, making everything less sticky and much more manageable. Your hands will thank you.
The squeeze test: Before committing to rolling all 20 balls, test your mixture. Squeeze a small amount in your palm – it should compact into a firm ball that holds together well. If it crumbles, add more binding agent (nut butter or honey). If it’s so sticky you can’t form it, add more oats.
Uniform sizing: Use a cookie scoop for perfectly uniform balls. This isn’t just about aesthetics – uniform size means consistent nutrition information and even chilling/storage. A 1-tablespoon scoop is the sweet spot for bite-sized perfection.
The rolling technique: Roll between your palms with gentle but firm, consistent pressure. Don’t be timid – you want these compact! If they’re loosely formed, they’ll crumble when you bite into them. Apply enough pressure that they’re tightly packed but not squished flat.
Flavor development: For deeper flavor, toast your oats in a dry skillet for 3-4 minutes before using. This adds a nutty, toasted dimension that elevates the entire recipe. Let them cool completely before mixing.
The freshness factor: Use fresh ingredients! Old oats taste stale, rancid nuts ruin the whole batch, and expired nut butter has off flavors. Check dates and give ingredients a smell test – your energy balls are only as good as what goes into them.
Customize smartly: When adding mix-ins, maintain the ratios. If adding ¼ cup of something wet (like mashed banana), reduce the honey by a tablespoon or add extra oats. The base recipe is perfectly balanced, so major add-ins need compensation.
Double-batch wisdom: These freeze beautifully, so I always make double batches. It takes the same amount of time and effort, and future-you will be so grateful to have healthy snacks waiting in the freezer!
Common Mistakes to Avoid
Mistake #1: Using quick oats instead of old-fashioned rolled oats – Quick oats are more finely cut and absorb liquid differently, resulting in mushy, paste-like energy balls with no texture. Old-fashioned rolled oats maintain their structure and provide that characteristic chewy texture. If you only have quick oats, reduce the liquid by 1-2 tablespoons and expect slightly different texture.
Mistake #2: Not chilling the mixture before rolling – I cannot stress this enough! Trying to roll warm or room temperature mixture results in sticky, messy hands and misshapen, crumbly balls. The 15-30 minute chill time firms up the fats and makes rolling exponentially easier. This is especially important in warm kitchens or during summer.
Mistake #3: Adding too many mix-ins – Enthusiasm is great, but overloading with add-ins disrupts the careful balance of wet to dry ingredients. Stick to about ½ cup total of add-ins (chocolate chips, coconut, dried fruit, etc.). More than that and you’ll need to adjust the base recipe, which gets tricky for beginners.
Mistake #4: Using old or rancid nuts/nut butter – Nuts and nut butters contain oils that can go rancid, especially when stored improperly or kept too long. Rancid oils taste terrible and ruin your entire batch. Always store nut butters in the fridge after opening, use within 3 months, and give them a smell test before using.
Mistake #5: Not measuring ingredients accurately – This recipe relies on specific ratios to achieve the right consistency. Eyeballing the peanut butter or honey can throw everything off. Use proper measuring cups, and for sticky ingredients like honey and nut butter, spray your measuring cup with cooking spray first for easy release and accurate measurement.
Mistake #6: Skipping the salt – Even a tiny pinch of salt is crucial! It enhances all the other flavors and balances the sweetness. Without it, energy balls taste flat and one-dimensional. Don’t skip this ingredient even if using salted nut butter – you still want that pinch of salt for optimal flavor.
Mistake #7: Storing at room temperature long-term – While energy balls can sit out for a few hours (perfect for lunchboxes or short trips), long-term room temperature storage causes the chocolate to melt, the balls to dry out, and potential spoilage of the nut butter. Always store in the refrigerator for best quality and food safety.
Storage & Meal Prep
Refrigerator Storage: Store your no-bake energy balls in an airtight container in the refrigerator for up to 2 weeks. Layer them in a single layer if possible, or place parchment paper between layers to prevent sticking. They actually taste better after a day or two as the flavors meld together and the texture firms up perfectly.
For meal prep, I love using small silicone muffin liners in a larger container – this keeps each ball separate and makes grabbing one quick and easy. You can also store them in individual snack-sized bags or small containers for grab-and-go convenience.
Room Temperature Holding: These energy balls can sit at room temperature for 4-6 hours, making them perfect for lunchboxes, road trips, or keeping in your purse or gym bag during the day. Just don’t leave them in hot cars or direct sunlight, as the chocolate chips will melt and the nut butter can become too soft.
Meal Prep Strategy: I make a double batch every Sunday and portion them into containers for the week ahead. Store 3-4 in small containers in the fridge for easy breakfast additions, pre-workout snacks, or afternoon pick-me-ups. Having them pre-portioned removes any temptation to eat too many in one sitting!
Refreshing Texture: If your energy balls have been in the fridge for a week or more and seem a bit dry, you can refresh them! Place them in an airtight container with a piece of bread for a few hours. The moisture from the bread will transfer to the balls, making them soft and fresh again. Remove the bread before it gets moldy.
Taking Them On-the-Go: For travel, pack energy balls in small containers with ice packs if it’ll be more than 4-6 hours. They’re perfect for hiking, camping (in a cooler), air travel, or keeping in your work bag. Just remember they’re best kept cool when possible.
Make-Ahead & Freezer Notes
Make-Ahead Timeline:
2-3 days before: These actually benefit from being made ahead! The flavors develop and improve as they sit. Make the full batch, chill, roll, and store in the refrigerator. They’ll be perfect when you need them.
Morning of use: If taking to work or school, simply grab however many you need from the fridge. They’ll come to a pleasant, slightly-chilled-but-not-cold temperature by the time you eat them.
Freezer Instructions:
Freezing is perfect for energy balls! They freeze beautifully and last up to 3 months frozen, making them ideal for bulk meal prep.
How to freeze: Arrange rolled energy balls in a single layer on a parchment-lined baking sheet. Freeze for 1-2 hours until solid. This “flash freezing” prevents them from sticking together. Once frozen solid, transfer to a freezer-safe bag or container, removing as much air as possible. Label with the date and flavor.
Serving from frozen: The beauty of frozen energy balls is their versatility. You can:
- Eat them directly from the freezer (they’re like little ice cream bites – delicious!)
- Let them thaw at room temperature for 10-15 minutes for softer texture
- Transfer to the fridge the night before for fully thawed balls
- Pack them frozen in lunchboxes – they’ll thaw by lunchtime and keep other items cool
Thawing guidelines: For best texture, thaw energy balls in the refrigerator overnight. Room temperature thawing works too (15-30 minutes), but may make them slightly softer than ideal. I actually prefer eating some varieties (especially chocolate-heavy ones) partially frozen – they’re like healthy truffles!
Freezer meal prep strategy: I make three different flavors in one afternoon, freeze them all, and have variety for months. Store different flavors in separate labeled containers, or keep them all in one container with a list of what’s inside. Pull out 3-4 at a time as needed.
Best reheating method: No reheating needed! These are designed to be eaten cold or at room temperature. The beauty of energy balls is their grab-and-go nature – no reheating required ever.
Serving Suggestions
While these protein energy balls are perfect as standalone snacks, there are so many creative ways to serve and enjoy them:
As Part of Breakfast:
- Add 2-3 energy balls to your morning yogurt parfait
- Serve alongside oatmeal or overnight oats for extra protein
- Include in a balanced breakfast plate with fruit and nuts
- Crumble one over your smoothie bowl
- Pair with hard-boiled eggs for a complete protein breakfast
Snack Pairings:
- Fresh apple or banana slices
- Celery sticks with additional nut butter
- String cheese or cheese cubes for extra protein
- Fresh berries (strawberries, blueberries, raspberries)
- Sliced vegetables with hummus
- A handful of mixed nuts
- Greek yogurt
Pre/Post Workout:
- Pre-workout (1-2 hours before): Have 2 balls for sustained energy
- Post-workout (within 30 minutes): Eat 2-3 balls for protein and carb recovery
- Pair with a protein shake for complete post-workout nutrition
- Add to a smoothie for blended pre-workout fuel
Lunchbox Ideas: Pack 2 energy balls with:
- Turkey and cheese roll-ups
- Baby carrots and ranch
- String cheese
- Whole grain crackers
- Fresh fruit
- Trail mix
Dessert Alternative: These make perfect healthy desserts! Serve:
- On a small dessert plate with fresh berries
- Alongside herbal tea or coffee
- As part of a dessert board with fruit and dark chocolate
- Drizzled with melted dark chocolate for special occasions
- Rolled in extra cocoa powder or coconut for truffle effect
Party & Entertaining: Include energy balls on:
- Breakfast buffets or brunch spreads
- Healthy dessert tables
- Kid’s birthday party snack stations
- Baby or bridal shower refreshment tables
- Coffee shop-style snack displays
- After-school snack platters
Beverage Pairings:
- Coffee or espresso
- Hot or iced tea
- Protein smoothies
- Fresh-pressed juice
- Almond or oat milk
- Sparkling water with lemon
On-The-Go Situations:
- Hiking and camping trips
- Road trip snacks
- Air travel (TSA-friendly!)
- Kids’ sports games and practices
- Long work meetings
- Study sessions
- Movie snacks (healthier than popcorn!)
FAQs Section
Q: Can I use instant oats or steel-cut oats instead of old-fashioned rolled oats? A: I don’t recommend it. Instant oats are too fine and will create a mushy, paste-like texture without the pleasant chew that makes energy balls so satisfying. Steel-cut oats are too hard and crunchy – they won’t soften without cooking and will make the balls difficult to chew. Old-fashioned rolled oats are the perfect texture and absolutely necessary for success. If you only have quick oats (different from instant), you can use them but reduce liquid slightly and expect softer texture.
Q: Why are my energy balls falling apart and not holding together? A: This usually means your ratio of wet to dry ingredients is off. The most common culprit is nut butter that’s too thick or dry. Try adding more nut butter (1 tablespoon at a time) or more honey until the mixture holds together when squeezed. Also, make sure you’re mixing thoroughly – it takes a good 1-2 minutes of vigorous stirring to get everything properly combined. Finally, press firmly when rolling to compact the ingredients together. Gentle rolling creates loose, crumbly balls.
Q: Can I make these without chocolate chips for a healthier option? A: Absolutely! While the chocolate chips add delicious flavor, they’re completely optional. You can omit them entirely for a less sweet version, or replace them with other mix-ins like dried cranberries, raisins, chopped dates, coconut flakes, or extra nuts. Some people add cacao nibs for chocolate flavor without added sugar. You might want to add a tiny bit more honey (1-2 teaspoons) if omitting chocolate chips to maintain sweetness.
Q: How do I make these nut-free for school lunches? A: Easy! Replace the peanut butter with sunflower seed butter, which has a similar texture and protein content. WowButter (made from soybeans) is another excellent nut-free option that tastes remarkably like peanut butter. You can also use tahini (sesame seed paste), though it has a more distinct flavor. Be aware that sunflower seed butter can sometimes turn green due to chlorophyll reacting with certain ingredients – this is harmless but may look odd. Make sure all other ingredients (chocolate chips, oats) are certified nut-free if dealing with severe allergies.
Q: Can I add protein powder to make these more filling? A: Yes! Adding 2-4 tablespoons of protein powder boosts the protein content significantly. However, protein powder absorbs moisture, so you’ll need to compensate by adding an extra tablespoon or two of nut butter or honey. Start with 2 tablespoons of protein powder and see how the consistency feels. Vanilla and chocolate protein powders work best. Plant-based proteins tend to be drier than whey, so may require more liquid adjustment. Mix thoroughly and do the squeeze test before rolling.
Q: How long do these energy balls really last in the fridge? A: When stored properly in an airtight container, these will last 2 weeks in the refrigerator. Honestly, though, they usually don’t last that long in my house – they get eaten within a week! The honey and low moisture content act as natural preservatives. You’ll know they’re past their prime if they dry out significantly, develop off odors, or if the chocolate chips bloom (develop white spots, which is harmless but unappealing). For longest freshness, keep them in the coldest part of your fridge and minimize opening the container.
Q: Can I make these with just dates instead of honey for Whole30 or paleo diets? A: Yes! This creates a different but delicious version. Use about 1 cup of pitted Medjool dates (8-10 dates). Process them in a food processor until they form a paste, then add your nut butter and vanilla and process until smooth. Transfer to a bowl and mix in the oats, flaxseed, and other ingredients by hand. The texture will be slightly denser and chewier than honey-based balls, but equally delicious. Date-sweetened energy balls are naturally paleo and Whole30 compliant (omit chocolate chips for strict Whole30).
Q: Why are my energy balls too sticky to roll? A: Sticky energy balls are usually caused by too much liquid (honey or nut butter) or not chilling the mixture before rolling. First, refrigerate the mixture for 30 minutes – this firms up the fats and makes rolling much easier. If they’re still too sticky after chilling, mix in additional oats 1 tablespoon at a time until the consistency improves. You can also lightly wet your hands or rub a tiny bit of coconut oil on your palms before rolling each ball. Working in a cool kitchen helps too – warm temperatures make everything stickier. As a last resort, you can press the mixture into a pan, chill until firm, then cut into squares instead of rolling into balls.
Conclusion
And there you have it – everything you need to know to make the most delicious, nutritious, energy-boosting No-Bake Energy Balls that will transform your snacking routine forever! These little powerhouses of goodness prove that healthy eating doesn’t have to be boring, complicated, or time-consuming. With just a handful of wholesome ingredients and 15 minutes of your time, you can create weeks’ worth of satisfying snacks that fuel your body and taste absolutely amazing.
What I love most about these healthy energy bites is how they’ve become a staple in my family’s life. My kids request them constantly, my husband grabs them pre-workout, and I rely on them during busy afternoons when I need sustained energy without the sugar crash. They’re proof that eating well can be delicious, convenient, and something the whole family actually enjoys.
The beauty of this recipe is its incredible versatility. Once you master the basic formula, you can create endless flavor combinations to keep things exciting. Chocolate peanut butter one week, lemon coconut the next, pumpkin spice when fall rolls around – the possibilities are truly endless. You’ll never get bored, and you’ll always have a healthy option ready to grab from your fridge or freezer.
These protein-packed energy balls have honestly saved me so many times – from preventing hangry meltdowns to fueling long hikes to satisfying late-night sweet cravings without derailing my health goals. They’re the kind of recipe that becomes part of your life, not just something you make once and forget about.
Ready to change your snacking game forever? Give these no-bake energy balls a try this week! I promise you’ll be amazed at how simple they are to make and how delicious healthy eating can be. Your body, your taste buds, and your schedule will all thank you.
I’d love to hear from you! After you make these energy balls, come back and leave a comment below telling me about your experience. What flavor combination did you try? Did your kids love them? What creative add-ins did you experiment with? Your feedback and variations inspire other readers and help build our community of healthy home cooks!
Don’t forget to PIN this recipe to your favorite Pinterest boards so you can find it whenever you need it! Save it to your “Healthy Snacks,” “Meal Prep Ideas,” “No-Bake Recipes,” or “Kid-Friendly Foods” boards. Share it with friends who are looking for nutritious snack options – they’ll be so grateful you introduced them to these little bites of energy!