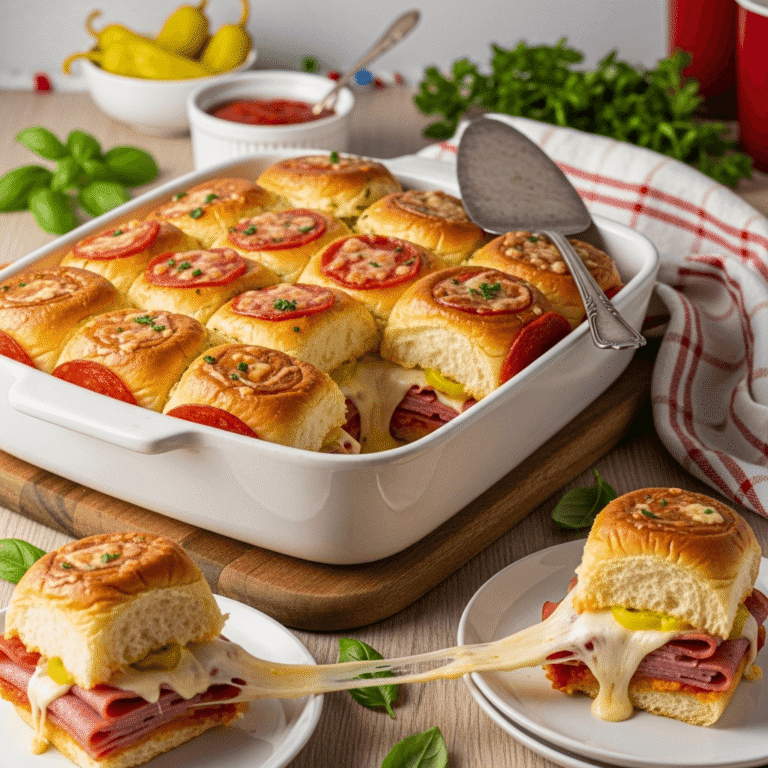
French Dip Sliders – Easy Party Sandwiches with Au Jus!

There’s something absolutely irresistible about a perfectly made French dip sandwich – that tender, juicy roast beef piled high on a soft roll, topped with melted cheese, and served with a rich, savory au jus for dipping. Now imagine all that deliciousness in adorable, bite-sized slider form that’s perfect for feeding a crowd! These French dip sliders are about to become your new favorite party food.
These easy French dip sliders take everything you love about the classic sandwich and transform it into a shareable, make-ahead appetizer that’s ideal for game day, family gatherings, potlucks, or any time you need to feed hungry people without spending hours in the kitchen. With layers of tender roast beef, melted Swiss or provolone cheese, and those buttery, garlicky slider buns all baked together until golden and perfect, every bite is pure comfort food heaven.
Whether you’re hosting a Super Bowl party, planning a casual dinner with friends, bringing a dish to share, or just craving something hearty and satisfying, these French dip party sliders deliver big flavor with minimal effort. They’re baked all together in one pan, making them incredibly efficient, and that warm cup of au jus on the side? It’s the perfect finishing touch that takes these sliders from great to absolutely unforgettable. Let’s dive into making these crowd-pleasing beauties!
History & Background of French Dip Sandwiches
The French dip sandwich has a fascinating history that’s as rich as the au jus it’s served with. Despite its name suggesting French origins, this iconic sandwich is actually 100% American, born in Los Angeles, California in the early 1900s. The “French” in the name likely refers to the French roll traditionally used, though another theory suggests it comes from the French word for dipping.
Two Los Angeles restaurants claim to have invented the French dip sandwich, and the debate continues to this day. Philippe’s (originally Philippe the Original) claims that owner Philippe Mathieu accidentally dropped a French roll into a roasting pan filled with hot meat drippings in 1918 while making a sandwich for a police officer. The customer loved it so much that he came back the next day with friends requesting the same “dipped” sandwich.
Cole’s Pacific Electric Buffet, which opened in 1908, also claims to be the birthplace, stating that the sandwich was created for a customer with sore gums who needed the bread softened. Regardless of which story is true, both restaurants are still serving French dip sandwiches today, over a century later!
The traditional French dip features thinly sliced roast beef on a French roll, served with a side of jus (the flavorful meat drippings) for dipping. Over the decades, the sandwich has evolved to include cheese (typically Swiss or provolone), horseradish sauce, and various toppings. It became particularly popular as a lunch counter staple and deli favorite throughout the 20th century.
The slider version we’re making today is a modern, party-friendly adaptation that became popular in the 2010s with the rise of “slider recipes” – where full-sized sandwiches are reimagined as shareable, baked-together appetizers on Hawaiian rolls or similar small buns. This format makes French dips more accessible for entertaining, easier to eat at parties, and perfect for feeding crowds without the need to assemble individual sandwiches.
Today, French dip sandwiches and their slider cousins remain beloved comfort food across America, representing that perfect combination of simple ingredients elevated by technique (the dipping!) into something truly special.
Why You’ll Love This Recipe
These French dip sliders recipe checks every box for what makes a great party food or easy family dinner. They’re the kind of recipe that makes you look like a culinary genius while requiring surprisingly little effort. The magic happens when these sliders bake together, the cheese melts into gooey perfection, the butter-garlic topping soaks into those soft rolls, and everything becomes this cohesive, pull-apart masterpiece.
What I absolutely love about these baked French dip sliders is how they solve the biggest problem with traditional French dips – you can make them all at once instead of assembling individual sandwiches! That means more time enjoying your party and less time playing sandwich maker. Plus, they’re completely customizable to your crowd’s preferences. Here’s why this recipe deserves a permanent spot in your rotation:
- Incredibly Easy: Minimal prep, mostly assembly work, and the oven does the heavy lifting – perfect for busy hosts and beginner cooks
- Make-Ahead Friendly: Assemble hours ahead (or even the night before) and just pop them in the oven when guests arrive – stress-free entertaining!
- Feeds a Crowd: One pan makes 12 sliders, perfect for parties, potlucks, or feeding hungry teenagers
- Budget-Friendly: Deli roast beef and slider rolls are inexpensive, making this an economical way to feed a group
- Kid-Approved: The slider size is perfect for little hands, and kids love the interactive dipping element
- Customizable Heat: Keep them mild for a family-friendly option or add peppers and horseradish for adult gatherings
- Perfect Temperature Flexibility: Delicious hot, warm, or even at room temperature, giving you serving flexibility
- Game Day Hero: These are the appetizers that get devoured first and have everyone asking for the recipe
- Restaurant Quality at Home: That rich au jus makes these taste like something from a French bistro, not your home kitchen
- One-Pan Wonder: Everything bakes together in a single baking dish, meaning less cleanup and easier serving
Ingredient Notes
Creating perfect French dip sliders starts with selecting quality ingredients. While this recipe is beautifully simple, each component plays a crucial role in the final result. Let’s break down what you’ll need:
Hawaiian Sweet Rolls or Slider Buns: The foundation of your sliders! Hawaiian rolls (like King’s Hawaiian) are the most popular choice because their slight sweetness balances the savory beef and rich au jus perfectly. You’ll need one 12-count package. The rolls stay connected, making them easy to slice horizontally as one unit. Regular slider buns work too, though you’ll lose that signature sweetness. For a more traditional approach, use small French rolls or dinner rolls.
Deli Roast Beef: This is your protein star! Use high-quality deli roast beef sliced medium-thick (not paper-thin). You’ll need about 1 to 1.5 pounds. Look for roast beef that’s tender and flavorful – the better quality meat you buy, the better your sliders will taste. Avoid the cheapest options which can be tough and overly processed. If you have leftover pot roast or slow-cooked beef, that works beautifully too! Just slice or shred it thinly.
Swiss or Provolone Cheese: Cheese brings that essential melty, gooey factor. Swiss is traditional with its nutty, mild flavor, while provolone offers a slightly sharper taste. You’ll need about 8-10 slices, or 8 ounces if using shredded. For best melting results, use deli-sliced cheese rather than pre-packaged slices. Gruyère is a delicious upscale substitute, and mild cheddar works for cheese purists.
Butter: Unsalted butter is best so you can control the salt level. You’ll need about 4-6 tablespoons (half a stick). The butter gets melted and mixed with seasonings to brush over the tops of the rolls, creating that gorgeous golden, crispy top layer. Don’t substitute margarine – real butter is essential for proper flavor and browning.
Garlic: Fresh minced garlic (2-3 cloves) goes into the butter mixture, infusing the tops with aromatic flavor. Garlic powder works in a pinch (about 1 teaspoon), but fresh garlic delivers superior taste. The garlic mellows and sweetens as it bakes, adding complexity without overwhelming the beef.
Worcestershire Sauce: This adds savory, umami depth to the butter topping. Just 1-2 tablespoons makes a big difference, bringing that steakhouse quality to your sliders. It’s also essential in the au jus. Don’t skip it!
Dijon Mustard (Optional): A thin layer of Dijon on the bottom bun adds tangy complexity that cuts through the richness. This is optional but highly recommended. Yellow mustard works too, though it’s less sophisticated.
Beef Broth or Au Jus: For the dipping sauce, you’ll need 2-3 cups of beef broth. Store-bought works perfectly fine – choose low-sodium so you can adjust seasoning. For elevated flavor, use beef bone broth or make a quick au jus using beef bouillon, Worcestershire sauce, and a splash of soy sauce.
Onions (Optional): Caramelized or sautéed onions are a classic French dip addition. If using, you’ll need one large onion, thinly sliced and cooked down. This is extra effort but adds incredible flavor.
Horseradish (Optional): Mix prepared horseradish into softened butter or mayo for spreading on the buns if you like a little kick with your beef.
Equipment Needed
One of the best things about this easy slider recipe is that it requires minimal, basic equipment. Here’s what you’ll need:
- 9×13-inch Baking Dish: This is the perfect size for a 12-count package of slider rolls. A metal or glass pan works equally well. Make sure it has at least 2-inch sides.
- Sharp Serrated Knife: Essential for slicing through the connected slider rolls horizontally without tearing them. A bread knife works perfectly.
- Cutting Board: A stable, large cutting board gives you space to work when slicing rolls and preparing ingredients.
- Small Saucepan: For melting the butter and preparing the garlic butter mixture that goes on top.
- Pastry Brush or Spoon: For brushing the garlic butter mixture over the top of the rolls. A spoon works if you don’t have a brush.
- Aluminum Foil: For covering the sliders during the first part of baking to prevent over-browning.
- Medium Skillet (Optional): If you’re caramelizing onions or warming the au jus, you’ll need a skillet or small pot.
- Measuring Cups and Spoons: For accurate measurements of butter, Worcestershire sauce, and broth.
- Small Bowls: For organizing your ingredients and mixing the butter topping.
- Serving Bowls or Ramekins: For serving the au jus alongside your sliders. Small individual bowls are ideal for parties.
- Sharp Chef’s Knife: For mincing garlic and slicing onions if using.
- Spatula: For serving the sliders and transferring them to plates.

French Dip Sliders
These easy French dip sliders feature tender roast beef and melted cheese on Hawaiian rolls, topped with garlic butter and baked until golden. Served with rich au jus for dipping, they’re perfect for parties, game day, or easy family dinners. Make-ahead friendly and always a crowd favorite!
- Total Time: 35 minutes
- Yield: 12 sliders (6-8 servings) 1x
Ingredients
For the Sliders:
- 1 package (12 count) Hawaiian sweet rolls or slider buns
- 1 to 1.5 pounds deli roast beef, sliced medium-thick
- 8-10 slices Swiss or provolone cheese (or 8 ounces shredded)
- 2 tablespoons Dijon mustard (optional)
- 1 large onion, caramelized (optional)
For the Garlic Butter Topping:
- 6 tablespoons unsalted butter
- 3 cloves garlic, minced
- 1 tablespoon Worcestershire sauce
- 1 teaspoon dried parsley (or 1 tablespoon fresh)
- 1/2 teaspoon onion powder
- Pinch of salt and black pepper
For the Au Jus:
- 2 cups beef broth (low-sodium preferred)
- 1 tablespoon Worcestershire sauce
- 1 teaspoon soy sauce
- 1/2 teaspoon garlic powder
- 1/2 teaspoon onion powder
- Salt and pepper to taste
- Drippings from the sliders (optional, for extra flavor)
Instructions
Step 1: Prep the Baking Dish
Preheat your oven to 350°F. Lightly grease a 9×13-inch baking dish with butter or cooking spray. This prevents sticking and makes cleanup easier.
Step 2: Slice the Rolls
Without separating the individual rolls, use a sharp serrated knife to slice the entire block of rolls horizontally, creating a top and bottom layer. Keep them connected – this is key to easy assembly! Place the bottom half in your prepared baking dish.
Step 3: Add Mustard (Optional)
If using, spread a thin layer of Dijon mustard evenly over the bottom half of the rolls. This adds a tangy flavor that cuts through the richness of the beef and cheese.
Step 4: Layer the Roast Beef
Evenly distribute the roast beef over the bottom rolls, covering them completely. Fold or layer the meat so each slider gets a good amount. If using caramelized onions, add them now on top of the beef.
Step 5: Add the Cheese
Layer the Swiss or provolone cheese slices over the roast beef, making sure to cover all the meat. Overlap slices as needed to ensure every slider gets melty cheese. If using shredded cheese, sprinkle it evenly over the beef.
Step 6: Top with Upper Buns
Carefully place the top half of the rolls over the cheese layer, maintaining the connected structure. Press down gently to compact the layers slightly.
Step 7: Make the Garlic Butter
In a small saucepan over low heat, melt the butter. Add the minced garlic, Worcestershire sauce, dried parsley, onion powder, salt, and pepper. Stir well and let it cook for 1-2 minutes until fragrant but not browned. Remove from heat.
Step 8: Brush with Garlic Butter
Using a pastry brush or spoon, generously brush the garlic butter mixture over the tops of the rolls, making sure to get in all the crevices between rolls. Use all of the butter mixture – don’t be shy! This creates that gorgeous golden crust.
Step 9: Cover and Bake
Cover the baking dish tightly with aluminum foil. Bake for 15 minutes. This allows the cheese to melt and the sliders to heat through without over-browning the tops.
Step 10: Uncover and Finish
Remove the foil and bake for an additional 5-7 minutes, or until the tops are golden brown and slightly crispy. Watch carefully during this stage to prevent burning.
Step 11: Prepare the Au Jus
While the sliders bake, combine beef broth, Worcestershire sauce, soy sauce, garlic powder, and onion powder in a small saucepan. Heat over medium heat until simmering. Taste and adjust seasoning with salt and pepper. Keep warm on low heat. If your sliders released any drippings, add them to the au jus for extra flavor.
Step 12: Serve
Remove the sliders from the oven and let them rest for 2-3 minutes. Cut along the scored lines to separate individual sliders. Serve immediately with warm au jus in small bowls for dipping.
Notes
- Don’t separate the rolls before slicing – keeping them connected makes assembly much easier
- The butter topping might seem like a lot, but it’s essential for that golden, flavorful crust
- If your rolls are browning too quickly, tent with foil during the final baking stage
- For extra-melty cheese, use freshly sliced deli cheese rather than pre-packaged slices
- The au jus can be made ahead and reheated when ready to serve
- These are best served hot or warm, but they’re still good at room temperature
- If making ahead, assemble completely, cover tightly with foil, and refrigerate up to 24 hours before baking
- Add 5 minutes to baking time if cooking directly from refrigerator temperature
- Prep Time: 15 minutes
- Cook Time: 20 minutes
- Category: Appetizer
- Method: Baking
- Cuisine: American
- Diet: Vegetarian
Nutrition
- Serving Size: 2 sliders with au jus
- Calories: 425
- Sugar: 8g
- Sodium: 1,150mg
- Fat: 22g
- Saturated Fat: 11g
- Unsaturated Fat: 9g
- Trans Fat: 0g
- Carbohydrates: 32g
- Fiber: 2g
- Protein: 26g
- Cholesterol: 85mg
French Dip Sliders – Easy Party Sandwiches with Au Jus!
There’s something absolutely irresistible about a perfectly made French dip sandwich – that tender, juicy roast beef piled high on a soft roll, topped with melted cheese, and served with a rich, savory au jus for dipping. Now imagine all that deliciousness in adorable, bite-sized slider form that’s perfect for feeding a crowd! These French dip sliders are about to become your new favorite party food.
These easy French dip sliders take everything you love about the classic sandwich and transform it into a shareable, make-ahead appetizer that’s ideal for game day, family gatherings, potlucks, or any time you need to feed hungry people without spending hours in the kitchen. With layers of tender roast beef, melted Swiss or provolone cheese, and those buttery, garlicky slider buns all baked together until golden and perfect, every bite is pure comfort food heaven.
Whether you’re hosting a Super Bowl party, planning a casual dinner with friends, bringing a dish to share, or just craving something hearty and satisfying, these French dip party sliders deliver big flavor with minimal effort. They’re baked all together in one pan, making them incredibly efficient, and that warm cup of au jus on the side? It’s the perfect finishing touch that takes these sliders from great to absolutely unforgettable. Let’s dive into making these crowd-pleasing beauties!
History & Background of French Dip Sandwiches
The French dip sandwich has a fascinating history that’s as rich as the au jus it’s served with. Despite its name suggesting French origins, this iconic sandwich is actually 100% American, born in Los Angeles, California in the early 1900s. The “French” in the name likely refers to the French roll traditionally used, though another theory suggests it comes from the French word for dipping.
Two Los Angeles restaurants claim to have invented the French dip sandwich, and the debate continues to this day. Philippe’s (originally Philippe the Original) claims that owner Philippe Mathieu accidentally dropped a French roll into a roasting pan filled with hot meat drippings in 1918 while making a sandwich for a police officer. The customer loved it so much that he came back the next day with friends requesting the same “dipped” sandwich.
Cole’s Pacific Electric Buffet, which opened in 1908, also claims to be the birthplace, stating that the sandwich was created for a customer with sore gums who needed the bread softened. Regardless of which story is true, both restaurants are still serving French dip sandwiches today, over a century later!
The traditional French dip features thinly sliced roast beef on a French roll, served with a side of jus (the flavorful meat drippings) for dipping. Over the decades, the sandwich has evolved to include cheese (typically Swiss or provolone), horseradish sauce, and various toppings. It became particularly popular as a lunch counter staple and deli favorite throughout the 20th century.
The slider version we’re making today is a modern, party-friendly adaptation that became popular in the 2010s with the rise of “slider recipes” – where full-sized sandwiches are reimagined as shareable, baked-together appetizers on Hawaiian rolls or similar small buns. This format makes French dips more accessible for entertaining, easier to eat at parties, and perfect for feeding crowds without the need to assemble individual sandwiches.
Today, French dip sandwiches and their slider cousins remain beloved comfort food across America, representing that perfect combination of simple ingredients elevated by technique (the dipping!) into something truly special.
Why You’ll Love This Recipe
These French dip sliders recipe checks every box for what makes a great party food or easy family dinner. They’re the kind of recipe that makes you look like a culinary genius while requiring surprisingly little effort. The magic happens when these sliders bake together, the cheese melts into gooey perfection, the butter-garlic topping soaks into those soft rolls, and everything becomes this cohesive, pull-apart masterpiece.
What I absolutely love about these baked French dip sliders is how they solve the biggest problem with traditional French dips – you can make them all at once instead of assembling individual sandwiches! That means more time enjoying your party and less time playing sandwich maker. Plus, they’re completely customizable to your crowd’s preferences. Here’s why this recipe deserves a permanent spot in your rotation:
- Incredibly Easy: Minimal prep, mostly assembly work, and the oven does the heavy lifting – perfect for busy hosts and beginner cooks
- Make-Ahead Friendly: Assemble hours ahead (or even the night before) and just pop them in the oven when guests arrive – stress-free entertaining!
- Feeds a Crowd: One pan makes 12 sliders, perfect for parties, potlucks, or feeding hungry teenagers
- Budget-Friendly: Deli roast beef and slider rolls are inexpensive, making this an economical way to feed a group
- Kid-Approved: The slider size is perfect for little hands, and kids love the interactive dipping element
- Customizable Heat: Keep them mild for a family-friendly option or add peppers and horseradish for adult gatherings
- Perfect Temperature Flexibility: Delicious hot, warm, or even at room temperature, giving you serving flexibility
- Game Day Hero: These are the appetizers that get devoured first and have everyone asking for the recipe
- Restaurant Quality at Home: That rich au jus makes these taste like something from a French bistro, not your home kitchen
- One-Pan Wonder: Everything bakes together in a single baking dish, meaning less cleanup and easier serving
Ingredient Notes
Creating perfect French dip sliders starts with selecting quality ingredients. While this recipe is beautifully simple, each component plays a crucial role in the final result. Let’s break down what you’ll need:
Hawaiian Sweet Rolls or Slider Buns: The foundation of your sliders! Hawaiian rolls (like King’s Hawaiian) are the most popular choice because their slight sweetness balances the savory beef and rich au jus perfectly. You’ll need one 12-count package. The rolls stay connected, making them easy to slice horizontally as one unit. Regular slider buns work too, though you’ll lose that signature sweetness. For a more traditional approach, use small French rolls or dinner rolls.
Deli Roast Beef: This is your protein star! Use high-quality deli roast beef sliced medium-thick (not paper-thin). You’ll need about 1 to 1.5 pounds. Look for roast beef that’s tender and flavorful – the better quality meat you buy, the better your sliders will taste. Avoid the cheapest options which can be tough and overly processed. If you have leftover pot roast or slow-cooked beef, that works beautifully too! Just slice or shred it thinly.
Swiss or Provolone Cheese: Cheese brings that essential melty, gooey factor. Swiss is traditional with its nutty, mild flavor, while provolone offers a slightly sharper taste. You’ll need about 8-10 slices, or 8 ounces if using shredded. For best melting results, use deli-sliced cheese rather than pre-packaged slices. Gruyère is a delicious upscale substitute, and mild cheddar works for cheese purists.
Butter: Unsalted butter is best so you can control the salt level. You’ll need about 4-6 tablespoons (half a stick). The butter gets melted and mixed with seasonings to brush over the tops of the rolls, creating that gorgeous golden, crispy top layer. Don’t substitute margarine – real butter is essential for proper flavor and browning.
Garlic: Fresh minced garlic (2-3 cloves) goes into the butter mixture, infusing the tops with aromatic flavor. Garlic powder works in a pinch (about 1 teaspoon), but fresh garlic delivers superior taste. The garlic mellows and sweetens as it bakes, adding complexity without overwhelming the beef.
Worcestershire Sauce: This adds savory, umami depth to the butter topping. Just 1-2 tablespoons makes a big difference, bringing that steakhouse quality to your sliders. It’s also essential in the au jus. Don’t skip it!
Dijon Mustard (Optional): A thin layer of Dijon on the bottom bun adds tangy complexity that cuts through the richness. This is optional but highly recommended. Yellow mustard works too, though it’s less sophisticated.
Beef Broth or Au Jus: For the dipping sauce, you’ll need 2-3 cups of beef broth. Store-bought works perfectly fine – choose low-sodium so you can adjust seasoning. For elevated flavor, use beef bone broth or make a quick au jus using beef bouillon, Worcestershire sauce, and a splash of soy sauce.
Onions (Optional): Caramelized or sautéed onions are a classic French dip addition. If using, you’ll need one large onion, thinly sliced and cooked down. This is extra effort but adds incredible flavor.
Horseradish (Optional): Mix prepared horseradish into softened butter or mayo for spreading on the buns if you like a little kick with your beef.
Equipment Needed
One of the best things about this easy slider recipe is that it requires minimal, basic equipment. Here’s what you’ll need:
- 9×13-inch Baking Dish: This is the perfect size for a 12-count package of slider rolls. A metal or glass pan works equally well. Make sure it has at least 2-inch sides.
- Sharp Serrated Knife: Essential for slicing through the connected slider rolls horizontally without tearing them. A bread knife works perfectly.
- Cutting Board: A stable, large cutting board gives you space to work when slicing rolls and preparing ingredients.
- Small Saucepan: For melting the butter and preparing the garlic butter mixture that goes on top.
- Pastry Brush or Spoon: For brushing the garlic butter mixture over the top of the rolls. A spoon works if you don’t have a brush.
- Aluminum Foil: For covering the sliders during the first part of baking to prevent over-browning.
- Medium Skillet (Optional): If you’re caramelizing onions or warming the au jus, you’ll need a skillet or small pot.
- Measuring Cups and Spoons: For accurate measurements of butter, Worcestershire sauce, and broth.
- Small Bowls: For organizing your ingredients and mixing the butter topping.
- Serving Bowls or Ramekins: For serving the au jus alongside your sliders. Small individual bowls are ideal for parties.
- Sharp Chef’s Knife: For mincing garlic and slicing onions if using.
- Spatula: For serving the sliders and transferring them to plates.
📋 French Dip Sliders Recipe
Prep Time: 15 minutes
Cook Time: 20 minutes
Total Time: 35 minutes
Yield: 12 sliders (6-8 servings)
Category: Appetizer, Main Course
Method: Baking
Cuisine: American
Description: These easy French dip sliders feature tender roast beef and melted cheese on Hawaiian rolls, topped with garlic butter and baked until golden. Served with rich au jus for dipping, they’re perfect for parties, game day, or easy family dinners. Make-ahead friendly and always a crowd favorite!
Ingredients
For the Sliders:
- 1 package (12 count) Hawaiian sweet rolls or slider buns
- 1 to 1.5 pounds deli roast beef, sliced medium-thick
- 8-10 slices Swiss or provolone cheese (or 8 ounces shredded)
- 2 tablespoons Dijon mustard (optional)
- 1 large onion, caramelized (optional)
For the Garlic Butter Topping:
- 6 tablespoons unsalted butter
- 3 cloves garlic, minced
- 1 tablespoon Worcestershire sauce
- 1 teaspoon dried parsley (or 1 tablespoon fresh)
- 1/2 teaspoon onion powder
- Pinch of salt and black pepper
For the Au Jus:
- 2 cups beef broth (low-sodium preferred)
- 1 tablespoon Worcestershire sauce
- 1 teaspoon soy sauce
- 1/2 teaspoon garlic powder
- 1/2 teaspoon onion powder
- Salt and pepper to taste
- Drippings from the sliders (optional, for extra flavor)
Instructions
Step 1: Prep the Baking Dish
Preheat your oven to 350°F. Lightly grease a 9×13-inch baking dish with butter or cooking spray. This prevents sticking and makes cleanup easier.
Step 2: Slice the Rolls
Without separating the individual rolls, use a sharp serrated knife to slice the entire block of rolls horizontally, creating a top and bottom layer. Keep them connected – this is key to easy assembly! Place the bottom half in your prepared baking dish.
Step 3: Add Mustard (Optional)
If using, spread a thin layer of Dijon mustard evenly over the bottom half of the rolls. This adds a tangy flavor that cuts through the richness of the beef and cheese.
Step 4: Layer the Roast Beef
Evenly distribute the roast beef over the bottom rolls, covering them completely. Fold or layer the meat so each slider gets a good amount. If using caramelized onions, add them now on top of the beef.
Step 5: Add the Cheese
Layer the Swiss or provolone cheese slices over the roast beef, making sure to cover all the meat. Overlap slices as needed to ensure every slider gets melty cheese. If using shredded cheese, sprinkle it evenly over the beef.
Step 6: Top with Upper Buns
Carefully place the top half of the rolls over the cheese layer, maintaining the connected structure. Press down gently to compact the layers slightly.
Step 7: Make the Garlic Butter
In a small saucepan over low heat, melt the butter. Add the minced garlic, Worcestershire sauce, dried parsley, onion powder, salt, and pepper. Stir well and let it cook for 1-2 minutes until fragrant but not browned. Remove from heat.
Step 8: Brush with Garlic Butter
Using a pastry brush or spoon, generously brush the garlic butter mixture over the tops of the rolls, making sure to get in all the crevices between rolls. Use all of the butter mixture – don’t be shy! This creates that gorgeous golden crust.
Step 9: Cover and Bake
Cover the baking dish tightly with aluminum foil. Bake for 15 minutes. This allows the cheese to melt and the sliders to heat through without over-browning the tops.
Step 10: Uncover and Finish
Remove the foil and bake for an additional 5-7 minutes, or until the tops are golden brown and slightly crispy. Watch carefully during this stage to prevent burning.
Step 11: Prepare the Au Jus
While the sliders bake, combine beef broth, Worcestershire sauce, soy sauce, garlic powder, and onion powder in a small saucepan. Heat over medium heat until simmering. Taste and adjust seasoning with salt and pepper. Keep warm on low heat. If your sliders released any drippings, add them to the au jus for extra flavor.
Step 12: Serve
Remove the sliders from the oven and let them rest for 2-3 minutes. Cut along the scored lines to separate individual sliders. Serve immediately with warm au jus in small bowls for dipping.
Notes
- Don’t separate the rolls before slicing – keeping them connected makes assembly much easier
- The butter topping might seem like a lot, but it’s essential for that golden, flavorful crust
- If your rolls are browning too quickly, tent with foil during the final baking stage
- For extra-melty cheese, use freshly sliced deli cheese rather than pre-packaged slices
- The au jus can be made ahead and reheated when ready to serve
- These are best served hot or warm, but they’re still good at room temperature
- If making ahead, assemble completely, cover tightly with foil, and refrigerate up to 24 hours before baking
- Add 5 minutes to baking time if cooking directly from refrigerator temperature
Nutrition Facts (Per Serving – 2 sliders)
Serving Size: 2 sliders with au jus
Calories: 425
Sugar: 8g
Sodium: 1,150mg
Fat: 22g
Saturated Fat: 11g
Unsaturated Fat: 9g
Trans Fat: 0g
Carbohydrates: 32g
Fiber: 2g
Protein: 26g
Cholesterol: 85mg
Tips & Variations
Spicy French Dip Sliders: Add sliced jalapeños, banana peppers, or pepperoncini on top of the cheese before adding the top buns. Mix 1-2 tablespoons of prepared horseradish into the butter topping for an extra kick. Serve with spicy horseradish cream on the side.
Philly Cheesesteak Style: Add sautéed bell peppers and onions along with the beef. Use provolone cheese exclusively. Mix in some Italian seasoning to the garlic butter for an East Coast twist.
French Onion Dip Sliders: Caramelize two large onions until deep golden brown (this takes 30-40 minutes but is worth it!). Layer generously on the beef. Add Gruyère cheese instead of Swiss for authentic French onion soup flavors.
Italian French Dip: Use mozzarella and provolone cheese blend. Add a layer of roasted red peppers and a sprinkle of Italian seasoning to the butter. Serve with a side of marinara for dipping instead of au jus.
Horseradish Cream Version: Mix 1/4 cup prepared horseradish with 1/2 cup softened cream cheese or mayo. Spread on the bottom buns before adding beef for a zesty kick that pairs beautifully with the rich meat.
BBQ French Dip: Brush the beef with your favorite BBQ sauce before adding cheese. Mix 2 tablespoons BBQ sauce into the butter topping. Serve with both au jus and extra BBQ sauce for dipping.
Lighter Version: Use lower-sodium beef broth, reduced-fat cheese, and cut the butter in half (though the tops won’t be as golden). Use whole wheat slider rolls for added fiber.
Mushroom Swiss: Sauté sliced mushrooms in butter until golden and layer them with the beef. Use Swiss cheese exclusively for that classic mushroom-Swiss combination.
Herb-Crusted: Add 1 tablespoon fresh chopped rosemary and thyme to the butter mixture. Sprinkle a mixture of grated Parmesan and breadcrumbs over the butter-brushed tops for a crispy, herb-crusted finish.
Slider Ring Variation: Arrange the sandwiches in a circular pattern on a round pizza stone or baking sheet for a fun presentation. Serve the au jus in a bowl in the center for communal dipping.
Pro Chef Tips
Quality Meat Matters: Invest in good deli roast beef from the service counter rather than pre-packaged. Ask them to slice it medium-thick (not shaved) – about 1/8 inch. This thickness gives you substantial beef flavor while still being tender enough to bite through easily. If you’re planning ahead, buy a beef roast and slow-cook it yourself for ultimate quality control.
The Butter Infusion Technique: Don’t just melt the butter and pour it on. Cook the garlic in the butter for 1-2 minutes over low heat to infuse the flavors without burning the garlic. This creates a much more complex, aromatic topping. Let it cool slightly before brushing so it absorbs into the rolls rather than running off.
Layer Strategically: The order matters! Mustard (if using) goes directly on the bread, then meat, then cheese, then top bun. This arrangement ensures the cheese melts down into the beef while the top bun gets that crispy butter crust. Never put cheese directly on bread – it won’t melt as well.
The Compression Secret: Before baking, place a piece of parchment paper over the assembled sliders and gently press down with a cutting board or your hands. This compresses the layers together, ensuring they stick and don’t fall apart when you cut them later. It also helps cheese make better contact with the beef for optimal melting.
Au Jus Enhancement: For restaurant-quality au jus, use beef bone broth instead of regular beef broth – the extra gelatin creates a richer, silkier texture. After baking, pour any drippings from the slider pan into your au jus and simmer for 2-3 minutes. This adds incredible depth. A splash of red wine (2-3 tablespoons) elevates it further.
The Two-Temperature Method: Some professional caterers bake at 325°F covered for 20 minutes, then increase to 375°F uncovered for 5 minutes. This ensures thorough heating without risking burnt tops. It’s especially helpful if you’re making multiple pans.
Cheese Distribution: Tear cheese slices into smaller pieces and distribute them evenly rather than laying whole slices. This ensures every single slider gets cheese in every bite, not just where slices happened to overlap. It also melts more uniformly.
Resting Time: Let the sliders rest for 3-5 minutes after baking before cutting. This allows the cheese to set slightly so it doesn’t all ooze out when you cut. Your sliders will hold together much better and look more presentable.
Bread Scoring: Before placing the top buns on, use a sharp knife to lightly score where you’ll cut the individual sliders. This makes separating them after baking much easier and creates cleaner cuts.
Temperature Check: The internal temperature of your sliders should reach 165°F. If your cheese is melted but the center isn’t hot enough, cover with foil and continue baking 5 minutes more. Cold spots in the center are the most common complaint.
Common Mistakes to Avoid
Using Thick-Cut Rolls: Regular hamburger buns or thick sub rolls don’t work well for this recipe. They’re too much bread relative to filling and won’t bake evenly in the same timeframe. Stick with slider-sized rolls or Hawaiian sweet rolls – the smaller size is essential for proper bread-to-filling ratio and even heating.
Separating the Rolls Too Early: One of the biggest mistakes is cutting the rolls into individual pieces before assembling. Keep them connected throughout assembly and baking! The connected structure makes it dramatically easier to layer ingredients and creates those beautiful pull-apart sliders. Only separate them after baking.
Over-Browning the Tops: The butter and sugar content in Hawaiian rolls means they brown quickly. If you skip covering with foil for the first part of baking, you’ll end up with dark, hard tops before the insides are heated through. Always cover for most of the baking time, then uncover just for the final few minutes to achieve golden perfection.
Skimping on the Butter Topping: I know it seems like a lot of butter, but don’t reduce it! The butter is what creates that gorgeous golden crust and keeps the tops from drying out. It also carries all those garlic and herb flavors. If you use too little, your tops will be pale and dry instead of golden and delicious.
Not Heating the Au Jus: Serving cold or room-temperature au jus is a missed opportunity. The warmth is part of the experience – it keeps the sliders hot longer and the flavors are more pronounced when warm. Keep your au jus at a gentle simmer on the stove or in a slow cooker on warm setting during serving.
Storage & Meal Prep
Storing Leftovers: If you have leftover French dip sliders (which rarely happens!), let them cool completely, then store in an airtight container in the refrigerator for up to 3 days. Keep the au jus separately in a sealed container in the fridge for up to 5 days. The sliders will lose some crispness on the tops but still taste delicious.
Reheating Instructions: For best results, reheat sliders in a 300°F oven for 10-12 minutes, covered with foil to prevent over-browning. You can also microwave individual sliders for 45-60 seconds, though the tops won’t be as crispy. For the au jus, reheat gently on the stovetop or in the microwave until steaming hot.
Room Temperature Serving: These sliders are surprisingly good at room temperature for up to 2 hours, making them party-friendly. The cheese firms up a bit but they’re still tasty. Just make sure to keep the au jus warm in a slow cooker or insulated container.
Make-Ahead Assembly: The beauty of this recipe is that you can completely assemble the sliders (including the butter topping) up to 24 hours ahead. Cover tightly with plastic wrap and refrigerate. When ready to bake, remove from fridge and let sit at room temperature for 15-20 minutes, then bake as directed (add 5 extra minutes to account for starting cold).
Batch Cooking: Planning a big party? These scale perfectly. Use multiple 9×13 pans and bake on different racks, rotating halfway through. You can keep finished batches warm in a 200°F oven while subsequent batches bake.
Make-Ahead & Freezer Notes
Advance Prep for Parties: For stress-free entertaining, follow this timeline – 1-2 days ahead: shop for ingredients and prepare au jus (refrigerate). Day before: assemble sliders completely with butter topping, cover tightly with foil, and refrigerate. Morning of: bring au jus to room temperature. 30 minutes before serving: remove sliders from fridge. Bake as directed when ready to serve. This strategy means you have just 20 minutes of hands-off baking time during your event.
Freezing Assembled Unbaked Sliders: These freeze beautifully before baking! Assemble completely (including butter topping), wrap tightly in plastic wrap, then aluminum foil. Freeze for up to 2 months. To bake from frozen: don’t thaw. Place frozen pan in preheated 350°F oven, cover with foil, and bake for 30 minutes covered, then 10-15 minutes uncovered until heated through and tops are golden. Check internal temperature reaches 165°F.
Freezing Baked Sliders: While not ideal (they lose some texture), you can freeze fully cooked sliders if needed. Cool completely, wrap individual sliders in foil, place in freezer bags, and freeze up to 2 months. Reheat from frozen in a 325°F oven for 15-20 minutes wrapped in foil.
Au Jus Storage: The au jus can be made up to 5 days ahead and refrigerated, or frozen for up to 3 months. It actually improves with time as flavors meld. Freeze in portions (ice cube trays work great!) so you can thaw just what you need.
Individual Freezing: For meal prep, wrap individual baked sliders in foil, freeze, and grab for quick lunches. Reheat in the microwave for 60-90 seconds with a small container of au jus. Perfect for those work-from-home lunches!
Thawing Instructions: If you froze assembled unbaked sliders and want to thaw first, transfer to the refrigerator 24 hours before baking. Let come to room temperature for 20 minutes, then bake as directed. Thawed sliders bake more evenly than frozen ones.
Serving Suggestions
French dip sliders are incredibly versatile and work for everything from casual game day spreads to more formal party menus. Here’s how to serve them for maximum impact:
Classic Game Day Spread: Serve these sliders as the centerpiece alongside buffalo wings, loaded nachos, potato skins, vegetable platter with ranch, and plenty of cold beer. Set out the au jus in small individual ramekins so everyone can dip without double-dipping.
Comfort Food Dinner: Make these your main course and pair with classic sides like French fries (or sweet potato fries), coleslaw, pasta salad, or a simple green salad with vinaigrette. Add pickles and chips for the full deli experience.
Soup and Slider Combo: Perfect for cold weather! Serve sliders alongside tomato soup, French onion soup, or creamy potato soup for the ultimate comfort meal. The combination of hot soup and dippable sliders is unbeatable.
Elegant Cocktail Party: Arrange the sliders on a large white platter or wooden board, garnish with fresh herbs (thyme or rosemary), and serve the au jus in small individual cups for dipping. Add cornichons (tiny pickles) and gourmet mustards as accompaniments.
Picnic or Potluck: These travel well! Keep warm wrapped in foil and towels in an insulated carrier. Transport au jus in a thermos to keep it hot. They’re substantial enough to serve with just chips and a simple salad.
Side Dish Pairings: Roasted vegetables, garlic Parmesan fries, onion rings, mac and cheese, three-bean salad, cucumber salad, or grilled corn on the cob all work beautifully.
Beverage Pairings: Beer (especially lagers, IPAs, or stouts), red wine (Cabernet or Merlot), bourbon cocktails, whiskey, ginger ale, root beer, or iced tea all complement the rich, savory flavors.
Condiment Bar: Set out a variety of dipping options beyond au jus – horseradish sauce, creamy horseradish, spicy mustard, garlic aioli, or even cheese sauce for extra indulgence.
Presentation Tips: Serve on rustic wooden boards, in cast iron skillets, or on simple white platters. Garnish with fresh herbs, provide plenty of napkins (these can be drippy!), and use small cups or ramekins for individual au jus portions.
Frequently Asked Questions
Can I use leftover roast beef instead of deli meat?
Absolutely! Leftover pot roast, prime rib, or any slow-cooked beef works wonderfully. Just slice or shred it thinly. Leftover roast beef often has even better flavor than deli meat. If your roast beef has gravy or cooking liquid, save it to add to your au jus for incredible depth. You’ll need about 1.5-2 cups of shredded or sliced beef.
What if I can’t find Hawaiian rolls?
Any slider-sized rolls will work! Look for dinner rolls, potato rolls, or even small brioche buns. Regular hamburger buns are too large and won’t bake properly in the same timeframe. If you can only find separated rolls (not connected), that’s fine – just arrange them close together in the pan and the cheese will help hold them together.
Can I make these gluten-free?
Yes! Use gluten-free slider rolls (Canyon Bakehouse and Schar both make good options). Make sure your Worcestershire sauce is gluten-free (some brands contain malt vinegar), and verify your beef broth doesn’t have any hidden gluten. Everything else in this recipe is naturally gluten-free.
How do I keep the au jus warm for a party?
The best method is using a small slow cooker set on “warm” or “low.” Alternatively, keep it in a saucepan on your stove over the absolute lowest heat setting, stirring occasionally. For smaller gatherings, a thermal carafe or insulated pitcher works well and keeps it hot for several hours.
Can I double this recipe for a large party?
Definitely! Simply use two 9×13 pans and double all ingredients. Bake both pans at once on different oven racks, rotating positions halfway through baking for even browning. Each pan makes 12 sliders, so two pans feed 12-16 people as a main course or 20-24 as appetizers.
My cheese didn’t melt all the way. What happened?
This usually means the oven temperature was too high or the sliders weren’t baked long enough in the covered phase. Make sure you bake covered for the full 15 minutes before uncovering – this trapped steam helps melt the cheese. Also, using freshly sliced deli cheese melts better than pre-packaged slices. If needed, tent with foil and bake 5 more minutes.
Can I add vegetables to these sliders?
Absolutely! Caramelized onions, sautéed mushrooms, roasted red peppers, or even arugula make excellent additions. Add them as a layer between the beef and cheese. Just make sure any vegetables are cooked first and well-drained so they don’t make the bread soggy. Sautéed onions and peppers especially complement the French dip flavors beautifully.
Conclusion
There’s something wonderfully satisfying about pulling apart these golden, cheese-laden French dip sliders and dipping them into that rich, savory au jus. It’s pure comfort food magic that never fails to impress, whether you’re feeding your family on a busy weeknight or entertaining a houseful of guests. The best part? You now have a tried-and-true recipe that’s practically foolproof.
These easy baked sliders prove that impressive food doesn’t have to be complicated. With just a handful of ingredients, minimal prep time, and one pan, you can create something that tastes like it came from a gourmet deli or French bistro. The make-ahead flexibility means you can relax and actually enjoy your own party.