The Ultimate Baked Goat Cheese Dip Recipe – Creamy, Tangy, and Irresistible!

If you’re looking for an appetizer that practically screams “crowd-pleaser,” this baked goat cheese dip is your answer! Imagine a bubbling hot dish of creamy, tangy goat cheese swirled with herbs, roasted garlic, and just the right amount of richness that makes everyone gather around with crackers in hand. This warm goat cheese appetizer is the kind of recipe that turns a simple gathering into something memorable.
Whether you’re hosting a holiday party, planning a cozy game day spread, or just want something impressive to bring to your next potluck, this easy baked cheese dip delivers every single time. It comes together in about 30 minutes, requires minimal prep, and bakes into golden, gooey perfection that pairs beautifully with everything from crunchy baguette slices to fresh vegetables. The best part? It looks like you spent hours in the kitchen when you actually spent more time choosing the perfect playlist than cooking!
This recipe has become my go-to whenever I need something that feels fancy but doesn’t require fancy chef skills. The combination of creamy goat cheese, aromatic herbs, and a drizzle of honey creates this beautiful balance of savory and sweet that keeps people coming back for “just one more bite” (which always turns into five more bites, let’s be honest). Perfect for holiday entertaining, weekend brunches, or those moments when you just want to treat yourself to something special.
History / Background
While goat cheese itself has ancient origins dating back thousands of years—making it one of the oldest cheese varieties in the world—the concept of baked goat cheese dip as we know it today is a more modern American creation that gained serious momentum in the 1990s and 2000s.
Goat cheese, or chèvre as it’s known in France, has been produced in the Mediterranean region for over 8,000 years. Ancient Greeks and Romans treasured it, and it became a staple in French cuisine centuries ago. However, in America, goat cheese was considered quite exotic until the 1980s when artisanal cheese-making experienced a renaissance. Small-scale dairy farmers began producing high-quality domestic goat cheese, making it more accessible to home cooks.
The idea of baking goat cheese likely emerged from the French tradition of warming chèvre and serving it atop salads—those famous “salade de chèvre chaud” dishes you’ll find in Parisian bistros. Creative American chefs and home cooks took this concept further, transforming it into a shareable dip format that fit perfectly with our appetizer-loving culture.
By the early 2000s, baked goat cheese appetizers started appearing on restaurant menus across the country, from California wine country to New York City bistros. The dish aligned perfectly with the growing farm-to-table movement and Americans’ increasing appetite for Mediterranean-inspired flavors. Food bloggers and Pinterest users (hello, that’s probably you!) helped popularize this creamy baked goat cheese recipe, turning it into the entertaining staple it is today.
What makes this dish particularly special is how it bridges rustic simplicity with elegant presentation. It’s humble enough for a casual gathering yet sophisticated enough for your fanciest dinner party—a true testament to versatile home cooking.
Why You’ll Love This Recipe
This warm goat cheese dip recipe hits all the right notes whether you’re an experienced home cook or just starting your culinary journey. It’s become one of my most-requested recipes because it genuinely makes entertaining feel effortless.
Here’s why this recipe will become your new favorite appetizer:
- Incredibly Easy – With just 10 minutes of prep time and minimal ingredients, this recipe is perfect for busy hosts who want maximum impact with minimum stress
- Sophisticated Yet Simple – It looks and tastes like something from an upscale restaurant, but requires no special skills or techniques
- Customizable – Easily adapt the flavors with different herbs, add-ins, or toppings to match your personal preferences or dietary needs
- Make-Ahead Friendly – Assemble hours (or even a day) in advance, then just pop it in the oven when guests arrive
- Budget-Friendly Elegance – While goat cheese feels fancy, this recipe serves 8-10 people for roughly the cost of a couple store-bought appetizers
- Perfect Temperature Control – Serve it straight from the oven or let it cool slightly—it’s delicious at any temperature from piping hot to warm
- Allergy-Friendly Options – Naturally gluten-free when served with GF crackers, and easily adaptable for various dietary preferences
- Minimal Cleanup – Just one baking dish means less time scrubbing and more time enjoying your gathering
The creamy, tangy flavor profile appeals to almost everyone, even people who think they don’t like goat cheese. Something magical happens when you bake it—the tanginess mellows, the texture becomes luxuriously smooth, and those crispy golden edges? Absolutely addictive!
Ingredient Notes
Let’s talk about what makes this baked goat cheese appetizer so incredible. The ingredient list is short, but each component plays an important role in creating that perfect balance of flavors.
Goat Cheese (Chèvre) – This is your star ingredient! Look for fresh, soft goat cheese (usually found in logs at the grocery store). The tangy, slightly earthy flavor of goat cheese is what makes this dip special. It has a lower melting point than many cheeses, which gives you that gorgeous creamy texture. If goat cheese is too tangy for your taste, you can blend it with cream cheese (50/50 ratio) to mellow it out while maintaining that luxurious consistency.
Cream Cheese – Adding a bit of cream cheese creates an ultra-smooth, stable dip that holds its shape beautifully. It also adds richness and helps balance the tanginess of the goat cheese. Full-fat cream cheese works best here—low-fat versions can make the dip grainy. Make sure to bring it to room temperature before mixing for the smoothest results.
Fresh Garlic – Roasted or sautéed garlic adds incredible depth without overwhelming sharpness. Raw garlic can be too harsh in a creamy dip, so taking the time to cook it mellows the flavor into sweet, savory perfection. You can also use garlic-infused olive oil as a substitute.
Fresh Herbs – Thyme and rosemary are classic choices that bring earthy, aromatic notes. Fresh herbs always taste better than dried in this recipe, but if you only have dried, use about 1/3 of the amount (dried herbs are more concentrated). Basil, oregano, or chives work beautifully too—use what you love or what’s in your garden!
Extra Virgin Olive Oil – Good quality olive oil adds richness and helps everything meld together. It also creates a gorgeous glossy finish when drizzled on top before baking. Don’t skip this step—it makes a real difference in both flavor and texture.
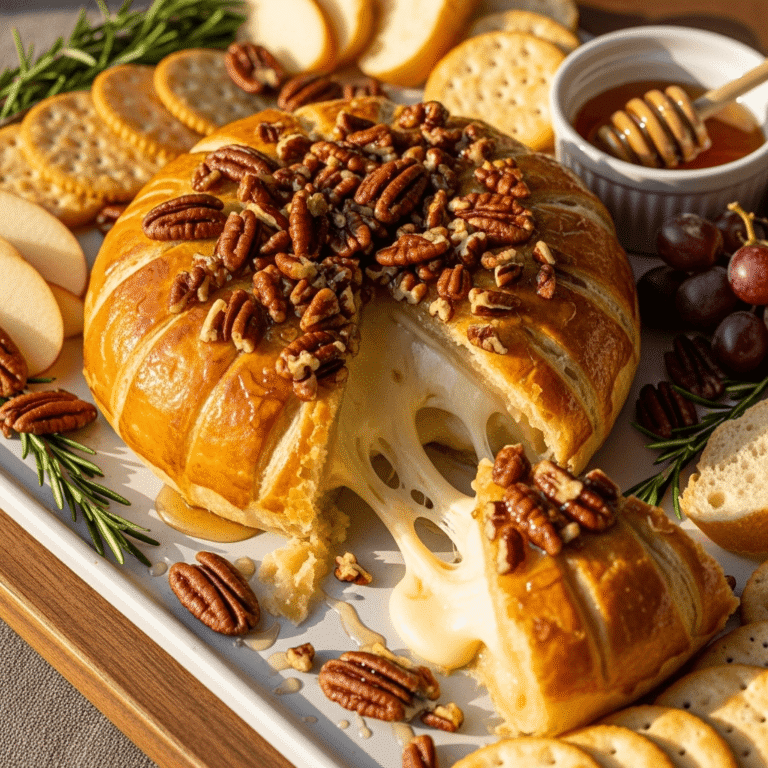
Honey – Just a drizzle of honey before serving adds a subtle sweetness that beautifully contrasts the tangy cheese. This sweet-savory combination is what makes people say “wow, what’s in this?” It’s optional but highly recommended! Use maple syrup as a substitute if you prefer.
Red Pepper Flakes – A pinch of heat cuts through the richness and adds complexity. Adjust to your spice preference—you can omit entirely for a mild dip or increase for those who love a kick.
Lemon Zest – Brightens everything up! Fresh lemon zest adds a subtle citrusy note that prevents the dip from feeling too heavy. The oils in the zest pack so much more flavor than lemon juice alone.
Sea Salt and Black Pepper – Essential for bringing out all the other flavors. Taste before baking and adjust—goat cheese can vary in saltiness by brand.
Equipment Needed
You don’t need a fancy kitchen to make this easy goat cheese dip! Here’s everything you’ll need:
- Small Baking Dish – A 6-8 inch round or square oven-safe dish works perfectly (ceramic, glass, or cast iron all work beautifully)
- Mixing Bowl – For combining your ingredients before transferring to the baking dish
- Small Skillet – If you’re sautéing your garlic first (recommended for the best flavor!)
- Rubber Spatula or Wooden Spoon – For mixing and spreading the cheese mixture
- Measuring Cups and Spoons – For accurate ingredient portions
- Zester or Microplane – For fresh lemon zest (a regular grater works too, just use the smallest holes)
- Knife and Cutting Board – For chopping herbs and garlic
- Oven Mitts – Safety first—that dish will be hot!
Optional but helpful:
- Hand Mixer or Food Processor – Makes mixing the cheese super smooth and creamy
- Small Serving Spoon or Spreader – For easy serving alongside your dip

Baked Goat Cheese Dip Recipe
This warm and creamy baked goat cheese dip features tangy chèvre blended with cream cheese, aromatic herbs, roasted garlic, and a drizzle of honey. Baked until golden and bubbly, it’s the ultimate crowd-pleasing appetizer that pairs perfectly with crackers, bread, or fresh vegetables. Easy to make and absolutely irresistible!
- Total Time: 30 minutes
- Yield: 8-10 servings 1x
Ingredients
- 8 oz fresh goat cheese (chèvre), softened to room temperature
- 4 oz cream cheese, softened to room temperature
- 3 cloves garlic, minced or finely chopped
- 2 tablespoons extra virgin olive oil, divided
- 1 tablespoon fresh thyme leaves (or 1 teaspoon dried thyme)
- 1 tablespoon fresh rosemary, finely chopped (or 1 teaspoon dried rosemary)
- 1 teaspoon lemon zest
- ¼ teaspoon red pepper flakes (adjust to taste)
- ½ teaspoon sea salt
- ¼ teaspoon black pepper
- 2 tablespoons honey (for drizzling)
- Fresh herbs for garnish (thyme sprigs, rosemary)
- Crackers, baguette slices, or vegetables for serving
Instructions
- Preheat Your Oven: Set your oven to 375°F (190°C). This temperature is perfect for getting a golden top while keeping the center creamy and smooth.
- Prepare the Garlic: In a small skillet over medium heat, add 1 tablespoon of olive oil. Once warm, add the minced garlic and sauté for 1-2 minutes until fragrant and just beginning to turn golden. Be careful not to burn it! Remove from heat and let cool slightly. This step mellows the garlic’s sharpness and adds a wonderful roasted flavor.
- Mix the Cheese Base: In a medium mixing bowl, combine the softened goat cheese and cream cheese. Using a rubber spatula, hand mixer, or food processor, blend until completely smooth and creamy with no lumps remaining. This might take 2-3 minutes of mixing—patience here creates that luxurious texture everyone loves.
- Add Aromatics and Seasonings: To your cheese mixture, add the sautéed garlic (with any oil from the pan), fresh thyme, rosemary, lemon zest, red pepper flakes, salt, and black pepper. Mix thoroughly until all ingredients are evenly distributed throughout the cheese. Taste and adjust seasonings if needed—remember, flavors will mellow slightly as it bakes.
- Transfer to Baking Dish: Lightly grease your small baking dish with a bit of olive oil or cooking spray. Spoon the cheese mixture into the dish and use your spatula to spread it evenly, smoothing the top. Create slight peaks and swirls on the surface—these will turn golden and crispy in the oven!
- Add Finishing Touches: Drizzle the remaining 1 tablespoon of olive oil over the top of the cheese mixture. This helps create that gorgeous golden crust and adds richness.
- Bake: Place the baking dish in your preheated oven and bake for 18-22 minutes. You’re looking for the dip to be heated through, bubbling gently around the edges, and developing golden-brown spots on top. The center should still be soft and creamy, not dried out.
- Add the Honey Drizzle: Remove the dish from the oven (careful—it’s hot!). Immediately drizzle the honey over the top in a back-and-forth motion. The warmth of the dip will help the honey spread slightly and create beautiful ribbons.
- Garnish and Serve: Top with fresh herb sprigs for a beautiful presentation. Serve immediately while hot and bubbly alongside your favorite crackers, toasted baguette slices, pita chips, or fresh vegetables like carrot sticks, cucumber rounds, and bell pepper strips.
Notes
- Room Temperature Ingredients: Make sure both cheeses are at room temperature before mixing—this ensures a smooth, lump-free dip. Set them out 30-60 minutes before you start cooking.
- Don’t Overbake: Keep an eye on your dip during the last few minutes of baking. Overbaking can cause the cheese to separate and become oily. It’s done when bubbly and just starting to brown.
- Serving Size Guidance: This recipe serves 8-10 people as an appetizer. If serving as part of a larger spread, it can stretch to serve 12-15.
- Herb Substitutions: Feel free to use whatever fresh herbs you have on hand—basil, oregano, chives, or sage all work wonderfully.
- Spice Level: Adjust the red pepper flakes based on your heat preference. For a milder dip, reduce to ⅛ teaspoon or omit entirely.
- Prep Time: 10 minutes
- Cook Time: 10 minutes
- Category: Appetizer
- Method: Baking
- Cuisine: American
- Diet: Gluten Free
Nutrition
- Serving Size: About ¼ cup (based on 10 servings)
- Calories: 156
- Sugar: 3g
- Sodium: 218mg
- Fat: 13g
- Saturated Fat: 7g
- Unsaturated Fat: 5g
- Trans Fat: 0g
- Carbohydrates: 4g
- Fiber: 0g
- Protein: 6g
- Cholesterol: 28mg
Tips & Variations
This creamy baked goat cheese recipe is wonderfully versatile! Here are some delicious ways to make it your own:
Mediterranean Style: Add sun-dried tomatoes, Kalamata olives, and a pinch of oregano. Top with crumbled feta before baking for extra tanginess.
Italian-Inspired: Mix in pesto instead of fresh herbs, top with pine nuts before baking, and drizzle with balsamic glaze instead of honey.
Spicy Version: Increase red pepper flakes to ½ teaspoon, add diced jalapeños, or swirl in a tablespoon of hot honey for sweet heat.
Garden Veggie: Fold in finely chopped spinach, roasted red peppers, or caramelized onions for added nutrition and flavor.
Fall Flavors: Add a tablespoon of pumpkin puree, swap honey for maple syrup, and use sage instead of thyme for a cozy autumn twist.
Cranberry-Walnut: Perfect for holidays! Mix in dried cranberries and top with toasted walnuts before baking.
Lighter Version: Use one-third less fat cream cheese (Neufchâtel) and reduce the cream cheese to 2 oz while increasing goat cheese to 10 oz.
Vegan Option: Use cashew-based cheese alternatives that melt well, and substitute agave for honey.
Protein Boost: Top with crumbled cooked bacon, prosciutto, or pancetta just before serving for meaty richness.
Truffle Luxury: Drizzle with truffle oil instead of regular olive oil and omit the honey for an elegant, earthy appetizer.
Pro Chef Tips
Want to take your warm goat cheese appetizer from good to absolutely phenomenal? Here are some professional secrets:
Temperature is Everything: Always bring your cheeses to room temperature before mixing. Cold cheese creates lumps and won’t blend smoothly no matter how long you mix. Plan ahead and set them out at least an hour before you start cooking.
Roast Your Garlic for Next-Level Flavor: Instead of sautéing, try roasting whole garlic cloves in their skins at 400°F for 30-35 minutes until soft and caramelized. Squeeze out the roasted cloves and mash them into the cheese mixture for an incredibly sweet, mellow garlic flavor without any sharpness.
Create Texture Contrast: For an elevated presentation, reserve some crumbled goat cheese and fresh herbs to sprinkle on top during the last 5 minutes of baking. This creates visual appeal and textural variety—creamy interior with slightly firmer, golden cheese pieces on top.
Use High-Quality Ingredients: Since this recipe has so few ingredients, quality really matters. Splurge on good goat cheese from your local creamery or specialty cheese shop, use fresh herbs rather than dried, and choose real honey (not corn syrup blend).
The Broiler Trick: After your dip is fully baked, turn on the broiler for just 1-2 minutes to create gorgeous caramelized peaks on top. Watch it like a hawk—broilers work fast and you don’t want burnt cheese!
Season in Layers: Add salt and pepper at different stages—some mixed into the cheese, some sprinkled on top before baking. This creates depth and ensures well-seasoned flavor throughout.
Oil Quality Matters: Use finishing-grade extra virgin olive oil for drizzling on top. Its fruity, peppery notes shine through when it’s not cooked, adding a professional touch.
Common Mistakes to Avoid
Even with a simple recipe like this baked goat cheese dip, a few missteps can affect your results. Here’s what to watch out for:
Using Cold Cheese: This is the number one mistake! Cold cheese doesn’t blend properly and creates a lumpy, uneven texture. Always let your cream cheese and goat cheese sit at room temperature for at least an hour before mixing.
Overbaking: When you overbake cheese, it separates and becomes oily and grainy instead of creamy. The dip is done when it’s bubbly around the edges and just starting to brown on top—usually 18-22 minutes. The center might look slightly underdone, but carry-over heat will finish cooking it.
Skipping the Garlic Sauté: Raw garlic in a creamy dip can be unpleasantly sharp and overpowering. Taking two minutes to sauté or roast it transforms the flavor completely, making it sweet and mellow instead of harsh.
Using Low-Fat Cheese: Low-fat or fat-free cream cheese doesn’t melt the same way and can make your dip grainy or watery. Full-fat versions create that luxurious, smooth consistency you’re looking for. This isn’t the time to cut calories—save that for another meal!
Forgetting to Taste Before Baking: Different brands of goat cheese have varying salt levels. Always taste your mixture before baking so you can adjust seasonings. It’s much harder to fix after it’s baked!
Overcrowding Your Baking Dish: Use a dish that allows the cheese mixture to be about 1-1.5 inches deep. Too shallow and it will dry out; too deep and the center won’t heat through properly before the top burns.
Not Letting It Rest: Give your dip a 3-5 minute rest after removing it from the oven before serving. This lets the temperature even out and makes it easier to scoop without being lava-hot.
Storage & Meal Prep
One of the best things about this easy goat cheese dip is how well it holds up for make-ahead entertaining and storing leftovers.
Refrigerator Storage: Transfer any leftover dip to an airtight container and refrigerate for up to 4-5 days. The texture will firm up when cold (goat cheese solidifies), but it’s still delicious spread on sandwiches or crackers cold, or you can reheat it.
Reheating Instructions: Place the dip in an oven-safe dish and reheat at 350°F for about 10-15 minutes until warmed through and bubbling again. You can also microwave individual portions for 30-45 seconds, though the oven method gives better texture. Add a small drizzle of olive oil before reheating to restore moisture.
Leftover Uses: Don’t let leftover dip go to waste! It makes an incredible pasta sauce when thinned with a bit of pasta water. You can also spread it on grilled chicken, stir it into scrambled eggs, use it as a pizza base instead of tomato sauce, or spread it on sandwiches and wraps for instant flavor.
Room Temperature Serving: If you refrigerated your dip and want to serve it at room temperature (which is also delicious), remove it from the fridge about 1-2 hours before serving. It will soften to a spreadable consistency perfect for a cheese board.
Make-Ahead & Freezer Notes
This is the ultimate make-ahead appetizer that saves you stress on entertaining day!
Advance Preparation (Recommended!): You can assemble this entire dip up to 24 hours before you need it. Mix all the ingredients, transfer to your baking dish, cover tightly with plastic wrap, and refrigerate. When ready to serve, remove from the fridge, let sit at room temperature for 15-20 minutes, then bake as directed. You may need to add 3-5 extra minutes to the baking time since it’s starting cold.
Freezer Storage: While you can freeze this dip, goat cheese can become slightly grainy when frozen and thawed. If you do freeze it, use an airtight freezer-safe container and freeze for up to 2 months. Thaw overnight in the refrigerator before baking. Stir well before transferring to your baking dish as some separation may occur.
Best Freezer Method: For best results, assemble the unbaked dip in a disposable aluminum baking dish, cover tightly with plastic wrap and then aluminum foil, label with baking instructions, and freeze. You can bake directly from frozen—just add 10-15 minutes to the baking time and cover with foil for the first half of cooking to prevent over-browning.
Batch Cooking: This recipe doubles or triples easily! Make multiple portions and freeze individually for quick appetizers whenever you need them. It’s like having a gourmet appetizer in your back pocket for unexpected guests.
Serving Suggestions
The beauty of this baked goat cheese appetizer is how many delicious things you can serve alongside it! Here are my favorite pairings:
Classic Crackers & Bread:
- Toasted baguette slices (brush with olive oil and toast until golden)
- Water crackers or butter crackers
- Pita chips (store-bought or homemade)
- Crostini with various toppings
- Naan bread, torn into pieces
- Sourdough bread chunks
Fresh Vegetables:
- Carrot sticks and baby carrots
- Cucumber rounds or spears
- Bell pepper strips (red, yellow, and orange are sweetest)
- Cherry tomatoes
- Celery sticks
- Radishes
- Blanched asparagus spears
Fruits for Sweet-Savory Balance:
- Apple slices (Honeycrisp or Granny Smith work beautifully)
- Pear slices
- Fresh figs when in season
- Grapes (red or green)
- Dried apricots
- Strawberries
Complete Appetizer Spread Pairings:
- Charcuterie items: prosciutto, salami, cured meats
- Marinated olives
- Roasted nuts (candied pecans or rosemary almonds)
- Fig jam or honey for extra drizzling
- Pickled vegetables
- Fresh fruit preserves
Beverage Pairings:
- Crisp white wines (Sauvignon Blanc, Pinot Grigio)
- Light red wines (Pinot Noir)
- Sparkling wines or champagne
- Rosé wine
- Craft beer (especially wheat beers or Belgian styles)
- Sparkling water with lemon
FAQs Section
Q: Can I make this dip with only goat cheese and no cream cheese?
A: Absolutely! You can use 12 oz of goat cheese total instead of the goat cheese/cream cheese blend. The texture will be slightly less stable and more tangy, but still delicious. Some people actually prefer it this way for a stronger goat cheese flavor. Just know that it may be a bit looser when hot.
Q: My goat cheese dip turned out grainy. What went wrong?
A: Graininess usually happens from one of three things: using cold cheese that wasn’t properly blended, overbaking causing the cheese to separate, or using low-fat cheese products. Make sure your cheese is room temperature, mix thoroughly until completely smooth, and watch your baking time carefully. Don’t bake beyond the point where it’s bubbling and just starting to brown.
Q: Can I make this dip ahead and reheat it?
A: Yes! This is actually one of the best make-ahead appetizers. You can either assemble it completely and refrigerate unbaked (then bake when needed), or fully bake it, refrigerate, and reheat at 350°F for 10-15 minutes. Both methods work beautifully.
Q: Is this recipe gluten-free?
A: The dip itself is naturally gluten-free! Just make sure to serve it with gluten-free crackers, vegetables, or gluten-free bread. Always check your ingredient labels to ensure nothing has hidden gluten if you’re serving someone with celiac disease or severe gluten sensitivity.
Q: What can I substitute for goat cheese if I don’t like the tangy flavor?
A: If goat cheese is too tangy for your taste, you can substitute with ricotta cheese for a milder, creamier option, or use all cream cheese (12 oz total) with added fresh herbs for a classic herbed cheese dip. You could also try a 50/50 blend of goat cheese and mascarpone for something in between.
Q: Why did my dip separate and become oily?
A: Cheese separation happens when it’s overbaked or baked at too high a temperature. The proteins squeeze out the fat, creating an oily layer. Stick to 375°F and pull it from the oven as soon as it’s bubbly and lightly golden. If this happens, stir the dip well before serving—it will still taste delicious even if the texture isn’t perfect.
Q: Can I use dried herbs instead of fresh?
A: Yes, but you’ll need to adjust the quantities. Use about 1 teaspoon of dried herbs for every tablespoon of fresh herbs called for in the recipe. Dried herbs are more concentrated in flavor. The taste won’t be quite as bright and aromatic, but it will still be delicious!
Conclusion
There you have it—your complete guide to making the most irresistible baked goat cheese dip that will have everyone at your next gathering asking for the recipe! This warm goat cheese appetizer truly is the perfect combination of simplicity and sophistication. With just a handful of quality ingredients and about 30 minutes from start to finish, you can create something that tastes like it came from a fancy restaurant.
What I love most about this recipe is how it brings people together. There’s something magical about a warm, bubbling dish of creamy cheese that makes everyone gather around, laughing and chatting while they reach for “just one more bite.” It’s the kind of appetizer that breaks the ice at parties and makes weeknight dinners feel a little bit special.
Whether you’re serving this easy baked cheese dip for the holidays, game day, book club, or just because it’s Tuesday and you deserve something delicious, I hope you enjoy every creamy, tangy, honey-drizzled bite. Don’t forget to experiment with the variations and make it your own—that’s what home cooking is all about!
Ready to make this recipe? I’d love to hear how it turns out for you! Leave a comment below with your experience, any variations you tried, or questions you might have. And if you love this recipe as much as I do, please pin it to your Pinterest boards so you can find it easily next time you’re planning a party or need a show-stopping appetizer. Share it with your friends who love easy entertaining recipes—they’ll thank you!
Happy cooking, and here’s to many more delicious gatherings around your table!