Homemade Pepperoni Rolls Recipe: West Virginia’s Famous Snack Made Easy

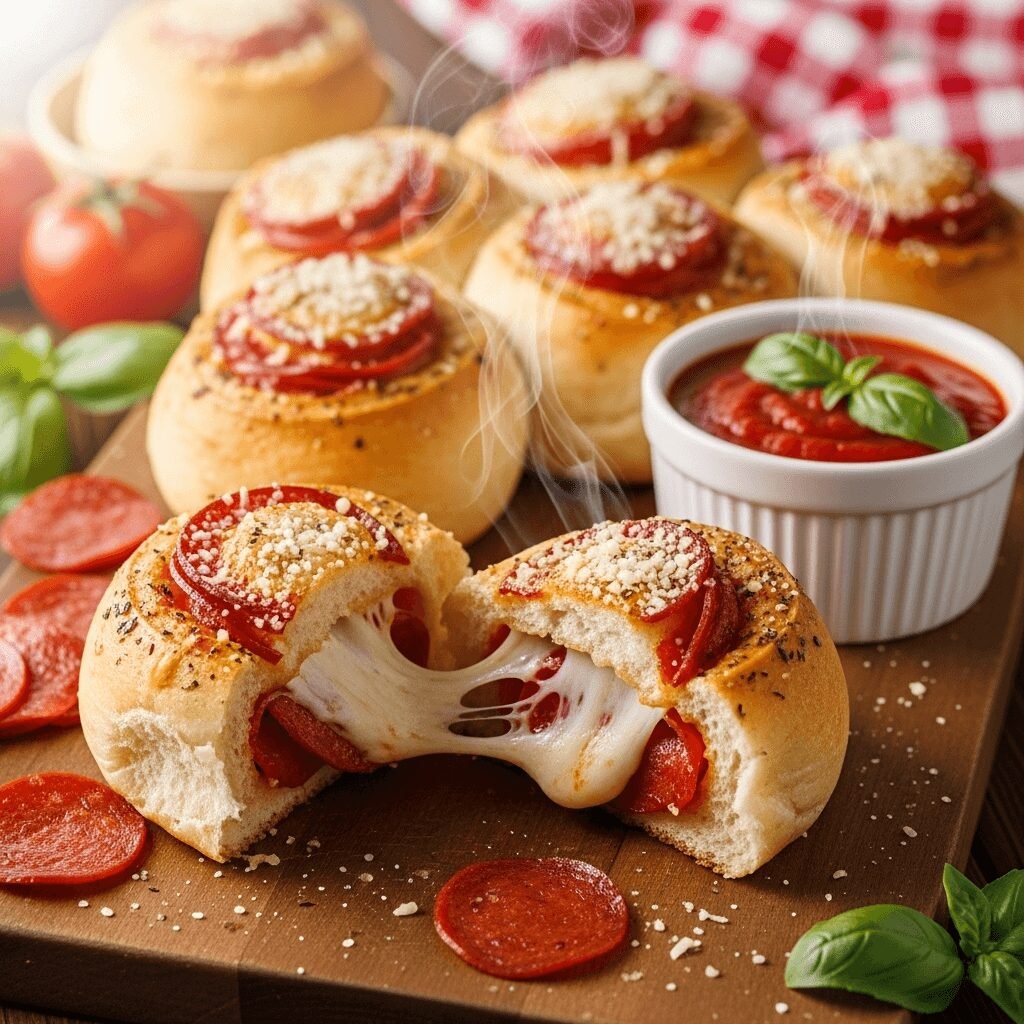
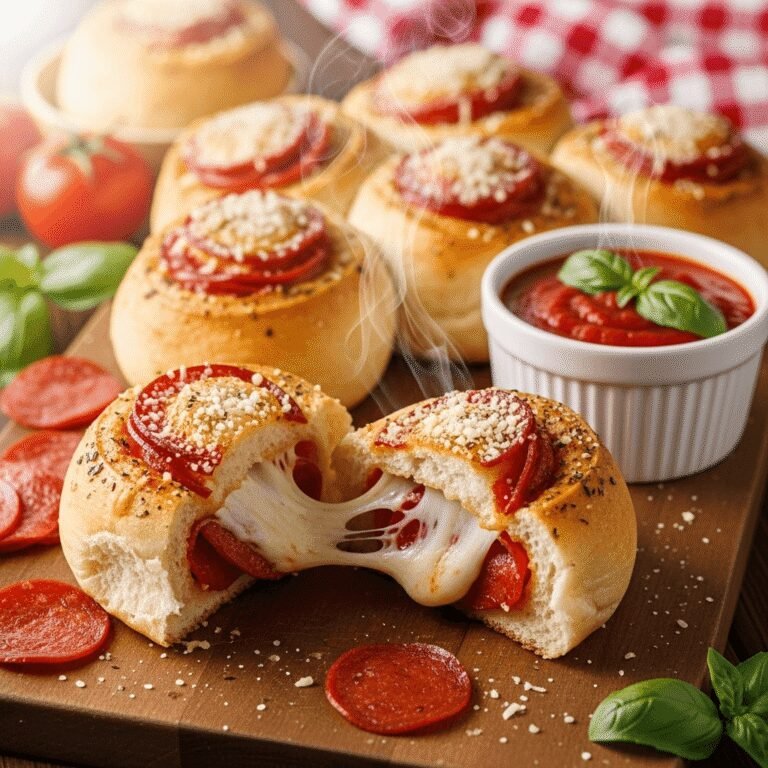
Get ready to fall in love with one of West Virginia’s most beloved culinary treasures! These homemade pepperoni rolls are soft, pillowy bread rolls stuffed with savory pepperoni and gooey melted cheese, baked until golden brown and absolutely irresistible. They’re the perfect handheld snack that combines everything we love about pizza in a convenient, portable package that’s perfect for any occasion.
These easy pepperoni rolls are incredibly versatile and work beautifully for game day parties, school lunches, after-school snacks, road trip food, potlucks, quick dinners, or even as appetizers at your next gathering. What makes this pepperoni bread recipe truly special is its perfect balance of soft, buttery bread with the bold, spicy kick of pepperoni and the creamy richness of melted cheese. They’re comfort food at its finest—familiar, satisfying, and always a crowd-pleaser.
The beauty of these homemade West Virginia pepperoni rolls lies in their simplicity and adaptability. While traditional versions use just pepperoni and bread, this recipe adds cheese for extra deliciousness and can be customized with your favorite pizza toppings. Whether you make them with store-bought pizza dough for a quick weeknight treat or from-scratch dough for that authentic homemade touch, these rolls deliver big on flavor while keeping prep straightforward. Trust me, once you start making these pepperoni-stuffed bread rolls at home, they’ll become a regular request from everyone in your family!
History / Background
Pepperoni rolls hold a special place in American food history, with roots deeply embedded in West Virginia’s coal mining culture. The story begins in 1927 in Fairmont, West Virginia, where an Italian immigrant baker named Giuseppe “Joseph” Argiro created the first pepperoni roll at the Country Club Bakery. Argiro, like many Italian immigrants who settled in Appalachia to work in the coal mines or start small businesses, brought his culinary traditions with him and adapted them to his new American home.
The genius of Argiro’s creation lay in its practicality. Coal miners needed a hearty, portable lunch that could withstand hours in the hot, humid mines without refrigeration. The pepperoni roll was perfect—the bread protected the meat, the pepperoni’s natural oils and salt content acted as preservatives, and the entire meal could be eaten with dirty hands without utensils. It was filling, flavorful, and stayed fresh throughout a long shift underground.
The original pepperoni rolls were remarkably simple: soft bread dough wrapped around sticks of pepperoni, then baked until golden. No cheese, no sauce, no fancy additions—just bread and pepperoni. This minimalist approach wasn’t about austerity; it was about creating something that could survive the harsh mining environment while delivering maximum flavor and sustenance.
Throughout the 1930s and 40s, pepperoni rolls spread throughout West Virginia’s coal mining regions. Italian bakeries in towns like Clarksburg, Morgantown, and Charleston began making their own versions, each adding small variations that reflected local preferences. Some bakeries used pepperoni sticks, others used sliced pepperoni, and eventually, some began adding cheese—a controversial innovation that purists still debate today.
By the 1950s and 60s, pepperoni rolls had transcended their working-class origins to become beloved throughout West Virginia by people of all backgrounds. They appeared in gas stations, convenience stores, school cafeterias, and home kitchens. The rolls became so intertwined with West Virginia identity that they’re now considered the unofficial state food, celebrated at festivals and cherished by West Virginians living elsewhere as a taste of home.
The pepperoni roll represents more than just a regional food specialty—it’s a testament to immigrant ingenuity, working-class resourcefulness, and the way food traditions adapt and evolve in America. Today, while coal mining has declined, the pepperoni roll thrives, with countless variations appearing in bakeries, restaurants, and home kitchens across the country. From simple bread-and-pepperoni versions to elaborate creations with multiple cheeses, vegetables, and sauces, the humble pepperoni roll has earned its place in American culinary history.
Why You’ll Love This Recipe
These soft pepperoni rolls are about to become your new favorite make-ahead snack, and here’s why they’re absolutely perfect for busy families and home cooks. The combination of warm, pillowy bread, spicy pepperoni, and melted cheese creates an incredibly satisfying bite that appeals to kids and adults alike. They’re like portable pizza pockets but better—less messy, easier to eat, and absolutely delicious at any temperature.
Here’s what makes this recipe absolutely irresistible:
- Incredibly Easy – Simple ingredients and straightforward steps make these accessible even for beginner bakers
- Budget-Friendly – Uses affordable, everyday ingredients you can find at any grocery store
- Make-Ahead Wonder – Prepare ahead and bake when needed, or freeze for quick future meals
- Kid-Approved – Children absolutely love these; perfect for picky eaters who love pizza
- Customizable – Easily adapt with different meats, cheeses, and add-ins to suit any taste
- Portable Perfection – Ideal for lunch boxes, road trips, picnics, or eating on the go
- No Mess – Unlike pizza, these can be eaten with one hand without dripping sauce everywhere
- Freezer-Friendly – Make big batches and freeze for quick snacks and meals anytime
- Great for Parties – Serve as appetizers, game day snacks, or party food everyone will love
- Versatile Serving – Delicious hot, warm, or even at room temperature
- Family Bonding – Fun to make together; kids love helping roll and stuff these
- Better Than Store-Bought – Homemade versions taste fresher and cost less than convenience store options
Ingredient Notes
Understanding your ingredients helps you make the best baked pepperoni rolls every single time.
Pizza Dough – The foundation of your rolls! You have several options here: store-bought refrigerated pizza dough (found in the refrigerated section near biscuits) is the quickest and easiest option that still delivers great results. Frozen bread dough works wonderfully too—just thaw according to package directions. For the most authentic experience, homemade pizza dough or bread dough gives you that incredible fresh-baked flavor and texture. If you’re feeling adventurous, I’ve included a simple dough recipe in the notes. One pound of dough typically makes 8-10 rolls.
Pepperoni – The star ingredient! Use regular sliced pepperoni from the deli section or packaged pepperoni. You’ll need about 30-40 slices depending on how generously you want to fill your rolls. For traditional West Virginia-style rolls, pepperoni sticks (whole pepperoni cut into 4-5 inch pieces) are authentic, but sliced is easier to work with and distributes flavor more evenly. Turkey pepperoni works as a lighter alternative, though it has less fat and slightly different flavor.
Mozzarella Cheese – Adds that irresistible gooey, melted cheese pull! Shredded mozzarella is easiest to work with and melts beautifully. You can use pre-shredded or shred from a block (which melts better but takes more time). About 1½ to 2 cups total is perfect. For extra flavor, try a blend of mozzarella and provolone, or add a little sharp cheddar.
Butter – Melted butter brushed on top creates a gorgeous golden-brown finish and adds rich flavor. Use unsalted butter so you can control the salt level. If you want extra flavor, mix minced garlic or Italian seasoning into the melted butter before brushing.
Italian Seasoning – A blend of dried herbs (oregano, basil, thyme) that adds authentic Italian-American flavor. This is sprinkled on top before baking for extra taste and visual appeal. You can substitute with individual dried herbs if you don’t have the blend, or use garlic powder and dried parsley.
Parmesan Cheese – Optional but highly recommended! Freshly grated Parmesan sprinkled on top before baking adds a salty, umami-rich crust that takes these rolls to the next level. The pre-grated kind from a shaker works fine, but freshly grated tastes better.
Marinara Sauce (For Serving) – While not baked into the rolls, marinara sauce is the traditional accompaniment for dipping. Use your favorite store-bought sauce or homemade if you have it. Some people prefer ranch dressing or garlic butter for dipping instead.
Optional Add-Ins – Banana peppers, jalapeños, diced bell peppers, olives, cooked Italian sausage, or even a small spoonful of pizza sauce inside each roll can customize these to your taste. Just don’t overstuff or they’ll be hard to seal and may burst during baking.
Equipment Needed
You’ll need basic baking equipment to make these delicious pepperoni bread rolls:
- Large baking sheet – For baking your rolls; line it with parchment paper or a silicone mat for easy cleanup
- Rolling pin – For rolling out dough (or use your hands to stretch and shape)
- Sharp knife or pizza cutter – For cutting dough into portions
- Pastry brush – For brushing melted butter on top of rolls
- Small bowl – For melting butter and mixing any seasonings
- Measuring cups and spoons – For accurate ingredient portions
- Clean work surface – Lightly floured counter or large cutting board for working with dough
- Kitchen towel – To cover dough while it rests, if needed
- Wire cooling rack – For cooling rolls slightly before serving (optional but helpful)
Pepperoni Rolls Recipe
These irresistible homemade pepperoni rolls feature soft, pillowy dough wrapped around savory pepperoni and gooey melted mozzarella cheese, then baked until golden brown. They’re West Virginia’s famous handheld snack that’s perfect for lunch boxes, parties, or anytime you need a delicious bite!
- Total Time: 38 minutes
- Yield: 8-10 rolls 1x
Ingredients
For the Rolls:
- 1 pound pizza dough (store-bought or homemade), at room temperature
- 30-40 slices pepperoni (about 3-4 slices per roll)
- 1½ cups shredded mozzarella cheese
- 2 tablespoons unsalted butter, melted
- 1 teaspoon Italian seasoning
- 2 tablespoons grated Parmesan cheese
- Flour for dusting work surface
For Serving:
- 1 cup marinara sauce, warmed
Optional Simple Dough (if making from scratch):
- 2¼ teaspoons active dry yeast (1 packet)
- 1 cup warm water (110°F)
- 1 tablespoon sugar
- 2½ cups all-purpose flour
- 2 tablespoons olive oil
- 1 teaspoon salt
Instructions
If Making Dough from Scratch (Optional):
- In a large bowl, dissolve yeast and sugar in warm water. Let sit for 5 minutes until foamy.
- Add flour, olive oil, and salt. Mix until a shaggy dough forms.
- Knead on a floured surface for 5-7 minutes until smooth and elastic.
- Place in an oiled bowl, cover, and let rise in a warm place for 1 hour until doubled. Then proceed with recipe below.
For the Pepperoni Rolls:
- Preheat and prepare: Preheat your oven to 400°F (200°C). Line a large baking sheet with parchment paper or lightly grease it.
- Prepare the dough: If using store-bought dough, let it sit at room temperature for 15-20 minutes to make it easier to work with. Lightly flour your work surface and rolling pin.
- Divide the dough: On your floured surface, gently stretch or roll the dough into a large rectangle, about 12×16 inches and roughly ¼ inch thick. Using a sharp knife or pizza cutter, cut the dough into 8-10 rectangular pieces (approximately 3×4 inches each).
- Fill each roll: Working with one rectangle at a time, place 3-4 slices of pepperoni in the center, overlapping slightly. Top with about 2 tablespoons of shredded mozzarella cheese. Don’t overfill or the rolls will be difficult to seal.
- Roll and seal: Starting from one short end, roll the dough tightly around the filling like a jelly roll or burrito. Pinch the seam firmly closed and pinch the ends to seal completely. Place seam-side down on your prepared baking sheet, leaving about 2 inches between each roll for expansion.
- Prepare for baking: Brush the tops and sides of each roll generously with melted butter. Sprinkle with Italian seasoning and grated Parmesan cheese for extra flavor and a beautiful golden finish.
- Bake: Bake in the preheated oven for 16-18 minutes, until the rolls are golden brown on top and the dough is cooked through. The cheese inside should be melted and bubbly.
- Cool slightly: Remove from the oven and let the rolls cool on the baking sheet for 3-5 minutes. This brief rest allows the cheese to set slightly, making them easier to handle and less likely to burn your mouth!
- Serve: Transfer to a serving platter and serve warm with marinara sauce for dipping. These are best enjoyed warm but are also delicious at room temperature.
Notes
- Dough temperature matters: Room temperature dough is much easier to roll and shape without springing back. If your dough is cold and resistant, let it rest for 15-20 minutes.
- Don’t overfill: It’s tempting to pack in lots of pepperoni and cheese, but overfilling makes the rolls difficult to seal and prone to bursting. Less is more here!
- Seal tightly: Make sure to pinch all seams and ends firmly closed, or the cheese will leak out during baking.
- Customize away: These are endlessly customizable. Add banana peppers, olives, cooked sausage, or different cheeses based on your preferences.
- Make-ahead friendly: Assemble rolls, place on baking sheet, cover tightly with plastic wrap, and refrigerate up to 24 hours before baking. Add 2-3 minutes to baking time if baking cold.
- Prep Time: 20 minutes
- Cook Time: 18 minutes
- Category: Appetizer
- Method: Baking
- Cuisine: American
- Diet: Gluten Free
Nutrition
- Serving Size: 1 roll
- Calories: 245
- Sugar: 2g
- Sodium: 485mg
- Fat: 11g
- Saturated Fat: 5g
- Unsaturated Fat: 5g
- Trans Fat: 0g
- Carbohydrates: 26g
- Fiber: 1g
- Protein: 10g
- Cholesterol: 25mg
Tips & Variations
These cheesy pepperoni rolls are wonderfully adaptable to different tastes and dietary preferences.
Traditional West Virginia Style: For the most authentic version, skip the cheese entirely and use whole pepperoni sticks (about 4-5 inches long, one per roll) instead of sliced pepperoni. This is how they’re traditionally made in West Virginia bakeries.
Supreme Pizza Rolls: Add diced bell peppers, sliced olives, cooked crumbled Italian sausage, and mushrooms along with the pepperoni and cheese for a supreme pizza-inspired version.
Spicy Version: Use hot pepperoni or add sliced jalapeños and pepper jack cheese instead of mozzarella. Brush with garlic butter mixed with red pepper flakes for extra heat.
Three-Cheese Rolls: Combine mozzarella, provolone, and sharp cheddar for an ultra-cheesy, more complex flavor profile. Add a sprinkle of Parmesan inside too.
Vegetarian Option: Skip the pepperoni and load up with sautéed vegetables like bell peppers, onions, mushrooms, and spinach. Add sun-dried tomatoes for extra flavor.
Breakfast Pepperoni Rolls: Add a scrambled egg and cooked breakfast sausage along with cheese for a hearty breakfast version.
Ham and Cheese Rolls: Replace pepperoni with thin-sliced deli ham and use Swiss or provolone cheese for a milder flavor that kids often prefer.
Garlic Butter Upgrade: Mix minced fresh garlic or garlic powder into your melted butter before brushing for incredible garlic bread flavor.
Whole Wheat Version: Use whole wheat pizza dough for a slightly healthier option with more fiber and nutrients.
Pro Chef Tips
These professional techniques will elevate your easy pepperoni rolls from good to absolutely bakery-quality:
Room Temperature Everything: This is crucial for working with yeast dough. Cold dough from the refrigerator is stiff, resistant to rolling, and springs back constantly. Let store-bought dough sit at room temperature for 15-20 minutes before working with it. The dough should feel slightly warm and pliable, stretching easily without tearing or shrinking back.
The Rest Technique: If your dough keeps shrinking back when you try to roll it, let it rest for 5-10 minutes covered with a kitchen towel. This allows the gluten to relax, making it much easier to roll into your desired shape. Don’t fight resistant dough—patience pays off.
Sealing Mastery: The key to preventing cheese explosions is proper sealing. After filling, moisten the edges of the dough lightly with water using your finger—this acts like glue. Then roll tightly and pinch firmly, creating a strong seal. Place seam-side down on the baking sheet so gravity helps keep it closed during baking.
Strategic Filling Placement: Don’t spread filling edge-to-edge. Leave about ½ inch of bare dough around all edges. This gives you room to seal properly without filling squeezing out. Think of it like an envelope—you need that border to create a secure closure.
The Butter Brush Technique: Brush the rolls with melted butter twice—once before adding seasonings, and once halfway through baking. This creates an incredibly golden, glossy, flavorful crust that looks professionally baked.
Oven Position Matters: Bake on the center rack for the most even heat distribution. If you’re baking multiple sheets, rotate them halfway through baking and switch rack positions for uniform browning.
The Cooling Pause: Resist the urge to bite into these immediately! The cheese inside is molten lava hot. Let them rest for 3-5 minutes after baking. This allows the cheese to set slightly while keeping the rolls warm enough to be perfectly enjoyable.
Common Mistakes to Avoid
Even simple recipes can go wrong. Here’s how to sidestep the most common pitfalls:
Mistake #1: Overfilling the rolls. This is the number one error that leads to messy, burst-open rolls with cheese oozing everywhere. While generous filling sounds good, it makes the rolls impossible to seal properly and they’ll explode in the oven. Use restraint—3-4 slices of pepperoni and 2 tablespoons of cheese per roll is plenty. You want a good filling-to-bread ratio, but the dough needs to be able to close and seal around it completely.
Mistake #2: Not sealing properly. If you don’t pinch the seams and ends tightly, cheese will escape during baking, making a mess on your pan and leaving your rolls deflated and sad. After rolling, pinch firmly along the entire seam, then pinch the ends closed too. Place seam-side down on the baking sheet for extra security.
Mistake #3: Using cold dough. Cold dough from the refrigerator is stiff, difficult to roll, and springs back constantly. It can also lead to uneven baking—cold center, overdone edges. Always let refrigerated dough come to room temperature for at least 15-20 minutes before working with it. The dough should feel slightly warm, soft, and pliable.
Mistake #4: Baking at the wrong temperature. Too low (350°F) and your rolls will be pale, doughy, and undercooked. Too high (450°F+) and the outside burns before the inside cooks through. 400°F is the sweet spot for golden, evenly baked rolls with melted cheese and fully cooked dough.
Mistake #5: Skipping the butter. The melted butter brushed on top isn’t just for flavor—it creates that beautiful golden-brown crust, adds richness, and helps the seasonings stick. Without it, your rolls will be pale and bland-looking. Don’t skip this important step!
Storage & Meal Prep
Proper storage keeps your homemade West Virginia pepperoni rolls fresh and delicious for days.
Room Temperature Storage: These rolls are best enjoyed the day they’re baked, but they’ll keep at room temperature in an airtight container or zip-top bag for up to 2 days. They won’t be quite as soft and fresh as when first baked, but they’re still delicious. Don’t refrigerate unless you must keep them longer—refrigeration makes the bread stale faster.
Refrigerator Storage: If you need to keep them longer than 2 days, store in the refrigerator in an airtight container for up to 5 days. The bread will firm up in the fridge, so you’ll want to reheat before eating for the best texture.
Reheating Methods: To restore that fresh-baked quality, reheat individual rolls in the microwave for 20-30 seconds (they’ll be soft but not crispy), or better yet, reheat in a 350°F oven for 5-7 minutes until warmed through and the crust crisps up again. You can also reheat in an air fryer at 350°F for 3-4 minutes for perfectly crispy results.
Lunch Box Friendly: These rolls are perfect for packed lunches! They’re delicious at room temperature, so pack them in the morning and they’ll still taste great by lunch. Include a small container of marinara sauce for dipping.
Portion Control: If you’re meal prepping, wrap individual rolls in foil or plastic wrap before storing in a larger container. This makes it easy to grab one or two at a time without exposing the whole batch to air repeatedly.
Make-Ahead & Freezer Notes
These baked pepperoni rolls are one of the best make-ahead and freezer-friendly recipes you’ll ever make.
Make-Ahead Unbaked (Best Method): This is my favorite approach for fresh-baked taste. Assemble the rolls completely, place them on a parchment-lined baking sheet, cover tightly with plastic wrap, and refrigerate for up to 24 hours. When ready to bake, remove from refrigerator, brush with butter and seasonings, and bake as directed, adding 2-3 minutes to the baking time since they’re starting cold.
Make-Ahead Baked: You can also bake the rolls completely, let them cool, then store in an airtight container at room temperature for up to 2 days before your event. Reheat in a 350°F oven for 5-7 minutes before serving.
Freezing Unbaked Rolls (Recommended): Assemble rolls completely, place on a parchment-lined baking sheet, and freeze until solid (about 2 hours). Transfer frozen rolls to a freezer bag or airtight container and freeze for up to 3 months. When ready to bake, place frozen rolls on a baking sheet, brush with butter and seasonings, and bake at 400°F for 22-25 minutes (no need to thaw!). They’ll taste freshly made.
Freezing Baked Rolls: Fully baked and cooled rolls can be frozen in an airtight container or freezer bag for up to 3 months. Thaw at room temperature or in the refrigerator, then reheat in a 350°F oven for 8-10 minutes until heated through.
Individual Wrapping: For maximum convenience, wrap each roll individually in plastic wrap or foil before placing in a freezer bag. This lets you pull out exactly how many you need without thawing the whole batch.
Best Reheating from Frozen: Whether reheating frozen baked rolls or baking frozen unbaked rolls, the oven gives the best results. The microwave works in a pinch but won’t crisp the outside. An air fryer is excellent for reheating—350°F for 5-6 minutes from frozen.
Serving Suggestions
The right accompaniments and presentation make your soft pepperoni rolls shine at any meal or gathering.
Classic Dipping Sauces: Warm marinara or pizza sauce is the traditional accompaniment and absolutely essential. Serve in small bowls for easy dipping. Ranch dressing is also popular, especially with kids. Garlic butter, cheese sauce, or even a spicy arrabbiata sauce are delicious alternatives.
As Part of a Meal: While these rolls can absolutely be a snack or appetizer, they also work as a main course. Serve 2-3 rolls per person alongside a fresh green salad, Caesar salad, or Italian pasta salad for a complete, satisfying meal. Minestrone soup or tomato soup pairs beautifully too.
Game Day Spread: These are perfect party food! Arrange warm rolls on a large platter surrounded by various dipping sauces—marinara, ranch, garlic butter, and maybe a spicy option. Add other finger foods like mozzarella sticks, wings, and veggies with dip for a complete game day spread.
School Lunches: Pack 1-2 rolls in a lunch box with fresh fruit, veggies and dip, and a treat. Include a small container of marinara if your child likes to dip. These travel well and don’t need refrigeration for a few hours.
Picnic or Road Trip Food: Because they’re delicious at room temperature and not messy, pepperoni rolls are ideal for outdoor eating. Pack them in a cooler for picnics, beach days, or long car trips. No utensils needed!
Breakfast or Brunch: While not traditional, these rolls make a fun brunch offering alongside scrambled eggs, fresh fruit, and coffee. They’re heartier than pastries and more interesting than plain bread.
Beverage Pairings: These savory rolls pair well with beer (especially Italian lagers or pale ales), red wine, iced tea, lemonade, or soda. For kids’ parties, fruit punch or Italian sodas complement the Italian-American flavors nicely.
Elegant Presentation: For parties, arrange rolls on a wooden cutting board or white platter, garnish with fresh basil or parsley, and serve with small appetizer plates and napkins nearby. Small forks or toothpicks can make serving easier at stand-up events.
FAQs Section
Can I use crescent roll dough instead of pizza dough?
Yes! Refrigerated crescent roll dough works in a pinch, though the texture will be flakier and more pastry-like rather than bread-like. Separate the dough into triangles, place filling at the wide end, roll up toward the point, and bake according to package directions (usually 10-12 minutes at 375°F). The result is more like pepperoni crescents than traditional rolls, but still delicious!
Do I have to use cheese, or can I make them like traditional West Virginia pepperoni rolls?
Absolutely! Traditional West Virginia pepperoni rolls contain no cheese at all—just bread dough and pepperoni (often whole pepperoni sticks rather than slices). The cheese is a modern addition that many people prefer, but purists insist the original no-cheese version is best. Try both ways and see which you prefer! Without cheese, they’re even more portable and pack-lunch friendly.
Can these pepperoni rolls be made gluten-free?
Yes, by using gluten-free pizza dough or bread dough. Several brands make ready-to-use gluten-free pizza dough (check the freezer section). The texture will be slightly different—often a bit more crumbly and less stretchy—but they’ll still be delicious. Follow the same assembly and baking instructions.
Why did my pepperoni rolls burst open in the oven?
This usually happens for one of two reasons: overfilling or poor sealing. Make sure you’re not putting too much pepperoni and cheese inside—leave about ½ inch of bare dough around the edges for sealing. Pinch the seams very firmly closed and place seam-side down on the baking sheet. Also, don’t roll them so tightly that pressure builds up inside—roll snugly but not super tight.
Can I make these with other meats besides pepperoni?
Definitely! Try Italian sausage (cooked and crumbled), ham, salami, or even bacon. You can mix meats too—pepperoni and sausage is a popular combination. For each variation, follow the same assembly method. Just make sure any meat you use is fully cooked before filling the rolls.
How do I prevent the bottom of my rolls from getting soggy?
Use parchment paper or a silicone baking mat on your baking sheet—this prevents direct contact with the pan and allows air circulation. Make sure your oven is fully preheated to 400°F before baking so the bottoms start cooking immediately. Don’t let filled rolls sit too long before baking, as moisture from the filling can start soaking into the dough.
Can I make mini pepperoni rolls for parties?
Absolutely! Cut your dough into smaller rectangles (about 2×3 inches), use 1-2 slices of pepperoni and 1 tablespoon of cheese per roll, and reduce baking time to 12-14 minutes. You’ll get about 16-20 mini rolls from 1 pound of dough—perfect bite-sized appetizers for parties. They’re adorable and even easier to eat!
Conclusion
And there you have it—the ultimate recipe for homemade pepperoni rolls that brings a taste of West Virginia right to your kitchen! These soft, pillowy rolls stuffed with savory pepperoni and gooey cheese prove that sometimes the simplest recipes are the most satisfying. Whether you’re making them for lunch boxes, game day parties, quick dinners, or just because you’re craving something delicious, these rolls deliver every single time.
The magic of this pepperoni bread recipe lies in its perfect combination of convenience and homemade goodness. With store-bought dough, you can have these ready in under 40 minutes. With homemade dough, you control every aspect of quality and flavor. Either way, you’ll end up with warm, golden-brown rolls that are infinitely better than anything you can buy at a convenience store—and your family will definitely agree!
I absolutely can’t wait to hear about your pepperoni roll adventures! Did you stick with the classic version or try one of the variations? Are you team cheese or team traditional no-cheese? What’s your favorite dipping sauce? Drop a comment below and share your experience—I love connecting with fellow home cooks and hearing about your successes! And if these rolls become a hit in your household like they have in mine, please pin this recipe to your favorite board on Pinterest so other food lovers can discover the joy of homemade pepperoni rolls too.
Now grab that dough, pile on that pepperoni, and get ready to bake up a batch of West Virginia’s finest contribution to American snack food. Your kitchen is about to smell absolutely amazing, and those golden rolls fresh from the oven? Pure perfection. Happy baking, friends, and enjoy every cheesy, pepperoni-packed bite!