Crispy Baked Potato Slices – Easy, Golden & Perfectly Seasoned Side Dish!

Get ready for the most addictive potato side dish you’ll ever make! These crispy baked potato slices transform humble potatoes into golden, crunchy rounds that are crispy on the outside and tender on the inside. If you’ve been looking for a potato recipe that’s easier than french fries but just as satisfying, these oven baked potato rounds are about to become your new go-to side dish!
These easy potato slices have taken home kitchens by storm, and it’s no wonder why. They’re incredibly simple to prepare—just slice, season, and bake—yet they deliver restaurant-quality results that make any meal feel special. I make these constantly because they’re the perfect balance of crispy and creamy, they pair with absolutely everything, and they’re endlessly customizable with different seasonings. Plus, they’re so much healthier than deep-fried potatoes while still delivering that satisfying crunch everyone craves.
Perfect for weeknight dinners, holiday gatherings, BBQ sides, potlucks, breakfast hash browns alternative, or any time you need a crowd-pleasing side dish that practically makes itself, these versatile potato slices work for absolutely any occasion. Serve them alongside grilled steak, roasted chicken, breakfast eggs, or as a snack with your favorite dipping sauce—these golden beauties are always a hit. The best part? They require just a handful of simple ingredients and one baking sheet, making cleanup a breeze!
History / Background
The story of baked potato slices is really the story of humanity’s enduring love affair with the potato itself—one of the world’s most versatile and beloved vegetables. To truly appreciate these crispy rounds, we need to understand how potatoes became such a cornerstone of global cuisine.
Potatoes originated in the Andean region of South America over 7,000 years ago, where indigenous peoples cultivated hundreds of varieties. Spanish conquistadors brought potatoes to Europe in the 16th century, though Europeans were initially suspicious of this strange underground tuber. It took nearly two centuries for potatoes to gain widespread acceptance, but once they did, they became a dietary staple across Europe and eventually the world.
The simple act of slicing and baking potatoes has roots in multiple culinary traditions. In France, the classic “pommes Anna” features thinly sliced potatoes layered with butter and baked until golden—a dish created in the 19th century. German cuisine gave us “Bratkartoffeln” (pan-fried potato slices), while British cooking contributed “potato rounds” served alongside traditional roasts.
The American approach to potato slices evolved throughout the 20th century as home ovens became standard kitchen equipment. Unlike the labor-intensive deep-frying required for french fries or the long baking time needed for whole baked potatoes, sliced and roasted potatoes offered a middle ground: quicker cooking than whole potatoes, healthier than frying, and incredibly versatile for seasoning.
The modern version of baked potato slices—simply seasoned, evenly cut rounds roasted until crispy—gained popularity during the health-conscious cooking movements of the 1980s and 90s. As people sought alternatives to fried foods, oven-roasted vegetables became increasingly popular. Food bloggers and Pinterest users further popularized this technique in the 2010s, sharing endless variations with different seasonings, herbs, and serving suggestions.
What makes baked potato slices particularly special is their democratic appeal. They’re elegant enough for dinner parties (think hasselback-style presentations), practical enough for busy weeknight dinners, and budget-friendly enough for feeding large families or crowds. This simple preparation method honors the potato’s natural flavor while creating textural contrast—crispy edges and creamy centers—that makes them irresistible.
Today, baked potato slices represent the kind of simple, honest cooking that home cooks everywhere appreciate. They require no fancy techniques, no exotic ingredients, and no special equipment—just good potatoes, quality oil, proper seasoning, and the transformative power of a hot oven. They prove that sometimes the best recipes are the simplest ones, allowing quality ingredients to shine while creating something greater than the sum of their parts.
Why You’ll Love This Recipe
These crispy potato slices are about to revolutionize your side dish rotation! I’ve been making these for years, and they never fail to impress—whether I’m serving them to my family on a Tuesday night or bringing them to a potluck. The perfect combination of crispy edges and fluffy centers creates an addictive texture that has everyone reaching for seconds (and thirds!).
Here’s why these oven roasted potato slices will become your new favorite:
- Ridiculously easy – Just slice, season, and bake. No fancy techniques required!
- Crispy perfection – Achieves that satisfying crunch without deep frying
- Budget-friendly – Potatoes are inexpensive and feed a crowd
- Healthier than fries – Baked instead of fried, uses minimal oil
- Endlessly customizable – Works with any seasoning blend you love
- Kid-approved – Even picky eaters love these crispy rounds
- Quick cooking time – Ready in 30-40 minutes, faster than whole baked potatoes
- Perfect for meal prep – Makes great leftovers for the week
- Versatile serving – Works for breakfast, lunch, dinner, or snacks
- One-pan wonder – Minimal cleanup with just one baking sheet
- Naturally gluten-free and vegan – Accommodates many dietary needs
- Impressive presentation – Looks restaurant-quality with minimal effort
Ingredient Notes
The magic of perfect baked potato slices lies in choosing quality ingredients and understanding their roles. Here’s what you need to know:
Potatoes – The foundation of your dish! Russet potatoes (Idaho potatoes) are ideal for the crispiest results because their high starch content creates that perfect fluffy interior and crispy exterior. Yukon Gold potatoes work beautifully too, offering a buttery flavor and creamy texture with slightly less crispiness. Red potatoes and fingerlings are excellent for a waxier, creamier texture but won’t crisp as dramatically. For best results, choose medium to large potatoes that are firm without soft spots, sprouts, or green tinges.
Olive Oil – Essential for achieving golden, crispy edges. Extra virgin olive oil adds the most flavor, while regular olive oil has a higher smoke point for extra-high-heat roasting. Avocado oil is an excellent substitute with its neutral flavor and very high smoke point. Melted butter creates incredibly rich flavor but won’t crisp quite as well as oil. For best results, use enough oil to coat each slice—skimping on oil results in dry, pale potatoes.
Salt – The most important seasoning! Coarse kosher salt or sea salt provides the best flavor and texture. Fine table salt works but use about 25% less as it’s more concentrated. Salt draws out moisture from the potato surface during baking, which helps create that coveted crispy texture.
Black Pepper – Adds warmth and subtle spice. Freshly cracked black pepper provides the most aromatic flavor, but pre-ground works perfectly fine. Adjust to your heat preference.
Garlic Powder – Provides savory depth without the risk of burning that fresh garlic presents at high oven temperatures. Garlic powder distributes evenly and creates consistent flavor throughout. Fresh minced garlic can burn and become bitter at roasting temperatures, so powdered is preferred for this recipe.
Optional Seasonings – The beauty of this recipe is its versatility! Paprika (smoked or regular) adds color and mild sweetness, onion powder contributes savory depth, dried herbs like rosemary, thyme, or oregano provide aromatic flavor, and Parmesan cheese creates extra crispy, cheesy edges.
Equipment Needed
You’ll need minimal equipment for this simple recipe—nothing fancy required!
Essential Tools:
- Large baking sheet – Rimmed half-sheet pan (18×13 inches) is ideal for even heat distribution
- Sharp knife – For slicing potatoes uniformly
- Cutting board – Stable surface for safe slicing
- Large mixing bowl – For tossing potato slices with oil and seasonings
- Measuring spoons – For accurate seasoning amounts
- Spatula or tongs – For flipping potatoes halfway through baking
Optional but Helpful:
- Mandoline slicer – Creates perfectly uniform slices (use the safety guard!)
- Parchment paper or silicone baking mat – Prevents sticking and makes cleanup easier
- Wire cooling rack – For cooling if not serving immediately
- Kitchen timer – Ensures you don’t forget about them in the oven

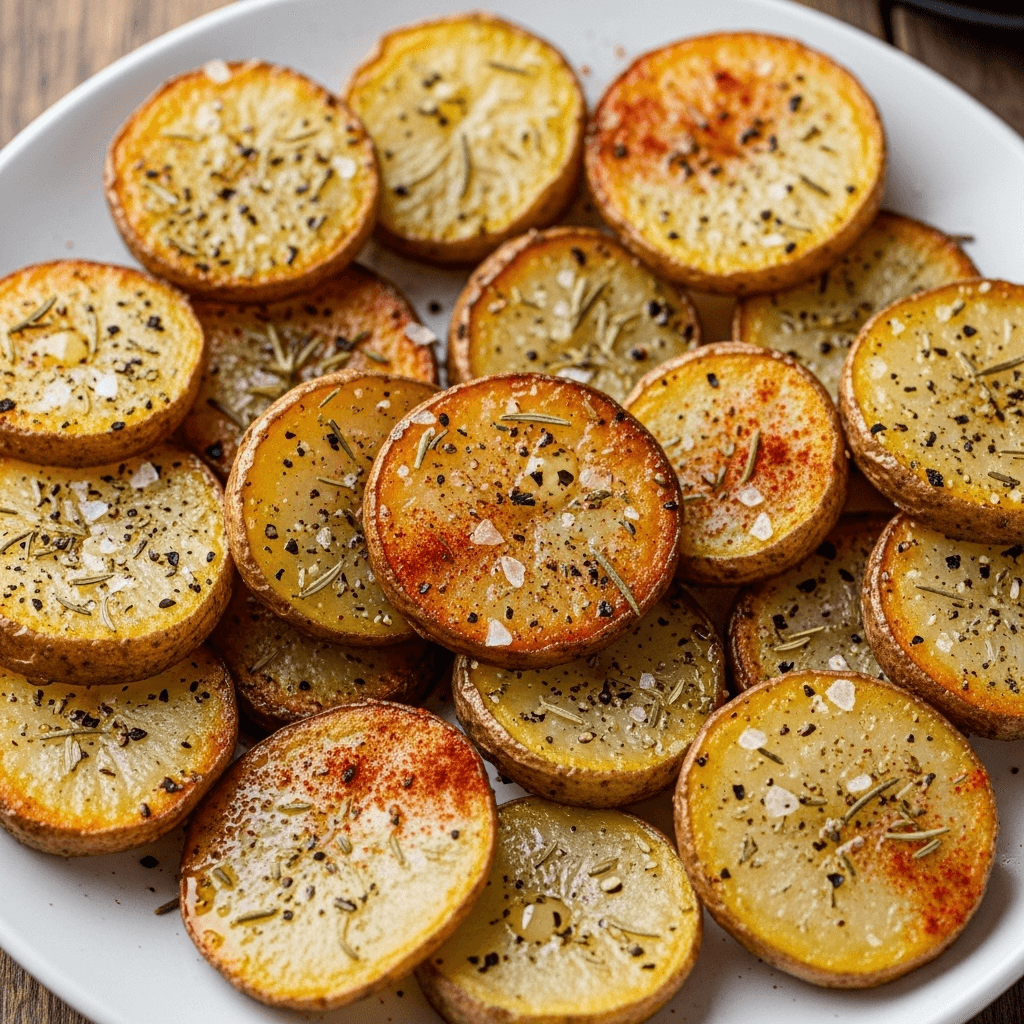
Crispy Baked Potato Slices
These crispy baked potato slices are perfectly golden on the outside and fluffy on the inside. Seasoned with simple spices and roasted to perfection, they’re an easy, delicious side dish that pairs with everything and takes just 10 minutes to prep!
- Total Time: 40 minutes
- Yield: 4-6 servings 1x
Ingredients
- 4 medium russet potatoes (about 2 pounds)
- 3 tablespoons olive oil (or avocado oil)
- 1 teaspoon kosher salt (or ¾ teaspoon table salt)
- ½ teaspoon black pepper
- ½ teaspoon garlic powder
- ½ teaspoon paprika (optional, for color and flavor)
- ¼ teaspoon onion powder (optional)
Optional Garnishes:
- Fresh chopped parsley
- Grated Parmesan cheese
- Fresh chives or green onions
- Sour cream or Greek yogurt for serving
Instructions
- Preheat your oven: Preheat to 425°F (220°C). This high temperature is crucial for achieving crispy edges. Line a large baking sheet with parchment paper or lightly grease it with cooking spray for easier cleanup and to prevent sticking.
- Prepare the potatoes: Scrub potatoes thoroughly under cold running water to remove any dirt. Pat completely dry with paper towels or a clean kitchen towel—this is important! You can peel the potatoes if you prefer, but leaving the skins on adds texture, nutrients, and helps them hold their shape.
- Slice the potatoes: Using a sharp knife, slice potatoes into ¼-inch thick rounds. Try to keep them as uniform as possible so they cook evenly—some will be larger circles from the middle, some smaller from the ends, and that’s perfectly fine! Aim for consistent thickness rather than size. If slices are too thin (less than ¼ inch), they’ll crisp up too much and burn; too thick (more than ½ inch), and they won’t get crispy.
- Season the potatoes: Place potato slices in a large mixing bowl. Drizzle with olive oil and add salt, pepper, garlic powder, paprika, and onion powder (if using). Using your hands or a large spoon, toss everything together until every potato slice is evenly coated with oil and seasonings. Make sure to separate any slices that are sticking together.
- Arrange on baking sheet: Arrange potato slices in a single layer on your prepared baking sheet. This is crucial—avoid overlapping! Overlapping slices will steam instead of roast, resulting in soggy potatoes instead of crispy ones. If all slices don’t fit in a single layer, use two baking sheets. Leave a little space between slices if possible for maximum air circulation.
- Bake: Place baking sheet in preheated oven and bake for 15-20 minutes. The bottoms should be golden brown and starting to crisp up.
- Flip the potatoes: Carefully flip each potato slice using a spatula or tongs. Return to oven and bake for an additional 15-20 minutes, until both sides are golden brown and crispy around the edges, and the potatoes are tender when pierced with a fork. Total baking time is typically 30-40 minutes depending on your oven and potato thickness.
- Rest and serve: Remove from oven and let rest on the baking sheet for 2-3 minutes—they’ll crisp up even more as they cool slightly. Transfer to a serving platter, garnish with fresh herbs or Parmesan if desired, and serve immediately while hot and crispy!
Notes
- Potato thickness matters: ¼-inch slices are ideal. Thinner burns easily, thicker won’t crisp properly.
- Don’t skip the flip: Flipping halfway ensures even browning on both sides.
- Single layer is crucial: Overlapping potatoes will steam and become soggy rather than crispy.
- Oven temperature variations: Every oven is different. If potatoes aren’t crisping, increase temperature to 450°F for the last 10 minutes.
- Fresh vs. dried herbs: Use dried herbs for baking (fresh herbs can burn). Add fresh herbs as garnish after baking.
- Make them extra crispy: After flipping, increase oven temperature to 450°F for the final 10-15 minutes.
- Serving size: Plan for about 1 medium potato per person as a side dish.
- Prep Time: 10 minutes
- Cook Time: 30 minutes
- Category: Side Dish
- Method: Baking
- Diet: Gluten Free
Nutrition
- Serving Size: About 1 potato's worth (approximately ⅙ of recipe)
- Calories: 165
- Sugar: 1g
- Sodium: 390mg
- Fat: 7g
- Saturated Fat: 1g
- Unsaturated Fat: 6g
- Trans Fat: 0g
- Carbohydrates: 24g
- Fiber: 2g
- Protein: 3g
- Cholesterol: 0mg
Tips & Variations
The beauty of these baked potato rounds is their incredible versatility! Here are endless ways to customize them:
Seasoning Variations:
- Parmesan Garlic: Add ¼ cup grated Parmesan cheese, extra garlic powder, and Italian seasoning
- Ranch Style: Toss with dry ranch seasoning mix instead of individual spices
- Cajun Spiced: Use Cajun or Creole seasoning for Southern heat
- Rosemary Lemon: Add fresh rosemary and lemon zest after baking
- Taco Seasoned: Use taco seasoning mix for Mexican-inspired flavor
- Everything Bagel: Sprinkle with everything bagel seasoning
- BBQ Style: Toss with your favorite BBQ dry rub
- Greek Style: Season with oregano, lemon pepper, and crumbled feta after baking
Potato Variety Substitutions:
- Yukon Gold: Buttery, creamy texture, less crispy than russets
- Red Potatoes: Waxier texture, holds shape well, sweeter flavor
- Sweet Potatoes: Naturally sweet, nutrient-dense (reduce temperature to 400°F)
- Purple Potatoes: Stunning color, slightly nutty flavor
- Fingerling Potatoes: Slice lengthwise for elegant presentation
- Mix of varieties: Use multiple types for visual interest
Cooking Method Variations:
- Air Fryer: Cook at 400°F for 15-18 minutes, shaking basket halfway through
- Grill: Use a grill basket, cook over medium-high heat, flipping once
- Cast Iron Skillet: Arrange in single layer in oiled cast iron, bake as directed for extra crispy bottoms
Loaded Potato Slices: After baking, top with:
- Shredded cheese, return to oven until melted
- Crumbled bacon and sour cream
- Chili and cheese for potato nachos
- Greek yogurt and fresh herbs
- Guacamole and salsa
Healthier Modifications:
- Lower Oil: Use just 1-2 tablespoons oil and cooking spray
- Air Fryer Method: Uses significantly less oil
- Herb Only: Skip oil entirely, use cooking spray and fresh herbs
- Sweet Potato Version: Higher in nutrients and fiber
Pro Chef Tips
Want restaurant-quality crispy potato slices? These professional techniques make all the difference:
1. Uniform slicing is the secret to even cooking. Inconsistent thickness means some slices burn while others remain undercooked. Use a mandoline slicer for perfectly uniform slices (always use the safety guard!), or take your time with a sharp knife and aim for consistent ¼-inch thickness. If you have varied sizes, group similar-sized slices together on the pan—they’ll cook more evenly.
2. Dry potatoes are essential for maximum crispiness. After washing, thoroughly pat potatoes completely dry with paper towels or a clean kitchen towel. Surface moisture creates steam during baking, which inhibits browning and crisping. This simple step makes a dramatic difference in the final texture.
3. Don’t crowd the pan—give your potatoes breathing room. Professional cooks know that proper spacing creates crispy results. Each potato slice needs air circulation on all sides to roast rather than steam. If slices touch or overlap, they’ll release moisture onto each other and become soggy. Use two baking sheets if necessary—it’s worth the extra rack space for superior texture.
4. Preheat your baking sheet for extra crispy bottoms. For restaurant-level crispiness, place your empty baking sheet in the oven while it preheats. Once hot, quickly arrange your seasoned potato slices on the hot pan (work fast and carefully!). The immediate sear creates incredibly crispy bottoms. This technique requires confidence but delivers exceptional results.
5. The flip is non-negotiable for even browning. Flipping potatoes halfway through ensures both sides achieve that gorgeous golden-brown color and crispy texture. Use a thin metal spatula to get under each slice cleanly. If some slices are browning faster than others (usually those around the pan’s edges), move them to the center and vice versa.
6. Finish with a temperature boost for ultimate crispiness. Professional kitchens often finish roasted vegetables at higher heat for maximum caramelization. After flipping, increase your oven temperature to 450°F for the final 10-15 minutes. Watch carefully to prevent burning, but this technique creates exceptionally crispy edges.
7. Season again after baking for maximum flavor impact. While you season before baking, a light sprinkle of flaky sea salt and freshly cracked pepper immediately after removing from the oven creates a burst of flavor that hits your taste buds first. This “finishing salt” technique is used in fine dining to enhance dishes just before serving.
8. Let them rest briefly before serving. Counterintuitively, letting potato slices rest on the hot baking sheet for 2-3 minutes after removing from the oven allows them to crisp up even more as excess steam escapes. They’ll also hold together better when transferring to a serving platter.
Common Mistakes to Avoid
Even this simple recipe has pitfalls. Here’s what to watch out for:
1. Slicing potatoes too thin or too thick. This is the most common error! Too-thin slices (less than ⅛ inch) burn before the interior cooks; too-thick slices (more than ½ inch) never crisp up and remain pale and floppy. The sweet spot is ¼ inch—substantial enough to stay tender inside while thin enough to crisp on the outside. When in doubt, err slightly thicker rather than thinner.
2. Using wet or damp potatoes. Moisture is the enemy of crispiness! If you put wet potato slices in the oven, that water must evaporate before browning can begin, dramatically extending cooking time and often resulting in soggy, steamed potatoes. Always thoroughly dry potatoes after washing—this seemingly minor step makes a massive difference in the final result.
3. Overcrowding the baking sheet. It’s tempting to pile all the potato slices on one pan to save time and dishes, but overlapping slices will steam instead of roast. Steam creates soft, pale, disappointing potatoes. The extra five minutes to use a second baking sheet pays off tremendously in texture and flavor. Single layer, slight spacing—that’s the mantra.
4. Not preheating the oven properly. Putting potatoes in a cold or not-fully-preheated oven means they’ll sit at lower temperatures longer, essentially steaming before they begin to roast. This extended low-temperature period draws out moisture and prevents proper browning. Wait for your oven to fully reach 425°F before the potatoes go in.
5. Skipping the oil or using too little. Oil serves multiple crucial purposes: it conducts heat evenly, promotes browning, adds flavor, and prevents sticking. Using too little oil (trying to make them “healthier”) results in dry, pale potatoes that stick to the pan. You need enough oil to lightly coat each slice—about 3 tablespoons for 4 medium potatoes is the minimum for proper results.
Storage & Meal Prep
These crispy potato slices are great for meal prep, though they’re always best fresh from the oven!
Refrigerator Storage: Store cooled potato slices in an airtight container in the refrigerator for up to 4-5 days. While they won’t maintain their initial crispiness, they’re still delicious and can be refreshed! Layer parchment paper between stacked slices to prevent them from sticking together.
Best Reheating Methods:
- Oven (best for re-crisping): Spread on baking sheet, reheat at 400°F for 8-10 minutes until hot and crispy again
- Air fryer (excellent results): Reheat at 375°F for 5-7 minutes, shaking basket halfway through
- Toaster oven: Works great for small portions, 400°F for 5-8 minutes
- Skillet: Heat a thin layer of oil over medium-high heat, pan-fry slices 2-3 minutes per side until crispy
- Microwave (quick but not crispy): Heat 1-2 minutes, though texture will be soft, not crispy
Meal Prep Strategy: These potato slices work beautifully for weekly meal prep:
- Bake a large batch on Sunday
- Portion into meal prep containers (pair with protein and vegetables)
- Reheat individual portions throughout the week
- Use cold in salads or as base for breakfast hash
- Pack for lunchboxes (kids love them cold as snacks!)
Serving Leftovers: Leftover potato slices are incredibly versatile:
- Breakfast hash: Chop and pan-fry with eggs and vegetables
- Potato salad: Mix cold slices with mayo, mustard, and herbs
- Loaded potato bites: Top with cheese, bacon, and sour cream
- Soup topping: Crisp in oven and use as crouton alternative
- Sandwich addition: Add to sandwiches for extra texture
Make-Ahead & Freezer Notes
Make-Ahead Preparation:
Up to 24 Hours Before:
- Slice potatoes, place in bowl of cold water with a little lemon juice (prevents browning)
- Cover and refrigerate
- When ready to bake, drain completely, pat bone-dry, then season and proceed with recipe
- Note: Pre-sliced potatoes won’t be quite as crispy as freshly cut, but very close
2-3 Hours Before:
- Slice and season potatoes
- Arrange on baking sheet, cover with plastic wrap
- Refrigerate until ready to bake
- May need 5 extra minutes baking time since they’re cold
Freezing Instructions:
Freezing Baked Potato Slices:
- Bake potatoes completely according to recipe
- Cool completely to room temperature
- Arrange in single layer on parchment-lined baking sheet
- Freeze until solid (2-3 hours)
- Transfer frozen slices to freezer-safe zip-top bags or containers
- Label with date, freeze up to 2 months
- To reheat: No need to thaw! Bake from frozen at 400°F for 12-15 minutes until hot and crispy
Freezing Raw Potato Slices (Not Recommended): Raw potatoes don’t freeze well—they become watery, grainy, and discolored when thawed. The texture deteriorates significantly. If you must freeze raw, blanch first in boiling water for 2 minutes, shock in ice water, dry thoroughly, then freeze. However, results are mediocre at best.
Best Approach: For easiest make-ahead strategy, bake the potato slices fully, freeze, then reheat from frozen. This preserves texture far better than freezing raw.
Serving Suggestions
These versatile baked potato slices pair beautifully with countless dishes! Here’s how to serve them:
Perfect Protein Pairings:
- Grilled steak or beef tenderloin
- Roasted chicken (whole, pieces, or thighs)
- Baked or grilled salmon
- Pork chops or pork tenderloin
- Meatloaf or meatballs
- Grilled burgers or turkey burgers
- Pan-seared fish filets
- BBQ ribs
Complete Meal Ideas:
- Classic Dinner: Potato slices + grilled chicken + roasted broccoli
- Steakhouse Style: Potato slices + ribeye + Caesar salad
- Breakfast Plate: Potato slices + scrambled eggs + bacon
- BBQ Spread: Potato slices + pulled pork + coleslaw + baked beans
- Fish Dinner: Potato slices + salmon + asparagus + lemon butter
- Comfort Meal: Potato slices + meatloaf + green beans
Dipping Sauce Options: Serve with an assortment of dipping sauces:
- Sour cream or Greek yogurt (plain or herbed)
- Ketchup or spicy ketchup
- Ranch dressing or ranch dip
- Garlic aioli or regular mayonnaise
- BBQ sauce
- Honey mustard
- Buffalo sauce for spicy kick
- Cheese sauce or queso
Serving for Different Occasions:
Casual Family Dinner:
- Serve family-style on large platter
- Place dipping sauces in small bowls
- Let everyone help themselves
Elegant Dinner Party:
- Arrange on individual plates with protein
- Garnish with fresh herbs
- Drizzle with herb oil for restaurant presentation
Party or Potluck:
- Keep warm in chafing dish or slow cooker on LOW
- Provide toothpicks or small plates
- Offer multiple dipping sauce options
Kids’ Meals:
- Cut larger slices in half for smaller portions
- Serve with familiar dips like ketchup and ranch
- Make it fun with colorful garnishes
Beverage Pairings:
- Red wine (for steakhouse dinners)
- White wine or rosé (for fish or chicken)
- Beer (for casual BBQ meals)
- Iced tea or lemonade (for family dinners)
- Sparkling water with lemon
FAQs Section
Q: Do I need to peel the potatoes? A: No! Leaving the skins on is actually recommended for several reasons: the skins add texture, nutrients (especially fiber and potassium), help the slices hold their shape during baking, and save you prep time. The skins also add rustic visual appeal. However, if you prefer, you can absolutely peel them—the recipe works either way. Just know that peeled potato slices may be slightly more fragile.
Q: Can I use sweet potatoes instead of regular potatoes? A: Absolutely! Sweet potato slices are delicious and slightly healthier with more nutrients. However, sweet potatoes cook faster and contain more sugar, so reduce your oven temperature to 400°F and watch carefully to prevent burning. Sweet potatoes will caramelize more quickly. The cooking time is similar (30-35 minutes total) but they may brown faster. They won’t crisp quite as much as russet potatoes due to lower starch content.
Q: Why aren’t my potato slices getting crispy? A: Several factors affect crispiness: (1) Slices are too thick—aim for ¼ inch thickness, (2) Potatoes were wet when baked—always pat completely dry, (3) Pan is overcrowded—slices need space and can’t overlap, (4) Oven temperature is too low—425°F is minimum for crispiness, (5) Not enough oil—every slice needs light coating, or (6) Wrong potato variety—russets crisp best, waxy potatoes stay softer. Following these tips ensures crispy results!
Q: Can I make these in an air fryer? A: Yes! Air fryers work beautifully for potato slices. Preheat air fryer to 400°F. Prepare and season potato slices as directed. Working in batches (don’t overcrowd the basket!), arrange slices in single layer. Cook 15-18 minutes total, shaking or flipping halfway through. Air fryer potatoes often get extra crispy with less oil—you may only need 1-2 tablespoons total. Cook time varies by air fryer model, so check after 12 minutes.
Q: How do I prevent potatoes from sticking to the baking sheet? A: Three effective methods: (1) Line baking sheet with parchment paper—potatoes release easily and cleanup is simple, (2) Use a silicone baking mat, which is non-stick and reusable, or (3) Lightly grease baking sheet with cooking spray or oil before arranging potatoes. Also ensure you’re using enough oil to coat the potatoes themselves—this helps prevent sticking. A thin metal spatula makes flipping easier too.
Q: What’s the best potato variety for crispy slices? A: Russet potatoes (Idaho potatoes) are hands-down best for maximum crispiness because of their high starch content and low moisture. They develop the crispiest exteriors while maintaining fluffy interiors. Yukon Gold potatoes are second choice—they’re less crispy but have beautiful buttery flavor and creamy texture. Red potatoes and fingerlings are waxier with more moisture, so they stay creamier and don’t crisp as dramatically, though they’re still delicious!
Q: Can I prep these ahead for a party? A: Yes! For best results, slice potatoes up to 24 hours ahead and store in cold water (with a splash of lemon juice to prevent browning) in the refrigerator. About 30-40 minutes before guests arrive, drain, dry thoroughly, season, and bake. Alternatively, bake completely ahead of time, then reheat in a 400°F oven for 8-10 minutes before serving. They won’t be quite as crispy as fresh, but they’ll still be delicious and much easier for party planning!
Conclusion
There you have it—everything you need to know to make the crispiest, most delicious baked potato slices that will transform your side dish game! These easy potato rounds prove that simple recipes with quality ingredients and proper technique can deliver restaurant-quality results right in your home kitchen. Whether you’re feeding your family on a busy weeknight or impressing guests at a dinner party, these golden, crispy potato slices never disappoint.
The beauty of these oven baked potato rounds is their incredible versatility and universal appeal. They’re healthy enough for everyday eating yet special enough for holidays. They work with any seasoning combination you can imagine and pair with virtually every protein and vegetable. Plus, they’re budget-friendly, naturally gluten-free and vegan, and require just one pan for easy cleanup—what’s not to love?
I’d love to hear about your crispy potato slice adventures! What seasonings did you try? How did you serve them? Did they disappear from the table as quickly as they do at my house? Drop a comment below and share your experience—I read every comment and love hearing about your variations, serving ideas, and family feedback!
If this recipe made your dinner easier, more delicious, or helped you finally achieve those perfectly crispy potato slices you’ve been dreaming about, please save it to your favorite Pinterest board for easy access whenever you need a reliable side dish. Share it with friends who are always looking for simple, crowd-pleasing recipes—they’ll thank you after their first batch of these golden beauties!
Happy cooking, and here’s to many meals elevated by these simple, crispy, absolutely irresistible baked potato slices! 🥔