Vegan Queso Dip: The Creamy, Dairy-Free Cheese Dip That Tastes Like the Real Thing

Let me introduce you to the vegan queso dip that’s about to revolutionize your party spreads, taco nights, and snacking game. This creamy, cheesy, impossibly delicious dip tastes so authentic that even your cheese-loving, non-vegan friends will be asking for the recipe – and they’ll be shocked when you tell them it’s completely dairy-free.
This easy vegan cheese dip is made from simple, whole-food ingredients like cashews, nutritional yeast, and roasted peppers, blended into a silky-smooth, nacho-worthy sauce that’s perfect for dipping, drizzling, or smothering over just about anything. Unlike store-bought vegan cheese alternatives that can taste artificial or grainy, this homemade version is naturally creamy, packed with flavor, and has that perfect stretchy, gooey consistency you crave in a good queso.
Whether you’re serving this dairy-free queso at game day parties, Taco Tuesday dinners, movie nights, or casual get-togethers, it’s guaranteed to disappear fast. Load it into a slow cooker to keep it warm throughout your party, drizzle it over nachos, stuff it into burritos, or simply grab some tortilla chips and dig in. The best part? This recipe comes together in about 15 minutes with just a high-speed blender – no complicated cheese-making techniques or hard-to-find ingredients required.
Perfect for vegans, lactose-intolerant folks, or anyone looking to add more plant-based options to their diet, this cashew queso dip proves that eating dairy-free doesn’t mean sacrificing flavor or satisfaction. Let’s make some magic happen!
History / Background
The story of vegan queso is a fascinating tale of innovation, cultural fusion, and the growing plant-based food movement. Traditional queso dip has deep roots in Tex-Mex cuisine, which emerged in the 1940s and 50s when Mexican flavors met American convenience culture in Texas and the Southwest. Classic queso was born from melted cheese (usually Velveeta or American cheese) combined with canned tomatoes and green chilies – simple, quick, and crowd-pleasing.
As the vegetarian and vegan movements gained momentum in the 1970s and 80s, plant-based eaters began experimenting with dairy alternatives. Early vegan cheese attempts were, let’s be honest, pretty disappointing – often grainy, flavorless, or rubbery. The breakthrough came when creative home cooks and food bloggers discovered that soaked cashews, when blended with nutritional yeast (a deactivated yeast with a naturally cheesy, nutty flavor), created an incredibly creamy, cheese-like base.
The vegan food revolution of the 2010s took this concept mainstream. Food bloggers, YouTube creators, and plant-based chefs began sharing cashew-based cheese recipes that actually tasted good – really good. Nutritional yeast became the secret weapon, providing that umami, savory depth that makes cheese so addictive. Combined with bold spices like cumin, smoked paprika, and chili powder, plus the tanginess of lime juice and the creaminess of blended cashews, vegan queso was born.
What makes vegan queso especially interesting is how it’s evolved beyond just being a dairy-free substitute. Many omnivores now prefer it because it doesn’t have that heavy, greasy feeling of traditional cheese dips. It’s lighter, easier to digest, and won’t leave you feeling sluggish after eating half the bowl (though you probably still will eat half the bowl, because it’s that good).
Today, vegan queso has become a staple at parties, restaurants, and food trucks across the country. It represents the beautiful intersection of Mexican-inspired flavors, health-conscious eating, and the reality that plant-based food can be just as craveable as its dairy-based counterparts. This recipe honors those Tex-Mex roots while proving that vegan cooking is creative, delicious, and accessible to everyone.
Why You’ll Love This Recipe
Here’s the deal: I’ve tried countless vegan cheese recipes over the years, and this one is the winner. It’s the recipe I make when I want to convert skeptics, impress party guests, or just treat myself to something indulgent without the dairy. The texture is spot-on creamy, the flavor is bold and satisfying, and it comes together faster than ordering takeout.
Here’s why this vegan queso dip deserves a permanent spot in your recipe rotation:
- Tastes Like Real Cheese: Seriously, the nutritional yeast and cashew combination creates that savory, cheesy flavor that even dairy lovers crave.
- Incredibly Creamy: No grainy, weird texture here – this blends into silky perfection that rivals any dairy-based cheese sauce.
- Ready in 15 Minutes: From start to finish, you’ll have hot, creamy queso ready to serve in a quarter of an hour.
- Whole Food Ingredients: Made from nuts, vegetables, and spices – nothing artificial or processed.
- Allergy-Friendly: Naturally dairy-free, gluten-free, and can be made nut-free with sunflower seed substitution.
- Crowd-Pleaser: Non-vegans won’t even realize it’s dairy-free until you tell them (then watch their amazed faces).
- Versatile Usage: Not just a dip – use it on nachos, tacos, baked potatoes, steamed vegetables, pasta, and more.
- Budget-Friendly: Costs a fraction of store-bought vegan cheese sauces and tastes exponentially better.
- Customizable Heat: Control the spice level from mild and kid-friendly to blazing hot.
- Reheats Beautifully: Make ahead and warm up whenever you need it – texture stays perfect.
Ingredient Notes
The magic of this vegan queso lies in how simple ingredients transform into something special. Here’s what you need to know:
Raw Cashews: The foundation of your queso, providing creaminess and body. Raw, unsalted cashews work best – roasted ones add unwanted flavor. Cashews have a neutral taste and high fat content that creates that silky cheese sauce texture when blended. Substitutions: For nut-free version, use raw sunflower seeds (same amount) though the color will be greenish. Macadamia nuts work but are pricier. White beans (cannellini) can work in a pinch but won’t be as creamy.
Nutritional Yeast: This is your cheesy flavor secret weapon! Nutritional yeast is deactivated yeast sold as yellow flakes or powder, found in the health food section. It has a naturally nutty, cheesy, umami flavor. Don’t confuse it with brewer’s yeast or active yeast. Substitutions: There’s no real substitute that provides that cheesy taste, but you can use less if the flavor is too strong for you. Start with 3 tablespoons and adjust.
Roasted Red Peppers (Jarred): Adds sweetness, color, and body to the queso. The jarred roasted peppers are convenient and perfectly smoky. Substitutions: Fresh roasted red bell peppers work great. Piquillo peppers add a Spanish twist. In a pinch, use a small amount of tomato paste for color (but you’ll lose the sweet pepper flavor).
Salsa or Diced Tomatoes with Green Chilies: Provides that authentic Tex-Mex flavor, acidity, and a bit of texture. Use your favorite salsa – chunky or smooth both work. Substitutions: Canned fire-roasted tomatoes, fresh tomatoes with jalapeños, or even a can of Rotel.
Garlic Powder, Cumin, Chili Powder, Smoked Paprika: These spices create that complex, Mexican-inspired flavor profile. Each adds a different dimension – earthiness, smokiness, warmth. Substitutions: Use fresh garlic (2 cloves), swap regular paprika if you don’t have smoked, or add taco seasoning for convenience.
Lime Juice (Fresh): Brightens all the flavors and adds the tangy note that cheese has naturally. Always use fresh lime, not bottled. Substitutions: Fresh lemon juice works, or apple cider vinegar for tang.
Hot Sauce or Pickled Jalapeño Juice: Adds heat and vinegary kick. The jalapeño brine from jarred peppers is especially good. Substitutions: Fresh jalapeños (seeded and blended in), cayenne pepper, or your favorite hot sauce.
Salt: Essential for bringing out all the flavors. Start with less and adjust – nutritional yeast has some saltiness already.
Water: Thins the queso to your desired consistency. Use vegetable broth instead for even more flavor.
Equipment Needed
The good news is you only need one main piece of equipment for perfect vegan queso:
- High-Speed Blender: A Vitamix, Blendtec, or similar high-powered blender is essential for silky-smooth texture. Regular blenders may work but won’t be as creamy. Immersion blenders won’t get smooth enough.
- Measuring Cups and Spoons: For accurate ingredient measurements
- Small Saucepan: For warming the queso after blending (optional but recommended)
- Rubber Spatula: For scraping down the blender and transferring queso
- Serving Bowl or Small Slow Cooker: For serving and keeping warm
- Strainer (if using whole cashews): For draining soaked cashews
That’s all you need! This is truly a minimal-equipment recipe.
Print
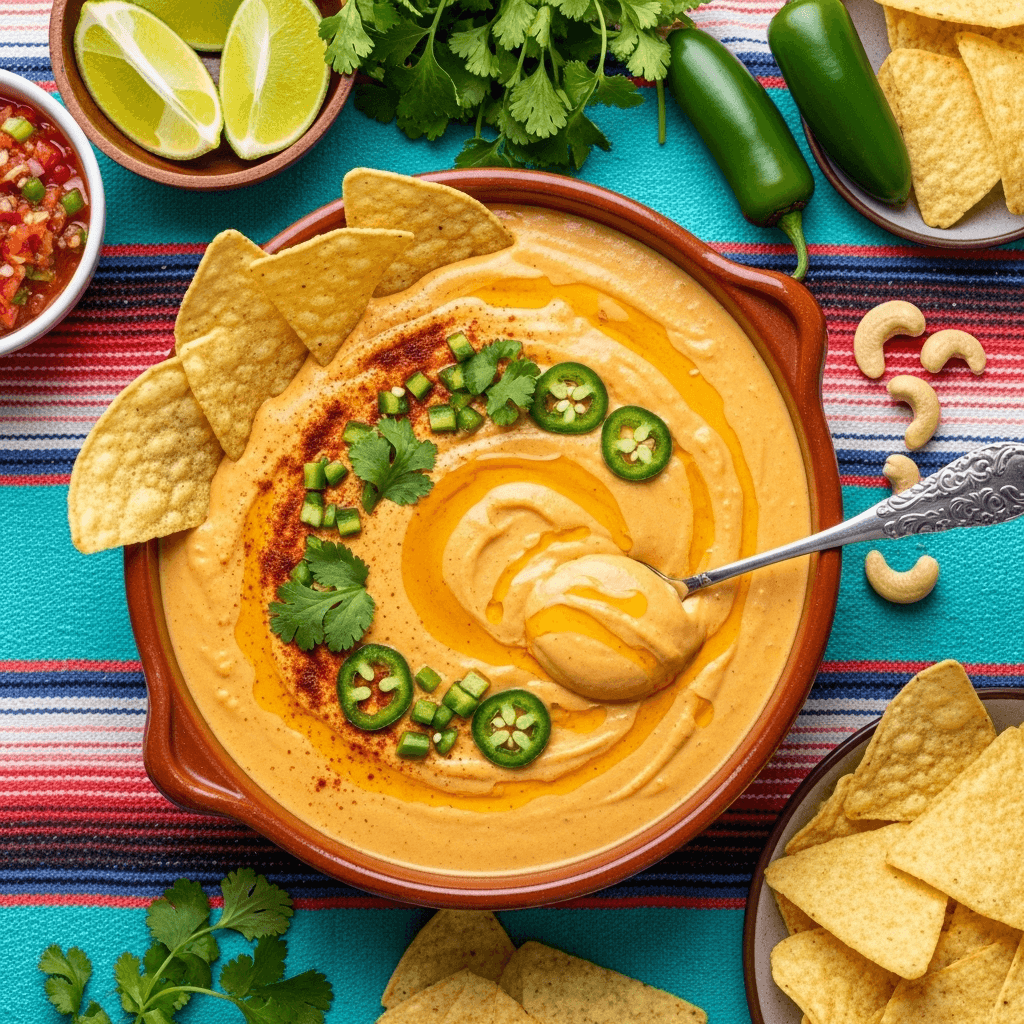
Vegan Queso Dip
This incredibly creamy vegan queso dip is made from cashews, nutritional yeast, and bold spices for an authentic cheese dip flavor without any dairy. Perfect for nachos, tacos, or dipping with chips, this easy dairy-free cheese sauce comes together in just 15 minutes and tastes so good that no one will believe it’s vegan!
- Total Time: 15 minutes
- Yield: 6-8 servings (about 3 cups) 1x
Ingredients
- 1½ cups raw cashews (soaked in hot water for 1 hour, or boiled for 10 minutes)
- ¾ cup water (plus more for thinning)
- ¼ cup nutritional yeast
- ½ cup jarred roasted red peppers, drained
- ¼ cup salsa or 1 can (10 oz) diced tomatoes with green chilies, drained
- 2 tablespoons fresh lime juice
- 2 teaspoons garlic powder
- 1½ teaspoons cumin
- 1 teaspoon chili powder
- 1 teaspoon smoked paprika
- 1 teaspoon salt (adjust to taste)
- ½ teaspoon onion powder
- 2-3 tablespoons pickled jalapeño juice or hot sauce (adjust for heat preference)
- Optional: 2 tablespoons diced jalapeños for extra heat and texture
Instructions
- Prepare the Cashews: Drain and rinse your soaked cashews thoroughly. If you forgot to soak them ahead of time, you can do a quick-soak method: boil cashews in water for 10 minutes, then drain and rinse. This softens them enough to blend smooth.
- Blend the Base: Add the drained cashews, water, nutritional yeast, roasted red peppers, salsa, lime juice, garlic powder, cumin, chili powder, smoked paprika, salt, onion powder, and jalapeño juice to your high-speed blender. Secure the lid tightly.
- Blend Until Silky Smooth: Start on low speed and gradually increase to high. Blend for 2-3 minutes, stopping to scrape down the sides with a rubber spatula as needed. The mixture should be completely smooth and creamy with no graininess. If it’s too thick, add water 1-2 tablespoons at a time and blend again until you reach nacho-cheese-sauce consistency.
- Taste and Adjust: At this point, taste your queso (it’s safe to eat raw). Adjust seasonings as needed – more salt for savoriness, more lime for brightness, more hot sauce for heat, or more nutritional yeast for cheesier flavor. Blend briefly to incorporate any additions.
- Warm It Up: Pour the queso into a small saucepan and warm over medium-low heat for 3-5 minutes, stirring constantly. This step isn’t mandatory, but warming enhances the flavors and gives it that fresh-from-the-stove appeal. Don’t boil – just heat until warmed through and smooth.
- Serve Immediately: Transfer to a serving bowl or small slow cooker set to “warm” to keep it at the perfect dipping temperature throughout your party. If adding fresh diced jalapeños for texture, stir them in now.
- Thin as Needed: As the queso sits, it may thicken. Simply stir in a tablespoon or two of water, vegetable broth, or even non-dairy milk to return it to your desired consistency.
Notes
- Soaking Shortcut: For super quick queso, use cashew pieces (they soften faster) or boil whole cashews for 10 minutes instead of soaking.
- Consistency Control: This recipe makes a medium-thick queso perfect for dipping. For nacho drizzling, thin with extra water. For a thick cheese sauce, use less water.
- Spice Level: Start with 2 tablespoons jalapeño juice for mild heat. Add more hot sauce or fresh jalapeños for spicier queso.
- Nutritional Yeast Brands: Different brands vary in flavor intensity. Red Star and Bragg’s are common favorites with good cheesy flavor.
- High-Speed Blender Essential: A powerful blender is crucial for silky texture. Regular blenders may leave it grainy.
- Color Variation: Queso color ranges from golden yellow to orange depending on your salsa and peppers. All are delicious!
- Prep Time: 10 minutes (plus 1 hour soaking time for cashews)
- Cook Time: 05 minutes
- Category: Appetizer
- Method: Blender
- Cuisine: American
- Diet: Vegan
Nutrition
- Serving Size: ⅓ cup
- Calories: 155
- Sugar: 2g
- Sodium: 350mg
- Fat: 11g
- Saturated Fat: 2g
- Unsaturated Fat: 9g
- Trans Fat: 0g
- Carbohydrates: 10g
- Fiber: 2g
- Protein: 6g
- Cholesterol: 0mg
Tips & Variations
The basic vegan queso is fantastic, but here are creative ways to customize it to your taste:
Extra Spicy Queso: Add 1-2 tablespoons of diced chipotle peppers in adobo sauce for smoky heat. You can also blend in fresh jalapeños or serrano peppers with the cashews, or stir in hot sauce to taste at the end.
Loaded Vegan Queso: Make it into a full-blown queso fundido by stirring in cooked and crumbled plant-based chorizo, sautéed mushrooms, caramelized onions, black beans, or roasted corn. Serve in a cast-iron skillet for dramatic presentation.
Herb-Infused Queso: Add ¼ cup fresh cilantro to the blender for a bright, herby twist. Fresh oregano or a pinch of dried Mexican oregano also adds authentic flavor.
Poblano Queso: Roast and peel a poblano pepper, add it to the blender with everything else for a mild, smoky, green-chile version that’s absolutely delicious.
Nacho Cheese Sauce: Thin the queso with extra water or vegetable broth until it reaches perfect drizzling consistency. Use this for loaded nachos, cheese fries, or drizzling over burrito bowls.
Nut-Free Version: Replace cashews with raw sunflower seeds in the same amount. Note that sunflower seeds can turn the queso slightly greenish (it’s a natural reaction with baking soda in other ingredients) but won’t affect taste. Some people add a tiny amount of turmeric to mask the color.
Protein-Packed: Add ¼ cup of white miso paste or tahini for extra protein and depth of flavor (reduce salt accordingly).
Smoother Texture: Strain through a fine-mesh sieve after blending for ultra-silky queso (though honestly, a good blender makes this unnecessary).
Pro Chef Tips
Want to elevate your vegan queso from good to absolutely restaurant-quality? Here are the insider secrets:
Soak Your Cashews Properly: For the absolute smoothest queso, soak cashews for at least 2-4 hours or overnight if possible. Longer soaking breaks down more starches and creates silkier texture. Quick-soaked or boiled cashews work in a pinch but won’t be quite as creamy as long-soaked.
Hot Water in the Blender: When blending, use hot or warm water instead of cold. This helps the cashews blend more smoothly and creates a warmer final product. You can even use hot vegetable broth for extra flavor.
Blend in Stages: Start blending on low speed with minimal liquid, gradually increasing speed and adding more liquid as needed. This prevents air pockets and ensures everything blends evenly. A tamper (that stick that comes with Vitamix blenders) is incredibly helpful here.
Don’t Skip the Warming Step: While this queso can be served cold or room temperature, warming it for a few minutes on the stove transforms the texture and melds the flavors. It goes from “good dip” to “oh wow, THIS is queso.”
Fresh Spices Matter: If your spices have been sitting in the cupboard for years, they’re probably stale. Fresh, quality spices make a noticeable difference in flavor depth. Smell your spices – if there’s no strong aroma, replace them.
Acid Balance: The lime juice is crucial for that tangy cheese flavor. If your queso tastes flat, it probably needs more acid. Add lime juice or a splash of apple cider vinegar until it tastes bright and balanced.
Salt Gradually: Nutritional yeast, salsa, and jalapeño juice all contain sodium. Add salt conservatively at first, then adjust after tasting. Under-salted food tastes bland; over-salted is hard to fix.
Emulsion Technique: For extra-smooth, emulsified texture like Velveeta, blend on high speed for a full 2-3 minutes without stopping. The extended blending creates a velvety, almost stretchy texture.
Serving Temperature: Queso tastes best slightly warm, not hot. If it’s too hot, the cashew flavor can become more pronounced. Aim for pleasantly warm, not steaming.
Common Mistakes to Avoid
Even straightforward blender recipes have pitfalls. Here’s how to sidestep the most common vegan queso mistakes:
Using a Regular Blender: This is the #1 issue. Regular blenders don’t have the power to completely pulverize cashews into silky smoothness. You’ll end up with grainy, chunky queso instead of creamy perfection. If you only have a regular blender, soak cashews for 8+ hours and blend for much longer, but results still may not be ideal. A high-speed blender is truly essential here.
Not Soaking Cashews Long Enough: If your cashews aren’t softened properly, they won’t blend smooth no matter how powerful your blender. Minimum 1 hour in hot water, ideally 2-4 hours. Or use the 10-minute boiling method. There’s no shortcut without one of these prep steps.
Adding Too Much Liquid Initially: Start with less water than you think you need. It’s easy to thin queso by adding more water; it’s impossible to thicken it once it’s too thin (unless you add more cashews and re-blend). Err on the thick side and adjust from there.
Skipping the Taste Test: Different brands of nutritional yeast, salsa, and other ingredients vary in saltiness and flavor intensity. Always taste before serving and adjust seasonings. Your queso should taste bold, cheesy, tangy, and well-seasoned – not flat or bland.
Overheating: If you heat queso too high or for too long, it can separate or become grainy. Warm gently over medium-low heat, stirring constantly. Never boil. If it does separate, try blending briefly to re-emulsify.
Not Draining Ingredients: Roasted red peppers and salsa come packed in liquid. If you don’t drain them well before adding to the blender, your queso will be too thin and watery. Give them a good drain and even pat dry with paper towels.
Storage & Meal Prep
Great news for planners – vegan queso stores beautifully and actually tastes better the next day as flavors meld:
Refrigerator Storage: Store in an airtight container in the refrigerator for up to 5-7 days. The queso will thicken considerably as it cools, which is completely normal. It may also separate slightly with a bit of liquid on top – just stir to recombine.
Reheating Methods: The best way to reheat is gently on the stovetop over low heat, stirring frequently and adding 1-3 tablespoons of water to restore creamy consistency. You can also microwave in 30-second intervals, stirring between each, adding water as needed. It reheats beautifully without losing texture.
Meal Prep Champion: Make a batch at the beginning of the week and use it multiple ways: Monday as nacho cheese, Tuesday drizzled over tacos, Wednesday as a pasta sauce, Thursday with raw veggies, Friday over baked potatoes. The versatility makes it perfect for meal planning.
Keeping Warm for Parties: Transfer warm queso to a small slow cooker set on “warm” or “low.” It’ll stay perfectly dippable for hours without burning or separating. Stir occasionally and thin with water if it thickens.
Thinning After Storage: Cold queso is very thick – almost spreadable. This is normal! When reheating, whisk in water, vegetable broth, or non-dairy milk tablespoon by tablespoon until you reach your desired consistency. Start with 2-3 tablespoons and go from there.
Signs of Spoilage: Vegan queso has gone bad if it smells sour or off, develops mold, or tastes fermented. The cashew base can ferment if left too long, so stick to the 5-7 day window.
Make-Ahead & Freezer Notes
This recipe is a meal-prepper’s dream! Here’s everything you need to know about making it ahead:
Make-Ahead Timeline: You can make vegan queso up to 5 days ahead. In fact, I often make it 1-2 days before serving because the flavors develop and deepen beautifully as it sits. Just refrigerate in an airtight container and reheat when ready to serve.
Freezing Instructions: Yes, this queso freezes well for up to 3 months! Pour cooled queso into freezer-safe containers or bags, leaving about 1 inch of headspace for expansion. Label with the date. Freeze flat in bags for space-efficient storage.
Thawing Method: The safest way is overnight in the refrigerator. For quicker thawing, place the sealed container in a bowl of cold water, changing the water every 30 minutes. Never thaw at room temperature as cashew-based sauces can develop bacteria quickly when warm.
Reheating from Frozen: You can actually reheat frozen queso directly on the stovetop! Place the frozen block in a saucepan over very low heat, stirring frequently as it thaws and warms. Add water as needed to restore consistency. Takes about 10-15 minutes. Or thaw first and reheat normally.
Texture After Freezing: Queso may separate slightly after freezing and thawing, with some watery liquid separating from the cashew solids. This is normal. Simply whisk or briefly blend to re-emulsify, and it’ll be perfectly smooth again. Add a bit of water if needed to restore creaminess.
Party Planning: For stress-free entertaining, make the queso 2-3 days ahead, refrigerate, then simply reheat 20 minutes before guests arrive. Transfer to your slow cooker set on warm, and you’re done. One less thing to worry about on party day!
Serving Suggestions
Vegan queso is incredibly versatile! Here are delicious ways to serve and enjoy it:
Classic Dipping: The obvious choice – serve warm with tortilla chips, pita chips, pretzels, or fresh vegetables like bell pepper strips, carrot sticks, and celery. Arrange on a platter with the queso as the centerpiece.
Loaded Nachos: This is where vegan queso truly shines. Layer tortilla chips on a baking sheet, drizzle with queso, add black beans, corn, jalapeños, and any other toppings you love. Bake until warm, then finish with fresh toppings like avocado, cilantro, and lime.
Taco Tuesday: Use as a drizzle over tacos, burritos, burrito bowls, or enchiladas. It adds creaminess and flavor without dairy sour cream.
Baked Potato Bar: Set up a baked potato bar with vegan queso as one of the toppings alongside chili, salsa, guacamole, and tempeh bacon bits.
Mac and Cheese: Thin the queso with vegetable broth or non-dairy milk and toss with cooked pasta for quick vegan mac and cheese. Add some sautéed vegetables for a complete meal.
Veggie Drizzle: Pour over roasted or steamed broccoli, cauliflower, Brussels sprouts, or asparagus for an irresistible cheese sauce that makes vegetables disappear.
Breakfast Applications: Drizzle over scrambled tofu, breakfast burritos, or vegan breakfast tacos. It’s unexpectedly delicious for brunch.
Party Dip Trio: Serve alongside guacamole and salsa for the ultimate Mexican-inspired dip spread. Add some margaritas and you’ve got a party!
Beverage Pairings: Serve with Mexican beer, margaritas (frozen or on the rocks), agua fresca, or for non-alcoholic options, lime sparkling water or horchata.
Cheese Fries: Pour over crispy French fries or sweet potato fries, top with tempeh bacon and green onions for vegan loaded fries.
FAQs Section
Q: Can I make this nut-free for allergies?
A: Yes! Replace cashews with raw, hulled sunflower seeds in equal amounts. Follow the same soaking and blending process. Note that sunflower seeds can turn the queso slightly greenish (especially when combined with acidic ingredients) due to a natural chemical reaction, but it doesn’t affect taste at all. Some people add a pinch of turmeric to help mask the color. The texture and flavor are still delicious!
Q: Why is my queso grainy instead of smooth?
A: This almost always comes down to two issues: (1) Your blender isn’t powerful enough. You truly need a high-speed blender like Vitamix or Blendtec to completely pulverize cashews. Regular blenders can’t achieve the same smoothness. (2) Your cashews weren’t soaked long enough. They need to be very soft before blending. Try soaking longer (4-8 hours) or using the quick-boil method (10 minutes in boiling water).
Q: Can I use pre-made cashew cream or cashew milk?
A: Cashew milk won’t work – it’s too thin and diluted. However, if you have homemade thick cashew cream (1 part cashews to 1 part water, blended smooth), you can use about 1½ cups in place of the cashews and water in this recipe. Store-bought cashew cream may work but check ingredients – avoid ones with additives or gums that might affect texture.
Q: How do I make this queso spicier?
A: There are several ways to turn up the heat! Add more jalapeño juice or your favorite hot sauce (sriracha, Cholula, Tabasco). Blend in 1-2 chipotle peppers in adobo for smoky heat. Add fresh jalapeños or serranos to the blender. Or stir in cayenne pepper or red pepper flakes. Taste as you go – you can always add more heat, but you can’t take it away!
Q: Why does my queso taste bitter?
A: Bitterness usually comes from too much nutritional yeast or a specific brand that’s naturally more bitter. Different brands vary significantly in flavor – Bragg’s and Red Star are generally mild and cheesy. If yours tastes bitter, reduce the nutritional yeast to 2-3 tablespoons next time. Also ensure you’re not using brewer’s yeast by mistake, which is quite bitter.
Q: Can I double or halve this recipe?
A: Absolutely! This recipe scales beautifully. Just maintain the same proportions. If doubling, you may need to blend in two batches depending on your blender size – don’t overfill. The recipe keeps well, so doubling is great for parties or meal prep. Halving works perfectly for smaller households.
Q: What can I do if my queso is too thick/thin?
A: Too thick? Simply whisk in water, vegetable broth, or non-dairy milk one tablespoon at a time until you reach your preferred consistency. Queso thickens as it cools, so always thin it more than you think you need. Too thin? Let it simmer on low heat for a few minutes to reduce and thicken, or blend in a small handful of additional cashews to add body.
Conclusion
And there you have it – the ultimate vegan queso dip that’s going to change the way you think about dairy-free cheese forever! This creamy, dreamy, insanely flavorful queso proves that plant-based eating doesn’t mean sacrificing the foods you love. In fact, many people prefer this version to traditional queso because it’s lighter, more flavorful, and doesn’t leave you feeling weighed down.
What I love most about this easy vegan cheese dip is how it makes plant-based eating accessible and delicious for everyone – not just vegans. Whether you’re dairy-free by choice or necessity, or you’re just trying to incorporate more plant-based meals into your week, this recipe is your new best friend. It’s versatile enough for casual snacking, impressive enough for party hosting, and simple enough to make on a busy weeknight.
The fact that it comes together in 15 minutes with whole-food ingredients and tastes better than anything you can buy at the store? That’s just the cherry on top. Make a batch this weekend and watch it disappear – then immediately make another batch because you’ll be craving it again by Tuesday!
I can’t wait to hear how your vegan queso turns out! Did you make it spicy? Use it on nachos? Serve it at a party where everyone was shocked it was dairy-free? Drop a comment below and share your experience! And if you’re as obsessed with this cashew queso dip as I am, please share this recipe on Pinterest so other home cooks can discover it. Pin it to your “Vegan Recipes,” “Party Food,” or “Healthy Appetizers” boards – your followers will absolutely love you for it!
Happy dipping, and get ready for some serious cheese-sauce cravings! 🧀