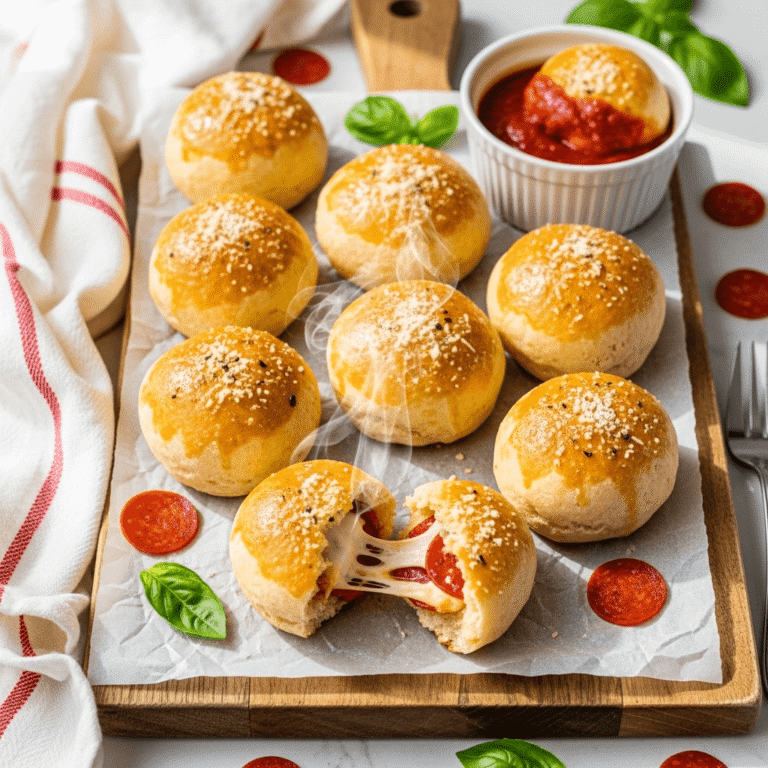
Easy Pizza Bombs Recipe – Cheesy, Bite-Sized Pizza Perfection!

If you’ve been searching for the ultimate crowd-pleasing appetizer or weeknight dinner that combines everything you love about pizza into one adorable, poppable bite, then pizza bombs are about to become your new obsession! These golden, flaky parcels of cheesy goodness are essentially pizza turned inside-out – imagine warm, gooey mozzarella and savory pepperoni wrapped in buttery, garlic-brushed biscuit dough that bakes up golden and crispy on the outside.
Pizza bombs have taken Pinterest by storm, and for good reason. They’re incredibly versatile, endlessly customizable, and so simple that even beginner cooks can master them on the first try. Whether you’re hosting game day, planning a kid-friendly dinner, need something quick for a potluck, or just want to satisfy that pizza craving without ordering delivery, these little flavor bombs deliver big time. They’re perfect as appetizers, after-school snacks, party food, or even a fun Friday night dinner that the whole family can help assemble. Best of all, they come together in about 30 minutes from start to finish, making them an absolute lifesaver for busy home cooks.
History / Background
While pizza bombs don’t have centuries of culinary tradition behind them, they’re a brilliant example of American home cooking creativity at its finest. The concept likely emerged in the early 2000s as home cooks began experimenting with convenient store-bought biscuit dough, transforming it into something far more exciting than simple buttered biscuits. The rise of food blogs and Pinterest in the 2010s launched pizza bombs into mainstream popularity, with thousands of home cooks sharing their own variations and creative twists.
The genius of pizza bombs lies in their fusion of two beloved American conveniences: canned biscuit dough (a staple since Pillsbury introduced it in 1931) and everyone’s favorite food – pizza! They belong to a broader category of “stuffed biscuit” recipes that became popular in Southern cooking, where resourceful cooks would wrap biscuit dough around various fillings to create portable, handheld meals.
Pizza bombs are particularly popular in family-friendly cooking circles and have become a staple at school events, church potlucks, and Super Bowl parties across America. They represent that uniquely American approach to cooking – taking something simple and accessible, making it fun and shareable, and creating a dish that brings people together. Unlike traditional pizza that requires dough-making skills and special equipment, pizza bombs democratized pizza-making for everyone, proving that restaurant-quality flavors can come from your own oven with minimal fuss.
Why You’ll Love This Recipe
These pizza bombs are about to become your go-to recipe for so many occasions, and here’s why they’re absolutely irresistible:
These little bundles of joy combine everything you crave about pizza – the stretchy cheese, savory pepperoni, tangy sauce, and aromatic Italian herbs – all wrapped up in a buttery, golden package that’s perfectly portioned and fun to eat. Unlike traditional pizza that requires special equipment or dough-making skills, pizza bombs use convenient store-bought biscuit dough that transforms into something spectacular with just a few simple ingredients and a hot oven.
Here’s what makes this recipe a winner:
- Incredibly Easy – No pizza dough making, no kneading, no special skills required. If you can wrap and pinch dough, you can make these!
- Ready in 30 Minutes – From package to plate in half an hour, perfect for those “what’s for dinner?” panic moments
- Budget-Friendly – Uses affordable, accessible ingredients you can grab at any grocery store
- Kid-Approved – Children absolutely love these, and they’re perfect for little hands to help make and eat
- Customizable – Endless filling possibilities mean you’ll never get bored (veggie, meat lovers, Hawaiian, you name it!)
- Perfect for Crowds – Easily doubled or tripled, and they disappear fast at parties
- No Mess, No Fuss – Self-contained servings mean no greasy slices or plates needed
- Freezer-Friendly – Make ahead and bake whenever the craving strikes
- Guaranteed Crowd-Pleaser – I’ve never met anyone who didn’t love these
Ingredient Notes
Let’s break down what makes these pizza bombs so delicious and talk about how each ingredient contributes to the final result:
Refrigerated Biscuit Dough: This is your secret weapon and the foundation of the recipe. I recommend using Pillsbury Grands or a similar flaky-layered biscuit (not the buttermilk style) because they create those beautiful, buttery layers when baked. Each biscuit gets flattened and wrapped around the filling. You can use the regular or the “Flaky Layers” variety – both work wonderfully. For a slightly healthier option, reduced-fat biscuits work too, though they won’t be quite as rich.
Mozzarella Cheese: Low-moisture, part-skim mozzarella cubes or sticks are ideal because they melt beautifully without making the bombs soggy. I like cutting string cheese into chunks because it’s pre-portioned and melts perfectly. Fresh mozzarella is too wet and will make your dough soggy, so save that for caprese salad! You could substitute with cheddar, Monterey Jack, or a pizza blend if you prefer.
Pepperoni: Classic mini pepperonis are perfect for this recipe. They’re the right size and pack tons of flavor. Turkey pepperoni works great as a leaner option. You can also use diced ham, cooked sausage, or leave the meat out entirely for a vegetarian version. I typically use 4-6 mini pepperonis per bomb.
Pizza Sauce or Marinara: This provides that essential pizza flavor. You can use jarred pizza sauce, marinara, or even pasta sauce – whatever you have on hand works. Some people like serving extra sauce on the side for dipping, which is always a crowd favorite.
Melted Butter: Brushing the bombs with garlic butter before baking creates that golden, crispy exterior and adds incredible flavor. Don’t skip this step – it’s what makes them look and taste professional!
Italian Seasoning: A blend of oregano, basil, thyme, and rosemary gives these bombs authentic pizza flavor. If you don’t have Italian seasoning, just use dried oregano and basil.
Garlic Powder: Adds depth and that pizzeria aroma. Fresh minced garlic mixed into the butter works too if you prefer.
Parmesan Cheese: A final sprinkle of grated Parmesan adds a salty, savory finish that takes these over the top.
Equipment Needed
Good news – you don’t need any fancy equipment for this recipe! Here’s what you’ll use:
- Large Baking Sheet – A standard 18×13-inch sheet pan works perfectly
- Parchment Paper or Silicone Baking Mat – Prevents sticking and makes cleanup a breeze
- Rolling Pin or Your Hands – For flattening the biscuit dough (hands work just fine!)
- Small Mixing Bowl – For mixing the garlic butter
- Pastry Brush or Spoon – To brush the bombs with garlic butter
- Sharp Knife or Pizza Cutter – For cutting cheese and pepperoni if needed
- Measuring Spoons – For seasonings
- Kitchen Scissors – Optional, but helpful for cutting string cheese
Easy Pizza Bombs Recipe
Golden, buttery pizza bombs stuffed with melty mozzarella and pepperoni – the perfect easy appetizer or weeknight dinner that’s ready in just 30 minutes! These bite-sized pizza pockets are brushed with garlic butter and baked until perfectly crispy and golden.
- Total Time: 30 minutes
- Yield: 8 pizza bombs (4 servings) 1x
Ingredients
- 1 can (16.3 oz) refrigerated biscuit dough (8 biscuits, Grands Flaky Layers work best)
- 8 mozzarella string cheese sticks, cut into thirds (or 24 small cubes of mozzarella)
- 32-48 mini pepperoni slices (4-6 per bomb)
- ½ cup pizza sauce or marinara (for dipping)
- 3 tablespoons unsalted butter, melted
- 2 cloves garlic, minced (or ½ teaspoon garlic powder)
- 1 teaspoon Italian seasoning
- ¼ cup grated Parmesan cheese
- Fresh parsley or basil, chopped (optional, for garnish)
Instructions
- Preheat and Prep: Preheat your oven to 375°F (190°C). Line a large baking sheet with parchment paper or a silicone baking mat and set aside.
- Prepare the Biscuits: Open the can of biscuit dough and separate into 8 individual biscuits. Working with one biscuit at a time, gently flatten it with your hands or a rolling pin into a 4-5 inch circle. The dough should be thin enough to wrap but not so thin it tears.
- Add the Filling: Place 3 pieces of mozzarella cheese in the center of each flattened biscuit. Top with 4-6 mini pepperoni slices. You can also add a small spoonful of pizza sauce inside if you like (about ½ teaspoon), but this is optional as too much sauce can make them soggy.
- Seal the Bombs: Carefully bring all edges of the biscuit dough up and over the filling, pinching and pleating as you go to completely seal the filling inside. Make sure there are no gaps or holes where cheese could leak out. Pinch the seams firmly and roll gently between your palms to create a smooth ball. Place seam-side down on the prepared baking sheet, spacing them about 2 inches apart.
- Make Garlic Butter: In a small bowl, mix together the melted butter, minced garlic (or garlic powder), and Italian seasoning until well combined.
- Brush and Season: Generously brush the top and sides of each pizza bomb with the garlic butter mixture. Make sure they’re well coated – this creates that beautiful golden crust. Sprinkle the tops with grated Parmesan cheese.
- Bake: Bake in the preheated oven for 12-15 minutes, or until the bombs are golden brown and puffed up. The biscuits should be cooked through and the cheese inside should be melted and gooey.
- Serve: Remove from the oven and let cool for 2-3 minutes (the filling will be very hot!). Garnish with fresh chopped parsley or basil if desired. Serve warm with pizza sauce or marinara on the side for dipping.
Notes
- Sealing is Key: Make sure to pinch the seams very well to prevent cheese from leaking during baking. If you have trouble sealing them, slightly wet your fingertips to help the dough stick together.
- Don’t Overfill: It’s tempting to add lots of filling, but too much will make them hard to seal and may cause them to burst open while baking.
- Customize Your Fillings: Feel free to swap pepperoni for cooked sausage, ham, bacon, or go vegetarian with mushrooms, bell peppers, and olives.
- Make It Spicy: Add a sprinkle of red pepper flakes to the garlic butter or tuck in a slice of jalapeño with the filling.
- Check for Doneness: The bombs should be golden brown on top and the bottoms should be lightly browned. If the tops are browning too quickly, tent loosely with foil.
- Prep Time: 15 minutes
- Cook Time: 15 minutes
- Category: Appetizer
- Method: Baking
- Cuisine: American
- Diet: Gluten Free
Nutrition
- Serving Size: 2 pizza bombs
- Calories: 385
- Sugar: 6g
- Sodium: 1,150mg
- Fat: 20g
- Saturated Fat: 9g
- Unsaturated Fat: 9g
- Trans Fat: 0g
- Carbohydrates: 35g
- Fiber: 1g
- Protein: 15g
- Cholesterol: 45mg
Tips & Variations
The beauty of pizza bombs is how easily you can customize them to suit any taste preference or dietary need. Here are some delicious ways to make this recipe your own:
Vegetarian Pizza Bombs: Skip the pepperoni and load them up with sautéed mushrooms, diced bell peppers, black olives, and spinach. Add a sprinkle of red pepper flakes for a kick!
Meat Lover’s Version: Combine pepperoni with cooked Italian sausage, crumbled bacon, and diced ham for an ultra-hearty version.
Hawaiian Style: Use diced ham and pineapple chunks with the mozzarella – yes, even in pizza bomb form, pineapple on pizza is controversial but delicious!
Buffalo Chicken: Toss shredded cooked chicken in buffalo sauce, add ranch dressing instead of pizza sauce, and use cheddar cheese instead of mozzarella.
Margherita Inspired: Use fresh basil leaves, a small piece of tomato, and mozzarella, then brush with olive oil instead of butter.
Breakfast Pizza Bombs: Fill with scrambled eggs, cooked breakfast sausage, and cheddar cheese for a morning treat.
Cheese-Stuffed: Use three different cheeses (mozzarella, cheddar, and provolone) for an extra gooey, cheese-lover’s dream.
Healthier Options: Use turkey pepperoni, part-skim mozzarella, and reduced-fat biscuit dough to cut calories without sacrificing flavor.
Pro Chef Tips
Want to take your pizza bombs from good to absolutely restaurant-worthy? Here are some professional tricks:
Temperature Matters: Make sure your oven is fully preheated before baking. A hot oven creates that immediate rise and golden crust you’re looking for. If your oven runs cool, bump the temperature up to 385°F.
Double Seal Technique: After pinching the seams closed, roll the bomb in your hands to create a smooth ball, then place it seam-side down AND give it a gentle press. This double-securing method prevents any cheese explosions.
Freeze Before Baking: For extra-neat pizza bombs that hold their shape perfectly, assemble them completely, then freeze for 15 minutes before brushing with butter and baking. This firms up the dough and helps prevent leaking.
Layer Your Seasonings: Don’t just brush garlic butter on top – sprinkle a tiny pinch of Italian seasoning inside each bomb before sealing. This creates layers of flavor that make people wonder what your secret is!
Use an Egg Wash: For an extra-professional, shiny finish, brush the bombs with beaten egg before adding the Parmesan. This creates a beautiful golden sheen that looks bakery-quality.
Let Them Rest: After removing from the oven, resist the urge to bite in immediately (I know, it’s hard!). Letting them rest for 2-3 minutes allows the cheese to set slightly, so you get that perfect cheese pull rather than molten lava that burns your mouth.
Infuse Your Butter: Take your garlic butter to the next level by letting minced garlic sit in the melted butter for 5 minutes before brushing. This infuses the flavor deeply. You can also add a pinch of dried basil and oregano directly to the butter.
Common Mistakes to Avoid
Even simple recipes have potential pitfalls. Here’s how to avoid the most common pizza bomb fails:
Overfilling: This is mistake number one! It’s so tempting to stuff them full, but too much filling makes them impossible to seal properly and they’ll burst open during baking, creating a cheesy mess. Stick to the recommended amounts – 3 pieces of cheese and 4-6 pepperonis is plenty.
Not Sealing Properly: If you don’t pinch the seams firmly enough, cheese will leak out as it melts. Make sure there are absolutely no gaps or thin spots in the dough. When in doubt, pinch more! The seams should be completely sealed with no holes visible.
Using Wet Ingredients: Adding too much pizza sauce inside or using fresh mozzarella (which has high moisture content) will make the dough soggy and prevent proper sealing. If you want sauce inside, use just ½ teaspoon per bomb, or better yet, serve sauce on the side for dipping.
Skipping the Parchment Paper: Baking directly on a greased pan can cause sticking and uneven browning. Parchment paper or a silicone mat ensures even baking and makes cleanup effortless.
Baking at Wrong Temperature: Too hot and the outside burns before the inside cooks; too cool and they don’t rise properly and can become dense. The sweet spot is 375°F for most ovens, but adjust if you know your oven runs hot or cold.
Storage & Meal Prep
Pizza bombs are excellent for meal prep and actually reheat beautifully, making them perfect for busy weeknights or grab-and-go snacks.
Storing Leftovers: Allow pizza bombs to cool completely, then store them in an airtight container in the refrigerator for up to 3-4 days. Placing a paper towel in the bottom of the container helps absorb any excess moisture and keeps them from getting soggy.
Reheating Instructions: The best way to reheat pizza bombs is in a 350°F oven for 8-10 minutes until heated through and the outside crisps up again. You can also use an air fryer at 350°F for 5-7 minutes for perfectly crispy results. Microwaving works in a pinch (30-45 seconds on high), but the biscuit exterior won’t be as crispy – it’ll be softer and more bread-like.
Extending Freshness: If you’re meal prepping for the week, consider storing the pizza bombs and the dipping sauce separately. The sauce can make them soggy if stored together for too long.
Lunchbox Friendly: These are perfect for school or work lunches! Pack them cold with a small container of pizza sauce, and they’ll be fine at room temperature for a few hours. Kids especially love finding these in their lunchboxes.
Make-Ahead & Freezer Notes
This is where pizza bombs really shine – they’re incredibly freezer-friendly and perfect for make-ahead cooking!
Freezing Unbaked Pizza Bombs: This is my preferred method because you get that fresh-baked taste and aroma. Assemble the pizza bombs completely (including brushing with garlic butter and sprinkling with Parmesan), but don’t bake them. Place them on a parchment-lined baking sheet and freeze for 1-2 hours until solid. Once frozen, transfer them to a freezer-safe bag or container and store for up to 3 months. When ready to bake, place them on a baking sheet (no need to thaw) and bake at 375°F for 18-20 minutes, just a few minutes longer than fresh.
Freezing Baked Pizza Bombs: You can also freeze fully baked and cooled pizza bombs. Wrap them individually in plastic wrap, then place in a freezer bag. They’ll keep for up to 2 months. Reheat in a 350°F oven for 15-18 minutes from frozen, or 10-12 minutes if thawed.
Make-Ahead for Parties: If you’re serving these at a party, you can assemble them up to 24 hours in advance. Place them on the baking sheet, cover tightly with plastic wrap, and refrigerate. Brush with garlic butter right before baking – this keeps them from drying out.
Batch Cooking: Double or triple the recipe and freeze portions for easy weeknight dinners. I like to make a huge batch once a month and keep them stocked in my freezer. They’re a lifesaver when you need dinner on the table fast!
Serving Suggestions
Pizza bombs are wonderfully versatile and pair beautifully with lots of different sides and accompaniments:
Classic Pairings: Serve alongside a crisp Caesar salad or a simple mixed green salad with Italian vinaigrette. The fresh, crunchy greens provide a nice contrast to the rich, cheesy bombs.
Soup Combo: These make an excellent companion to tomato soup, minestrone, or Italian wedding soup for a cozy, comforting meal that feels like a warm hug.
Dipping Sauces: Besides pizza sauce and marinara, try offering ranch dressing, garlic aioli, pesto, alfredo sauce, or even a spicy arrabbiata sauce for variety. Having 2-3 sauce options makes it more fun and interactive, especially for parties.
Game Day Spread: Pair pizza bombs with other finger foods like mozzarella sticks, wings, loaded nachos, and veggie sticks with dip for the ultimate game day spread.
Side Dishes: Garlic bread sticks, roasted vegetables, sweet potato fries, or crispy onion rings all complement pizza bombs beautifully.
Drinks: Serve with Italian soda, lemonade, iced tea, or for adults, a crisp white wine like Pinot Grigio or a light Italian beer.
For Kids: Make it a fun dinner by serving with carrot sticks, apple slices, and a variety of dipping sauces. Kids love the interactive element of dunking their pizza bombs!
FAQs Section
Can I use crescent roll dough instead of biscuit dough?
Yes! Crescent roll dough works, but it creates a flakier, thinner shell that’s more delicate. You’ll need to use 2 triangles per bomb, pressing them together to form a rectangle before adding the filling. They’re delicious but slightly more fragile than biscuit-based bombs.
Why did my pizza bombs open up during baking?
This usually happens when they’re overfilled or not sealed properly. Make sure to pinch the seams very firmly with no gaps, place them seam-side down, and don’t overstuff them. Chilling them in the freezer for 15 minutes before baking can also help them hold their shape.
Can I make these gluten-free?
Absolutely! Simply substitute gluten-free biscuit dough (check your local grocery store – several brands now make them). Everything else in the recipe is naturally gluten-free or easily substituted.
What’s the best cheese to use?
Low-moisture mozzarella (like string cheese or block mozzarella cut into cubes) works best because it melts perfectly without releasing too much liquid. Avoid fresh mozzarella as it’s too wet. You can also use provolone, cheddar, or a pizza cheese blend.
Can I add pizza sauce inside the bombs?
You can, but use it sparingly – no more than ½ teaspoon per bomb. Too much sauce makes them soggy and hard to seal. Most people prefer serving sauce on the side for dipping, which keeps the exterior crispy.
How do I know when they’re done baking?
They should be golden brown on top and lightly browned on the bottom. The internal temperature should reach 200°F if you want to check with a thermometer. They’ll sound hollow when tapped and will have puffed up significantly.
Can I make these dairy-free?
Yes! Use dairy-free mozzarella shreds or cheese alternative, and substitute the butter with melted olive oil or vegan butter. Keep the pepperoni or use veggie alternatives. They won’t be quite as stretchy inside, but they’re still delicious!
Conclusion
There you have it – the ultimate guide to making perfect pizza bombs right in your own kitchen! These little bundles of cheesy, pepperoni-packed goodness prove that the best comfort food doesn’t have to be complicated. With just a handful of simple ingredients, about 30 minutes of your time, and minimal cleanup, you can create something that’ll have everyone asking for seconds (and the recipe!).
Whether you’re feeding hungry kids after school, need an impressive but easy appetizer for your next gathering, or just want to satisfy that pizza craving without the delivery wait, these pizza bombs are your answer. The best part? Once you master the basic technique, the filling possibilities are truly endless. You can experiment with different cheeses, meats, veggies, and seasonings to create your own signature version.
I’d absolutely love to hear how your pizza bombs turn out! Did you try any fun variations? What dipping sauce was the family favorite? Drop a comment below and share your experience – your tips might help another home cook! And if you loved this recipe (I know you will!), please pin it to your favorite Pinterest board so you can find it again easily. Trust me, you’ll be making these on repeat!
Now, preheat that oven and get ready to pull the most gorgeous, golden, cheese-filled pizza bombs out of your kitchen. Your family is going to think you’re a culinary genius! Happy cooking, friends! 🍕