Authentic Greek Spanakopita: The Ultimate Spinach Phyllo Pie Recipe

If you’ve ever bitten into a perfectly golden, flaky piece of spanakopita with its layers of buttery phyllo pastry giving way to a savory, herb-filled spinach and feta filling, you know why this Greek classic has captured hearts around the world. Spanakopita (pronounced spah-nah-KO-pee-tah) is Greece’s beloved spinach pie—a stunning combination of crispy, paper-thin phyllo layers encasing a luscious mixture of spinach, feta cheese, fresh herbs, and aromatics.
This traditional Greek spanakopita recipe is surprisingly approachable for home cooks, despite its impressive appearance. The filling comes together quickly with just a handful of ingredients, while store-bought phyllo dough eliminates any intimidation factor. The result is a dish that looks like it came straight from a Greek taverna but was made in your own kitchen with ingredients you can find at any grocery store.
Spanakopita is incredibly versatile—serve it as an elegant appetizer cut into triangles for parties, as a satisfying vegetarian main course for lunch or dinner, or even as part of a Mediterranean mezze spread. It’s perfect for potlucks, holiday gatherings, brunch buffets, or meal prep for the week ahead. Whether you’re hosting a Greek-themed dinner party or simply looking for a delicious way to eat more greens, this easy spanakopita recipe delivers restaurant-quality results every single time.
The beauty of homemade spanakopita lies in how the buttery, crispy exterior contrasts with the creamy, savory filling. Each bite offers the salty tang of feta, the earthiness of spinach, the brightness of fresh dill, and the subtle sweetness of sautéed onions—all wrapped in those impossibly flaky layers of golden phyllo. Once you make it at home, you’ll wonder why you ever ordered it at restaurants.
History / Background
Spanakopita is one of Greece’s most iconic dishes, belonging to a family of savory pies called “pita” that have been central to Greek cuisine for centuries. The word “spanakopita” comes from the Greek words “spanaki” (spinach) and “pita” (pie), though in this context, “pita” refers to any filled pastry rather than the pocket bread Americans are familiar with.
The origins of spanakopita trace back to ancient Greece, where various filled pastries were documented in early culinary texts. However, the modern version we know today likely developed during the Byzantine Empire (330-1453 AD), when phyllo dough techniques were refined and perfected. The Byzantines were masters of creating paper-thin pastry layers, a skill that would become synonymous with Greek and Turkish cuisines.
Phyllo itself (also spelled “filo” or “fillo,” from the Greek word for “leaf”) represents one of the great achievements of Mediterranean baking. The technique of stretching dough until it becomes translucent requires skill and patience, traditionally learned from grandmothers and mothers in Greek households. While modern cooks typically buy pre-made phyllo, traditionalists still make it by hand, stretching the dough across large tables until it’s so thin you can read a newspaper through it.
Spanakopita holds a special place in Greek food culture beyond its delicious taste. It’s traditionally associated with celebrations, particularly Greek Orthodox feast days and family gatherings. Different regions of Greece have their own variations—in some areas, it’s made with wild greens foraged from hillsides rather than cultivated spinach. The Epirus region is famous for its “hortopita,” made with a mixture of wild greens and herbs. In Crete, they add local cheeses and sometimes rice to the filling.
The dish also carries symbolic meaning in Greek tradition. Green vegetables like spinach represent renewal and spring, making spanakopita particularly popular around Easter time. The layered nature of the pie symbolizes abundance and prosperity, with each thin layer representing blessings stacked upon one another.
Greek immigrants brought spanakopita to America in the early 20th century, where it became a beloved part of Greek-American cuisine. Today, you’ll find it at Greek festivals, Mediterranean restaurants, and increasingly in home kitchens as more people discover how achievable it is to make. The dish has also influenced other cuisines—you’ll find similar spinach and cheese filled pastries throughout the Mediterranean and Middle East, from Turkish börek to Lebanese fatayer.
What makes traditional spanakopita special is its simplicity and respect for quality ingredients. Unlike many modern recipes that add excessive amounts of cheese or heavy cream, authentic Greek spanakopita lets the flavor of fresh spinach shine through, balanced by just enough feta and herbs. It’s peasant food elevated to an art form—proof that simple ingredients, when handled with care, can create something truly extraordinary.
Why You’ll Love This Recipe
This authentic Greek spanakopita recipe brings the flavors of the Mediterranean to your kitchen with surprisingly little effort. While it might look fancy and complicated, it’s actually one of those wonderful recipes that delivers impressive results with straightforward techniques.
Here’s why this homemade spanakopita will become a regular in your cooking rotation:
- Easier Than It Looks – Despite its impressive layers and restaurant-quality appearance, spanakopita is genuinely beginner-friendly. The filling takes just 15 minutes, and working with phyllo is much less intimidating than people think.
- Vegetarian Crowd-Pleaser – Even dedicated meat-eaters love this savory pie. The combination of feta, herbs, and flaky pastry is so satisfying that no one misses the meat.
- Make-Ahead Dream – Assemble it completely up to 24 hours in advance, or freeze it for up to 3 months. Perfect for stress-free entertaining and meal prep.
- Budget-Friendly Elegance – Spinach and phyllo are inexpensive, yet the finished dish looks and tastes like something from an upscale Greek restaurant. Feeds a crowd for just a few dollars per serving.
- Incredibly Versatile – Serve as appetizers, lunch, dinner, or brunch. Cut into triangles for parties or squares for meals. Works for casual weeknights or fancy occasions.
- Packed with Nutrients – Spinach provides iron, vitamins, and fiber, while eggs and feta add protein. It’s an indulgent-tasting dish that’s actually quite nutritious.
- Impressive Presentation – Those golden, flaky layers look absolutely stunning when sliced, making it perfect for entertaining when you want to wow your guests.
- Authentic Greek Flavor – This recipe uses traditional ratios and methods passed down through Greek families, delivering genuine taverna-quality taste.
- Great for Meal Prep – Makes excellent leftovers that actually improve overnight as flavors meld. Pack for lunch throughout the week.
- Customizable – Easy to adjust herbs, add different greens, or incorporate other vegetables while maintaining the traditional spirit.
Ingredient Notes
Understanding your ingredients is key to making exceptional spanakopita. Here’s what you need to know about each component:
Fresh Spinach or Frozen Spinach – You can use either! Fresh spinach (about 2 pounds) will cook down significantly—you’ll need to sauté it first to remove excess moisture. Frozen spinach (two 10-ounce packages) is actually preferred by many Greek cooks because it’s already cooked and economical. The key is to thaw frozen spinach completely and squeeze out every drop of liquid using a clean kitchen towel or cheesecloth—this step is crucial for preventing soggy spanakopita. If using fresh, remove thick stems and roughly chop before cooking.
Feta Cheese – The heart and soul of spanakopita! Use authentic Greek feta (usually made from sheep’s milk or a sheep-goat blend) rather than domestic versions, which tend to be more crumbly and less flavorful. Greek feta is creamier, tangier, and has more complexity. You’ll need about 12 ounces. Crumble it by hand into larger chunks rather than buying pre-crumbled feta, which often contains anti-caking agents that affect texture. If you find feta too salty, soak it in cold water for 30 minutes before using.
Phyllo Dough (Filo Pastry) – Sold frozen in most grocery stores, typically in 1-pound boxes containing two rolls. Thaw phyllo overnight in the refrigerator, never at room temperature or in the microwave, which can cause sheets to stick together. Phyllo dries out quickly once exposed to air, so keep sheets covered with a slightly damp (not wet) towel while working. Don’t stress about tears—they’ll be hidden between layers and won’t affect the final result.
Butter (Melted) – Unsalted butter is preferred so you can control the salt level. You’ll need about ¾ to 1 cup melted butter for brushing the phyllo layers. Some Greek recipes use olive oil instead, which is more traditional but creates a slightly different texture—less flaky, more tender. For authentic Greek flavor, use half butter and half olive oil.
Onions or Scallions – Yellow onions are traditional and add sweetness when sautéed. Green onions (scallions) are also common in Greek recipes and provide a milder, fresher flavor. You can use all of one type or combine them. About 1 large onion or 1 bunch of scallions, finely chopped.
Fresh Dill – Essential for authentic Greek flavor! Fresh dill is non-negotiable—dried dill cannot replicate its bright, aromatic quality. You’ll need about ¼ cup of chopped fresh dill. If you absolutely cannot find it, you can use fresh parsley alone, but the flavor will be different.
Fresh Parsley – Flat-leaf (Italian) parsley is preferred for its superior flavor. Use about ¼ cup chopped. This adds freshness and helps balance the richness of the cheese.
Eggs – Act as a binder, holding the filling together and creating a custard-like texture when baked. You’ll need 2-3 large eggs depending on how much spinach you use.
Garlic – Fresh garlic cloves (2-3, minced) add aromatic depth. Don’t skip this—it’s essential to the flavor profile.
Salt, Pepper, and Nutmeg – Season generously with salt and pepper. A tiny pinch of nutmeg (⅛ teaspoon) is a traditional Greek addition that enhances the spinach flavor without being identifiable. Don’t skip the nutmeg—it’s a secret ingredient in many authentic recipes.
Optional: Ricotta or Cottage Cheese – Some modern recipes add a small amount (½ cup) of ricotta or well-drained cottage cheese for extra creaminess. This isn’t traditional but creates a slightly creamier texture if you prefer.
Equipment Needed
Spanakopita requires minimal specialized equipment—most of which you likely already have:
- 9×13-inch Baking Dish – Standard size, preferably glass or ceramic. Metal pans work but may brown the bottom more quickly.
- Large Skillet or Sauté Pan – For cooking the spinach (if using fresh) and sautéing the onions
- Large Mixing Bowl – For combining the filling ingredients
- Pastry Brush – Essential for brushing butter between phyllo layers. A silicone brush works best as it doesn’t shed bristles.
- Clean Kitchen Towels – One slightly damp towel to cover phyllo sheets while working, and one dry towel for squeezing moisture from spinach
- Sharp Knife or Pizza Cutter – For cutting spanakopita into portions before baking
- Small Bowl or Measuring Cup – For melted butter
- Colander or Strainer – For draining cooked spinach
- Cutting Board – For chopping vegetables and herbs
- Measuring Cups and Spoons – For accurate measurements
- Wooden Spoon or Spatula – For stirring and mixing

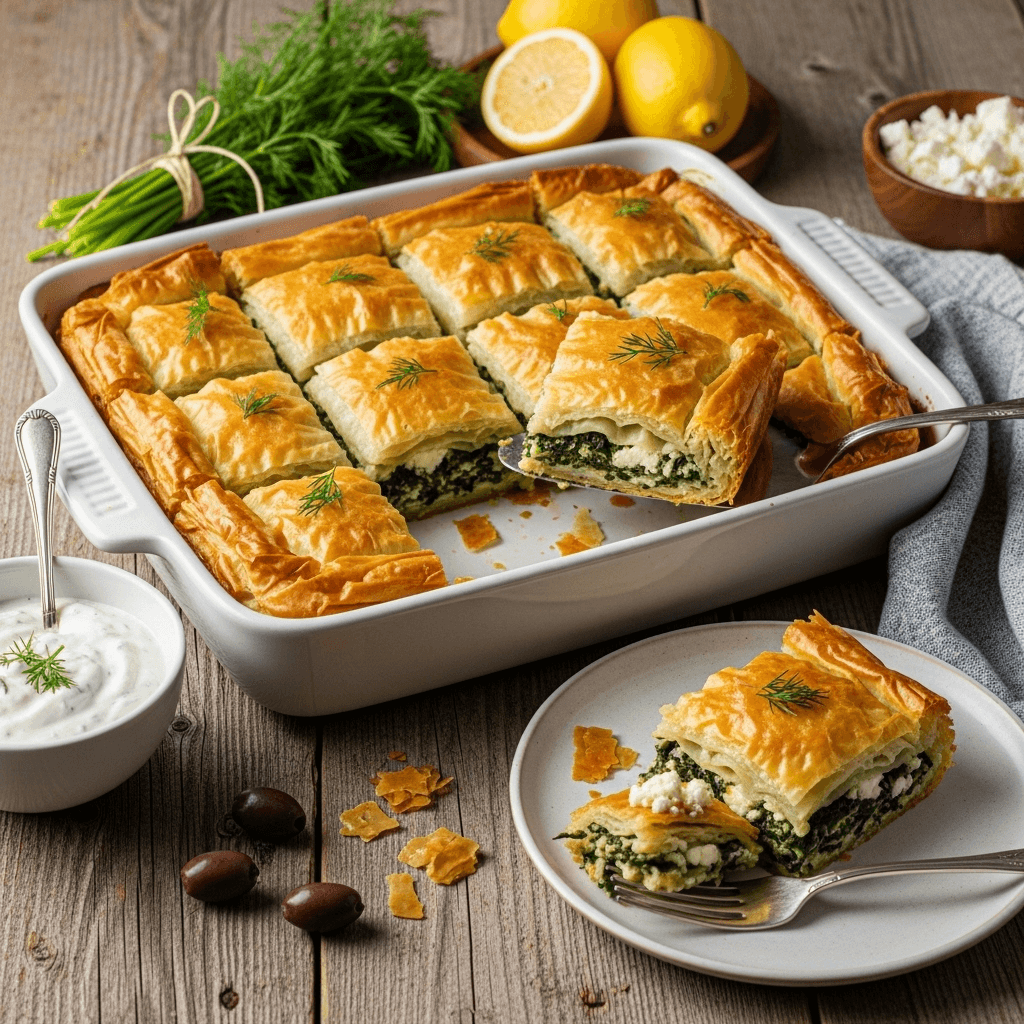
Authentic Greek Spanakopita
This authentic Greek spanakopita features layers of crispy, buttery phyllo pastry filled with a savory mixture of spinach, feta cheese, fresh herbs, and aromatics. A traditional Mediterranean recipe that’s surprisingly easy to make at home and perfect for entertaining or meal prep.
- Total Time: 1 hour 15 minutes
- Yield: 12 servings 1x
Ingredients
For the Filling:
- 2 pounds fresh spinach (or two 10-ounce packages frozen spinach, thawed)
- 2 tablespoons olive oil
- 1 large yellow onion, finely chopped (or 1 bunch scallions, chopped)
- 3 cloves garlic, minced
- 12 ounces Greek feta cheese, crumbled
- 3 large eggs, lightly beaten
- ¼ cup fresh dill, finely chopped
- ¼ cup fresh parsley, finely chopped
- ⅛ teaspoon ground nutmeg
- ½ teaspoon salt (adjust based on feta saltiness)
- ½ teaspoon black pepper
- ½ cup ricotta cheese (optional, for creamier filling)
For the Phyllo Layers:
- 1 pound phyllo dough (about 20 sheets), thawed according to package directions
- ¾ cup unsalted butter, melted (or use half butter, half olive oil)
Instructions
- Prepare the Spinach – If using fresh spinach: Heat 1 tablespoon olive oil in a large skillet over medium heat. Add spinach in batches, stirring until wilted, about 5-7 minutes total. Transfer to a colander and let cool. If using frozen spinach: Thaw completely, then squeeze out all excess liquid using a clean kitchen towel—this is crucial! You should remove at least 1 cup of liquid. Roughly chop the spinach and set aside.
- Sauté the Aromatics – In the same skillet, heat remaining 1 tablespoon olive oil over medium heat. Add the chopped onion and cook until softened and translucent, about 5-6 minutes. Add minced garlic and cook for 1 minute more until fragrant. Remove from heat and let cool slightly.
- Make the Filling – In a large bowl, combine the squeezed spinach, sautéed onion and garlic, crumbled feta, beaten eggs, fresh dill, fresh parsley, nutmeg, salt, and pepper. Mix well until everything is evenly distributed. If using ricotta, fold it in now. Taste and adjust seasoning—it should be well-seasoned as the phyllo adds no flavor.
- Prepare Your Baking Dish – Brush the bottom and sides of a 9×13-inch baking dish with melted butter. Preheat your oven to 350°F (175°C).
- Layer the Bottom Phyllo – Unroll your phyllo dough and cover immediately with a slightly damp (not wet) kitchen towel to prevent drying. Place one sheet of phyllo in the baking dish—it should cover the bottom with overhang on the sides. Brush generously with melted butter. Repeat this process with 9 more sheets (for a total of 10 sheets), brushing each layer with butter. Don’t worry if sheets tear—just piece them together. The butter will seal everything.
- Add the Filling – Spread the spinach-feta mixture evenly over the phyllo layers, smoothing it into an even layer all the way to the edges.
- Layer the Top Phyllo – Place one sheet of phyllo over the filling and brush with butter. Repeat with the remaining phyllo sheets (about 10 more), brushing each layer generously with butter. Brush the very top layer extra generously—this creates that beautiful golden color.
- Fold and Seal the Edges – Fold any overhanging phyllo edges over the top and brush with more butter. This creates a nice sealed edge.
- Score Before Baking – Using a sharp knife, carefully score the top layers of phyllo (don’t cut all the way through to the filling) into 12 squares or diamond shapes. This makes serving easier and helps the top layers crisp evenly.
- Bake – Bake in the preheated 350°F oven for 45-50 minutes, until the top is deep golden brown and crispy. The phyllo should be puffed and crackly. If the top browns too quickly, tent loosely with aluminum foil.
- Cool and Serve – Let the spanakopita rest for at least 10-15 minutes before cutting—this allows the filling to set. Cut along your scored lines and serve warm or at room temperature.
Notes
- Phyllo Drying Prevention: Keep phyllo covered with a damp towel at all times while working. If sheets do dry out and crack, don’t panic—just piece them together and brush with butter.
- Moisture is the Enemy: The single most important step is removing all liquid from the spinach. Soggy spanakopita comes from wet spinach, not from technique issues.
- Butter Application: Don’t be stingy! Generously buttering each layer is what creates those flaky, crispy layers. You should use almost all of the melted butter.
- Scoring is Essential: Always score before baking. Cutting through after baking crushes the delicate layers.
- Make It Dairy-Free: Use olive oil instead of butter and substitute the feta with cashew cheese or dairy-free feta alternatives.
- Prep Time: 25 minutes
- Cook Time: 45 minutes
- Category: Appetizer
- Method: Baking
- Cuisine: Greek
- Diet: Vegetarian
Nutrition
- Serving Size: 1 piece (1/12 of pan)
- Calories: 245
- Sugar: 2g
- Sodium: 465mg
- Fat: 17g
- Saturated Fat: 9g
- Unsaturated Fat: 7g
- Trans Fat: 0g
- Carbohydrates: 16g
- Fiber: 2g
- Protein: 9g
- Cholesterol: 85mg
Tips & Variations
The basic spanakopita recipe is wonderfully adaptable. Here are some ways to customize your Greek spinach pie:
Herb Variations:
- Traditional Greek: Stick with dill and parsley as written
- Mint Addition: Add 2 tablespoons fresh mint for a refreshing twist
- Oregano Boost: Add 1 tablespoon fresh oregano for more Mediterranean flavor
- Fennel Fronds: Substitute half the dill with chopped fennel fronds for an anise note
Greens Variations:
- Mixed Greens: Use half spinach and half Swiss chard or kale
- Wild Greens (Horta): Traditional Greek method using dandelion greens, amaranth, or other foraged greens
- Arugula Addition: Add 1 cup chopped arugula for peppery notes
- Spinach-Leek: Sauté 2 leeks along with the onions for extra depth
Cheese Variations:
- Kasseri Addition: Add ½ cup grated kasseri cheese (Greek sheep’s milk cheese) for authenticity
- Ricotta Version: Increase ricotta to 1 cup for a creamier, less tangy filling
- Goat Cheese: Substitute half the feta with soft goat cheese for milder flavor
- Vegan: Use cashew-based feta alternatives and nutritional yeast
Shape Variations:
- Triangles (Tiropitakia): Cut phyllo into strips, add filling, and fold into triangles for individual appetizers
- Spiral (Koulouri): Roll the filling into a log and coil it into a spiral shape in a round pan
- Small Pies: Make individual portions in muffin tins
Protein Additions (Non-Traditional):
- Add ½ cup cooked, crumbled ground lamb for a heartier version
- Fold in ½ cup cooked, crumbled bacon for smoky richness
- Add ½ cup chopped cooked chicken for extra protein
Mediterranean Twists:
- Sun-Dried Tomatoes: Add ¼ cup chopped sun-dried tomatoes to the filling
- Pine Nuts: Toast ¼ cup pine nuts and fold into filling for texture
- Lemon Zest: Add 1 tablespoon lemon zest for brightness
- Olives: Fold in ½ cup chopped Kalamata olives
Pro Chef Tips
Professional bakers and Greek grandmothers know these secrets for perfect spanakopita every time:
Master the Moisture Removal – This cannot be emphasized enough. The difference between soggy, disappointing spanakopita and crispy, perfect spanakopita is entirely about removing moisture from your spinach. After squeezing, the spinach should feel almost dry. Place it in a clean kitchen towel, twist the ends, and wring it like you’re wringing out a wet towel. You’ll be amazed how much liquid comes out. Do this twice if necessary. Professional Greek cooks say you should extract at least 1 to 1½ cups of liquid from frozen spinach.
Room Temperature Matters – Let your filling come to room temperature before assembling. If you put cold filling on phyllo, condensation forms and creates sogginess. Make your filling, spread it on a baking sheet, and let it cool completely. This also prevents the eggs from scrambling when added.
The Butter Temperature Sweet Spot – Your melted butter should be warm but not hot. Too hot and it soaks through the phyllo making it greasy; too cool and it solidifies in spots creating uneven layers. Keep it in a warm (not hot) place and use quickly. Some Greek bakers keep their butter bowl in a larger bowl of warm water to maintain consistent temperature.
Layer Patiently, Don’t Rush – The most common mistake is rushing the phyllo layering process. Each sheet should be brushed thoroughly with butter—not drizzled, not sprayed, but properly brushed. Yes, it takes time. Yes, it uses a lot of butter. This is what creates those impossibly flaky, golden layers. Professional bakers spend 15-20 minutes just on the phyllo layers alone.
Score Confidently Before Baking – Use a very sharp knife and press firmly through the top layers of phyllo before baking. This serves multiple purposes: it allows steam to escape (preventing sogginess), ensures even crisping, and makes cutting after baking infinitely easier. Score deeper than you think—you want to cut through about half the phyllo layers.
The Resting Period is Mandatory – When spanakopita comes out of the oven, it’s tempting to cut into it immediately. Don’t! The filling needs 15-20 minutes to set up. If you cut too early, the filling will be runny and messy. Professional kitchens always build in this resting time.
Create Steam Vents – In addition to scoring, some Greek bakers poke a few small holes through all the layers with a skewer before baking. This creates steam vents that help prevent the dreaded soggy middle.
Common Mistakes to Avoid
Even experienced cooks can run into trouble with spanakopita. Here’s what to watch out for:
Not Removing Enough Liquid from Spinach – I’ll say it one more time because it’s that important: Wet spinach equals soggy, disappointing spanakopita. The most common complaint about homemade spanakopita is sogginess, and 95% of the time, it’s because the cook didn’t squeeze out enough water. When you think you’ve squeezed enough, squeeze again. The spinach should be almost dry to the touch. If liquid pools in your filling bowl, you need to drain it off or squeeze more.
Letting Phyllo Dry Out – Phyllo becomes brittle and impossible to work with when exposed to air. It will crack and crumble, making layering nearly impossible. Always keep unused sheets covered with a slightly damp (emphasis on slightly—wringing wet is too much) kitchen towel. If sheets do dry out, you can’t reverse it. Your only option is to piece together cracked sheets and bind them with butter.
Skimping on the Butter – I understand the impulse to be “healthier” by using less butter, but phyllo absolutely requires generous buttering to achieve proper texture. Each layer needs to be well-coated. Under-buttered phyllo won’t separate into flaky layers—it will be tough and chewy. If you must reduce fat, make a smaller pan of spanakopita rather than reducing butter per layer. Alternatively, use olive oil, which is traditional and slightly lighter than butter.
Adding Filling While Still Hot – If you add warm or hot filling to phyllo, the moisture and heat will make the bottom layers soggy before you even get to the oven. Always cool your filling completely to room temperature. Spread it on a baking sheet to speed up cooling if you’re in a hurry.
Cutting After Baking Instead of Scoring Before – Attempting to cut through baked phyllo layers crushes them and creates messy, jagged pieces. The top layers shatter, the middle compresses, and you lose all those beautiful flaky layers. Always score (cut partway through) before baking. Then after baking and resting, you can simply cut through the remaining layers following your score marks.
Overbaking or Underbaking – Spanakopita should be deeply golden brown—not pale, not burnt. Pale phyllo is tough and chewy; burnt phyllo is bitter. The sweet spot is a rich, deep golden color. Every oven is different, so check after 40 minutes and adjust accordingly. If the top is browning too fast but the center isn’t done, tent loosely with foil.
Storage & Meal Prep
Spanakopita is excellent for meal prep and actually tastes even better the next day as flavors meld:
Refrigerator Storage: Once cooled completely, cover the baking dish tightly with plastic wrap or aluminum foil, or transfer pieces to an airtight container. Properly stored spanakopita will keep for 4-5 days in the refrigerator. The phyllo will soften slightly in the fridge but crisps up beautifully when reheated.
Reheating for Crispy Phyllo: This is key—never microwave spanakopita if you want crispy layers! The microwave creates steam that makes phyllo soggy and rubbery. Instead, reheat in a 350°F oven for 15-20 minutes until heated through and the phyllo crisps up again. You can reheat individual pieces on a baking sheet or the whole pan. For extra crispiness, increase temperature to 375°F for the last 5 minutes.
Room Temperature Serving: Spanakopita is also delicious at room temperature, which makes it perfect for picnics, potlucks, or packed lunches. Many Greeks prefer it this way. Just remove from the fridge 30 minutes before serving.
Meal Prep Strategy: Make spanakopita on Sunday, cut into individual portions, and you have lunch or dinner sorted for several days. Pack a piece with a simple salad, some olives, and fresh fruit for a complete Mediterranean meal.
Maintaining Texture: If you notice the phyllo becoming soft during storage, a quick blast in a hot oven (400°F for 5-7 minutes) will restore much of its crispiness.
Make-Ahead & Freezer Notes
Spanakopita is one of the best make-ahead dishes, perfect for busy weeks and entertaining:
Make-Ahead Assembly (Refrigerator):
- 24 Hours Ahead: Assemble the spanakopita completely, cover tightly with plastic wrap, and refrigerate unbaked. When ready to bake, remove from fridge, let sit at room temperature for 15 minutes, then bake as directed, adding 5-10 extra minutes to the baking time since it’s starting cold.
- Filling Only: Make the filling up to 2 days ahead and refrigerate. Bring to room temperature before assembling with phyllo.
Freezing Unbaked Spanakopita (Best Method): This is ideal for preparing ahead:
- Assemble the spanakopita completely in a disposable aluminum pan or your regular baking dish
- Score the top as directed
- Wrap tightly with plastic wrap, then cover with aluminum foil
- Label and freeze for up to 3 months
- To bake: Do not thaw! Bake directly from frozen at 350°F for 60-75 minutes, covering with foil if top browns too quickly
- The benefit of baking from frozen is that phyllo stays crispier since ice crystals don’t have time to turn into moisture
Freezing Baked Spanakopita: While freezing unbaked is preferred, you can freeze baked:
- Cool completely, then cut into portions
- Wrap individual pieces tightly in plastic wrap, then place in a freezer bag
- Freeze for up to 2 months
- Reheat from frozen at 350°F for 25-30 minutes until heated through and crispy
Best Reheating from Frozen: Place frozen pieces on a baking sheet and bake at 350°F for 20-25 minutes for individual portions, or 60+ minutes for a whole pan. The phyllo will crisp up beautifully as it reheats.
Pro Freezer Tip: If you entertain often, keep a few frozen unbaked spanakopitas in your freezer. They go from freezer to impressive appetizer in about an hour with zero stress.
Serving Suggestions
Spanakopita shines in many serving contexts. Here’s how to present this Greek spinach pie at its best:
As an Appetizer:
- Cut into small triangles or squares for parties
- Serve on a platter with tzatziki sauce, hummus, and warm pita bread
- Pair with other mezze items like dolmades (stuffed grape leaves), olives, and feta
- Offer lemon wedges for squeezing over top
As a Main Course:
- Serve 2-3 pieces per person with a Greek salad
- Pair with roasted vegetables and lemon potatoes
- Add a simple soup like avgolemono (Greek lemon soup)
- Serve with a grain salad like tabbouleh or couscous
Greek Feast Spread:
- Include as part of a full Greek dinner with moussaka, grilled lamb, Greek salad, tzatziki, and baklava for dessert
- Serve family-style in the center of the table
- Include a variety of dipping sauces
Side Dish Pairings:
- Greek Salad (Horiatiki): Tomatoes, cucumbers, red onion, Kalamata olives, feta, oregano
- Tzatziki Sauce: Cucumber-yogurt sauce for dipping or drizzling
- Lemon Potatoes: Roasted potatoes with lemon, olive oil, and oregano
- Roasted Vegetables: Eggplant, zucchini, bell peppers with herbs
- Chickpea Salad: Mediterranean chickpea salad with parsley and lemon
- Orzo Pasta: Simple orzo with butter and parmesan
Beverage Pairings:
- Wine: Crisp white wines like Assyrtiko (Greek), Sauvignon Blanc, or Pinot Grigio
- Beer: Light lagers or wheat beers
- Greek Options: Ouzo (anise-flavored aperitif) or retsina (traditional Greek wine)
- Non-Alcoholic: Fresh lemonade, iced tea with mint, or sparkling water with lemon
Brunch Service:
- Serve with a simple arugula salad
- Pair with fresh fruit and Greek yogurt
- Add poached or soft-boiled eggs on the side
- Offer mimosas or Greek coffee
FAQs Section
Can I use fresh phyllo dough instead of frozen? Absolutely! Fresh phyllo (sometimes found in Greek or Middle Eastern markets) is actually easier to work with than frozen as it’s more pliable and less prone to tearing. Use it the same way as frozen, but you don’t need to thaw it. Fresh phyllo should still be kept covered with a damp towel while working.
Why is my spanakopita soggy in the middle? The number one culprit is wet spinach. Make sure you’ve squeezed out all excess liquid—the spinach should be almost dry. Other causes include: adding hot filling to phyllo, not using enough butter between layers, not scoring before baking (which traps steam), or underbaking. The solution: squeeze spinach thoroughly, cool filling completely, butter generously, score the top, and bake until deeply golden.
Can I make spanakopita without eggs for an egg-free version? Yes, though the texture will be slightly different. Eggs help bind the filling and create a custard-like consistency. For egg-free spanakopita, increase the ricotta or add Greek yogurt (about ½ cup) for binding. Some cooks use a flax egg (1 tablespoon ground flaxseed mixed with 3 tablespoons water per egg) or add 2 tablespoons flour to help bind the mixture.
What’s the difference between spanakopita and spanakopita triangles? They’re the same recipe! Spanakopita triangles (also called spanakopita bites or tiropitakia) are simply individual portions where phyllo strips are filled and folded into triangles. The large pan version is easier and less time-consuming, while triangles are perfect for appetizers and easier portion control. Both use the same filling.
Can I substitute the feta with another cheese? Feta is really essential to authentic spanakopita flavor—its salty, tangy profile is what makes the dish distinctive. However, if you must substitute, try a combination of ricotta (for creaminess) and parmesan (for saltiness), though the flavor will be quite different. Goat cheese can also work as it has a similar tangy quality. For dairy-free versions, look for cashew-based or almond-based feta alternatives at health food stores. Some cooks have had success with well-drained, firm tofu crumbled and mixed with nutritional yeast, lemon juice, and salt to mimic feta’s texture and tanginess.
How do I prevent phyllo from tearing when I work with it? First, ensure phyllo is properly thawed (overnight in the refrigerator). Work quickly but calmly, and keep unused sheets covered with a slightly damp towel. If sheets do tear, don’t panic—simply piece them together and brush with butter. The butter acts as “glue” and will seal any tears. Remember, you’re layering multiple sheets, so tears in individual sheets won’t show in the final product. Professional bakers say that even they get tears regularly—it’s the nature of working with such delicate pastry.
Is spanakopita gluten-free? Traditional spanakopita is not gluten-free due to the phyllo dough, which is made from wheat flour. However, some specialty stores carry gluten-free phyllo dough (usually made from rice flour or corn starch), though it can be expensive and harder to find. Alternatively, you can make a crustless version by simply baking the filling in a greased pan (similar to a crustless quiche), or use large rice paper sheets brushed with oil as a phyllo substitute, though the texture will be quite different.
Can I add meat to spanakopita? While traditional spanakopita is vegetarian, you can certainly add cooked ground meat for a heartier version. Sauté ½ pound ground lamb or beef with the onions, drain excess fat, and mix into the filling. This creates a variation that’s similar to Turkish börek. Some Greek cooks add small amounts of crumbled cooked bacon or prosciutto for smoky flavor, though this is non-traditional. If adding meat, you may want to reduce the feta slightly so the filling doesn’t become too heavy.
Conclusion
There’s something deeply satisfying about pulling a golden, flaky pan of homemade spanakopita from your oven. The way those butter-brushed phyllo layers shatter under your fork, revealing the savory, herb-flecked spinach and feta filling—it’s the kind of moment that makes you feel like a culinary rockstar, even if it’s your first time making it.
This authentic Greek spanakopita recipe proves that impressive, restaurant-quality dishes don’t have to be complicated or intimidating. Yes, working with phyllo requires a bit of patience, and yes, you need to be diligent about removing moisture from the spinach, but these are simple, manageable steps that lead to absolutely spectacular results. The hands-on time is minimal, the ingredients are straightforward and affordable, and the finished dish feeds a crowd while looking like you spent hours in the kitchen.
What I love most about spanakopita is its incredible versatility. Make it for a fancy dinner party and guests will be amazed. Make it for meal prep Sunday and you’ll have delicious lunches all week. Freeze a batch and you’ll have an impressive appetizer ready at a moment’s notice. Cut it into triangles for cocktail parties or into squares for family dinner—it adapts to whatever you need.
The beauty of traditional recipes like this is that they’ve been perfected over centuries by Greek grandmothers who knew exactly what they were doing. When you follow their wisdom—generous butter, well-drained spinach, plenty of fresh herbs, good feta—you simply cannot go wrong.
Ready to bring the flavors of Greece into your kitchen? Grab some phyllo dough and fresh spinach, and discover why spanakopita has been beloved for generations. After your first batch, you’ll understand why this crispy, savory pie has captured hearts around the world. Trust me, once you realize how achievable it is to make restaurant-quality Greek food at home, you’ll be making this easy spanakopita recipe on repeat!
I’d love to hear about your spanakopita adventures! Did you try any of the variations? Did your family devour it as quickly as mine does? Leave a comment below sharing your experience, and don’t forget to Pin this authentic Greek spanakopita recipe to your Pinterest boards so you’ll have it ready whenever the craving strikes. Your future self (and your dinner guests) will thank you!
Kali orexi! (That’s “good appetite” in Greek—now you’re practically fluent!)