Pull-Apart Cheesy Garlic Bread Recipe – Irresistibly Cheesy & Easy!

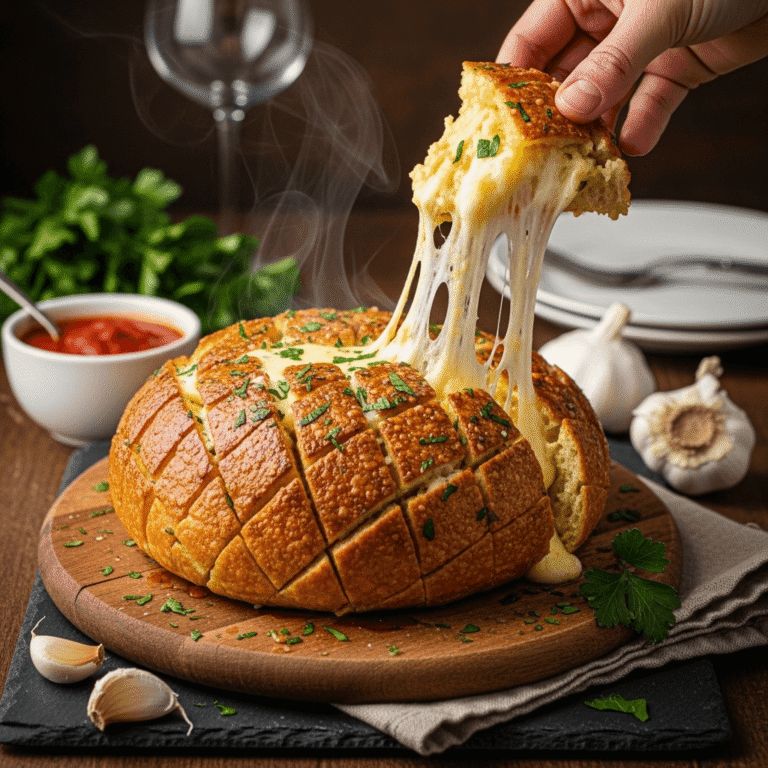
There’s something absolutely magical about pull-apart cheesy garlic bread – that gorgeous loaf stuffed with melted cheese and fragrant garlic butter that you can tear apart piece by delicious piece. This easy pull-apart garlic bread is the ultimate crowd-pleaser, featuring a crusty bread loaf sliced into a crosshatch pattern, stuffed with butter, garlic, and plenty of gooey melted cheese. It’s the kind of appetizer or side dish that disappears in minutes, with everyone reaching for “just one more piece” until the whole loaf is gone.
What makes this cheesy garlic bread pull-apart loaf so irresistible is how it combines the best of everything: crispy edges, soft fluffy interior, rich garlic butter, and cheese that stretches with every pull. This homemade pull-apart bread is perfect for parties, game day gatherings, pasta dinners, soup nights, or anytime you want something impressive that’s actually incredibly easy to make. The best part? You can prep it ahead and just pop it in the oven when guests arrive, filling your home with the most amazing aroma of garlic and melting cheese!
History / Background
Pull-apart bread, also known as “crack bread” due to its addictive nature, is a relatively modern culinary creation that emerged from the broader tradition of garlic bread and party breads. While garlic bread itself has Italian-American origins dating back to the mid-20th century, the pull-apart version is a more recent innovation that gained massive popularity through social media and food blogs in the 2010s.
The concept of stuffing bread with flavorful ingredients has roots in various cultures – from Middle Eastern stuffed breads to French pan bagnat. However, the specific pull-apart style we know today likely evolved from Australian cheese and bacon pull-apart bread (sometimes called “damper” when made with simple bread dough), which became a viral sensation in the early 2010s.
The American version of cheesy garlic pull-apart bread combines several beloved food traditions: the Italian-American love of garlic bread, the French approach to crusty bread, and the very American enthusiasm for cheese – lots and lots of cheese! The crosshatch cutting technique creates individual “tear-able” sections while keeping the loaf intact, making it perfect for sharing at parties without needing to slice or serve individual portions.
The dish gained explosive popularity on Pinterest and Instagram because it’s so visually striking – the golden, cheese-stuffed loaf looks impressive and photographs beautifully. The interactive nature of pulling apart your own piece also makes it fun for gatherings. Food bloggers embraced it as the ultimate party food, and variations proliferated with different cheeses, herbs, and add-ins.
Today, pull-apart garlic cheese bread has become a staple of American entertaining, right up there with dips and wings. It represents how traditional recipes evolve through social sharing and how a simple concept – bread + garlic + cheese – can be transformed into something that feels special and celebratory. This recipe honors that tradition while keeping it accessible for home cooks everywhere.
Why You’ll Love This Recipe
This cheesy pull-apart garlic bread recipe is about to become your new favorite thing to bring to parties – and trust me, you’ll be asked to bring it to every single gathering after people try it once. It’s got that rare combination of looking incredibly impressive while being ridiculously easy to make. No one needs to know it only took you 15 minutes to prep!
Here’s why you’ll fall in love with this pull-apart bread:
- Insanely easy – Just slice, stuff, and bake. That’s it!
- Ready in 30 minutes – From start to hot, cheesy perfection
- Always a crowd favorite – Seriously, this disappears first at every party
- Impressive presentation – Looks like you spent hours on it
- Minimal ingredients – Bread, butter, garlic, cheese, and herbs
- Customizable – Easy to adjust flavors and cheese types
- Perfect for sharing – No knife needed, everyone pulls their own piece
- Make-ahead friendly – Prep hours ahead, bake when ready
- Budget-friendly – Costs just a few dollars to make
- Kid-approved – Even picky eaters love this cheesy bread
- Pairs with everything – Goes with pasta, soup, salads, or stands alone
Ingredient Notes
Let’s break down what makes this easy cheesy pull-apart bread so incredibly delicious. Each ingredient plays an important role in creating those perfect garlicky, cheesy pulls.
Round Bread Loaf: The foundation of your pull-apart bread. A round sourdough loaf works beautifully, but Italian bread, French bread, or even a hearty white bread loaf all work great. Choose an unsliced loaf with a good crust and soft interior. The round shape is traditional and looks impressive, but oval loaves work too – you’ll just have rectangular sections instead of squares.
Unsalted Butter: Essential for carrying all the garlic flavor into every crevice of the bread. Unsalted butter lets you control the salt level. Make sure it’s melted and slightly cooled for easy brushing. Don’t substitute with margarine – real butter provides the flavor and richness this recipe needs.
Fresh Garlic: Fresh minced garlic is absolutely essential for authentic garlic bread flavor. Don’t use garlic powder here – fresh garlic provides that pungent, aromatic quality that makes garlic bread so irresistible. You’ll need about 4-6 cloves depending on how garlicky you like it. More garlic = more flavor!
Shredded Mozzarella: The primary cheese that creates those gorgeous cheese pulls. Mozzarella melts beautifully and has mild flavor that doesn’t overpower the garlic. Freshly shredded melts better than pre-shredded (which contains anti-caking agents), but either works. You’ll need plenty – don’t skimp!
Shredded Cheddar: Adds sharp flavor and golden color to complement the mild mozzarella. Sharp cheddar provides more flavor than mild. The combination of mozzarella and cheddar creates the perfect balance of meltability and taste.
Fresh Parsley: Adds color, freshness, and subtle herbaceous flavor. Flat-leaf (Italian) parsley has better flavor than curly, but either works. Dried parsley can substitute in a pinch (use 1 tablespoon), though fresh looks prettier and tastes better.
Salt and Black Pepper: Essential seasonings that enhance all the other flavors. Even though cheese has salt, you still need a bit more to season the butter mixture and bring out the garlic flavor.
Optional Add-Ins: Some people add grated Parmesan (for extra umami), red pepper flakes (for heat), Italian seasoning (for more herbs), or crispy bacon bits (for smokiness). All delicious additions!
Equipment Needed
Making pull-apart garlic cheese bread requires minimal equipment – just basic kitchen tools:
- Sharp serrated knife – Essential for making clean cuts without crushing the bread
- Cutting board – For stable slicing
- Small bowl or measuring cup – For mixing the garlic butter
- Pastry brush or spoon – For spreading garlic butter into cuts
- Aluminum foil – For wrapping and baking the bread
- Baking sheet – To place the foil-wrapped bread on
- Measuring cups and spoons – For accurate ingredient amounts
Optional but helpful:
- Kitchen shears (for snipping herbs)
- Garlic press (for easy garlic mincing)
- Oven mitts (for handling hot foil)
Pull-Apart Cheesy Garlic Bread Recipe
This easy pull-apart cheesy garlic bread features a crusty bread loaf stuffed with garlic butter and melted cheese. Perfect for parties, game day, or any time you want an impressive crowd-pleaser that takes just 30 minutes!
- Total Time: 30 minutes
- Yield: 8 servings 1x
Ingredients
- 1 large round bread loaf (sourdough, Italian, or French bread)
- ½ cup (1 stick) unsalted butter, melted
- 4-6 cloves garlic, minced
- 2 tablespoons fresh parsley, finely chopped
- ½ teaspoon salt
- ¼ teaspoon black pepper
- 1½ cups shredded mozzarella cheese
- 1 cup shredded cheddar cheese
- Optional: ¼ cup grated Parmesan cheese
- Optional: ½ teaspoon red pepper flakes
Instructions
- Preheat oven: Preheat your oven to 350°F (175°C). Tear off a large piece of aluminum foil, big enough to completely wrap your bread loaf.
- Slice the bread: Place the bread loaf on a cutting board. Using a sharp serrated knife, make cuts across the bread in one direction about 1 inch apart, cutting down to about ½ inch from the bottom (don’t cut all the way through!). Rotate the bread 90 degrees and make perpendicular cuts the same way, creating a crosshatch pattern of squares. The bread should still be connected at the bottom.
- Make garlic butter: In a small bowl, combine melted butter, minced garlic, chopped parsley, salt, and pepper. Mix well until everything is evenly distributed.
- Stuff with butter: Place the sliced bread on the aluminum foil. Using a pastry brush or spoon, generously brush the garlic butter mixture into all the cuts, making sure to get it deep into the crevices. Use all the butter – don’t hold back! Pour any remaining butter over the top.
- Add the cheese: Stuff the shredded mozzarella and cheddar cheese into all the cuts, pushing it down between the bread pieces. Pack in as much cheese as possible – the more cheese, the better the cheese pulls! Sprinkle any remaining cheese over the top, and add Parmesan and red pepper flakes if using.
- Wrap and bake: Wrap the bread completely in the aluminum foil, creating a sealed packet. Place on a baking sheet and bake for 15 minutes.
- Unwrap and crisp: After 15 minutes, carefully open the foil and fold it back to expose the top of the bread. Return to the oven and bake uncovered for 5-10 more minutes, until the cheese is melted and bubbly and the top is golden brown.
- Serve immediately: Remove from oven and let cool for 2-3 minutes (the cheese is molten hot!). Transfer to a serving platter or keep on the foil for easy cleanup. Serve hot while the cheese is still gooey and stretchy. Pull apart pieces and enjoy!
Notes
- Bread choice matters: Choose a bread with a good crust and dense, sturdy crumb. Soft sandwich bread won’t work well as it’s too delicate.
- Don’t cut through: Make sure your cuts don’t go all the way through the bottom. The bread needs to stay connected to hold together.
- Fresh garlic is key: Garlic powder doesn’t provide the same flavor punch. Use fresh minced garlic for authentic garlic bread taste.
- Cheese temperature: Let cheese sit at room temperature for 20 minutes before stuffing – it melts more evenly than cold cheese.
- Watch the final browning: During the uncovered baking, watch closely to prevent burning. Every oven is different!
- Serve immediately: This bread is best served hot and fresh. The cheese firms up as it cools.
- Make-ahead tip: Prepare completely through stuffing with butter and cheese, then wrap and refrigerate up to 4 hours before baking.
- Prep Time: 15 minutes
- Cook Time: 15 minutes
- Category: Appetizer
- Method: Baking
- Cuisine: American
- Diet: Vegetarian
Nutrition
- Serving Size: 1/8 of loaf
- Calories: 385
- Sugar: 3g
- Sodium: 625mg
- Fat: 22g
- Saturated Fat: 13g
- Unsaturated Fat: 8g
- Trans Fat: 0g
- Carbohydrates: 32g
- Fiber: 2g
- Protein: 14g
- Cholesterol: 60mg
Tips & Variations
Cheese Variations:
- Italian blend: Use mozzarella, provolone, and Parmesan
- Spicy kick: Add pepper jack cheese and jalapeños
- Extra sharp: Use aged cheddar and Gruyère
- Four cheese: Mozzarella, cheddar, Parmesan, and fontina
- Cream cheese addition: Add dollops of softened cream cheese for extra creaminess
Flavor Add-Ins:
- Herb lovers: Add fresh basil, oregano, or thyme to butter
- Bacon everything: Stuff with cooked, crumbled bacon
- Pizza style: Add mini pepperoni and Italian seasoning
- Ranch flavor: Mix ranch seasoning into the butter
- Pesto twist: Spread pesto between cuts before adding butter
Bread Options:
- Sourdough (classic choice with great tang)
- Italian bread (traditional and sturdy)
- French bread (crusty and delicious)
- Ciabatta (airy texture, great for absorbing butter)
- Whole wheat (for a healthier option)
Make It Healthier:
- Use whole grain bread
- Reduce butter to ⅓ cup and add olive oil
- Use part-skim mozzarella
- Add spinach or sun-dried tomatoes between cuts
- Use less cheese overall (still delicious with 1½ cups total)
Special Dietary Needs:
- Gluten-free: Use gluten-free bread loaf
- Vegan: Use vegan butter and dairy-free cheese (won’t be quite as stretchy)
- Keto-friendly: Use keto bread or make from almond flour bread
Pro Chef Tips
Tip #1: The Right Bread Makes All the Difference
Professional bakers know that bread selection is crucial. Choose a loaf with a tight, sturdy crumb that won’t fall apart when cut. The crust should be thick enough to hold its shape but not so hard it’s difficult to cut through. Day-old bread actually works better than fresh because it’s slightly drier and absorbs the butter mixture without getting soggy. Avoid soft sandwich bread – it’s too delicate for this application.
Tip #2: Sharp Knife, Confident Cuts
Use a sharp serrated knife and make confident, smooth cuts in one motion rather than sawing back and forth. Sawing tears the bread and creates uneven pieces. Cut straight down with steady pressure. The 1-inch spacing creates perfect pull-apart pieces – closer cuts make it too delicate, wider cuts don’t give enough surface area for butter and cheese.
Tip #3: Be Generous with Everything
Don’t be stingy with the butter, garlic, or cheese! Professional versions of this dish are loaded with all three. Every cut should glisten with garlic butter, and you should pack as much cheese as physically possible between the sections. The excess butter pools at the bottom of the foil and gets absorbed by the bread during baking, creating incredible flavor.
Tip #4: Room Temperature Cheese Melts Better
Cold cheese from the fridge doesn’t melt as evenly or quickly. Take your cheese out 20-30 minutes before making the bread, or warm it briefly in the microwave (just to take the chill off, not to melt it). Room temperature cheese melts more evenly and creates better cheese pulls.
Tip #5: The Two-Stage Baking is Essential
Baking wrapped for 15 minutes steams the bread and melts the cheese throughout. Opening the foil for the final 5-10 minutes crisps the top and creates that golden, slightly crunchy exterior. Skip either stage and you’ll have either soggy bread or unmelted cheese. Both steps are important for perfect texture.
Tip #6: Timing is Everything
Serve this bread immediately while it’s hot. The cheese is stretchiest and most photogenic in the first 10 minutes. As it cools, cheese firms up and those dramatic pulls diminish. If you need to wait, keep it wrapped in foil in a warm oven (200°F) until serving, then unwrap and let guests pull pieces while it’s hot.
Common Mistakes to Avoid
Mistake #1: Cutting All the Way Through
If you cut through the bottom of the bread, it falls apart into individual pieces instead of staying connected as a pull-apart loaf. Make your cuts about ½ inch from the bottom – enough to keep it connected but not so much that the cuts don’t open up for stuffing. A good test: you should be able to see light through the cuts but the bottom should be solid.
Mistake #2: Using Too-Soft Bread
Soft sandwich bread or hot dog buns don’t have the structure needed for pull-apart bread. They become soggy from the butter and fall apart when you try to pull pieces. Always use a sturdy artisan-style loaf with good crust and dense crumb that can hold up to the butter and cheese.
Mistake #3: Skimping on Butter or Cheese
Trying to make a “lighter” version by cutting butter or cheese means you miss out on what makes this special – the rich, indulgent, gooey deliciousness. This isn’t health food, it’s party food! If you want fewer calories, eat a smaller portion. But when you make it, make it right with generous amounts of both.
Mistake #4: Not Opening the Foil at the End
Leaving the bread completely wrapped for the entire baking time creates steam that makes the top soggy instead of golden and crispy. You need that final unwrapped baking time to crisp the top, brown the cheese, and create textural contrast. Don’t skip this step!
Mistake #5: Serving It Too Cool
Pull-apart bread should be served hot when the cheese is melty and stretchy. As it cools, cheese solidifies and loses that amazing pull factor. If you make it ahead and it cools, reheat briefly in the oven before serving. Cold or room temperature pull-apart bread just isn’t the same.
Storage & Meal Prep
Room Temperature:
Pull-apart garlic cheese bread is best enjoyed fresh and hot, but leftovers can sit at room temperature, loosely covered with foil, for up to 2 hours according to food safety guidelines. After that, refrigerate any remaining bread.
Refrigerator Storage:
Wrap leftover bread tightly in aluminum foil or place in an airtight container. Refrigerate for up to 3 days. The bread will firm up and lose some of its crispy texture, but it’s still delicious. Reheat before serving for best results.
Reheating Instructions:
The best way to reheat is in the oven: wrap in foil and bake at 350°F for 10-15 minutes until heated through. For the last 2-3 minutes, open the foil to re-crisp the top. You can also reheat individual pieces in the microwave for 20-30 seconds, but they won’t be crispy.
Texture After Storage:
The bread becomes slightly less crispy and the cheese firms up after refrigeration. This is normal! Reheating in the oven wrapped in foil helps restore moisture and meltiness. While it won’t be quite as perfect as fresh, it’s still very good.
Make-Ahead & Freezer Notes
Prep-Ahead Strategy:
This cheesy garlic pull-apart bread is perfect for advance preparation! Complete all steps through stuffing with butter and cheese, then wrap tightly in foil and refrigerate for up to 4 hours before baking. When ready to serve, let sit at room temperature for 15 minutes, then bake as directed (you may need to add 5 extra minutes since starting cold).
Day-Before Assembly:
You can fully assemble the bread the night before your party. After stuffing with butter and cheese, wrap very tightly in foil and refrigerate overnight. Bring to room temperature for 20-30 minutes before baking. This makes entertaining so much easier – just pop it in the oven when guests arrive!
Freezing Unbaked:
Assemble completely, wrap tightly in plastic wrap and then foil, and freeze for up to 1 month. To bake from frozen, unwrap plastic (keep foil), and bake at 350°F wrapped for 25 minutes, then unwrap and bake 10 more minutes. The bread will be almost as good as fresh!
Freezing Baked Bread:
You can freeze already-baked pull-apart bread for up to 2 months. Let cool completely, wrap tightly in foil, then place in a freezer bag. Thaw overnight in refrigerator, then reheat wrapped in foil at 350°F for 15-20 minutes. The texture won’t be quite as perfect as fresh, but it’s still tasty.
Best Make-Ahead Approach:
For optimal quality with maximum convenience, prep the bread completely (cut, stuff with butter and cheese) up to 4 hours ahead and refrigerate. Bake just before serving. This gives you all the benefits of advance prep while maintaining that fresh-baked quality.
Serving Suggestions
This pull-apart cheesy garlic bread pairs beautifully with so many dishes. Here’s how to serve it for maximum impact:
Perfect Pairings:
- Italian dishes: Serve with spaghetti, lasagna, or any pasta dish
- Soups: Perfect alongside tomato soup, minestrone, or creamy soups
- Salads: Complements Caesar salad or mixed greens
- Grilled meats: Great with steak, chicken, or barbecue
- Pizza night: Serve as an appetizer before pizza
- Wine and cheese: Works as part of a casual wine tasting spread
Party Presentation:
- Place on a wooden board for rustic appeal
- Surround with fresh herbs for garnish
- Set out marinara sauce for dipping
- Add flavored olive oils on the side
- Include small plates and napkins nearby
Complete Meal Ideas:
- Italian Night: Pull-apart bread, Caesar salad, spaghetti carbonara
- Soup & Bread: Tomato soup, this bread, simple green salad
- Game Day Spread: Pull-apart bread, wings, dips, veggies
- Casual Dinner: This bread, rotisserie chicken, roasted vegetables
Beverage Pairings:
- Red wine (Chianti or Sangiovese)
- White wine (Pinot Grigio)
- Beer (light lagers or wheat beers)
- Sparkling water with lemon
- Iced tea
Make It a Meal: While typically an appetizer or side, you can make this more substantial by adding extra protein like shredded chicken, pulled pork, or sausage between the cuts. This creates a heartier dish that can serve as a main course.
FAQs Section
Q: Can I use pre-sliced bread?
A: Pre-sliced bread won’t work for this recipe because the slices are completely separated and won’t hold together as a pull-apart loaf. You need an unsliced loaf that you cut yourself, leaving the bottom intact so the pieces stay connected while still being easy to pull apart.
Q: What if my bread falls apart while cutting?
A: Make sure you’re using a sharp serrated knife and cutting with confident, smooth motions rather than sawing. Leave at least ½ inch at the bottom uncut. If your bread is very soft or fresh, try refrigerating it for 30 minutes first to firm it up, making cleaner cuts easier.
Q: Can I make this without garlic?
A: While garlic is a key flavor component, you can make herb and cheese pull-apart bread by omitting garlic and increasing the herbs. Try Italian seasoning, fresh basil, or rosemary instead. It’ll be different but still delicious – more like a cheesy herb bread than traditional garlic bread.
Q: Why isn’t my cheese melting properly?
A: Make sure you’re wrapping the bread tightly in foil for the first baking stage – this traps steam and heat that melts the cheese. Also, use good quality cheese and shred it yourself rather than using pre-shredded. Cold cheese straight from the fridge takes longer to melt, so let it sit at room temperature first.
Q: Can I use frozen bread dough?
A: This recipe is designed for a store-bought baked loaf, not dough. However, you could bake frozen bread dough according to package directions, let it cool, then use it for this recipe. The texture will be different than using artisan bakery bread, but it can work.
Q: How do I keep it warm for a party?
A: After baking, keep the bread wrapped loosely in foil in a warm oven (200°F) for up to 30 minutes. For longer parties, you can reheat wrapped bread at 350°F for 5-10 minutes to refresh it. Don’t leave it at room temperature too long or the cheese firms up.
Q: What’s the best cheese for maximum stretch?
A: Mozzarella is the champion of cheese pulls! Use whole milk mozzarella (not part-skim) for the stretchiest results. Low-moisture mozzarella melts well too. Combining mozzarella with other cheeses gives you both stretch and flavor. Fresh mozzarella is too wet and won’t work as well.
Conclusion
And there you have it – everything you need to make the most incredible, cheese-filled, garlic-buttery pull-apart bread that will have everyone at your table fighting over the last piece! This easy cheesy garlic bread proves that the best party foods don’t require complicated techniques or hours of work. Just good bread, real butter, fresh garlic, and plenty of melted cheese create something truly spectacular.
The beauty of this homemade pull-apart bread is its versatility and guaranteed success. Whether you’re entertaining for a holiday, bringing something to a potluck, or just want to make dinner extra special, this recipe delivers every single time. It’s become a modern classic for good reason – it simply works, looks impressive, and everyone absolutely loves it!
Ready to make the most amazing pull-apart bread? I’d love to hear how yours turns out! Drop a comment below and let me know what you think, any variations you tried, or how fast it disappeared at your gathering. And if this becomes your new go-to party bread (and I think it will!), please save this recipe to your Pinterest boards so you can find it easily next time – and help other home cooks discover this amazing recipe too! Your pins and shares truly keep this blog going and inspire me to create more delicious recipes for you. Now grab that bread loaf and get ready to create some cheese-pull magic! 🧀