Crispy Parmesan Garlic Wings Recipe (Better Than Buffalo Wild Wings!)

There’s something undeniably addictive about crispy Parmesan garlic wings—those golden-brown beauties coated in a buttery garlic sauce and showered with freshly grated Parmesan cheese. This baked garlic Parmesan wings recipe delivers restaurant-quality results without the deep fryer, creating wings that are perfectly crispy on the outside, tender and juicy on the inside, and loaded with savory garlic and cheese flavor that keeps everyone reaching for just one more.
What makes these garlic Parmesan chicken wings so irresistible is the combination of textures and flavors. The secret technique of coating wings in baking powder creates an ultra-crispy skin that rivals any deep-fried version, while the garlic butter sauce adds richness and the Parmesan brings that salty, umami punch. Unlike traditional Buffalo wings with their spicy heat, these offer bold flavor that the whole family can enjoy, from kids to grandparents.
Perfect for game day parties, Super Bowl celebrations, casual dinners, family movie nights, potluck contributions, or anytime you’re craving wings without the guilt of deep frying, these easy baked wings never disappoint. They’re elegant enough for entertaining yet simple enough for weeknight dinners. Serve them as an appetizer before dinner, as the main event with sides, or as part of a wing bar with multiple sauces for guests to choose from.
History / Background
While chicken wings have been a staple in cuisines worldwide for centuries, the modern American obsession with chicken wings as bar food and party fare is surprisingly recent. The iconic Buffalo wing was invented in 1964 at the Anchor Bar in Buffalo, New York, when Teressa Bellissimo tossed some chicken wings in hot sauce and butter, creating an instant classic that would change American food culture forever.
However, Parmesan garlic wings emerged as a popular variation in the 1980s and 1990s as wing restaurants expanded beyond the traditional Buffalo-style preparation. As chains like Buffalo Wild Wings, Wingstop, and Hooters proliferated across America, they began offering diverse flavor profiles to appeal to customers who wanted wings without the intense heat of Buffalo sauce.
The garlic Parmesan combination likely draws inspiration from Italian-American cuisine, where garlic and Parmesan are foundational flavor pairings used in countless dishes from pasta to breadsticks. The marriage of these flavors with chicken wings created something entirely new—a perfect fusion of American bar food culture with Italian-American flavor traditions.
The shift from exclusively fried wings to baked wings came later, driven by health-conscious consumers seeking ways to enjoy their favorite foods with less oil. Home cooks and food bloggers discovered that with the right techniques—particularly the baking powder method—oven-baked wings could achieve the same crispy texture as fried versions while being significantly healthier and easier to prepare at home.
Today’s crispy garlic Parmesan wings represent the evolution of this beloved appetizer—combining the convenience of baking with restaurant-quality flavor and texture. They’ve become a staple at gatherings and game day parties across America, proving that you don’t need a deep fryer to create extraordinary wings.
Why You’ll Love This Recipe
These aren’t just any baked chicken wings—these are the crispy, flavorful, restaurant-quality garlic Parmesan wings that will make you famous among your friends and family. Every bite delivers that perfect crunch followed by tender, juicy chicken coated in buttery garlic sauce and sharp Parmesan cheese.
Here’s why these baked garlic wings will become your go-to recipe:
- Ultra-Crispy Without Frying – Special baking powder technique creates restaurant-quality crispiness using just the oven
- Healthier Than Traditional Wings – Baked, not fried, with significantly less oil while maintaining incredible texture
- Crowd-Pleasing Flavor – Savory garlic and Parmesan appeal to everyone, including those who don’t like spicy foods
- Easy Preparation – Straightforward steps with no special skills required, perfect for beginner cooks
- Ready in 45 Minutes – From prep to plate faster than ordering takeout
- Budget-Friendly – Chicken wings are affordable, and this recipe serves a crowd without breaking the bank
- Keto-Friendly & Low-Carb – Naturally low in carbs, perfect for low-carb and keto diets
- Party Perfect – Impressive presentation that looks like you ordered from a restaurant
- No Deep Fryer Needed – Eliminates mess, safety concerns, and excessive oil use
- Customizable Heat Level – Adjust garlic and add red pepper flakes to suit your preference
Ingredient Notes
Understanding your ingredients helps you achieve perfect crispy Parmesan garlic wings every time. Let’s break down each component.
Chicken Wings – You’ll need about 2-2.5 pounds of chicken wings for 4 servings. Wings are sold either whole (you’ll need to separate them into drumettes and flats) or already separated. The drumette is the mini-drumstick portion, while the flat (or wingette) is the middle section. Discard or save wing tips for stock—they have minimal meat. Fresh or frozen wings work equally well; just thaw frozen wings completely and pat very dry before proceeding.
Baking Powder – This is the secret ingredient for ultra-crispy skin! Baking powder (not baking soda—they’re different!) raises the pH of the chicken skin, allowing it to brown and crisp more effectively. It also draws out moisture, creating that restaurant-quality crunch. Use aluminum-free baking powder if possible. You need about 1 tablespoon per pound of wings.
Salt and Black Pepper – Simple seasoning that enhances the chicken’s natural flavor. Coarse kosher salt works best for even distribution. Freshly ground black pepper adds subtle heat and aroma.
Butter – Real butter (not margarine) creates the base for the garlic Parmesan sauce. Unsalted butter gives you better control over salt levels. You’ll need about ¼ to ⅓ cup depending on how saucy you like your wings. For dairy-free, ghee works beautifully.
Fresh Garlic – Fresh minced garlic is essential for authentic, bold garlic flavor. You’ll need 4-6 cloves depending on your garlic love. Jarred minced garlic can work in a pinch but lacks the bright, pungent flavor of fresh. Garlic powder doesn’t substitute well here—the sauce needs fresh garlic’s moisture and intensity.
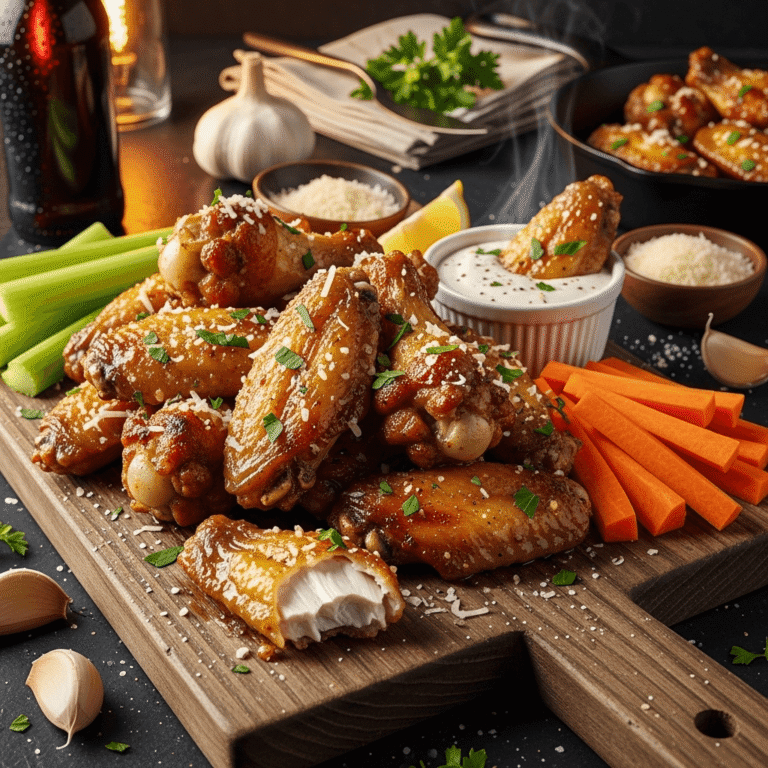
Parmesan Cheese – Use real Parmigiano-Reggiano or high-quality Parmesan cheese, freshly grated from a block. Pre-grated Parmesan from a can or bag contains anti-caking agents that prevent proper melting and clumping on the wings. Fresh-grated melts beautifully and provides superior flavor. You’ll need about ½ to ¾ cup.
Fresh Parsley – Adds color, freshness, and a subtle herbal note that balances the richness. Italian flat-leaf parsley has better flavor than curly, but either works. Fresh is significantly better than dried for garnish.
Optional Ingredients – Red pepper flakes add heat if desired. A splash of lemon juice brightens the sauce. Italian seasoning or dried oregano adds herbaceous notes. Some recipes include a touch of Worcestershire sauce for umami depth.
Equipment Needed
Making perfect crispy wings requires the right tools. Here’s what you’ll need:
- Large Baking Sheet – A rimmed baking sheet (also called a sheet pan or jelly roll pan) with 1-inch sides. Half-sheet pans (18×13 inches) work perfectly.
- Wire Cooling Rack – This is crucial! Placing wings on a rack over the baking sheet allows air to circulate underneath, creating crispiness on all sides. Choose an oven-safe metal rack.
- Large Mixing Bowl – For tossing wings with baking powder and seasonings, and later with the sauce.
- Small Saucepan – For melting butter and making the garlic Parmesan sauce.
- Paper Towels – Essential for drying wings thoroughly before seasoning.
- Tongs – For flipping wings halfway through baking and tossing in sauce.
- Measuring Cups and Spoons – For accurate ingredient portions.
- Grater or Microplane – For freshly grating Parmesan cheese.
- Sharp Knife and Cutting Board – For mincing garlic and chopping parsley.
- Aluminum Foil or Parchment Paper (Optional) – For easier cleanup, line the baking sheet under the rack.
Parmesan Garlic Wings Recipe
Ultra-crispy baked Parmesan garlic wings with a buttery garlic sauce and freshly grated Parmesan cheese. These restaurant-quality wings are baked, not fried, for a healthier version that’s just as delicious and addictive.
- Total Time: 50 minutes
- Yield: 4 servings (about 20 wing pieces) 1x
Ingredients
For the Wings:
- 2-2.5 pounds chicken wings (drumettes and flats)
- 1½ tablespoons baking powder (aluminum-free if possible)
- 1 teaspoon salt
- ½ teaspoon black pepper
- ½ teaspoon garlic powder (optional)
For the Garlic Parmesan Sauce:
- 5 tablespoons unsalted butter
- 5-6 cloves garlic, minced
- ½ teaspoon salt
- ½ teaspoon black pepper
- ⅔ cup freshly grated Parmesan cheese
- 2 tablespoons fresh parsley, chopped
- ¼ teaspoon red pepper flakes (optional)
- 1 tablespoon lemon juice (optional)
For Serving:
- Extra Parmesan cheese
- Fresh parsley
- Ranch or blue cheese dressing
Instructions
- Prep and Dry the Wings: Remove wings from refrigerator 30 minutes before cooking to bring to room temperature—this helps them cook evenly. Pat wings completely dry with paper towels, pressing firmly to remove all moisture. This is crucial for crispiness! If wings are very wet, let them air-dry on a plate in the refrigerator for 1-2 hours.
- Preheat and Prepare: Preheat oven to 425°F (220°C). Set an oven-safe wire rack on a large baking sheet. For easier cleanup, line the baking sheet with aluminum foil before placing the rack on top. Spray the rack with cooking spray to prevent sticking.
- Season the Wings: In a large bowl, toss the dried wings with baking powder, salt, pepper, and garlic powder (if using). Make sure every wing is evenly coated—the baking powder should be completely distributed with no clumps. Arrange wings in a single layer on the wire rack with space between each piece. Don’t overlap or crowd them, or they won’t crisp properly.
- Bake: Place baking sheet on the middle rack of preheated oven. Bake for 20 minutes, then flip each wing using tongs. Continue baking for another 20-25 minutes until wings are golden brown, crispy, and cooked through (internal temperature should reach 165°F). The skin should look dry and crispy.
- Make the Garlic Butter Sauce: While wings finish baking, melt butter in a small saucepan over medium heat. Add minced garlic and cook for 1-2 minutes, stirring constantly, until fragrant but not browned—burned garlic tastes bitter. Remove from heat and stir in salt, pepper, and red pepper flakes if using. Add lemon juice if desired.
- Toss with Sauce and Cheese: Transfer hot, crispy wings to a large clean bowl. Pour the garlic butter sauce over wings and toss gently but thoroughly to coat every piece. Add freshly grated Parmesan cheese and chopped parsley, then toss again until wings are evenly coated with cheese and herbs. The heat from the wings will melt the Parmesan slightly, creating a delicious coating.
- Serve: Transfer to a serving platter and sprinkle with additional Parmesan and parsley. Serve immediately while hot and crispy with ranch or blue cheese dressing for dipping.
Notes
- Drying is Critical: The drier the wings, the crispier they’ll be. Don’t skip the thorough drying step!
- Baking Powder, Not Baking Soda: These are different! Baking soda will make wings taste metallic. Use baking powder.
- Don’t Overcrowd: Wings need space for air circulation. Use two baking sheets if necessary.
- Temperature Check: Wings are done when internal temperature reaches 165°F and skin is golden and crispy.
- Sauce Consistency: If sauce seems too thick, add 1-2 tablespoons of water or chicken broth to thin slightly.
- Prep Time: 10 minutes
- Cook Time: 40 minutes
- Category: Appetizer
- Method: Baking
- Cuisine: American
- Diet: Gluten Free
Nutrition
- Serving Size: About 5 wing pieces
- Calories: 445
- Sugar: 0g
- Sodium: 895mg
- Fat: 32g
- Saturated Fat: 14g
- Unsaturated Fat: 16g
- Trans Fat: 0g
- Carbohydrates: 1g
- Fiber: 0g
- Protein: 38g
- Cholesterol: 165mg
Tips & Variations
The beauty of garlic Parmesan wings is how easily they adapt to different preferences and occasions:
Extra Crispy Wings – After initial baking, turn on the broiler and broil wings for 2-3 minutes, watching carefully to prevent burning. This creates maximum crispiness and slight charring.
Spicy Garlic Parmesan Wings – Add ½-1 teaspoon cayenne pepper to the baking powder mixture, increase red pepper flakes in sauce to 1 teaspoon, or toss finished wings with hot sauce before adding Parmesan.
Lemon Garlic Parmesan Wings – Add zest of one lemon to the butter sauce and increase lemon juice to 2 tablespoons for bright, citrusy flavor that cuts richness.
Herb Garlic Parmesan Wings – Add 1 teaspoon Italian seasoning, fresh thyme, or fresh rosemary to the butter sauce for more complex herbal notes.
Air Fryer Method – Cook wings in air fryer at 400°F for 20-25 minutes, flipping halfway, then toss with sauce. Results in similar crispiness with even faster cooking time.
Grilled Garlic Parmesan Wings – Grill wings over medium-high heat for 20-25 minutes, turning occasionally, then toss with garlic butter and Parmesan. Adds delicious smoky flavor.
Boneless Wings Version – Use chicken breast cut into chunks or chicken tenders. Reduce baking time to 15-18 minutes total. Perfect for kids!
Asiago or Romano Substitute – Replace Parmesan with Asiago or Pecorino Romano for different sharp, salty cheese flavors.
Pro Chef Tips
Want to elevate your garlic Parmesan wings from good to absolutely restaurant-perfect? These professional techniques make all the difference:
Air-Dry for Ultimate Crispiness – For the crispiest possible wings, arrange seasoned wings on the rack and refrigerate uncovered for 8 hours or overnight. The cold, dry refrigerator air removes surface moisture, creating ultra-crispy skin. This is the secret restaurants use.
Don’t Skip Room Temperature – Cold wings straight from the fridge won’t cook evenly—the outside overcooks before the inside is done. Let wings sit at room temperature 30 minutes before baking for even cooking.
Use Aluminum-Free Baking Powder – While any baking powder works, aluminum-free versions don’t leave any metallic aftertaste that some people detect with regular baking powder.
Double-Check Your Oven Temperature – Home ovens often run 25°F hotter or cooler than the dial indicates. Use an oven thermometer for accuracy. Proper temperature is crucial for crispy wings without burning.
Flip at the Right Time – Wait the full 20 minutes before flipping. Flipping too early can cause skin to stick to the rack and tear. By 20 minutes, the skin has set and releases easily.
Don’t Burn the Garlic – Garlic burns quickly and tastes bitter when burned. Cook just until fragrant (1-2 minutes), stirring constantly. If it starts browning, remove from heat immediately.
Toss in Batches for Even Coating – If making a large quantity, toss wings with sauce in smaller batches to ensure every wing is evenly coated rather than having sauce pool at the bottom.
Serve Immediately – Wings are crispiest straight from the oven. As they sit, the sauce softens the coating. If you must hold them, keep wings on the rack in a 200°F oven for up to 30 minutes.
Fresh Parmesan is Non-Negotiable – Canned “Parmesan” is mostly fillers and tastes nothing like real cheese. Always grate fresh Parmesan from a block for superior flavor and proper melting.
Common Mistakes to Avoid
Even experienced cooks can stumble with wings. Here are the most common pitfalls and how to avoid them:
Not Drying Wings Thoroughly – This is the number one cause of soggy wings. Moisture is the enemy of crispiness. Pat wings aggressively with paper towels until completely dry. If still damp, air-dry in the refrigerator for an hour before seasoning.
Using Baking Soda Instead of Baking Powder – These are completely different! Baking soda (sodium bicarbonate alone) will make wings taste metallic and soapy. Baking powder (which contains baking soda plus acid) is what you need for the pH-raising, crisping magic.
Overcrowding the Pan – Wings that touch each other steam instead of crisp. You need space between each piece for air circulation. Better to use two baking sheets than cram everything onto one.
Skipping the Wire Rack – Placing wings directly on the baking sheet creates a soggy bottom because the underside sits in its own rendered fat. The wire rack allows fat to drip away and air to circulate for all-over crispiness.
Burning the Garlic – Garlic goes from perfectly fragrant to burned and bitter in seconds. Use medium heat, stir constantly, and remove from heat as soon as it’s aromatic. Burned garlic ruins the entire sauce.
Adding Sauce Too Soon – If you sauce wings and then try to bake them further, the sauce burns and wings get soggy. Always bake wings completely until crispy, then toss with sauce off the heat immediately before serving.
Storage & Meal Prep
While wings are best enjoyed fresh, you can successfully store and reheat them with the right techniques:
Refrigerator Storage – Let wings cool completely, then store in an airtight container in the refrigerator for up to 3-4 days. Store any extra sauce separately. Note that wings lose some crispiness when refrigerated—this is normal.
Reheating for Crispiness – The best reheating method is in the oven. Preheat to 375°F, place wings on a wire rack over a baking sheet, and heat for 10-15 minutes until warmed through and slightly re-crisped. Avoid microwaving—it makes wings rubbery and soggy.
Air Fryer Reheating – Place wings in air fryer basket in a single layer and heat at 375°F for 5-7 minutes, shaking basket halfway through. This restores crispiness better than any other method.
Meal Prep Strategy – You can prep wings through step 3 (seasoned and arranged on rack) up to 24 hours ahead. Cover loosely with plastic wrap and refrigerate. When ready to cook, bring to room temperature for 20 minutes, then bake as directed.
Sauce Storage – Store leftover garlic butter sauce in an airtight container in the refrigerator for up to 1 week. Reheat gently in microwave or on stovetop before using.
Make-Ahead & Freezer Notes
Wings are excellent for advance preparation, making them perfect for stress-free entertaining:
Freezing Raw Seasoned Wings – Season wings completely through step 3, arrange on baking sheet, freeze until solid (2-3 hours), then transfer to freezer bags. Freeze for up to 3 months. Bake directly from frozen, adding 10-15 minutes to cooking time.
Freezing Cooked Wings – Freeze fully cooked, unsauced wings in an airtight container or freezer bags for up to 2 months. Separate layers with parchment paper to prevent sticking. Thaw overnight in refrigerator, then reheat in oven at 375°F for 15-20 minutes. Toss with freshly made sauce before serving.
Not Recommended – Freezing already-sauced wings doesn’t work well. The sauce makes them soggy when reheated and the cheese doesn’t maintain its texture. Always freeze unsauced and add sauce after reheating.
Make-Ahead Sauce – Prepare garlic butter sauce up to 3 days ahead and refrigerate. Reheat gently before tossing with hot wings. The flavors actually improve as they meld together.
Party Planning Timeline – For stress-free entertaining, season wings the morning of your event and refrigerate. One hour before guests arrive, bring to room temperature, then bake. Make sauce while wings bake, then toss and serve hot.
Serving Suggestions
Garlic Parmesan wings are versatile and pair beautifully with numerous sides and beverages:
Classic Dipping Sauces:
- Ranch Dressing – The traditional cooling companion
- Blue Cheese Dressing – Classic wing pairing
- Garlic Aioli – Doubles down on garlic flavor
- Honey Mustard – Sweet and tangy contrast
Side Dishes:
- Celery and Carrot Sticks – Traditional, refreshing vegetable pairing
- French Fries or Sweet Potato Fries – Classic pub food combination
- Coleslaw – Creamy or vinegar-based provides cooling crunch
- Mac and Cheese – Ultimate comfort food pairing
- Corn on the Cob – Perfect for summer BBQs
- Garden Salad – Light, fresh balance to rich wings
- Loaded Potato Skins – For an indulgent appetizer spread
Beverage Pairings:
- Beer: Light lagers, pilsners, or IPAs
- Wine: Chardonnay, Pinot Grigio, or Prosecco
- Cocktails: Bloody Mary, margaritas, or Moscow Mule
- Non-Alcoholic: Lemonade, iced tea, or cola
Serving Presentations:
- Pile high on a rustic wooden board with celery sticks tucked around edges
- Serve in individual baskets lined with parchment paper for casual feel
- Arrange on a large white platter with small bowls of dipping sauces
- Use mini wire baskets for individual servings at parties
Occasion Ideas:
- Game Day Parties – The ultimate Super Bowl food
- Casual Dinners – Main course with sides
- Tailgating – Easy to transport and reheat
- Birthday Parties – Kid and adult-friendly
- Movie Nights – Perfect finger food for couch dining
FAQs Section
Q: Can I use frozen wings without thawing?
A: Not recommended. Frozen wings contain too much ice/moisture and won’t crisp properly. They’ll steam instead of roast, resulting in rubbery, soggy skin. Always thaw completely in the refrigerator (24 hours for 2-3 pounds), then pat very dry before proceeding with the recipe.
Q: Why aren’t my wings crispy?
A: The most common reasons are: wings weren’t dried thoroughly before seasoning, wings were crowded on the pan, no wire rack was used, oven temperature was too low, or wings weren’t baked long enough. Follow the drying and spacing instructions carefully for crispy results.
Q: Can I make these in an air fryer?
A: Absolutely! Season wings with baking powder mixture as directed, then cook in air fryer at 400°F for 20-25 minutes, flipping halfway through. Work in batches to avoid overcrowding. Toss with garlic butter and Parmesan as directed. Air fryer creates exceptionally crispy wings even faster than oven-baking.
Q: What’s the white powder on my wings?
A: That’s the baking powder before it cooks off. It might look strange when you first coat the wings, but it completely disappears during baking while creating that crispy texture. Any visible white residue after baking means they need a few more minutes in the oven.
Q: Can I make these ahead for a party?
A: Yes! Best method: Fully cook wings, let cool, refrigerate up to 24 hours. Before serving, reheat in 375°F oven for 12-15 minutes until hot and crispy, then toss with freshly made sauce. The sauce is better made fresh, but wings themselves reheat well.
Q: Are these actually healthier than fried wings?
A: Yes, significantly! Fried wings absorb a substantial amount of oil (adding 100-200+ calories per serving), while baked wings render out fat instead of absorbing it. You save hundreds of calories while still getting crispy, delicious wings. Plus, baking is easier and safer than deep frying.
Q: Can I use chicken drumsticks instead?
A: Yes! The technique works perfectly with drumsticks. Increase baking time to 45-50 minutes total (flip at 25 minutes) since drumsticks are meatier than wings. Use the same seasoning and sauce. Kids especially love drumsticks for their easy-to-hold shape.
Conclusion
There you have it—everything you need to make the most incredible, crispy, restaurant-quality Parmesan garlic wings right in your own oven! These baked wings prove that you don’t need a deep fryer to create addictively delicious wings that disappear in minutes. With the magic of baking powder, some butter, garlic, and Parmesan, you’ve got a crowd-pleasing recipe that works for any occasion.
Whether you’re planning the ultimate game day spread, looking for a family-friendly dinner, hosting a casual party, or simply craving wings without the guilt of deep frying, this easy garlic Parmesan chicken wings recipe delivers every single time. They’re the kind of recipe that makes you the MVP of any gathering.
I’d absolutely love to hear how your crispy wings turned out! Did you make any fun variations? What did you serve them with? Drop a comment below sharing your experience and photos, and don’t forget to rate the recipe if these became a hit with your crew. If you found this recipe helpful, please share it on Pinterest so other home cooks can discover that restaurant-quality wings are totally achievable at home!
Here’s to crispy wings, finger-licking good garlic butter, and the cheers of everyone who devours them! 🍗✨