Crispy Air Fryer Chicken Wings: Extra Crunchy & No Deep Frying!

Get ready to make the most incredibly crispy air fryer chicken wings that taste like they’ve been deep-fried but are actually so much healthier! These wings come out perfectly golden brown with shatteringly crisp skin and juicy, tender meat inside—all without a single drop of deep-frying oil. It’s honestly hard to believe these restaurant-quality wings were made in an air fryer!
Whether you’re hosting game day parties, looking for an easy weeknight dinner, planning a Super Bowl spread, or just craving that satisfying crunch of perfectly cooked wings, this easy air fryer chicken wings recipe is your new secret weapon. The best part? They’re ready in about 30 minutes with minimal hands-on work, and you can customize them with literally any sauce or seasoning combination you can dream up.
These crispy chicken wings in air fryer are perfect for feeding a crowd without heating up your whole house or dealing with splattering oil. Plus, cleanup is a breeze compared to traditional frying methods. Once you master this basic technique, you’ll never want wings any other way. Let’s turn your air fryer into a wing-making machine!
History / Background
Chicken wings have a fascinating history that transformed them from a throwaway ingredient to one of America’s most beloved foods. For most of the 20th century, chicken wings were considered undesirable scraps—butchers often discarded them or sold them for pennies as stock ingredients or pet food. The meaty drumsticks and breasts were what people wanted, leaving wings in culinary obscurity.
Everything changed on a fateful night in 1964 at the Anchor Bar in Buffalo, New York. According to the most popular origin story, Teressa Bellissimo was faced with an unexpected late-night crowd and a surplus of chicken wings. Rather than serving them as soup stock as originally planned, she decided to deep-fry them, toss them in her homemade hot sauce and butter mixture, and serve them with celery sticks and blue cheese dressing on the side. The “Buffalo wing” was born, and American food culture was forever changed.
Throughout the 1970s and 80s, Buffalo wings spread from upstate New York to bars and restaurants across the country, becoming synonymous with sports watching, casual dining, and social gatherings. The introduction of wing-eating contests, the proliferation of wing chains like Buffalo Wild Wings (founded in 1982), and the rise of tailgating culture cemented chicken wings as an American institution.
The air fryer revolution of the 2010s brought another transformative moment for chicken wings. Home cooks discovered that air fryers’ rapid air circulation technology could achieve the same crispy, golden exterior as deep frying but with 70-80% less oil. This made wings more accessible for everyday cooking—no longer requiring special equipment, large amounts of oil, or dealing with splatter and disposal.
Today, air fryer wings represent the perfect marriage of classic American comfort food and modern healthy cooking technology. They maintain all the crispy, crunchy satisfaction of traditional Buffalo wings while fitting into contemporary preferences for healthier, easier home cooking. It’s a recipe innovation that Teressa Bellissimo herself would probably approve of!
Why You’ll Love This Recipe
These aren’t just good air fryer wings—they’re legitimately the crispiest, most perfectly cooked wings you’ll ever make at home, rivaling anything you’d get at your favorite wing restaurant. This recipe has been tested and perfected to guarantee success every single time, even if you’re brand new to air frying.
Here’s why this recipe will become your go-to for wings:
- Unbelievably Crispy Skin – The special technique creates shatteringly crisp, golden-brown skin that stays crunchy even after saucing
- 70-80% Less Oil – All the satisfaction of fried wings with a fraction of the fat and calories
- Ready in 30 Minutes – Faster than delivery and way better quality than takeout
- No Deep Fryer Required – No dealing with gallons of hot oil, splatter, or complicated cleanup
- Foolproof Method – Step-by-step technique that works perfectly every time, guaranteed
- Customizable Flavors – Use this base recipe with literally any sauce or dry rub you love
- Perfect for Meal Prep – Make big batches and reheat throughout the week for quick protein-packed meals
- Budget-Friendly – Chicken wings are affordable, especially when bought in bulk
- Naturally Keto and Low-Carb – Plain wings are zero-carb and perfect for keto diets
- Game Day Hero – Impress your guests with restaurant-quality wings made at home
- Kid-Approved – Even picky eaters love crispy chicken wings
- No Special Ingredients – Just chicken wings and basic pantry seasonings
- Scales Easily – Make as few or as many as your air fryer can hold
- Less Kitchen Heat – Won’t heat up your whole house like oven-baking or frying does
Ingredient Notes
The beauty of this recipe is its incredible simplicity—you really only need chicken wings and a few basic seasonings to create magic. Let’s break down what you need and why each component matters:
Chicken Wings – The star of the show! You can buy whole wings and cut them yourself, or purchase pre-cut “party wings” (drummettes and flats separated) for convenience. For the crispiest results, look for wings that aren’t “enhanced” or injected with solutions—check the label and avoid anything that mentions added water, broth, or sodium solution. Fresh wings are ideal, but properly thawed frozen wings work great too. Plan on about 1-1.5 pounds of wings per person for a main course, or ½ pound per person as an appetizer.
Baking Powder (NOT Baking Soda!) – This is the absolute secret weapon for ultra-crispy skin! Aluminum-free baking powder specifically works by raising the pH of the chicken skin, which helps it brown faster and more completely, creating that shatteringly crisp texture. This is a restaurant trick that makes a dramatic difference. DO NOT substitute with baking soda—it will make your wings taste soapy and metallic. This ingredient is what separates good wings from extraordinary wings.
Salt – Essential for seasoning and also helps draw moisture out of the skin, contributing to crispiness. Kosher salt or sea salt works best because the coarser grains distribute more evenly than table salt. Salt also enhances the natural chicken flavor rather than masking it.
Black Pepper – Adds a subtle warmth and complexity. Freshly ground black pepper has more flavor than pre-ground, but either works fine.
Garlic Powder – Provides savory depth and aromatic flavor that complements the chicken beautifully. Garlic powder (not garlic salt!) distributes more evenly than fresh garlic, which can burn in the high heat of the air fryer.
Paprika (Optional) – Adds beautiful color and a subtle sweet-smoky flavor. Use regular paprika for mild flavor, or smoked paprika for a deeper, barbecue-like taste.
Cooking Spray or Oil – Just a light mist helps the wings brown evenly. You can use olive oil, avocado oil, or neutral vegetable oil. Avoid using too much oil or it will prevent crisping.
Your Favorite Wing Sauce – Whether you love classic Buffalo sauce, BBQ, teriyaki, honey garlic, dry rubs, or any other flavor, this recipe creates the perfect base for any sauce or seasoning you prefer. The wings are delicious plain or can be customized endlessly!
Equipment Needed
The equipment for this recipe is refreshingly simple—the air fryer does most of the work! Here’s what you’ll need:
- Air Fryer – Obviously the star equipment! This recipe works with any size or style of air fryer (basket-style, oven-style, or drawer-style). You’ll need one with at least a 3.5-quart capacity to cook a decent batch. Larger air fryers (5+ quarts) let you make more wings at once.
- Large Mixing Bowl – For tossing the wings with seasonings before cooking
- Paper Towels – Essential for patting the wings completely dry, which is crucial for crispiness
- Measuring Spoons – For accurate seasoning measurements
- Kitchen Tongs – For flipping wings halfway through cooking without burning your fingers
- Meat Thermometer – Optional but recommended to ensure wings reach safe internal temperature of 165°F
- Wire Cooling Rack – Optional but useful for resting cooked wings before saucing
- Medium Bowl – For tossing wings with sauce after cooking (if using sauce)
- Cooking Spray or Oil Mister – For lightly coating wings and the air fryer basket
- Kitchen Shears or Sharp Knife – Only if you’re cutting whole wings into drummettes and flats yourself
Air Fryer Chicken Wings
These ultra-crispy air fryer chicken wings have perfectly golden, crunchy skin and juicy meat inside—no deep frying required! Ready in just 30 minutes with minimal oil, these easy wings are perfect for game day, parties, or weeknight dinners. Customize with any sauce or enjoy them plain!
- Total Time: 35 minutes
- Yield: 4 servings (about 24 wing pieces) 1x
Ingredients
For the Wings:
- 2 pounds chicken wings (about 24 pieces), separated into drummettes and flats, wing tips removed
- 1 tablespoon baking powder (aluminum-free)
- 1 teaspoon kosher salt
- ½ teaspoon black pepper
- ½ teaspoon garlic powder
- ½ teaspoon paprika (optional, for color)
- Cooking spray or oil mist
For Sauce Options (Choose One or Serve Plain):
- Classic Buffalo: ½ cup hot sauce + 4 tablespoons melted butter
- BBQ: ¾ cup your favorite BBQ sauce
- Honey Garlic: ⅓ cup honey + 3 tablespoons soy sauce + 3 cloves minced garlic
- Teriyaki: ¾ cup teriyaki sauce + 1 tablespoon sesame seeds
- Dry Rub: 2 tablespoons of your favorite seasoning blend
For Serving:
- Ranch or blue cheese dressing
- Celery sticks
- Carrot sticks
Instructions
- Prep the Wings: If using frozen wings, make sure they’re completely thawed and drained. Remove wings from packaging and pat them COMPLETELY dry with several layers of paper towels. This is the most important step for achieving crispy skin! Get them as dry as possible, even spending 2-3 minutes patting and pressing with fresh paper towels. Any surface moisture will steam the wings instead of crisping them. If you have time, place the dried wings on a wire rack in the refrigerator uncovered for 1-2 hours or even overnight—this air-drying technique creates exceptionally crispy skin.
- Season the Wings: Place the thoroughly dried wings in a large mixing bowl. Sprinkle the baking powder, salt, black pepper, garlic powder, and paprika (if using) over the wings. Using your hands or tongs, toss the wings thoroughly to coat every surface evenly with the seasoning mixture. Make sure each wing is completely coated—the baking powder is what creates that incredible crispiness, so don’t be shy! The wings will look slightly powdery and pale at this point, which is exactly what you want.
- Preheat the Air Fryer: Preheat your air fryer to 380°F for 5 minutes. This step isn’t absolutely essential, but preheating helps the wings start cooking immediately and promotes even browning. While it’s preheating, lightly spray the air fryer basket with cooking spray to prevent sticking.
- Arrange Wings in Single Layer: Place the seasoned wings in the air fryer basket in a single layer with space between each piece. Don’t overcrowd or stack them—they need air circulation on all sides to crisp up properly. Depending on your air fryer size, you may need to cook in 2-3 batches. Lightly spray the tops of the wings with cooking spray.
- First Cook Cycle: Air fry at 380°F for 12 minutes. You’ll start to see the wings turning golden and the fat rendering out. Don’t open the air fryer unnecessarily during this time as it releases heat and affects cooking.
- Flip and Continue Cooking: After 12 minutes, open the basket and use tongs to carefully flip each wing over. This ensures even browning and crispiness on all sides. The wings will already be looking good at this point! Lightly spray the newly exposed side with a bit more cooking spray. Return to the air fryer and cook for an additional 10-12 minutes at 380°F.
- Check for Doneness: The wings are done when they’re deep golden brown, the skin is crispy and shrunken around the meat, and the internal temperature reaches 165°F when checked with a meat thermometer in the thickest part of the meat (not touching bone). If they’re not quite crispy enough for your liking, increase temperature to 400°F and cook for an additional 2-3 minutes, watching carefully to prevent burning.
- Rest and Sauce (Optional): Transfer the cooked wings to a wire rack or large plate and let them rest for 2-3 minutes—this allows the exterior to firm up even more. If enjoying plain wings, they’re ready to eat now! If saucing, place wings in a large bowl, add your chosen sauce, and toss gently to coat evenly. For maximum crispiness, toss with sauce right before serving rather than letting them sit in sauce.
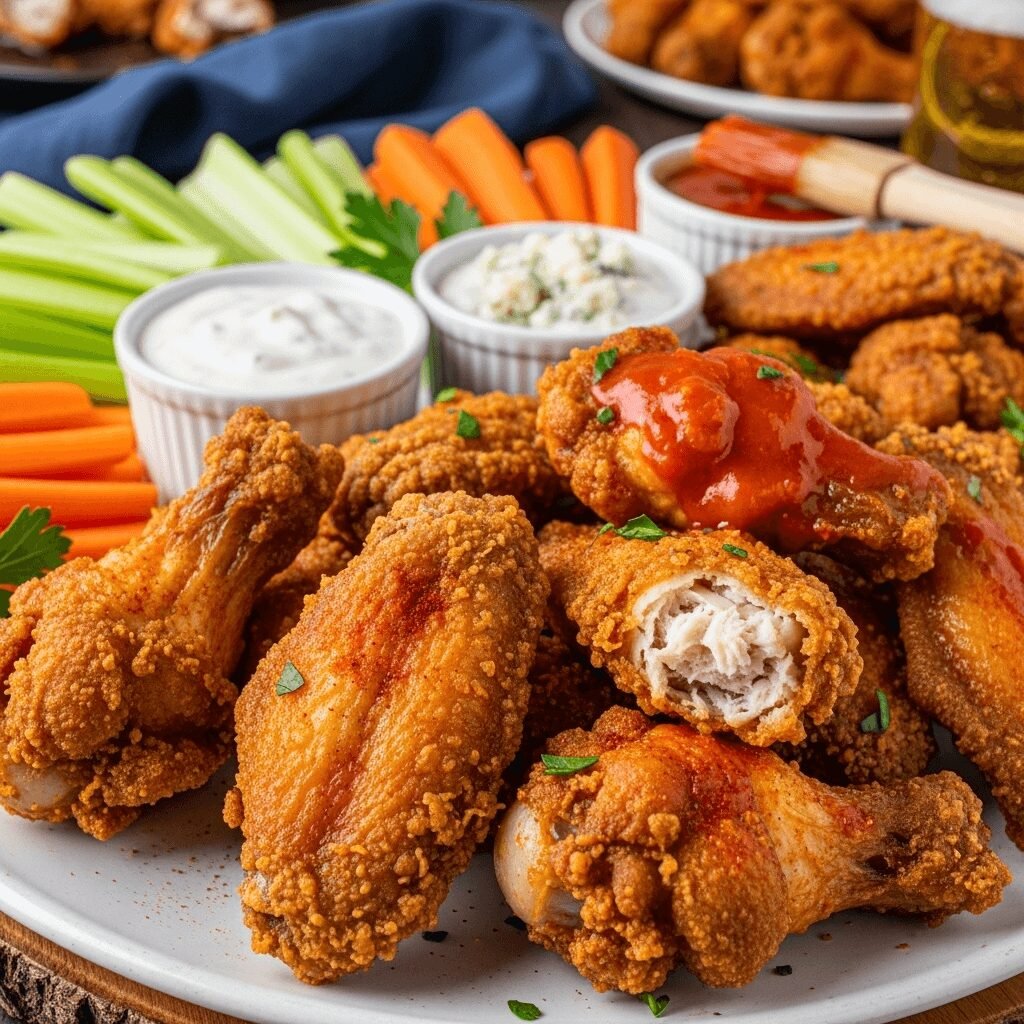
- Serve Immediately: Transfer sauced or plain wings to a serving platter. Serve hot with celery and carrot sticks, and ranch or blue cheese dressing for dipping. Watch them disappear!
Notes
- Baking Powder vs. Baking Soda: MUST use baking powder (aluminum-free preferred), NOT baking soda. Baking soda will make wings taste metallic and soapy.
- Don’t Skip Drying: The drying step is absolutely crucial for crispy wings. Take your time with this step!
- Batch Cooking: Never overcrowd the basket. Cook in multiple batches if necessary for best results.
- Temperature Variations: Some air fryers run hotter than others. If your wings are browning too quickly, reduce temperature to 360°F. If they’re not crisping enough, increase to 400°F.
- Frozen Wings: Can cook from frozen! Add 5-7 minutes to total cooking time and pat off any ice crystals first.
- Sauce Timing: For crispiest results, serve sauce on the side for dipping rather than tossing wings in sauce.
- Prep Time: 10 minutes
- Cook Time: 25 minutes
- Category: Appetizer
- Method: Air Frying
- Cuisine: American
- Diet: Gluten Free
Nutrition
- Serving Size: 6 wing pieces (plain, without sauce)
- Calories: 285
- Sugar: 0g
- Sodium: 680mg
- Fat: 19g
- Saturated Fat: 5g
- Unsaturated Fat: 11g
- Trans Fat: 0g
- Carbohydrates: 1g
- Fiber: 0g
- Protein: 26g
- Cholesterol: 95mg
Tips & Variations
Extra Crispy Variation: After the wings are fully cooked, increase the air fryer temperature to 400°F and cook for an additional 2-3 minutes. This creates an even crunchier exterior but watch carefully to avoid burning.
Spicy Buffalo Wings: Toss cooked wings with a mixture of ½ cup Frank’s RedHot sauce, 4 tablespoons melted butter, and 1 teaspoon cayenne pepper for extra heat.
Asian-Inspired Wings: Use a dry rub of 1 tablespoon Chinese five-spice powder, 1 teaspoon garlic powder, and 1 teaspoon ground ginger. Finish with a drizzle of sesame oil and sprinkle of sesame seeds.
Lemon Pepper Wings: Toss hot wings with 2 tablespoons melted butter, 1 tablespoon lemon zest, and 2 teaspoons cracked black pepper for a bright, tangy flavor.
Parmesan Garlic Wings: After cooking, toss with ¼ cup melted butter, 4 cloves minced garlic, and ½ cup grated Parmesan cheese plus fresh parsley.
BBQ Dry Rub: Instead of sauce, coat wings with 2 tablespoons brown sugar, 1 tablespoon smoked paprika, 1 teaspoon chili powder, 1 teaspoon garlic powder, and 1 teaspoon onion powder before cooking.
Korean Gochujang Wings: Toss finished wings with a sauce made from ¼ cup gochujang paste, 2 tablespoons honey, 2 tablespoons soy sauce, 1 tablespoon rice vinegar, and 1 tablespoon sesame oil.
Jamaican Jerk Wings: Season with 2 tablespoons jerk seasoning before cooking, then finish with a squeeze of fresh lime juice.
Nashville Hot Wings: Brush cooked wings with a mixture of ¼ cup hot oil (from frying cayenne pepper in oil), 2 tablespoons cayenne pepper, and 1 tablespoon brown sugar.
Salt and Vinegar Wings: Toss hot wings with 3 tablespoons apple cider vinegar and a generous sprinkle of sea salt.
Healthier Option: Skip the oil spray entirely for even lower calories—wings will still crisp up due to the baking powder, just slightly less golden.
Pro Chef Tips
The Overnight Drying Trick: For the absolute crispiest wings possible, pat them dry, arrange on a wire rack over a baking sheet, and refrigerate uncovered overnight. This air-drying technique is what restaurants use—it dehydrates the skin completely so it crisps beautifully during cooking. The results are dramatically crunchier than skipping this step.
Don’t Fear the White Powder: When you first coat wings with baking powder, they’ll look chalky and unappetizing. Don’t worry! This completely disappears during cooking and is what creates that golden, crispy skin. The alkaline environment created by baking powder breaks down proteins in the skin, allowing it to crisp faster and more thoroughly.
Temperature Stepping for Perfect Results: For wings with restaurant-level crispiness, use a two-temperature method: cook at 360°F for the first 12 minutes to render fat and cook the meat through, then increase to 400°F for the final 10-12 minutes to achieve maximum crispiness. This prevents the outside from burning before the inside is fully cooked.
The Flip is Non-Negotiable: Always flip your wings halfway through cooking. Air fryers circulate air, but the side touching the basket won’t crisp as well without flipping. Use tongs and flip every single wing—it’s worth the 30 seconds.
Oil Spray Technique: Use a very light mist of oil rather than brushing or drizzling. Too much oil actually prevents crispiness because it creates a barrier that steams the skin rather than allowing it to dry out and crisp up. A 1-second spray is plenty.
Sauce Separately for Maximum Crunch: If you want wings that stay crispy longer, serve sauce on the side for dipping rather than tossing wings in sauce. The moment wings are coated in wet sauce, they begin losing their crunch. If you must toss in sauce, do it literally right before serving.
Let Them Rest: After removing wings from the air fryer, let them sit on a wire rack for 2-3 minutes before serving. This brief rest allows the exterior to firm up even more and reach peak crispiness. It also prevents you from burning your mouth on molten-hot chicken!
Use a Thermometer: Even experienced cooks benefit from using an instant-read thermometer. Wings need to reach 165°F internally for food safety, but 170-175°F actually produces better texture—the meat is more tender and the skin is crispier. Insert the thermometer into the thickest part of the meat without touching bone for accurate readings.
Common Mistakes to Avoid
Not Drying Wings Thoroughly: This is the #1 mistake that prevents crispy wings. Surface moisture creates steam during cooking, which makes skin rubbery instead of crispy. Pat wings completely dry with multiple paper towels until they feel tacky to the touch, not wet. It should take at least 2-3 minutes of thorough patting and pressing.
Overcrowding the Air Fryer Basket: It’s tempting to cram as many wings as possible into the basket to cook them all at once, but overcrowding prevents proper air circulation. Wings need space around them for the hot air to circulate and crisp all sides. Overcrowded wings will steam each other and come out soggy and pale. Cook in batches if necessary—the extra time is worth it for crispy results.
Using Baking Soda Instead of Baking Powder: These are NOT interchangeable! Baking soda will make your wings taste soapy, bitter, and metallic. Always use baking powder, preferably aluminum-free. Double-check your container before adding to avoid this disappointing mistake.
Skipping the Preheat: While not absolutely essential, preheating your air fryer ensures wings start cooking immediately at the right temperature, promoting even browning and crispiness. Cold air fryers take time to come up to temperature, during which your wings are just sitting there instead of crisping.
Opening the Air Fryer Too Often: Every time you open the basket, you release heat and interrupt the cooking process. Only open the air fryer when it’s time to flip the wings—resist the urge to constantly check on them. Trust the timing and let the machine do its work.
Not Adjusting for Your Specific Air Fryer: All air fryers cook slightly differently based on wattage, size, and design. The first time you make this recipe, check wings a few minutes early to see how your specific model performs. Some run hotter and cook faster; others need a bit more time. Once you know how your air fryer behaves, you can adjust accordingly for perfect results every time.
Tossing in Sauce Too Early: If you coat wings in sauce and then let them sit, they’ll quickly lose their crispiness as the moisture from the sauce penetrates the skin. Always sauce right before serving, or better yet, serve sauce on the side for dipping to maintain maximum crunch throughout the meal.
Storage & Meal Prep
Refrigerator Storage: Store leftover cooked wings in an airtight container in the refrigerator for up to 4 days. For best results, store plain wings separately from any sauce—this prevents them from getting soggy. If wings are already sauced, they’ll still taste good but won’t maintain their crispy texture.
Maintaining Crispiness: To keep leftover wings as crispy as possible, store them on a wire rack set inside a storage container rather than stacking them directly on top of each other. This prevents the wings from steaming each other and maintains better texture.
Reheating for Best Results: The air fryer is hands-down the best way to reheat wings! Preheat your air fryer to 350°F, arrange wings in a single layer, and heat for 4-6 minutes until warmed through and crispy again. They’ll taste nearly as good as fresh! You can also reheat in a 375°F regular oven on a wire rack for 10-12 minutes.
Avoid the Microwave: Never reheat wings in the microwave if you care about texture—they’ll become rubbery and soggy. The microwave steams food, which is the opposite of what you want for maintaining crispy skin.
Meal Prep Strategy: Wings are fantastic for meal prep! Make a big batch on Sunday (cook in multiple batches if needed), let them cool completely, and store in portions for easy grab-and-go protein throughout the week. Reheat in the air fryer for a few minutes and you have restaurant-quality wings any day of the week.
Sauce Storage: If using homemade sauces, store them separately in airtight containers for up to 1 week. Reheat sauces gently before tossing with freshly reheated wings for the best flavor and texture.
Room Temperature Guidelines: Never leave cooked wings at room temperature for more than 2 hours (or 1 hour if it’s over 90°F outside). This is the danger zone where bacteria multiply rapidly. Get leftovers into the refrigerator promptly for food safety.
Make-Ahead & Freezer Notes
Prepping Wings in Advance: You can season wings with the dry rub up to 24 hours ahead and store them covered in the refrigerator. In fact, this extended marinating time allows the baking powder to work even better, creating exceptionally crispy results! Just bring them to room temperature for 15-20 minutes before air frying.
Freezing Uncooked Seasoned Wings: Season wings with the baking powder mixture, arrange in a single layer on a parchment-lined baking sheet, and freeze until solid (about 2 hours). Transfer frozen wings to a freezer bag or airtight container and freeze for up to 3 months. When ready to cook, air fry from frozen, adding 5-7 minutes to the total cooking time.
Freezing Cooked Wings: Fully cooked wings freeze beautifully for up to 3 months! Let them cool completely, then freeze in a single layer on a baking sheet before transferring to freezer bags. This prevents them from sticking together in one big clump. Reheat from frozen in the air fryer at 350°F for 10-12 minutes.
Best Thawing Method: If you prefer to thaw before reheating, transfer frozen wings to the refrigerator overnight. Never thaw wings at room temperature as this promotes bacterial growth.
Sauce Freezing: Most wing sauces don’t freeze well due to separation and texture changes, especially butter-based sauces. Make sauces fresh or store them in the refrigerator for up to 1 week rather than freezing.
Reheating Frozen Wings: You can reheat frozen cooked wings directly from the freezer! Place them in a preheated 360°F air fryer and cook for 8-10 minutes, shaking the basket halfway through. They’ll crisp up beautifully and taste freshly made.
Batch Cooking for the Freezer: Consider making a triple or quadruple batch of plain wings, freezing portions, and then customizing them with different sauces each time you reheat. This gives you incredible variety without repetitive cooking.
Serving Suggestions
Classic Game Day Spread: Serve your crispy air fryer wings as the star of a game day table alongside other crowd-pleasers like loaded nachos, mozzarella sticks, jalapeño poppers, and plenty of dipping sauces (ranch, blue cheese, honey mustard).
Wing Bar Party: Set up a DIY wing bar with plain crispy wings and multiple sauce options in bowls—Buffalo, BBQ, teriyaki, honey garlic, and ranch for dipping. Let guests customize their own wings for an interactive party experience!
Complete Meal: Pair wings with classic sides like french fries or sweet potato fries, coleslaw, corn on the cob, mac and cheese, or baked beans for a satisfying dinner that feels like your favorite wing restaurant.
Lighter Options: Serve wings with healthier sides like a crisp garden salad, roasted vegetables, cauliflower rice, or zucchini fries to balance the richness of the wings.
Traditional Accompaniments:
- Celery and carrot sticks with ranch or blue cheese dressing (classic for a reason!)
- Crispy french fries or tater tots
- Creamy coleslaw (helps balance spicy wings)
- Pickles and pickled vegetables
- Fresh vegetable crudités
- Corn on the cob
- Onion rings
- Loaded potato skins
Beverage Pairings:
- Ice-cold beer (lagers, pilsners, or IPAs pair wonderfully)
- Sweet iced tea to cool down spicy wings
- Lemonade or limeade
- Soda or sparkling water
- For wine lovers: Riesling or Sauvignon Blanc cuts through the richness beautifully
Wing Bowls: Create a complete meal by serving wings over cauliflower rice or regular rice with roasted broccoli, shredded cabbage, sliced green onions, and a drizzle of extra sauce for a deconstructed wing bowl.
Sandwich Style: Shred the meat off the bones and pile it onto toasted buns with pickles and coleslaw for amazing wing sandwiches!
Party Platter Style: Arrange wings on a large platter garnished with fresh parsley, lemon wedges, and surrounded by celery sticks, cherry tomatoes, and small bowls of various dipping sauces for an Instagram-worthy presentation.
FAQs Section
Do I need to use baking powder? Can I skip it?
While you technically can skip the baking powder, you absolutely shouldn’t if you want truly crispy wings! Baking powder is the secret ingredient that creates restaurant-quality crispiness by raising the pH of the skin and helping it brown better. Without it, your wings will still cook through but won’t achieve that shatteringly crisp texture. The small amount used doesn’t affect flavor at all, so there’s really no reason to skip it. Just make sure you’re using baking POWDER (not baking soda) and you’ll be amazed at the results.
Can I cook frozen wings without thawing?
Absolutely yes! Frozen wings cook beautifully in the air fryer. Pat off any visible ice crystals, season as directed (they’ll still be slightly frozen), and add 5-7 minutes to the total cooking time. You may need to separate any wings that are stuck together after about 10 minutes of cooking. The results are nearly identical to using thawed wings, making this perfect for last-minute dinner plans.
Why aren’t my wings getting crispy?
The most common culprits are: 1) Not drying the wings thoroughly enough before seasoning—surface moisture prevents crisping, 2) Overcrowding the air fryer basket so hot air can’t circulate properly, 3) Using baking soda instead of baking powder, or 4) Your specific air fryer may need a higher temperature or slightly longer cooking time. Try increasing the temperature to 400°F for the last few minutes, and make absolutely sure you’re drying wings completely and not overcrowding.
Should I flip the wings during cooking?
Yes, definitely flip them! Flipping halfway through ensures even browning and crispiness on all sides. The side that’s touching the basket won’t crisp as well without flipping. It only takes about 30 seconds with tongs, and it makes a noticeable difference in the final texture and appearance.
How many wings fit in an air fryer at once?
This depends entirely on your air fryer size. A standard 3.5-4 quart basket holds about 1-1.5 pounds of wings in a single layer (roughly 12 pieces). Larger 5-6 quart air fryers can fit 2-2.5 pounds (about 24 pieces). Never stack or overcrowd—if you have more wings than fit comfortably in one layer, cook in batches. The first batch stays warm while you cook the second, or you can hold them in a 200°F oven.
Can I use sauce before cooking the wings?
It’s not recommended. Adding wet sauce before air frying prevents the skin from crisping properly and can cause burning since many sauces contain sugar. Always cook wings plain first until they’re crispy, then toss with sauce afterward. If you really want sauced wings during cooking, use a dry rub instead or add a very thin glaze in the last 2-3 minutes of cooking.
What’s the difference between drummettes and flats?
Drummettes are the mini drumstick-shaped pieces that look like smaller versions of chicken legs—they have one bone and are meatier. Flats (also called wingettes) are the middle section with two bones and have slightly less meat but more skin, making them extra crispy. Both come from the same chicken wing; they’re just different sections. Most people have a preference, but both are delicious! A mix of both gives nice variety in your serving.
Do air fryer wings taste as good as deep-fried?
Honestly, yes—many people actually prefer air fryer wings! While the texture is slightly different, air fryer wings achieve the same golden, crispy exterior and juicy interior that makes wings so addictive. They’re less greasy than deep-fried wings (which some consider a plus), and the convenience and healthiness make them a better choice for regular home cooking. Once you master the technique, you genuinely won’t miss deep-frying.
Conclusion
There you have it—everything you need to know to make absolutely perfect crispy air fryer chicken wings that rival any restaurant! These wings prove that you don’t need a deep fryer or gallons of oil to achieve that shatteringly crisp skin and juicy, flavorful meat that makes wings so incredibly addictive.
What I love most about this easy air fryer chicken wings recipe is how it’s revolutionized wing-making for home cooks. No more heating up the entire house with the oven, no more dealing with splattering oil and difficult cleanup, no more worrying about disposing of used frying oil. Just pop them in the air fryer, flip once, and you’re rewarded with restaurant-
quality wings in about 30 minutes. It’s truly one of those game-changing recipes that makes you wonder how you ever lived without it!
Whether you’re making these crispy chicken wings in air fryer for the Super Bowl, a casual weeknight dinner, meal prep, or just because you’re craving that perfect combination of crispy skin and tender meat, this foolproof method delivers every single time. And once you’ve mastered the basic technique, the world of flavor possibilities is truly endless—Buffalo, BBQ, teriyaki, honey garlic, lemon pepper, or simply perfectly seasoned plain wings with your favorite dipping sauce.
The best part? These wings are so much healthier than traditional fried wings while tasting just as good (or better!). You’re getting all the satisfaction and crunch you crave with 70-80% less oil, making them perfect for regular enjoyment rather than just an occasional indulgence. Your family and friends will be absolutely blown away when you tell them these restaurant-quality wings came from your air fryer!
I can’t wait to hear about your wing-making adventures! What’s your favorite sauce or seasoning combination? Are you team drummettes or team flats? Did you try any of the flavor variations? Drop a comment below and share your experience—I love hearing from fellow wing enthusiasts and learning about your creative flavor combinations!
Don’t forget to PIN this recipe to your Pinterest boards! Save it to “Air Fryer Recipes,” “Game Day Food,” “Easy Dinner Ideas,” “Appetizers,” “Chicken Recipes,” or “Super Bowl Party Food” so you’ll always have it handy when those wing cravings hit. Trust me, once you make these once, you’ll be coming back to this recipe again and again!
If you loved these air fryer wings, be sure to check out my other air fryer favorites on the blog—crispy air fryer Brussels sprouts, air fryer french fries, air fryer chicken tenders, and air fryer bacon are all waiting to transform your cooking! And if you try this recipe, please leave a comment and five-star rating below—it helps other home cooks discover this recipe and makes my day!
Now fire up that air fryer and get ready to make the crispiest, most delicious wings you’ve ever tasted at home. Your game day (or Tuesday night dinner, or meal prep Sunday) will never be the same! 🍗