Crispy Fried Pickles Recipe – Easy Southern Appetizer in 20 Minutes

If you’ve ever found yourself craving something crunchy, tangy, and downright addictive, then this homemade fried pickles recipe is about to become your new favorite snack! These golden, crispy dill pickle slices are coated in a perfectly seasoned breading and fried until they’re irresistibly crunchy on the outside while still juicy and tangy on the inside. Served with a cool, creamy buttermilk ranch dipping sauce, they’re the ultimate crowd-pleaser.
Fried pickles are perfect for game day gatherings, summer cookouts, movie nights, or whenever you need an appetizer that’ll have everyone asking for seconds. They’re surprisingly easy to make at home, and trust me—once you’ve had fresh, hot fried pickles straight from your own kitchen, you’ll never want the restaurant version again. Whether you call them frickles, fried dill pickles, or crispy pickle chips, this Southern-inspired treat is guaranteed to disappear from the plate in minutes.
History / Background
Fried pickles have a rich and fascinating history rooted in the American South, though their exact origin is a topic of friendly debate among food historians. The most widely accepted story credits the Duchess Drive-In in Atkins, Arkansas, as the birthplace of this beloved snack. In 1963, Bernell “Fatman” Austin began serving deep-fried dill pickle slices to his hungry customers, and the rest is culinary history. The Duchess Drive-In still operates today and has become a pilgrimage site for fried pickle enthusiasts from around the world.
However, some food historians point to earlier mentions of fried pickles in Southern community cookbooks and county fair records, suggesting the concept may have existed in home kitchens before Austin popularized them commercially. What we do know for certain is that fried pickles gained tremendous popularity throughout Arkansas and the surrounding Southern states during the 1960s and 70s.
The dish embodies the Southern culinary tradition of taking simple, everyday ingredients and transforming them into something extraordinary through creative cooking techniques. Pickles were already a pantry staple throughout the South—a way to preserve cucumbers long after harvest season ended—so it made perfect sense to experiment with different preparation methods.
By the 1980s and 90s, fried pickles had spread beyond Arkansas to become a staple appetizer in sports bars, roadside diners, and casual restaurants across the United States. Today, they’ve achieved mainstream status and can be found on menus from coast to coast. The rise of food blogs, Pinterest, and social media has introduced a new generation to this crunchy, tangy treat, with home cooks everywhere discovering how easy they are to recreate in their own kitchens.
Why You’ll Love This Recipe
This easy fried pickles recipe is about to change your appetizer game forever! Making restaurant-quality fried pickles at home is simpler than you might think, and the results are absolutely incredible. Here’s why this recipe deserves a spot in your permanent rotation:
- Quick and Easy – From start to finish, you can have hot, crispy fried pickles on the table in just 30 minutes
- Budget-Friendly – Made with affordable, pantry-staple ingredients that won’t break the bank
- Perfect for Parties – Serve them as game day appetizers, party snacks, or alongside burgers and sandwiches
- Customizable Heat Level – Adjust the seasonings to make them mild, spicy, or anywhere in between
- Kid-Approved Snack – Children and adults alike can’t resist these crunchy, tangy bites
- Better Than Restaurants – Homemade means you control the quality, seasoning, and freshness
- Make-Ahead Friendly – Prep components in advance for stress-free entertaining
- Impressive Yet Simple – Guests will think you spent hours, but you’ll know the easy secret
Ingredient Notes
The beauty of fried pickles lies in their simplicity. Here’s what makes each component essential to achieving that perfect crunch and flavor:
Dill Pickle Slices – The star of the show! I recommend using dill pickle chips (not spears) that are about ¼-inch thick. Look for crisp, high-quality pickles with good crunch—avoid musty or overly soft pickles. Drain them thoroughly and pat them completely dry with paper towels; this step is crucial for getting the breading to stick properly. Claussen pickles are a popular choice for their exceptional crunch, but any refrigerated dill pickle chips work beautifully. You can substitute pickle spears cut into rounds if needed.
All-Purpose Flour – Creates the base coating layer that helps the egg mixture adhere to the pickles. The flour also helps absorb excess moisture from the pickles. For a gluten-free version, use your favorite 1:1 gluten-free flour blend or rice flour.
Eggs – Act as the binding agent that holds the breadcrumb coating to the pickles. Make sure your eggs are at room temperature for better coating consistency.
Buttermilk – Adds tanginess and helps tenderize the coating while creating an extra-crispy texture. If you don’t have buttermilk, make your own by adding 1 tablespoon of white vinegar or lemon juice to 1 cup of regular milk and letting it sit for 5 minutes.
Panko Breadcrumbs – The secret to ultra-crispy fried pickles! Panko breadcrumbs are lighter and flakier than regular breadcrumbs, creating a superior crunch. You can use regular breadcrumbs in a pinch, but panko truly makes a difference. For extra crunch, some cooks like to use half panko and half crushed cornflakes.
Cornmeal – Adds a subtle crunch and slight sweetness that complements the tangy pickles perfectly. Yellow cornmeal is traditional, but white cornmeal works equally well.
Seasonings – Garlic powder, onion powder, paprika (or cayenne for heat), salt, and black pepper create a well-rounded, flavorful coating. Don’t skip the paprika—it adds color and a subtle smoky note.
Vegetable Oil – For frying. Choose an oil with a high smoke point like vegetable, canola, or peanut oil. You’ll need enough to reach about 1-2 inches deep in your pan or pot.
Ranch Dressing – For serving alongside your crispy pickles. Homemade buttermilk ranch is incredible, but store-bought works perfectly fine for a quicker option.
Equipment Needed
- Large, heavy-bottomed pot or deep skillet – For frying; cast iron works exceptionally well for maintaining consistent oil temperature
- Candy or deep-fry thermometer – Essential for monitoring oil temperature and ensuring perfectly crispy results
- Three shallow bowls or pie plates – For your breading station (flour, egg mixture, and breadcrumb mixture)
- Wire cooling rack set over a baking sheet – For draining fried pickles without them getting soggy
- Paper towels – For drying pickles before coating and for draining excess oil
- Tongs or slotted spoon – For safely transferring pickles in and out of hot oil
- Measuring cups and spoons – For accurate ingredient measurements
- Whisk or fork – For beating eggs and mixing dry ingredients
- Plate or tray – For holding breaded pickles before frying
- Kitchen spider or slotted spoon – Helpful for removing multiple pickles at once
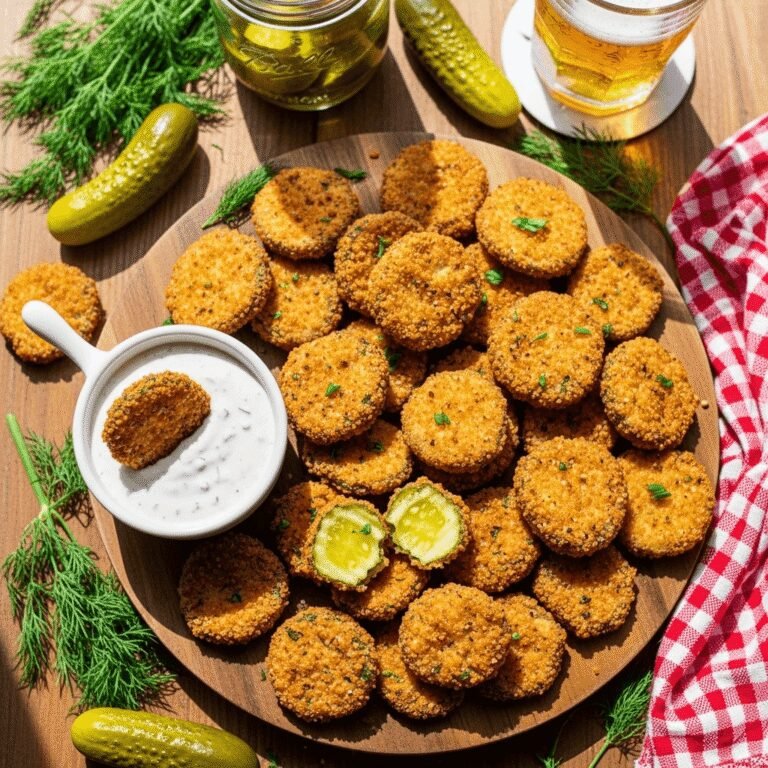
Crispy Fried Pickles Recipe
Golden, crispy fried pickles with a perfectly seasoned breading that delivers incredible crunch in every bite. These Southern-style dill pickle chips are fried to perfection and served with cool, creamy ranch dressing for the ultimate appetizer or game day snack.
- Total Time: 30 minutes
- Yield: 4-6 servings (approximately 30-35 pickle chips) 1x
Ingredients
For the Fried Pickles:
- 1 (32-ounce) jar dill pickle chips, drained and thoroughly patted dry
- 1 cup all-purpose flour
- 2 large eggs
- ¼ cup buttermilk
- 1½ cups panko breadcrumbs
- ½ cup cornmeal
- 1 tablespoon garlic powder
- 1 tablespoon onion powder
- 1 teaspoon paprika (or ½ teaspoon cayenne pepper for spicy version)
- 1 teaspoon salt
- ½ teaspoon black pepper
- Vegetable oil for frying (about 4-6 cups, depending on pot size)
For Serving:
- 1 cup ranch dressing (store-bought or homemade)
- Fresh chopped dill or parsley for garnish (optional)
- Lemon wedges (optional)
Instructions
- Prepare the Pickles: Remove pickle chips from the jar and drain them in a colander. Spread them out in a single layer on several layers of paper towels. Pat them completely dry with additional paper towels—this step is crucial for helping the breading stick properly. The drier your pickles, the better your coating will adhere.
- Set Up Breading Station: Arrange three shallow bowls or pie plates in a row. In the first bowl, add the all-purpose flour. In the second bowl, whisk together the eggs and buttermilk until well combined. In the third bowl, combine the panko breadcrumbs, cornmeal, garlic powder, onion powder, paprika, salt, and black pepper. Mix the dry ingredients thoroughly to ensure even distribution of seasonings.
- Bread the Pickles: Working with one pickle chip at a time (or a few at once once you get the hang of it), dredge each pickle in the flour, shaking off any excess. Then dip it into the egg mixture, letting excess drip off. Finally, press it firmly into the breadcrumb mixture, coating both sides thoroughly and pressing gently so the breading adheres well. Place breaded pickles on a clean plate or tray. Repeat until all pickles are coated.
- Heat the Oil: Pour vegetable oil into a large, heavy-bottomed pot or deep skillet to a depth of about 1½ to 2 inches. Heat the oil over medium-high heat until it reaches 350-375°F on a deep-fry thermometer. This temperature range is ideal for achieving golden, crispy pickles without burning the breading. If you don’t have a thermometer, test the oil by dropping in a small pinch of breadcrumbs—if they sizzle immediately and turn golden within 30 seconds, your oil is ready.
- Fry the Pickles: Working in small batches (don’t overcrowd the pan), carefully lower 5-7 breaded pickle chips into the hot oil using tongs. Fry for 2-3 minutes, flipping once halfway through, until they’re deep golden brown on both sides. The pickles should be uniformly golden and crispy. Avoid moving them around too much during frying—let them develop a crust first.
- Drain and Keep Warm: Use a slotted spoon or kitchen spider to transfer fried pickles to a wire rack set over a baking sheet. This allows excess oil to drip away while keeping the pickles crispy (paper towels can make them soggy). Season immediately with a light sprinkle of salt while they’re still hot. Keep finished batches warm in a 200°F oven while you fry the remaining pickles.
- Serve Immediately: Transfer fried pickles to a serving platter. Garnish with fresh chopped dill or parsley if desired. Serve hot with ranch dressing, and optional lemon wedges for squeezing. These are best enjoyed fresh and hot, straight from the fryer!
Notes
- Oil Temperature is Critical: Maintaining proper oil temperature (350-375°F) ensures crispy, non-greasy pickles. If the oil is too cool, your pickles will absorb excess oil and become soggy. If it’s too hot, the breading will burn before the pickle heats through.
- Dry Those Pickles: The number one mistake is not drying pickles thoroughly. Moisture prevents breading from adhering and creates steam during frying, leading to soggy results.
- Don’t Overcrowd: Frying too many pickles at once drops the oil temperature significantly and leads to greasy, limp results. Work in small batches for best results.
- Spicy Variation: For a kick of heat, add ½ to 1 teaspoon cayenne pepper to your breadcrumb mixture, or use spicy pickle chips instead of regular dill pickles.
- Baked Option: For a lighter version, arrange breaded pickles on a parchment-lined baking sheet, spray lightly with cooking spray, and bake at 425°F for 15-20 minutes, flipping halfway through, until golden and crispy.
- Prep Time: 15 minutes
- Cook Time: 15 minutes
- Category: Appetizer
- Method: Deep Frying
- Cuisine: American
- Diet: Vegetarian
Nutrition
- Serving Size: 5-6 pickle chips with 2 tablespoons ranch
- Calories: 285
- Sugar: 3g
- Sodium: 895mg
- Fat: 16g
- Saturated Fat: 3g
- Unsaturated Fat: 12g
- Trans Fat: 0g
- Carbohydrates: 28g
- Fiber: 2g
- Protein: 7g
- Cholesterol: 68mg
Tips & Variations
Spicy Fried Pickles: Add 1 teaspoon of cayenne pepper or hot paprika to your breadcrumb mixture for a fiery kick. You can also mix in some hot sauce with the egg mixture. For extreme heat lovers, use jalapeño pickle slices instead of regular dill pickles.
Air Fryer Version: Arrange breaded pickles in a single layer in your air fryer basket. Spray lightly with cooking oil spray. Air fry at 400°F for 10-12 minutes, flipping halfway through and spraying again, until golden and crispy. This method uses significantly less oil while still delivering great crunch.
Oven-Baked Fried Pickles: Place breaded pickles on a parchment-lined baking sheet. Spray generously with cooking spray. Bake at 425°F for 18-22 minutes, flipping once halfway through, until golden brown and crispy. While not quite as crunchy as fried, this is a healthier alternative.
Dill Pickle Spears: Instead of pickle chips, use whole or halved dill pickle spears for a heartier, more substantial version. These take slightly longer to fry (3-4 minutes) and are fun to dip.
Gluten-Free Fried Pickles: Substitute all-purpose flour with gluten-free flour blend and use certified gluten-free breadcrumbs or crushed gluten-free cornflakes in place of panko.
Extra Crunchy Version: Mix crushed cornflakes or crushed potato chips into your breadcrumb mixture for an even crispier coating. Some cooks swear by adding a tablespoon of cornstarch to the flour for extra crispiness.
Dipping Sauce Variations: While ranch is traditional, these pickles are also incredible with: remoulade sauce, comeback sauce, sriracha mayo, honey mustard, blue cheese dressing, spicy aioli, or even plain old ketchup for kids.
Pro Chef Tips
Double-Dip for Maximum Crunch: For an extra-thick, restaurant-quality coating, try the double-dip method: after the first complete breading, dip pickles back into the egg mixture and then into the breadcrumbs again. This creates an ultra-crunchy, substantial coating that stays crispy longer.
Season in Layers: Don’t just season your breadcrumb mixture—add a pinch of salt and pepper to your flour, and a dash of hot sauce to your egg mixture. Layering seasonings throughout ensures flavor in every bite, not just on the surface.
Rest Before Frying: After breading your pickles, let them rest on a rack in the refrigerator for 15-30 minutes before frying. This helps the coating set and adhere better, resulting in less breading falling off during cooking. This is a trick professional kitchens use for all breaded items.
Monitor Oil Temperature Constantly: The oil temperature will drop when you add pickles, then gradually rise again. Adjust your heat accordingly to maintain that sweet spot of 350-375°F. Professional cooks never set the burner and walk away—they’re constantly adjusting.
Use Fresh Oil: Oil that’s been used multiple times or has particles floating in it will give your pickles an off-flavor and darker color. For the cleanest taste and prettiest presentation, use fresh oil. If you must reuse oil, strain it thoroughly between batches.
Create a Production Line: When feeding a crowd, set up an assembly line with one person breading and another frying. This keeps the process moving smoothly and ensures hot pickles are constantly coming out of the fryer.
Common Mistakes to Avoid
Using Wet Pickles: This is the #1 mistake! Pickles are packed in brine, so they’re extremely wet. If you don’t dry them thoroughly with paper towels, the breading will slide right off and you’ll end up with bare, soggy pickles floating in oil. Take the extra two minutes to pat them completely dry—it makes all the difference.
Overcrowding the Pan: When you add too many pickles at once, the oil temperature plummets. This means your pickles will absorb excess oil, turn greasy instead of crispy, and take forever to brown. Fry in small batches of 5-7 chips at a time, even though it’s tempting to speed things up.
Skipping the Thermometer: Guessing at oil temperature is a recipe for disaster. Too cool and your pickles are greasy; too hot and the breading burns while the pickle stays cold. A $10 deep-fry thermometer is one of the best investments you can make for consistent frying success.
Draining on Paper Towels: While it seems logical, draining fried foods directly on paper towels traps steam underneath, which makes the breading soggy. Always use a wire rack set over a baking sheet so air can circulate around the pickles, keeping them crispy.
Not Seasoning Immediately: Salt and seasonings stick best to food while it’s still hot and slightly oily. If you wait until pickles cool to season them, the salt just falls off. Season immediately after removing from oil for best flavor distribution.
Storage & Meal Prep
Refrigerator Storage: Leftover fried pickles can be stored in an airtight container lined with paper towels in the refrigerator for 2-3 days. However, they will lose their crispiness—this is unavoidable with fried foods. They’re still edible, but the texture won’t be the same as when freshly fried.
Reheating Methods: To restore some crispiness to leftover fried pickles, your best option is the oven or air fryer. Spread them on a baking sheet in a single layer and reheat at 375°F for 8-10 minutes until warmed through and slightly crispy again. Air fryer method: reheat at 350°F for 4-5 minutes. Avoid the microwave at all costs—it will make them soggy and rubbery.
Advance Prep: While fried pickles are absolutely best served immediately after cooking, you can prep components ahead to make last-minute cooking easier. Dry your pickles thoroughly and bread them up to 4 hours in advance. Place breaded pickles in a single layer on a parchment-lined baking sheet, cover loosely with plastic wrap, and refrigerate. Let them sit at room temperature for 10 minutes before frying. This is perfect for entertaining—do all the messy breading work ahead of time, then just fry when guests arrive.
Room Temperature: Fried pickles should not be left at room temperature for more than 2 hours due to food safety concerns. If you’re serving them at a party, keep freshly fried batches warm in a 200°F oven and replenish the serving platter as needed.
Make-Ahead & Freezer Notes
Freezing Breaded Pickles (Before Frying): This is a game-changer for meal prep! Bread your pickles completely, then arrange them in a single layer on a parchment-lined baking sheet. Freeze until solid (about 2 hours), then transfer to a freezer-safe container or zip-top bag with parchment paper between layers to prevent sticking. These will keep for up to 3 months. Fry directly from frozen—no thawing needed—adding an extra 30-60 seconds to your cooking time. This is perfect for keeping on hand for unexpected guests or snack cravings.
Freezing Cooked Fried Pickles: Technically possible, but not recommended. While you can freeze already-fried pickles, they never quite regain their original crispiness when reheated. The breading tends to become soggy and fall off more easily. If you must freeze cooked pickles, let them cool completely, then freeze in a single layer before transferring to containers. Reheat from frozen at 400°F for 10-12 minutes.
Best Reheating from Frozen: Whether reheating previously fried pickles or cooking frozen breaded ones, the oven method yields the best texture. Arrange in a single layer on a baking sheet and don’t overcrowd. The air circulation is key to reviving crispiness.
Make-Ahead Dipping Sauce: Homemade ranch dressing actually tastes better after sitting in the refrigerator overnight as the flavors meld together. Make your dipping sauces up to 3 days ahead and store covered in the fridge. This takes one task off your plate on cooking day.
Serving Suggestions
Fried pickles are incredibly versatile and pair beautifully with so many dishes. Here are some delicious serving ideas:
Classic Pairings: Serve alongside burgers, pulled pork sandwiches, BBQ ribs, or fried chicken for the ultimate Southern feast. They’re also fantastic with fish and chips or fish tacos for a tangy twist.
Game Day Spread: Create an irresistible appetizer table with fried pickles, buffalo wings, jalapeño poppers, loaded potato skins, and mozzarella sticks. Don’t forget plenty of dipping sauces!
Cookout Side: Bring these to your next backyard BBQ alongside coleslaw, potato salad, baked beans, corn on the cob, and watermelon. They’re a guaranteed crowd-pleaser.
Sandwich Topper: Chop fried pickles and pile them on top of burgers, Nashville hot chicken sandwiches, or po’boys for added crunch and tang. This is a Southern secret weapon for next-level sandwiches.
Beer Pairing: Fried pickles are perfect beer food! Pair them with a cold lager, pilsner, or IPA. The crispy, salty, tangy pickles are ideal for balancing hoppy or malty beers.
Dipping Sauce Bar: Set out a variety of sauces for dipping: ranch (classic), blue cheese, comeback sauce, remoulade, honey mustard, spicy mayo, or sriracha aioli. Let guests choose their favorite—it’s fun and interactive!
Salad Topper: Crumble leftover fried pickles over a crispy chicken salad for amazing texture contrast and tangy flavor. They work similarly to croutons but with way more personality.
FAQs Section
Can I use pickle spears instead of chips?
Absolutely! Pickle spears work wonderfully—just cut them in half lengthwise if they’re very large. Keep in mind they’ll need slightly longer frying time (3-4 minutes instead of 2-3) to heat through completely. The breading technique remains the same. Some people actually prefer spears because they have more pickle flavor per bite.
Why is my breading falling off?
The most common reason is that your pickles weren’t dried thoroughly enough before breading. Moisture prevents the flour from adhering, which causes the entire coating to slide off during frying. Also make sure you’re pressing the breading firmly onto each pickle and allowing breaded pickles to rest for a few minutes before frying. Using panko instead of regular breadcrumbs also helps—the larger, flakier crumbs adhere better.
Can I make these in an air fryer?
Yes! Arrange breaded pickles in a single layer in your air fryer basket (work in batches—don’t overcrowd). Spray generously with cooking oil spray on both sides. Air fry at 400°F for 10-12 minutes, flipping halfway through and spraying again. While they won’t be quite as crispy as deep-fried, they’re still delicious and use significantly less oil. Air fryer models vary, so watch them closely the first time.
What’s the best oil for frying pickles?
Use any neutral oil with a high smoke point: vegetable oil, canola oil, or peanut oil are all excellent choices. Avoid olive oil, which has a low smoke point and strong flavor that can overwhelm the pickles. Peanut oil is popular in restaurants because it fries at high heat without breaking down and imparts a subtly sweet flavor, but vegetable or canola are more budget-friendly for home cooking.
How do I keep them crispy when serving a crowd?
The key is to keep finished pickles warm without trapping steam, which makes them soggy. Place fried pickles in a single layer on a wire rack set over a baking sheet, then keep them in a 200°F oven. This gentle heat keeps them warm without continuing to cook them, and the rack allows air circulation to maintain crispiness. Don’t pile them in a bowl or on a plate—they’ll steam each other.
Can I prep these ahead of time?
Yes! You can bread pickles up to 4 hours ahead and refrigerate them on a parchment-lined baking sheet covered with plastic wrap. For longer storage, bread them completely and freeze for up to 3 months. Fry frozen pickles directly without thawing, adding just 30-60 seconds extra to the cooking time. This make-ahead method is perfect for entertaining.
What can I use instead of buttermilk?
If you don’t have buttermilk on hand, make your own by adding 1 tablespoon of white vinegar or fresh lemon juice to 1 cup of regular milk. Stir and let it sit for 5 minutes—it will thicken slightly and develop a tangy flavor similar to real buttermilk. You can also substitute with plain yogurt thinned with a splash of milk, or simply use regular milk (though you’ll lose some tanginess).
Conclusion
There you have it—the ultimate crispy fried pickles recipe that’ll have everyone begging for your secret! These golden, crunchy pickle chips are everything you want in an appetizer: easy to make, absolutely delicious, and impossible to stop eating. Whether you’re serving them at your next game day party, summer cookout, or just treating yourself to a special snack, these homemade fried dill pickles deliver restaurant-quality results right from your own kitchen.
The beautiful thing about this recipe is how adaptable it is to your preferences. Make them spicy, bake them for a lighter version, or prep them ahead and freeze for ultimate convenience. Once you master the basic technique, you’ll find yourself making batch after batch—they’re that good!
I’d love to hear how your easy fried pickles turn out! Drop a comment below with your results, any creative variations you tried, or questions you might have. And if you loved this recipe, please share it with your friends and save it to your Pinterest boards—you know you’ll want to make these again and again. Don’t forget to snap a photo of your crispy creation and tag me on social media. Happy frying, friends!