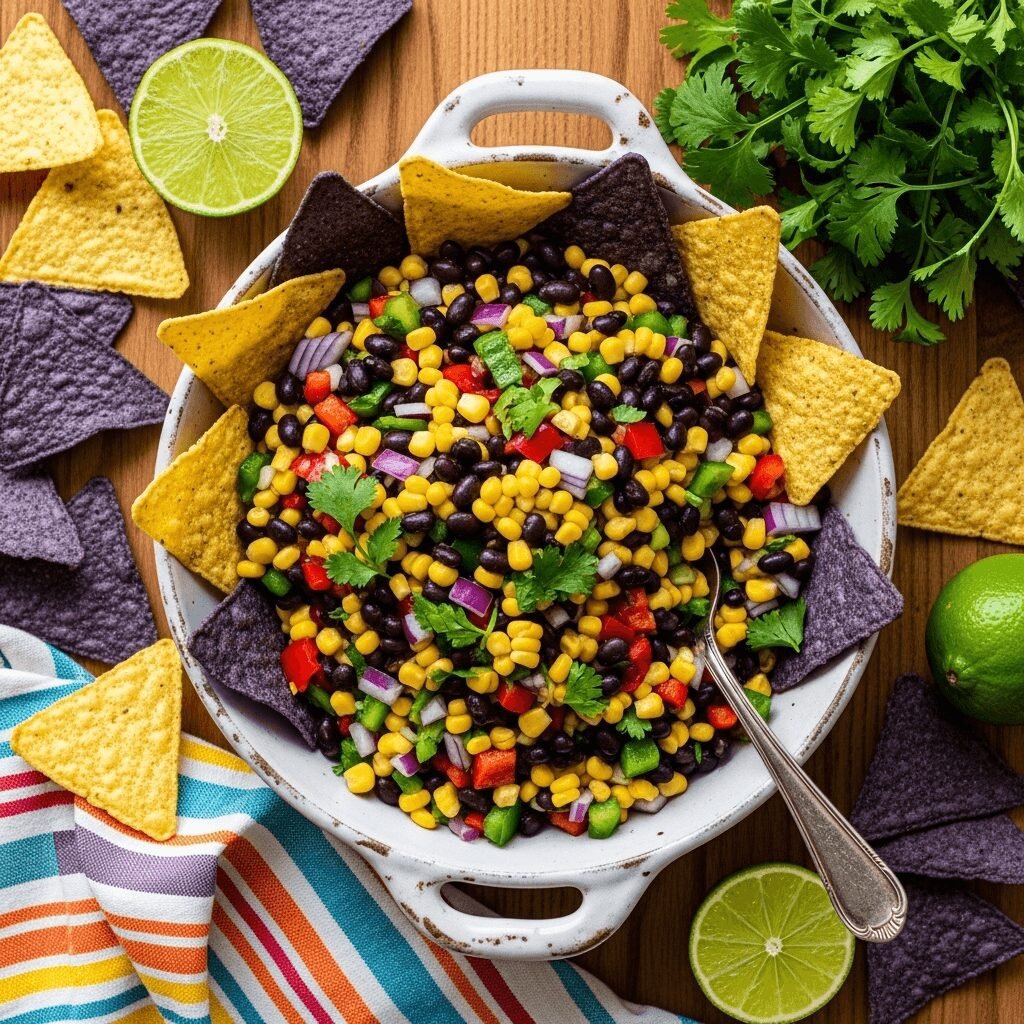
Fresh Black Bean and Corn Salsa – The Ultimate Party Dip Everyone Craves

There’s something magical about a bowl of vibrant, freshly-made black bean and corn salsa that just disappears at parties. This colorful, zesty Mexican-inspired dip is packed with protein-rich black beans, sweet corn kernels, crisp bell peppers, and a tangy lime dressing that ties everything together beautifully. Whether you’re hosting a summer barbecue, planning Taco Tuesday, or just craving a healthy snack with tortilla chips, this easy homemade salsa delivers big flavor with minimal effort. Ready in just 15 minutes with no cooking required, it’s the perfect make-ahead recipe that actually tastes better after the flavors meld together in the fridge!
Introduction of Recipe
Black bean and corn salsa is a chunky, Southwestern-style dip that combines hearty black beans with sweet corn, fresh vegetables, and a zesty lime vinaigrette. Unlike traditional tomato-based salsas, this version is more substantial and filling, making it perfect as both an appetizer and a side dish. It’s incredibly versatile – serve it with tortilla chips as a crowd-pleasing dip, spoon it over grilled chicken or fish for a fresh topping, stuff it into tacos or burritos, or even enjoy it as a healthy protein-packed salad on its own.
This recipe is particularly popular during summer months when fresh corn is at its peak, though it works beautifully year-round using canned or frozen corn. The combination of textures – creamy beans, crisp vegetables, and tender corn – creates an addictive eating experience that keeps people coming back for more. It’s naturally gluten-free, can easily be made vegan, and is budget-friendly enough to feed a crowd without breaking the bank.
Perfect for potlucks, game day gatherings, backyard cookouts, Cinco de Mayo celebrations, or simply as a nutritious afternoon snack, this black bean corn salsa has earned its place as a staple recipe in kitchens across America. The best part? There’s absolutely no cooking involved, which means you can whip this up in minutes and spend more time enjoying your gathering rather than being stuck in the kitchen.
History / Background
While black bean and corn salsa doesn’t have centuries of tradition behind it like some classic Mexican salsas, it represents a beautiful fusion of Southwestern American cooking and traditional Mexican flavors that emerged prominently in the 1980s and 1990s. This was the era when Tex-Mex cuisine exploded in popularity across the United States, and creative home cooks and chefs began experimenting with combining traditional Mexican ingredients in new, accessible ways.
The pairing of black beans and corn has deep roots in indigenous American agriculture. These two crops were part of the “Three Sisters” agricultural system practiced by Native Americans for thousands of years (corn, beans, and squash planted together). Black beans are native to Central and South America and have been cultivated for at least 7,000 years, while corn originated in Mexico around 9,000 years ago. Together, they create a complete protein, which is why this combination appears throughout Latin American cuisine.
The modern black bean and corn salsa we know today likely originated in the American Southwest – particularly in states like Texas, New Mexico, Arizona, and California – where Mexican culinary traditions blended with American convenience cooking. As Americans became more health-conscious in the 1990s and early 2000s, recipes like this gained popularity because they offered bold flavors without excessive calories, fat, or processed ingredients.
This salsa style also reflects the broader “salsa fresca” or “pico de gallo” tradition of fresh, uncooked salsas that celebrate raw ingredients at their peak. By adding protein-rich beans and sweet corn to the traditional formula of tomatoes, onions, cilantro, and lime, American cooks created a heartier, more substantial version that could stand on its own as a side dish or light meal.
Today, black bean and corn salsa has become a potluck and picnic staple across the country, with countless variations reflecting regional preferences and personal creativity. It represents the best of modern American home cooking – fresh, healthy, flavorful, and adaptable to whatever ingredients you have on hand.
Why You’ll Love This Recipe
This fresh black bean and corn salsa is about to become your new favorite go-to recipe, and here’s why: it combines restaurant-quality flavor with the simplicity of tossing ingredients in a bowl. There’s something deeply satisfying about creating such a vibrant, delicious dish with practically no effort, and the compliments you’ll receive make it feel like you spent hours in the kitchen.
The flavor profile hits all the right notes – you get sweetness from the corn, earthiness from the black beans, brightness from fresh lime juice, a subtle kick from jalapeños, and that essential freshness from cilantro and vegetables. Every bite offers different textures and flavors, which keeps it interesting whether you’re eating it with chips or using it as a topping.
Here’s what makes this recipe absolutely irresistible:
- Zero cooking required – Just rinse, chop, and mix! Perfect for hot summer days when you don’t want to turn on the stove
- Ready in 15 minutes – From pulling ingredients out of the fridge to serving, you’ll be done before most people can decide what to make
- Budget-friendly – Uses affordable pantry staples and a few fresh ingredients to feed a crowd for just a few dollars
- Naturally healthy – Packed with fiber, protein, and vitamins, this is guilt-free snacking at its finest
- Make-ahead friendly – Actually tastes better after sitting in the fridge, making it perfect for meal prep and party planning
- Incredibly versatile – Works as a dip, side dish, taco filling, salad, or topping for grilled meats and fish
- Crowd-pleasing – Even picky eaters love this colorful salsa, and it accommodates multiple dietary preferences
- Visually stunning – The vibrant colors make it Instagram and Pinterest worthy every single time
- Customizable – Easy to adjust the heat level, add more vegetables, or modify ingredients based on what you have available
- Travels well – Perfect for potlucks and picnics since it doesn’t require reheating and won’t wilt or get soggy
Whether you’re an experienced cook or someone who typically relies on store-bought dips, this recipe will make you feel like a culinary genius with minimal effort. It’s the kind of dish that people ask for the recipe after trying, and you’ll love telling them how simple it actually is!
Ingredient Notes
The beauty of this black bean and corn salsa lies in using simple, fresh ingredients that shine when combined together. Let’s break down what makes each component essential and how you can adapt based on what’s available in your kitchen.
Black Beans – The protein-packed foundation of this salsa. Canned black beans work perfectly and save loads of time. Make sure to drain and rinse them thoroughly to remove excess sodium and that slightly metallic canned taste. If you prefer, you can cook dried black beans from scratch, which will give you firmer beans with better texture. One 15-ounce can equals about 1½ cups of cooked beans. Substitution: Pinto beans, kidney beans, or chickpeas work well if you don’t have black beans.
Corn Kernels – Sweet corn adds pops of natural sweetness and a pleasing texture. Fresh corn cut from the cob is incredible when in season (usually summer months), but frozen corn that’s been thawed or even canned corn (drained well) works beautifully year-round. For extra flavor, you can char fresh or frozen corn in a hot skillet before adding. Pro tip: One large ear of corn yields about ¾ cup of kernels.
Bell Peppers – Red bell peppers are preferred for their sweetness and vibrant color, but any color works. They add crunch and freshness while contributing vitamin C. Dice them small (about ¼-inch pieces) so they distribute evenly throughout the salsa. Substitution: Try adding diced poblano peppers for a smoky flavor.
Red Onion – Provides that essential sharp, pungent bite that balances the sweetness. Red onion is preferred over white or yellow because it’s slightly milder and adds beautiful color. If raw onion is too strong for your taste, soak the diced onion in cold water for 10 minutes, then drain before adding. Substitution: Green onions (scallions) or sweet Vidalia onions for a milder flavor.
Jalapeño Pepper – This is your heat source, so adjust according to your spice preference. Most of the heat lives in the seeds and white membranes, so remove them for mild heat or leave them in if you like it spicy. One jalapeño gives a gentle kick; add two for more heat. Substitution: Serrano peppers for more heat, or omit entirely for a kid-friendly version.
Fresh Cilantro – The herb that divides households! Cilantro adds that distinctive fresh, citrusy flavor that’s essential to Southwestern cooking. Chop it roughly and don’t be shy – a good amount really brightens the salsa. Substitution: If you’re in the “cilantro tastes like soap” camp, substitute fresh parsley or simply omit.
Cherry Tomatoes – These add juiciness and acidity. Cherry or grape tomatoes are preferred over large tomatoes because they’re sweeter and less watery. Quarter them so they’re bite-sized. Substitution: Roma tomatoes (seeded and diced) work in a pinch.
Fresh Lime Juice – This is non-negotiable! Fresh lime juice is essential for that bright, tangy flavor. Bottled lime juice simply doesn’t compare. Plan on 2-3 limes for about ¼ cup of juice. Roll the limes firmly on the counter before cutting to release more juice. Tip: Add the zest of one lime for even more citrus flavor.
Olive Oil – A small amount of good-quality extra virgin olive oil helps carry flavors and gives the salsa a silky mouthfeel. It also helps the seasonings stick to the vegetables. Substitution: Avocado oil works great too.
Seasonings – Ground cumin adds earthy warmth that’s characteristic of Southwestern cuisine. Garlic powder provides savory depth without the harshness of raw garlic. Salt and black pepper are essential for bringing all flavors together. Some recipes add a pinch of chili powder for extra complexity.
Optional Add-Ins – Consider diced avocado for creaminess (add just before serving), minced garlic for extra punch, a pinch of cayenne for heat, or even diced mango or peach for a sweet twist.
Equipment Needed
One of the best things about this recipe is that it requires minimal equipment – most of which you likely already have in your kitchen. Here’s what you’ll need:
- Large Mixing Bowl – A spacious bowl (at least 3-quart capacity) gives you room to toss all ingredients together without making a mess. Glass or stainless steel works best.
- Cutting Board – A large, stable cutting board is essential for all the chopping. Consider using a separate board for the jalapeño if you’re sensitive to spicy residue.
- Sharp Chef’s Knife – Makes chopping vegetables quick and easy. A dull knife makes the job frustrating and less safe.
- Can Opener – For opening canned beans and corn (if using canned).
- Colander or Strainer – Essential for rinsing the black beans and draining the corn thoroughly.
- Measuring Cups and Spoons – For accurate proportions of lime juice, oil, and seasonings.
- Citrus Juicer (optional but helpful) – Makes extracting lime juice easier and more efficient. A handheld reamer or even a fork works in a pinch.
- Rubber Spatula or Large Spoon – For gently combining all ingredients without crushing the beans or corn.
- Airtight Storage Container – For refrigerating leftovers or making the salsa ahead of time. A container with a tight-fitting lid keeps the salsa fresh for up to 5 days.
That’s it! No blender, no food processor, no cooking equipment required. This is truly a recipe where a sharp knife and a good bowl are all you need to create something spectacular.
6-8 servings
Print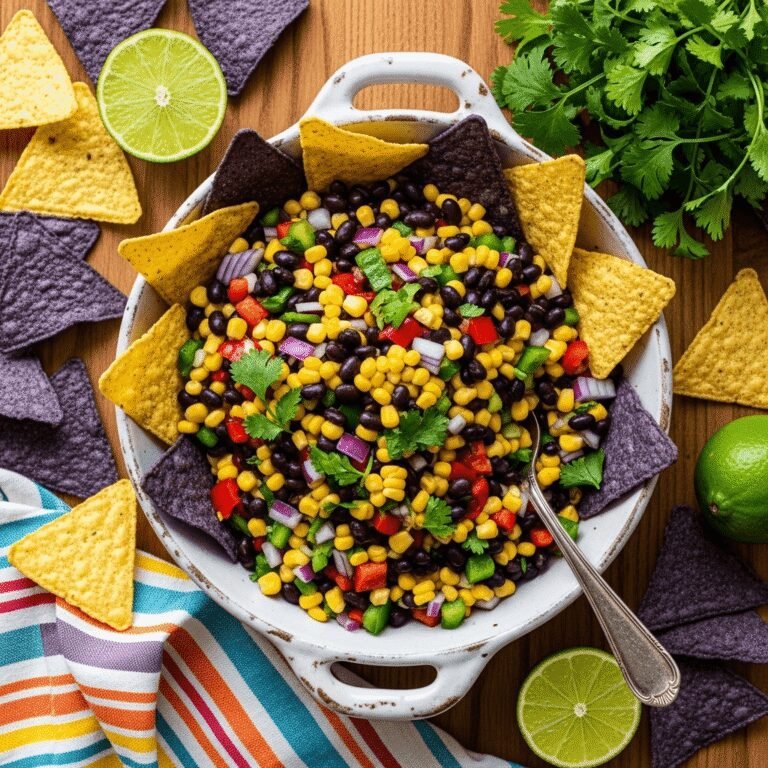
Fresh Black Bean and Corn Salsa
This vibrant Black Bean and Corn Salsa is a fresh, healthy, and incredibly flavorful Mexican-inspired dish perfect for parties, meal prep, or everyday snacking. Packed with protein, fiber, and colorful vegetables, it comes together in just 15 minutes with no cooking required!
- Total Time: 15 minutes
- Yield: 6-8 servings 1x
Ingredients
- 2 (15-ounce) cans black beans, drained and rinsed
- 2 cups corn kernels (fresh, frozen and thawed, or canned and drained)
- 1 red bell pepper, diced
- 1 orange or yellow bell pepper, diced
- ½ red onion, finely diced
- 1 jalapeño pepper, seeded and minced
- ½ cup fresh cilantro, chopped
- 3 cloves garlic, minced
- ⅓ cup fresh lime juice (about 2-3 limes)
- 3 tablespoons extra virgin olive oil
- 1 teaspoon ground cumin
- 1 teaspoon salt (or to taste)
- ½ teaspoon black pepper
- Optional: 1 avocado, diced (add just before serving)
- Optional: ½ teaspoon chili powder for extra warmth
Instructions
Step 1: Prepare Your Vegetables
Begin by thoroughly draining and rinsing your black beans in a colander under cold water. This removes excess sodium and the thick liquid that can make your salsa murky. Shake off excess water and transfer beans to a large mixing bowl. If using frozen corn, make sure it’s completely thawed and drained. If using fresh corn, cut the kernels off the cob. Add corn to the bowl with the beans.
Step 2: Dice the Peppers and Onion
Dice your bell peppers into small, uniform pieces (about ¼-inch cubes) so they’re easy to scoop with chips. Finely dice the red onion – you want small pieces that distribute evenly throughout the salsa. Seed and mince the jalapeño pepper, removing the white membranes for less heat if desired. Add all the chopped vegetables to the bowl.
Step 3: Add Aromatics and Herbs
Mince your garlic cloves very fine – you don’t want large chunks of raw garlic. Roughly chop the fresh cilantro, including the tender stems (they have tons of flavor!). Add both to the mixing bowl.
Step 4: Make the Dressing
In a small bowl, whisk together the fresh lime juice, olive oil, ground cumin, salt, and black pepper. This simple dressing will coat all the ingredients and help the flavors meld together beautifully.
Step 5: Combine and Mix
Pour the dressing over the vegetables and beans. Using a large spoon or rubber spatula, gently toss everything together until well combined. Make sure the dressing coats all the ingredients evenly. Be gentle to avoid smashing the beans.
Step 6: Taste and Adjust
This is the most important step! Taste your salsa and adjust seasonings as needed. You might want more lime juice for brightness, more salt to enhance flavors, or more jalapeño for heat. Remember, flavors will intensify as the salsa sits, so err on the side of slightly under-seasoning.
Step 7: Chill and Serve
For best results, cover the salsa and refrigerate for at least 30 minutes (or up to 3 days) before serving. This allows the flavors to marry and develop. If adding avocado, dice and fold it in just before serving to prevent browning. Serve with tortilla chips, or use as a topping for tacos, grilled meats, or salads.
Notes
- Make it spicier: Add diced serrano peppers, extra jalapeño, or a pinch of cayenne pepper
- Char the corn: For smoky flavor, char fresh or frozen corn in a hot cast-iron skillet before adding
- Fresh vs. canned: Fresh corn has the best texture, but frozen and canned work great for convenience
- Onion too strong? Soak diced red onion in cold water for 10 minutes, then drain before adding
- Cilantro haters: Substitute fresh parsley or omit entirely
- Best after resting: This salsa actually improves after 4-24 hours in the refrigerator as flavors develop
- Prep Time: 15 minutes
- Cook Time: 0 minutes
- Category: Appetizer
- Method: No-Cook
- Cuisine: Mexican
- Diet: Vegan
Nutrition
- Serving Size: ¾ cup
- Calories: 165
- Sugar: 4g
- Sodium: 385mg
- Fat: 6g
- Saturated Fat: 1g
- Unsaturated Fat: 5g
- Trans Fat: 0g
- Carbohydrates: 24g
- Fiber: 7g
- Protein: 7g
- Cholesterol: 0mg
Tips & Variations
Customize This Recipe to Make It Your Own:
Creamy Avocado Version: Fold in 1-2 diced avocados just before serving for a creamy Texas-style caviar. The buttery avocado adds richness and makes it more filling.
Extra Spicy Kick: Add diced serrano peppers (hotter than jalapeños), a pinch of cayenne pepper, or a few dashes of your favorite hot sauce. For serious heat lovers, include some of the jalapeño seeds.
Smoky Grilled Variation: Char the corn and bell peppers on a hot grill or in a cast-iron skillet before dicing. This adds incredible smoky depth that mimics traditional Mexican street corn.
Tropical Twist: Add 1 cup diced fresh mango or pineapple for a sweet-and-savory flavor combination that’s perfect for summer gatherings.
Mediterranean Style: Swap cilantro for fresh basil or parsley, add diced cucumber and cherry tomatoes, and use lemon juice instead of lime for a Greek-inspired version.
Protein-Packed Version: Add diced grilled chicken, shrimp, or crumbled queso fresco to transform this side dish into a complete meal.
Extra Veggie Boost: Incorporate diced cucumber, cherry tomatoes, zucchini, or radishes for additional crunch and nutrition.
Different Bean Options: Try pinto beans, kidney beans, white beans, or a combination of beans for variety.
Grain Bowl Addition: Mix in cooked quinoa, brown rice, or farro to create a hearty grain-based salad perfect for meal prep.
Pro Chef Tips
Dry Your Ingredients Thoroughly: After rinsing beans and draining corn, make sure to shake off as much excess water as possible. Too much moisture will dilute the dressing and make your salsa watery. Pat corn dry with paper towels if needed.
Let It Rest for Best Flavor: Professional chefs know that cold salads need time for flavors to develop. Make this salsa at least 2-4 hours before serving (or even the night before) for the most vibrant, well-developed taste.
Use the Freshest Lime Juice: Bottled lime juice tastes flat and artificial compared to fresh. The bright, tart acidity of freshly squeezed limes makes an enormous difference in the final flavor profile.
Season in Layers: Add salt gradually as you mix, then taste and adjust. It’s much easier to add more salt than to fix an over-salted dish. Remember that canned beans often contain sodium, so start conservatively.
Toast Your Cumin: For next-level flavor, toast whole cumin seeds in a dry skillet until fragrant, then grind them fresh. This releases aromatic oils that jarred pre-ground cumin often lacks.
Consider Texture Balance: Cut all your vegetables to a similar size (about ¼-inch dice) so every bite contains a balanced mix of ingredients. This also makes the salsa easier to scoop with chips.
Temperature Matters: Serve this salsa cold or at room temperature – the flavors are brightest when chilled. Remove it from the refrigerator about 15 minutes before serving to take the chill off if desired.
Common Mistakes to Avoid
Mistake #1: Not Rinsing the Beans
Canned beans sit in a starchy, salty liquid that can make your salsa cloudy and overly salty. Always drain and rinse beans thoroughly under cold water before using.
Mistake #2: Adding Avocado Too Early
While avocado is a delicious addition, it browns quickly due to oxidation. Only add diced avocado immediately before serving, or store it separately and let guests add their own.
Mistake #3: Using Dull Knives
Chopping vegetables with dull knives leads to crushed, bruised produce that releases excess moisture and looks messy. Sharp knives create clean cuts that maintain texture and appearance.
Mistake #4: Over-Mixing
Stirring too vigorously or too often can break down the beans and corn, creating a mushy texture. Fold ingredients together gently, just until combined.
Mistake #5: Skipping the Resting Time
Serving this salsa immediately after mixing means you’ll miss out on developed flavors. The ingredients need time to marinate in the dressing and exchange flavors with each other. At least 30 minutes of refrigeration makes a noticeable difference.
Storage & Meal Prep
This black bean and corn salsa is a meal prep champion that actually improves with time, making it perfect for busy families and anyone who likes to plan ahead.
Refrigerator Storage: Store the salsa in an airtight container in the refrigerator for up to 5 days. In fact, it tastes even better on days 2 and 3 as the flavors continue to develop and meld together. The lime juice acts as a natural preservative, helping maintain freshness.
What to Expect: You may notice some liquid pooling at the bottom of the container – this is completely normal. Simply give the salsa a good stir before serving to redistribute the dressing.
Avoiding Sogginess: If you know you won’t finish the salsa within a day or two, you can drain off some of the accumulated liquid and add a splash of fresh lime juice to brighten it up.
Portion Control: Consider dividing the salsa into individual serving containers for grab-and-go lunches or snacks throughout the week.
Reheating: This salsa is meant to be served cold or at room temperature. There’s no need to reheat it, though you can remove it from the refrigerator 15-20 minutes before serving if you prefer it less chilled.
Make-Ahead & Freezer Notes
Make-Ahead Instructions:
This is one of the best make-ahead recipes you’ll find! Prepare the entire salsa up to 3 days in advance and store it covered in the refrigerator. The flavors actually intensify and improve as it sits, making this perfect for party planning or weekly meal prep. Just hold off on adding avocado until right before serving.
For maximum convenience, you can also do the prep work separately: chop all vegetables and store them in separate containers up to 2 days ahead, then combine everything with the dressing a few hours before serving.
Freezer Instructions:
While this salsa can be frozen, I don’t typically recommend it because the texture changes significantly. The high water content in the vegetables (especially corn and peppers) means they’ll become soft and slightly mushy after thawing. However, if you do want to freeze it for convenience:
- Freeze the salsa in airtight freezer bags or containers for up to 3 months
- Remove as much air as possible to prevent freezer burn
- Do NOT add avocado before freezing
- Thaw overnight in the refrigerator (never at room temperature)
- Drain excess liquid after thawing and add fresh lime juice to brighten flavors
Best Reheating Method:
No reheating needed! This salsa is designed to be enjoyed cold or at room temperature. If you’ve frozen and thawed it, let it come to room temperature naturally, stir well, and refresh with a squeeze of lime juice and a sprinkle of fresh cilantro before serving.
Serving Suggestions
This versatile black bean corn salsa works beautifully in countless ways. Here are my favorite serving suggestions:
As a Dip:
- Serve with sturdy tortilla chips, pita chips, or veggie sticks
- Present in a colorful bowl surrounded by lime wedges and extra cilantro
- Pair with guacamole and queso for a triple-dip appetizer spread
As a Topping:
- Spoon over grilled chicken, steak, pork chops, or fish
- Pile onto tacos, burritos, quesadillas, or nachos
- Use as a fresh topping for baked potatoes or sweet potatoes
- Add to grain bowls with rice, quinoa, or farro
As a Salad:
- Serve over mixed greens with additional lime vinaigrette
- Stuff into lettuce cups for a light, refreshing meal
- Mix with cooked pasta for a cold pasta salad
Complete Meal Pairings:
- Mexican Feast: Serve alongside chicken fajitas, carne asada tacos, or cheese enchiladas
- BBQ Menu: Perfect companion to pulled pork, grilled ribs, or BBQ chicken
- Casual Gathering: Pair with chips, salsa verde, and margaritas
- Healthy Lunch: Enjoy with grilled vegetables and brown rice
- Breakfast Option: Serve alongside scrambled eggs, breakfast burritos, or huevos rancheros
Beverage Pairings:
This salsa pairs beautifully with cold beer (especially Mexican lagers), margaritas, fresh limeade, agua fresca, or iced tea.
FAQs Section
Can I use canned corn instead of fresh?
Absolutely! Canned corn works perfectly well in this recipe. Just make sure to drain it thoroughly and pat it dry with paper towels to remove excess moisture. While fresh corn cut from the cob has slightly better texture and flavor (especially during summer), canned corn is convenient and delivers great results year-round.
How can I make this salsa spicier?
There are several ways to amp up the heat! Leave the seeds and membranes in the jalapeño (that’s where most of the heat lives), add an additional jalapeño or serrano pepper (which is spicier), mix in diced fresh habanero for serious heat, add a pinch of cayenne pepper or red pepper flakes, or stir in your favorite hot sauce to taste.
Can I make this recipe oil-free?
Yes! Simply omit the olive oil and increase the lime juice slightly to maintain moisture. The salsa will still be delicious, though the olive oil does help the flavors meld together and adds a subtle richness. You could also use a small amount of the liquid from the canned beans as a replacement.
Why is my salsa watery?
Excess moisture usually comes from not draining the beans and corn thoroughly, or from vegetables releasing water as they sit. To fix watery salsa, drain off the excess liquid, then add a splash of fresh lime juice and a pinch of salt to refresh the flavors. For future batches, make sure to shake off excess water from rinsed beans and pat corn dry before mixing.
Can I leave out the cilantro?
Definitely! Some people have a genetic trait that makes cilantro taste like soap. If that’s you, substitute fresh flat-leaf parsley (which provides color and freshness without the distinctive cilantro flavor), use fresh basil for a different twist, or simply omit the herb entirely. The salsa will still be delicious.
How do I prevent avocado from browning?
Only add diced avocado immediately before serving to minimize browning. The lime juice in the salsa helps slow oxidation, but avocado will still eventually turn brown. If you need to prepare ahead, store diced avocado separately with plastic wrap pressed directly against the surface, or squeeze extra lime juice over it.
Can I turn this into a main dish?
Yes! Add protein to make it more substantial: fold in diced grilled chicken breast, cooked shrimp, or crumbled cotija cheese. You can also serve it over cooked quinoa, brown rice, or mixed greens to create a complete meal. Some people even stuff it into bell pepper halves and bake for a warm, filling dinner.
Conclusion
This Fresh Black Bean and Corn Salsa is everything you want in a recipe – quick, healthy, affordable, and absolutely bursting with fresh Mexican-inspired flavors! Whether you’re a seasoned home cook or just beginning your culinary journey, this no-cook recipe delivers restaurant-quality results every single time.
The beauty of this dish lies in its simplicity and versatility. It’s healthy enough for your meal prep routine, impressive enough for entertaining guests, and delicious enough that you’ll find yourself making it weekly. The combination of protein-rich black beans, sweet corn, crisp peppers, and zesty lime creates a flavor and texture profile that’s genuinely addictive.
I hope this easy black bean and corn salsa recipe becomes a staple in your home like it has in mine. It’s saved me countless times when I needed a last-minute appetizer, healthy lunch option, or flavorful side dish. The best part? It actually gets better as it sits in the refrigerator, making it perfect for stress-free entertaining and meal planning.
Ready to make this recipe? Grab your ingredients and give it a try today! I’d love to hear how it turns out for you. Leave a comment below sharing your experience, any fun variations you tried, or questions you have. And if you love this recipe as much as I do, please pin it to your Pinterest boards so you can find it easily next time – and share it with your friends who love fresh, healthy Mexican food!
Happy cooking, and here’s to many delicious bowls of this amazing salsa!