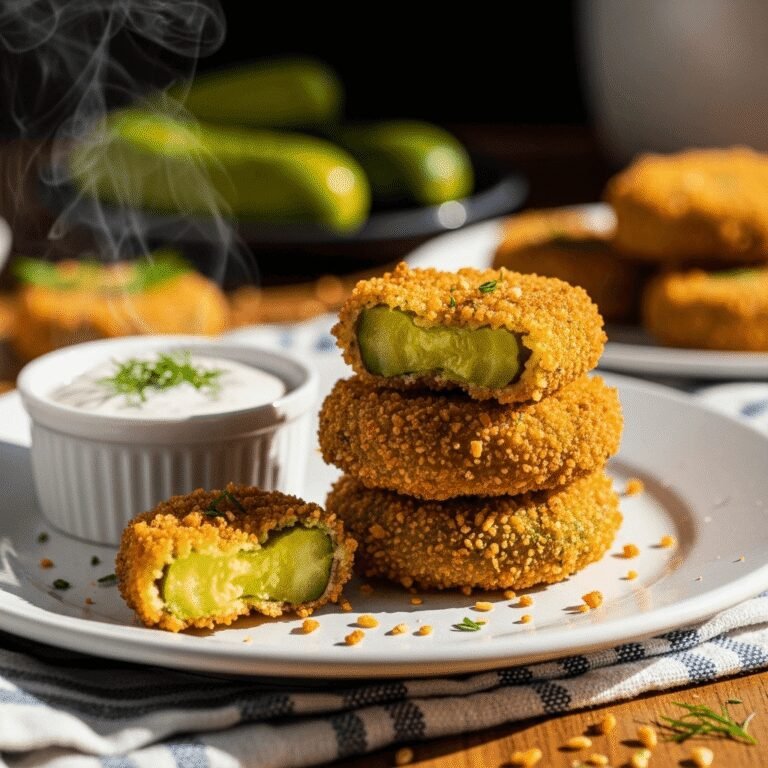
Crispy Air Fryer Fried Pickles (Better Than Restaurant!)
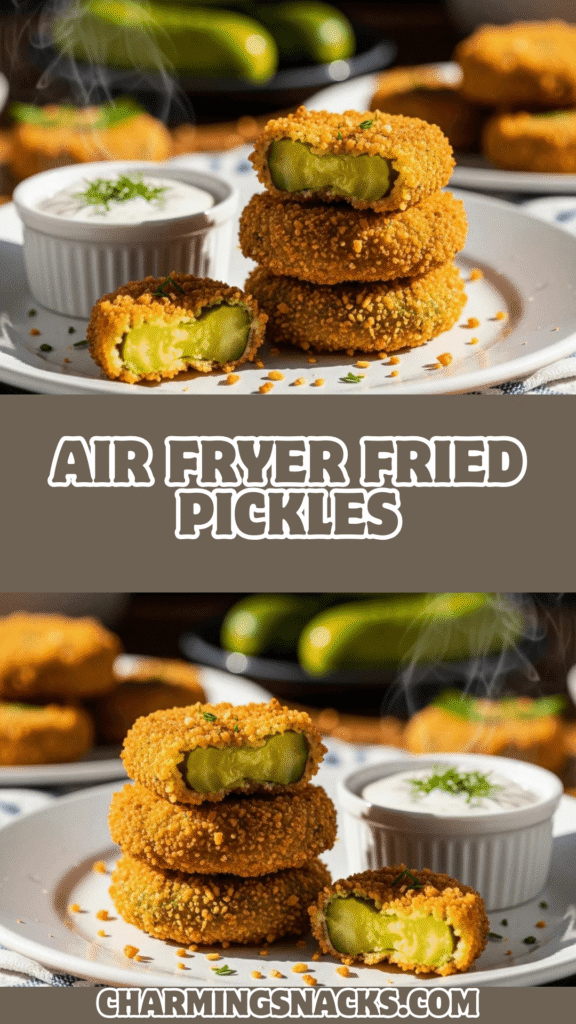
Experience the ultimate crispy, tangy, absolutely addictive snack that’ll have everyone fighting over the last piece! These Air Fryer Fried Pickles deliver all the golden, crunchy goodness of deep-fried pickles from your favorite sports bar or Southern restaurant, but with a fraction of the oil and mess. Made right in your air fryer in under 15 minutes, these beautifully breaded pickle chips or spears come out perfectly crispy on the outside with that signature tangy dill pickle bite on the inside.
If you’ve never tried fried pickles before, prepare to be amazed! The combination of hot, crispy breading with cold, tangy pickles creates an irresistible contrast that’s pure snacking perfection. And if you’re already a fried pickle fanatic who thought you needed a deep fryer to make them at home, this easy air fryer fried pickles recipe is about to change your life.
These are perfect for game day gatherings, movie nights, summer barbecues, casual parties, or honestly any time you’re craving a crunchy, salty, satisfying snack. Serve them as an appetizer at your next get-together, or make a batch for a fun Friday night treat with the family. They pair beautifully with ranch dressing, comeback sauce, or spicy mayo for dipping, and they disappear so fast you’ll want to make a double batch!
History / Background
Fried pickles are a beloved Southern delicacy with a fascinating history rooted in American culinary creativity and regional food culture. While the exact origin is debated (as with many iconic dishes), the most widely accepted story credits the Duchess Drive-In in Atkins, Arkansas, as the birthplace of this crispy creation.
In 1963, Bernell “Fatman” Austin, the owner of the Duchess Drive-In, was looking for something unique to serve alongside his burgers and fries. According to local legend, he had an abundance of dill pickles and decided to experiment by slicing them, breading them with a seasoned batter, and deep-frying them until golden and crispy. The result was an instant hit with customers who loved the unexpected combination of hot, crunchy coating and cool, tangy pickle inside.
Word spread quickly throughout Arkansas and the broader South, and soon fried pickles became a staple at dive bars, roadside diners, county fairs, and sports venues across the region. They embodied the Southern tradition of frying just about anything (and making it delicious), joining the ranks of other fried favorites like hush puppies, fried green tomatoes, and fried okra.
The trend remained primarily regional for decades, beloved in the South but relatively unknown elsewhere. However, in the 2000s, fried pickles experienced a renaissance as food trucks, gastropubs, and casual dining chains across the country began adding them to their menus. They became a social media sensation, with their photogenic golden exterior and surprising flavor profile making them perfect for Instagram and Pinterest.
Today, the Atkins Picklefest is held annually in Arkansas to celebrate this quirky culinary invention, complete with live music, arts and crafts, and of course, mountains of fried pickles. The festival honors Bernell Austin’s legacy and the town’s claim to being the “Fried Pickle Capital of the World.”
The air fryer revolution of the 2010s and 2020s brought fried pickles into the home kitchen in a whole new way. Suddenly, home cooks could recreate their favorite bar snack without dealing with pots of hot oil, splattering grease, or the lingering smell of deep frying. Air fryer fried pickles maintain that essential crispy texture while being healthier and infinitely more convenient—representing the perfect marriage of Southern comfort food tradition and modern cooking technology.
Why You’ll Love This Recipe
These crispy air fryer fried pickles are about to become your new favorite snack, and once you taste them, you’ll understand why they’ve become such a phenomenon. Unlike traditional deep-fried versions that leave you feeling heavy and greasy, these air-fried beauties deliver all the crunch and flavor with significantly less oil, making them a snack you can feel good about enjoying (well, at least better!).
Here’s what makes this recipe absolutely irresistible:
- Ready in 15 minutes – From prep to serving, you’ll have hot, crispy pickles faster than delivery or takeout
- Healthier than deep-fried – Uses just a light spray of oil instead of cups of frying oil, cutting calories and fat dramatically while maintaining incredible crispiness
- No messy cleanup – Say goodbye to disposing of used frying oil, scrubbing splattered stovetops, and that lingering fried food smell in your kitchen
- Perfectly crispy every time – The air fryer circulates hot air for even, consistent browning without any soggy spots
- Customizable seasoning – Adjust the spices to make them as mild or as zesty as you prefer
- Budget-friendly – A jar of pickles and some basic pantry staples create an impressive appetizer for just a few dollars
- Kid-approved snack – Even picky eaters love the fun, crunchy texture (and it’s a sneaky way to get them interested in pickles!)
- Party-perfect – Impressive enough for entertaining but easy enough for a casual Tuesday night
- Versatile serving options – Works as an appetizer, side dish, game-day snack, or even a fun salad topper
- No special skills required – If you can dip pickles in coating and press buttons on your air fryer, you can make these!
- Crowd-pleaser guaranteed – I’ve never met anyone who didn’t love these once they tried them
- Makes your kitchen smell amazing – That savory, garlicky, pickle-y aroma is absolutely mouthwatering
Ingredient Notes
Let’s break down everything you need for these homemade air fryer fried pickles so you understand what each ingredient does and how to substitute if needed!
Dill Pickle Chips or Spears – The star of the show! I prefer using dill pickle chips because they’re already the perfect size and thickness, but pickle spears work beautifully too (just pat them extra dry). Look for pickles with good crunch—avoid “sandwich stackers” or overly soft pickles. Kosher dill pickles have great flavor, or try bread-and-butter pickles for a sweeter version. The most important step is draining them thoroughly and patting them completely dry with paper towels—excess moisture is the enemy of crispiness!
All-Purpose Flour – This creates the base layer that helps everything else stick. The flour dredge is essential for the breading process and helps create that crispy exterior. You can substitute with gluten-free all-purpose flour blend if needed. Some people add a little cornstarch to the flour (about 2 tablespoons) for extra crunch.
Eggs – Acts as the “glue” that binds the breadcrumb coating to the pickles. Beat them well to ensure even coverage. For a dairy-free version, this recipe already works! For vegan pickles, you can substitute with a flax egg (1 tablespoon ground flaxseed mixed with 3 tablespoons water per egg, let sit 5 minutes) or use dairy-free buttermilk.
Buttermilk – Adding buttermilk to the egg wash creates that classic Southern fried coating and adds tang that complements the pickles perfectly. The acidity also helps tenderize the breading. If you don’t have buttermilk, substitute with regular milk mixed with 1 teaspoon lemon juice or white vinegar (let sit 5 minutes), or use plain whole milk.
Panko Breadcrumbs – These Japanese-style breadcrumbs are the secret to ultra-crispy fried pickles! Unlike regular breadcrumbs, panko has larger, airier flakes that create a lighter, crunchier coating. This is not the place to substitute with regular breadcrumbs—panko really makes a difference. You can find it in any grocery store near the regular breadcrumbs.
Regular Breadcrumbs – I like mixing panko with regular breadcrumbs for the perfect texture—the panko provides crunch while regular breadcrumbs add a bit more structure and help the coating stick. Use plain (unflavored) breadcrumbs or Italian-seasoned if you want extra herbs. For gluten-free, use gluten-free breadcrumbs or crushed gluten-free crackers.
Garlic Powder – Adds savory depth and aromatic flavor that’s essential to great fried pickles. Don’t substitute with garlic salt or you’ll end up with an overly salty coating. Fresh garlic would burn in the air fryer, so powder is the right choice here.
Onion Powder – Provides sweet, savory flavor complexity that enhances the overall taste. Again, use powder, not onion salt, to control sodium levels.
Paprika – Adds a subtle sweetness, beautiful golden color, and just a hint of smokiness. I use regular paprika, but smoked paprika adds amazing depth if you have it. Avoid hot paprika unless you want spicy pickles (which is also delicious!).
Cayenne Pepper (Optional) – Just a small pinch adds a subtle kick without making them spicy. Omit for kids or sensitive palates, or increase to ½ teaspoon if you love heat.
Salt and Black Pepper – Essential for seasoning the breading properly. Remember that pickles are already salty, so don’t oversalt the coating. I use about ½ teaspoon salt in the breading mix.
Cooking Spray or Oil – A light coating of oil is necessary to help the breadcrumbs crisp up and turn golden in the air fryer. Use neutral-flavored oil spray like avocado oil, canola, or vegetable oil. Avoid olive oil spray as it can have too strong a flavor and lower smoke point.
Equipment Needed
The beauty of this recipe is its simplicity—you don’t need much! Here’s your equipment list:
- Air fryer (any size, but 3.5-quart or larger works best) – This is essential! The circulating hot air is what creates that perfect crispy texture
- Three shallow bowls or plates – For your breading station (flour, egg wash, and breadcrumb mixture)
- Paper towels – Absolutely crucial for drying pickles thoroughly before breading
- Whisk or fork – For beating the eggs and buttermilk together
- Tongs – Makes handling the pickles during the breading process much easier and keeps your hands cleaner
- Cooking spray bottle – For spraying the breaded pickles before air frying (better control than aerosol cans)
- Cooling rack (optional) – Useful if making multiple batches to keep finished pickles crispy while others cook
- Serving platter – For presenting your beautiful crispy pickles
- Small bowls – For serving dipping sauces alongside
Air Fryer Fried Pickles
Crispy, golden air fryer fried pickles with a perfectly seasoned breading that’s crunchy on the outside and tangy on the inside. This healthier version of the Southern favorite uses minimal oil and cooks in just 8 minutes—perfect for game day, parties, or anytime snacking!
- Total Time: 18 minutes
- Yield: 4-6 servings (approximately 24-30 pickle chips) 1x
Ingredients
For the Pickles:
- 24-30 dill pickle chips (or 8-10 pickle spears), thoroughly drained and patted dry
- ½ cup all-purpose flour
- 2 large eggs
- ¼ cup buttermilk
- 1 cup panko breadcrumbs
- ½ cup regular breadcrumbs
- 1 teaspoon garlic powder
- 1 teaspoon onion powder
- 1 teaspoon paprika (smoked or regular)
- ¼ teaspoon cayenne pepper (optional, for heat)
- ½ teaspoon salt
- ½ teaspoon black pepper
- Cooking spray or oil spray
For Serving:
- Ranch dressing, for dipping
- Comeback sauce, spicy mayo, or your favorite dipping sauce
Instructions
Step 1: Prepare Your Pickles
This is the most important step for crispy results! Remove pickle chips from the jar and place them on several layers of paper towels. Pat them thoroughly dry on all sides—seriously, get them as dry as possible. Any excess moisture will create soggy breading and prevent that perfect crunch. If using pickle spears, cut them in half lengthwise, then dry them extremely well. Let them sit on fresh paper towels for a few minutes while you set up your breading station. The drier your pickles, the crispier your final result!
Step 2: Set Up Your Breading Station
Arrange three shallow bowls or plates in a row on your counter. In the first bowl, add the all-purpose flour. In the second bowl, whisk together the eggs and buttermilk until well combined—this creates your “wet” coating. In the third bowl, combine the panko breadcrumbs, regular breadcrumbs, garlic powder, onion powder, paprika, cayenne pepper (if using), salt, and black pepper. Mix the breadcrumb mixture thoroughly so the seasonings are evenly distributed throughout. Having everything organized before you start breading makes the process smooth and efficient!
Step 3: Bread the Pickles
Now for the fun part! Working with one pickle chip at a time (this ensures even coating), first dredge it in flour, coating all sides and shaking off any excess. Next, dip it into the egg mixture, letting any excess drip off—you want a thin, even coat, not globs of egg. Finally, press the pickle into the breadcrumb mixture, coating all sides generously and pressing gently so the crumbs adhere well. Place the breaded pickle on a clean plate or baking sheet. Repeat with all pickles. Pro tip: Use one hand for “dry” ingredients (flour and breadcrumbs) and one hand for “wet” (egg wash) to keep your fingers from getting completely coated!
Step 4: Preheat Your Air Fryer
Preheat your air fryer to 400°F for 3-5 minutes. This ensures the pickles start cooking immediately when you add them, which helps achieve maximum crispiness. While it’s preheating, spray your air fryer basket lightly with cooking spray to prevent sticking.
Step 5: Air Fry the First Batch
Arrange breaded pickles in a single layer in the air fryer basket, making sure they’re not touching or overlapping—air circulation is key to even cooking! Don’t overcrowd; you’ll likely need to cook in 2-3 batches depending on your air fryer size. Lightly spray the tops of the pickles with cooking spray—this helps them turn golden and crispy. Air fry at 400°F for 8 minutes, flipping halfway through at the 4-minute mark and spraying the other side with oil. They should be golden brown and crispy when done.
Step 6: Repeat and Serve
Continue air frying remaining batches, placing finished pickles on a cooling rack or plate while you cook the rest (though honestly, these are best eaten immediately, so don’t be surprised if people start snacking before you’re done cooking!). Serve hot with your favorite dipping sauces. These are absolutely incredible straight from the air fryer when they’re at peak crispiness!
Notes
- Moisture is the enemy: The single most important factor for crispy fried pickles is thoroughly drying your pickles before breading. Take your time with this step!
- Don’t skip the spray: The light coating of oil on the breaded pickles is essential for browning and crisping in the air fryer
- Single layer only: Never stack or overlap pickles in the air fryer or they’ll steam instead of crisp
- Serve immediately: These are at their absolute best right out of the air fryer. They’ll stay crispy for about 15-20 minutes but gradually soften as they cool
- Adjust cooking time: Air fryer models vary significantly in power. Start checking at 6 minutes and adjust as needed—you want deep golden brown color
- For extra crunch: Some people add 2 tablespoons cornstarch to the flour mixture for even more crispiness
- Prep Time: 10 minutes
- Cook Time: 8 minutes
- Category: Appetizer
- Method: Air Fryer
- Cuisine: American
- Diet: Gluten Free
Nutrition
- Serving Size: 5-6 pickle chips
- Calories: 145
- Sugar: 2g
- Sodium: 580mg
- Fat: 4g
- Saturated Fat: 1g
- Unsaturated Fat: 3g
- Trans Fat: 0g
- Carbohydrates: 21g
- Fiber: 1g
- Protein: 6g
- Cholesterol: 65mg
Tips & Variations
One of the best things about air fryer fried pickles is how easy they are to customize! Here are my favorite ways to switch things up:
Pickle Varieties:
- Try bread-and-butter pickles for a sweeter version that’s absolutely addictive
- Use spicy pickle chips for extra heat
- Experiment with dill pickle spears for a heartier, more substantial snack
- Kosher dill pickles have excellent flavor and crunch
- For parties, make a variety pack with different pickle types so guests can try them all
Breading Variations:
- Extra crispy: Replace half the breadcrumbs with crushed cornflakes or Rice Krispies cereal for incredible crunch
- Southern-style: Add 1 tablespoon of cornmeal to the breading for authentic texture
- Spicy: Increase cayenne to ½ teaspoon and add ½ teaspoon hot sauce to the egg wash
- Herby: Mix in 1 teaspoon dried dill, ½ teaspoon dried parsley, and ¼ teaspoon dried thyme
- Cheesy: Add ¼ cup grated Parmesan cheese to the breadcrumb mixture for savory richness
- Ranch-flavored: Mix in 2 tablespoons dry ranch seasoning mix to the breadcrumbs
Coating Alternatives:
- Gluten-free: Use gluten-free flour and gluten-free breadcrumbs or crushed gluten-free crackers
- Low-carb/Keto: Replace breadcrumbs with crushed pork rinds and use almond flour instead of all-purpose flour (reduces carbs significantly)
- Extra crunchy: Double-bread them by repeating the egg wash and breadcrumb steps after the first coating
Spice Level Adjustments:
- Mild: Omit cayenne entirely and reduce black pepper
- Medium: Use the recipe as written with ¼ teaspoon cayenne
- Spicy: Increase cayenne to ½ teaspoon and add ½ teaspoon chili powder
- Extra hot: Add 1 teaspoon hot sauce to the egg wash and sprinkle with red pepper flakes after cooking
Dipping Sauce Ideas:
- Classic ranch dressing (the traditional choice!)
- Comeback sauce (mayo-based Southern sauce with chili sauce and spices)
- Spicy mayo (mayo mixed with sriracha)
- Honey mustard for sweet-tangy contrast
- Blue cheese dressing for bold flavor
- Chipotle aioli for smoky heat
- Remoulade sauce for Creole flair
- BBQ ranch (half ranch, half BBQ sauce)
Pro Chef Tips
Want to take your crispy air fryer fried pickles from good to absolutely restaurant-quality? Here are the professional techniques that make all the difference:
1. The secret is in the drying – I cannot stress this enough: the drier your pickles, the crispier your results. After patting them with paper towels, let them sit on fresh paper towels for 5-10 minutes to air-dry even more. Some chefs even pat them with paper towels a second time just before breading. Every bit of moisture you remove translates directly to extra crispiness.
2. Temperature matters more than you think – Your pickles should be cold (straight from the refrigerator is perfect) when you bread them. The temperature contrast between cold pickle and hot air fryer helps create that satisfying crunch and prevents the inside from getting mushy. Never bread room-temperature pickles!
3. Double-dredging creates restaurant texture – For extra-thick, super-crunchy coating, try this professional technique: after the first complete breading (flour-egg-breadcrumbs), dip the breaded pickle back into the egg wash and then into breadcrumbs again. Yes, it’s more work, but the results are phenomenal for special occasions.
4. Press, don’t just dip – When coating pickles in breadcrumbs, don’t just dip them—actively press the crumbs onto the pickle with your palm. This creates better adhesion and a thicker, more substantial coating that stays put during cooking and eating.
5. The flip is crucial – When you flip pickles halfway through cooking, take a moment to spray any spots that look pale or dry with additional cooking spray. This ensures even browning and maximum crispiness on both sides.
6. Batch cooking strategy – Keep your oven on its lowest setting (170-200°F) and place finished batches on a baking sheet in there while you cook the rest. This keeps them warm without making them soggy, and everything can be served hot at once.
7. Don’t skip the preheat – A preheated air fryer is essential for immediate crisping. If you put pickles in a cold air fryer, they’ll steam before they crisp, resulting in soggy breading.
8. Seasoning layers create complexity – For maximum flavor, season your flour lightly (not just the breadcrumbs), add a pinch of salt to your egg wash, and season the breadcrumb mixture generously. Building flavor in layers creates more delicious results than putting all your seasoning in one place.
9. Oil spray quality matters – Invest in a good-quality oil mister or spray bottle you can fill yourself with your preferred oil. Aerosol cooking sprays often contain propellants that can damage air fryer baskets over time, and refillable misters give you better control over application.
10. The resting trick – After breading all your pickles, let them rest on the counter for 5 minutes before air frying. This allows the coating to “set” and adhere better, resulting in less breading falling off during cooking.
Common Mistakes to Avoid
Even a simple recipe like air fryer fried pickles can go wrong if you’re not careful. Here are the most common pitfalls and how to avoid them:
1. Not drying the pickles thoroughly enough – This is the #1 mistake people make! Wet pickles create steam, which prevents the breading from getting crispy and often causes it to fall off completely. The result is soggy, sad pickles with bare spots. Solution: Pat pickles with multiple layers of paper towels until they’re completely dry, then let them air-dry for a few extra minutes before breading.
2. Overcrowding the air fryer basket – When pickles touch or overlap, the hot air can’t circulate properly, resulting in uneven cooking with soggy spots. Some areas will be perfectly crispy while others remain pale and soft. Solution: Cook in multiple batches if necessary, arranging pickles in a single layer with space between each one. Yes, it takes a bit longer, but the results are worth it!
3. Skipping the cooking spray – Without oil, the breadcrumbs simply can’t brown and crisp properly in the air fryer. They’ll remain pale, soft, and unappetizing. Solution: Spray pickles lightly but thoroughly with cooking spray before air frying, and spray again after flipping. Don’t drench them (that defeats the “healthier” purpose), but don’t skip this step!
4. Using the wrong breadcrumbs – Regular fine breadcrumbs alone don’t create the same texture as panko. They can result in a dense, compact coating instead of light and crispy. Solution: Use panko breadcrumbs, or mix panko with regular breadcrumbs as the recipe suggests for the perfect texture.
5. Not preheating the air fryer – Starting with a cold air fryer means your pickles will heat up gradually instead of crisping immediately, often resulting in breading that absorbs too much moisture and turns soggy. Solution: Always preheat your air fryer to 400°F for 3-5 minutes before adding pickles.
6. Flipping too roughly or not at all – If you don’t flip pickles halfway through cooking, one side will be crispy while the other remains pale and soft. But flipping too roughly can knock off the breading. Solution: Use tongs to flip gently but confidently at the 4-minute mark, and spray the newly exposed side with cooking spray for even browning.
7. Serving them too late – Fried pickles are at their absolute peak crispiness right out of the air fryer. After sitting for 20-30 minutes, condensation forms and they start to soften. Solution: Time your cooking so pickles come out right when you’re ready to serve, or keep them warm in a low oven on a wire rack (never covered, which traps steam).
Storage & Meal Prep
While air fryer fried pickles are definitely best enjoyed immediately when they’re hot and crispy, here’s what you need to know about storing and reheating if you have leftovers (though that’s rare!):
Refrigerator Storage: If you somehow have leftover fried pickles, store them in an airtight container in the refrigerator for up to 2 days. Be aware that they will lose their crispiness during storage—this is unavoidable with any breaded, fried food. The breading absorbs moisture from the pickles and the air, becoming soft and less appealing. They’ll still taste good (especially if you reheat them properly), but they won’t have that just-cooked crunch.
Reheating Instructions: Never microwave fried pickles! This makes them soggy and rubbery. Instead, reheat them in your air fryer at 375°F for 3-4 minutes until warmed through and the breading crisps up again. Alternatively, reheat in a regular oven on a baking sheet at 400°F for 5-7 minutes. An air fryer does the best job of restoring crispiness, though they still won’t be quite as perfect as freshly made.
Why They Don’t Store Well: The fundamental problem with storing fried pickles is that pickles contain a lot of moisture. Even after drying them thoroughly before cooking, that moisture is still present inside. Over time, it migrates through the breading, softening it. This is just physics—there’s no way to completely prevent it.
Best Practice: Honestly, the best approach with fried pickles is to make only what you’ll eat immediately. If cooking for a party, prepare the breading station and have pickles dried and ready, but bread and cook them in batches throughout the event so guests always get hot, crispy pickles. People will be impressed watching you make them fresh!
Make-Ahead Prep: What you CAN do ahead is prepare your breading station. Mix your breadcrumb mixture up to 2 days ahead and store in an airtight container. Whisk together your egg wash, cover, and refrigerate for up to 1 day. Measure out flour into a bowl and cover. Drain and dry pickles, then store them between paper towels in the refrigerator. When it’s time to cook, everything is ready for quick assembly and cooking!
Make-Ahead & Freezer Notes
If you want to prep ahead for easy entertaining or quick snacks, here’s what works:
Freezing Breaded (Uncooked) Pickles: YES! This is the best make-ahead method for fried pickles. Bread your pickles completely according to the recipe instructions, then arrange them in a single layer on a parchment-lined baking sheet. Freeze for 2-3 hours until solid, then transfer to a freezer-safe bag or container, separating layers with parchment paper. They’ll keep for up to 2 months. Don’t thaw before cooking—cook directly from frozen, adding 2-3 minutes to the cooking time (10-11 minutes total at 400°F).
Advantages of Freezing Uncooked: This method is brilliant for parties or game days. Do all the messy breading work ahead of time, then pull out however many pickles you need and air fry them fresh. They come out just as crispy as if you’d breaded them fresh, and you avoid the soggy leftover problem entirely!
Freezing Cooked Pickles: You can freeze already-cooked fried pickles, but I don’t recommend it. When thawed and reheated, the breading loses much of its crispiness and the texture suffers. If you do freeze cooked pickles, store them in an airtight container for up to 1 month, then reheat from frozen in the air fryer at 375°F for 5-7 minutes.
Make-Ahead Breading Station: As mentioned above, you can prepare all your breading components 1-2 days ahead. Keep them separate and covered in the refrigerator, then assemble and bread pickles right before cooking for best results.
Time-Saving Tip: If you make fried pickles regularly, keep a batch of your seasoned breadcrumb mixture made up in an airtight container in your pantry (it keeps for months). Then you only need flour, eggs, and pickles to whip up a batch anytime!
Serving Suggestions
Air fryer fried pickles are incredibly versatile and pair beautifully with so many foods and occasions. Here are my favorite serving suggestions:
Perfect Dipping Sauces:
- Ranch dressing – The absolute classic pairing that everyone loves
- Comeback sauce – This tangy, spicy Mississippi sauce is PERFECT with fried pickles
- Spicy mayo – Mix mayonnaise with sriracha and a squeeze of lemon
- Honey mustard – Sweet and tangy, provides nice contrast to salty pickles
- Chipotle ranch – Ranch mixed with chipotle peppers in adobo sauce
- Blue cheese or Gorgonzola dressing – For bold flavor lovers
- Remoulade – Creole-style sauce with capers and herbs
- Garlic aioli – Sophisticated and delicious
- BBQ ranch – Half your favorite BBQ sauce, half ranch
- Dill sauce – Sour cream, mayo, fresh dill, and lemon juice
Game Day Spread: Serve fried pickles alongside buffalo wings, loaded nachos, mozzarella sticks, soft pretzels, and vegetable crudités for an epic game-watching spread. Add plenty of different dipping sauces so everyone can customize.
Summer BBQ Side: These make an unexpected and delightful side dish at cookouts! Serve them alongside burgers, hot dogs, pulled pork sandwiches, coleslaw, baked beans, and potato salad. They’re a fun alternative to traditional potato chips or fries.
Appetizer Platter: Create a Southern-inspired appetizer board with fried pickles, pimento cheese, deviled eggs, boiled peanuts, and crackers. Perfect for casual entertaining!
Main Course Pairing: Serve as a side with:
- Fish and chips (fried pickles instead of mushy peas!)
- Burgers or sliders (or put them right on the burger!)
- Fried chicken tenders
- Pulled pork or beef sandwiches
- Grilled cheese sandwiches
- Fish tacos
Creative Uses:
- Salad topper – Chop them up and add to salads for salty, crunchy texture (especially good on chef salad or Cobb salad!)
- Sandwich component – Add whole fried pickle chips to po’boy sandwiches, burgers, or chicken sandwiches for extra crunch
- Bloody Mary garnish – Skewer them with other garnishes for the ultimate brunch cocktail
- Snack board addition – Include on charcuterie or snack boards for unexpected texture and flavor
Beverage Pairings:
- Beer – Light lagers, pilsners, or wheat beers are refreshing alongside salty pickles
- Sweet tea – Classic Southern pairing
- Lemonade – Tangy and refreshing
- Craft soda – Root beer or ginger beer work wonderfully
- Cocktails – Pairs well with Bloody Marys, Moscow Mules, or bourbon cocktails
FAQs Section
Q: Can I make these in a regular oven instead of an air fryer?
A: Yes, though the texture won’t be quite as crispy! Preheat your oven to 425°F and arrange breaded pickles on a baking sheet lined with parchment paper or a wire rack. Spray generously with cooking spray. Bake for 10-12 minutes, flip, spray again, and bake another 8-10 minutes until golden brown and crispy. The air fryer does a better job of creating all-around crispiness, but the oven method definitely works!
Q: Why did my breading fall off?
A: This usually happens for one of three reasons: (1) Pickles weren’t dried thoroughly enough—excess moisture prevents the breading from adhering properly. (2) You didn’t press the breadcrum
bs firmly onto the pickles—they need gentle pressure to stick. (3) You skipped the flour dredge step—flour creates a dry surface that helps the egg wash adhere, which then helps the breadcrumbs stick. Make sure to follow all three coating steps (flour, egg wash, breadcrumbs) for best adhesion!
Q: Can I use pickle spears instead of chips?
A: Absolutely! Pickle spears work wonderfully and make for a heartier, more substantial snack. Cut them in half lengthwise if they’re very thick, and be extra diligent about drying them since spears hold more moisture than chips. They may need an extra 1-2 minutes of cooking time. Some people prefer spears because they’re easier to handle and dip, while others love chips because you can eat more of them!
Q: Are these actually healthier than deep-fried pickles?
A: Yes, significantly! Traditional deep-fried pickles are submerged in oil, which means the breading absorbs a substantial amount of fat. These air fryer pickles use just a light spray of oil on the surface, cutting the fat and calories by approximately 70-80% compared to deep-fried versions. You’re getting all the crispy texture and delicious flavor with a fraction of the oil, making them a much lighter option—though they’re still an indulgent treat rather than health food!
Q: My air fryer is small. Can I still make these?
A: Definitely! You’ll just need to cook in more batches. Even small 2-quart air fryers can make fried pickles—you might only fit 6-8 chips per batch, but they’ll turn out perfectly crispy. Just keep finished batches warm in a 200°F oven on a wire rack while you cook the rest. The cooking time remains the same; you’re just working in smaller quantities.
Q: Can I make these gluten-free?
A: Yes! Simply substitute gluten-free all-purpose flour for regular flour and use gluten-free breadcrumbs (or crushed gluten-free crackers like Glutino or Schar). The texture will be nearly identical. Make sure your pickles are gluten-free (most are, but always check labels), and verify that any seasonings or dipping sauces you use are certified gluten-free if you have celiac disease.
Q: What’s the best type of pickle to use?
A: For classic fried pickles, dill pickle chips are most popular because they’re the perfect size and have that tangy dill flavor everyone loves. Look for “hamburger dill chips” at the grocery store—they’re the ideal thickness. Kosher dill pickles have excellent flavor and crunch. If you prefer sweeter pickles, bread-and-butter chips are amazing (surprisingly addictive!). Avoid overly soft or thin “sandwich stacker” pickles, which can turn mushy.
Q: How do I keep them crispy if I’m serving at a party?
A: The trick is to cook them in batches throughout the party rather than all at once. Set up your breading station in advance and keep dried pickles ready in the fridge. Every 15-20 minutes, bread and cook a fresh batch. Guests will love getting hot, crispy pickles straight from the air fryer, and you avoid the sogginess problem entirely. If you must cook ahead, keep them in a 200°F oven on a wire rack (never cover them), but know they’ll gradually lose crispiness. For large parties, consider keeping your air fryer in the entertaining space and making them to order—it becomes a fun conversation piece!
Conclusion
There you have it—everything you need to know to make absolutely incredible Air Fryer Fried Pickles right in your own kitchen! These crispy, tangy, addictively crunchy snacks prove that you don’t need a deep fryer or restaurant kitchen to create seriously delicious comfort food. With just a few simple ingredients, your trusty air fryer, and about 15 minutes, you can serve up golden, perfectly seasoned fried pickles that taste just as good (or better!) than anything you’d get at your favorite bar or restaurant.
The beauty of this recipe is its perfect balance of indulgence and convenience. You get all the satisfying crunch and bold flavor of traditional fried pickles, but with a fraction of the oil, none of the mess, and cooking time that fits even the busiest schedule. Whether you’re hosting game day, looking for a fun snack to make with kids, need an impressive appetizer for your next party, or just want to treat yourself to something delicious on a random Tuesday evening, these crispy air fryer fried pickles deliver every single time.
I absolutely love hearing from readers who try my recipes! If you make these fried pickles, please drop a comment below and let me know how they turned out. Did you try any fun variations? What dipping sauce was your favorite? Did they disappear as fast at your house as they do at mine? Your feedback and stories truly make my day and help other home cooks feel confident trying the recipe!
Don’t forget to PIN this recipe to your Pinterest boards so you can find it whenever that fried pickle craving hits (and trust me, once you make these, it will hit often!). Save it to your “Air Fryer Recipes,” “Game Day Appetizers,” “Easy Snacks,” or “Southern Cooking” boards—wherever you’ll remember to come back to it when you need a crowd-pleasing recipe that never fails.
If you loved these air fryer fried pickles as much as my family does, please share this recipe with your friends and anyone who appreciates crispy, crunchy, outrageously delicious snacks. The more people who discover how easy it is to make restaurant-quality fried pickles at home, the better!
Now grab that jar of pickles from your fridge, fire up your air fryer, and get ready to experience pure crispy, tangy, golden-brown perfection. Happy cooking, and enjoy every single crunchy bite!