Crispy Baked Chicken Taquitos – Better Than Restaurant Style!

Get ready to fall in love with the crunchiest, most flavorful homemade chicken taquitos you’ve ever made! These golden, crispy rolled tacos are stuffed with tender seasoned chicken, melty cheese, and zesty spices, then baked (or fried) to absolute perfection. Whether you’re feeding hungry kids after school, hosting game day, or meal prepping for the week ahead, these easy chicken taquitos are about to become your new favorite recipe.
What makes these so special? Unlike store-bought frozen taquitos that can taste bland and cardboard-y, homemade versions are bursting with fresh flavors and real ingredients you can pronounce. Plus, you control exactly what goes inside – more cheese? Done. Extra spicy? Absolutely. And the best part? They’re baked in the oven, making them a healthier alternative to deep-fried versions while still achieving that irresistible crunch we all crave. Serve them with your favorite toppings like sour cream, guacamole, and salsa, and watch them disappear in minutes. Trust me, you’ll want to make a double batch because these crispy chicken taquitos never last long!
History / Background
Taquitos, which literally translates to “little tacos” in Spanish, have a fascinating history that’s deeply rooted in Mexican-American culinary tradition. While the exact origin is debated among food historians, most agree that taquitos as we know them today were popularized in Southern California during the 1940s and 1950s, particularly in San Diego.
The most widely accepted origin story credits Ralph Pesqueira Sr., who owned a tortilla factory in San Diego in the 1940s. According to family accounts, Ralph’s aunt would make rolled tacos (what we now call taquitos) for family gatherings, filling corn tortillas with shredded meat and frying them until crispy. Ralph recognized their commercial potential and began selling them at his factory, eventually opening a restaurant called El Indio in 1940, where taquitos became the signature dish.
However, taquitos draw inspiration from much older Mexican traditions. In Mexico, similar dishes called “tacos dorados” (golden tacos) or “flautas” (flutes, named for their flute-like shape) have been made for generations, typically using corn tortillas filled with various meats, potatoes, or beans, then fried until crispy. The key difference? Taquitos are generally smaller and made with corn tortillas, while flautas are longer and often made with flour tortillas, though these definitions vary by region.
As Mexican-American cuisine evolved throughout the 20th century, taquitos became a staple at Tex-Mex restaurants, school cafeterias, and eventually in frozen food aisles across America. The dish perfectly embodied the fusion of Mexican tradition with American convenience culture – portable, kid-friendly, and endlessly adaptable.
Today’s baked chicken taquitos represent a modern evolution of this classic dish. Health-conscious home cooks discovered that baking taquitos in the oven with a light brush of oil creates nearly the same crispy exterior as deep-frying, but with significantly less fat and mess. This oven-baked method has made taquitos more accessible for weeknight dinners, transforming them from an occasional restaurant treat into a regular home-cooked meal.
Why You’ll Love This Recipe
These homemade chicken taquitos hit every single note when it comes to family-friendly, crowd-pleasing comfort food. They’ve become one of the most saved recipes on Pinterest for excellent reasons!
Here’s why this recipe deserves a permanent spot in your meal rotation:
- Seriously crispy without deep frying – Achieve restaurant-quality crunch using just the oven and a light spray of oil
- Kid-approved and picky-eater friendly – Even the pickiest eaters can’t resist these cheesy, crunchy delights
- Incredible for meal prep – Make a huge batch on Sunday and enjoy easy lunches or dinners all week long
- Budget-friendly magic – Use rotisserie chicken or leftover chicken to stretch your grocery budget further
- Freezer-friendly champion – Freeze them before or after baking for the ultimate make-ahead meal
- Customizable to your taste – Mild for kids, spicy for adults, or veggie-packed for health enthusiasts
- Perfect party food – Serve as appetizers at your next gathering and watch them vanish
- Ready in 30 minutes – From start to finish, you’re looking at minimal active cooking time
- Healthier than takeout – Control the ingredients, reduce the oil, and skip the preservatives
- Versatile serving options – Appetizer, main course, lunch box addition, or game day snack
Whether you’re a busy parent looking for dinner solutions, a college student wanting something better than cafeteria food, or a home cook who loves Mexican-inspired flavors, these taquitos check every single box.
Ingredient Notes
Let’s break down what makes these crispy baked chicken taquitos so irresistibly delicious. Each ingredient plays an important role in creating the perfect flavor and texture.
Cooked Chicken (Shredded) – This is your protein base and the heart of the filling. Rotisserie chicken is the ultimate shortcut – it’s already seasoned, tender, and shreds beautifully. Leftover grilled chicken, poached chicken breasts, or even Instant Pot shredded chicken work wonderfully. You need about 2-3 cups shredded. For extra flavor, toss the chicken with a bit of the cooking juices from rotisserie chicken before mixing with other ingredients.
Cream Cheese – This is the secret weapon that makes the filling creamy, luxurious, and helps bind everything together. Softened cream cheese blends smoothly with the other ingredients. You can substitute with Greek yogurt or sour cream for a tangier, lighter option, though the texture will be slightly different.
Shredded Cheese (Mexican Blend or Cheddar) – Melty, gooey cheese is non-negotiable in great taquitos! Mexican blend (a mix of Monterey Jack, cheddar, asadero, and queso quesadilla) is ideal for authentic flavor, but sharp cheddar, pepper jack, or even mozzarella work well. The cheese not only adds flavor but helps the filling stay cohesive inside the tortillas.
Salsa or Diced Tomatoes with Green Chilies – This adds moisture, acidity, and a flavor boost to the filling. Use your favorite jarred salsa (mild, medium, or hot depending on preference) or a can of Rotel for that classic Tex-Mex taste. Make sure to drain excess liquid to prevent soggy taquitos.
Seasonings (Cumin, Chili Powder, Garlic Powder, Onion Powder) – These create that signature taquito flavor profile. Cumin adds earthy warmth, chili powder brings mild heat and color, while garlic and onion powder provide savory depth. You can also use a pre-made taco seasoning packet for convenience.
Small Flour Tortillas (6-8 inch) – Flour tortillas are more pliable and easier to roll than corn tortillas, making them perfect for beginners. They crisp up beautifully in the oven. If you want to use corn tortillas for a more traditional approach, warm them first to prevent cracking when rolling.
Oil or Cooking Spray – A light coating of oil on the outside is essential for achieving golden, crispy taquitos in the oven. Avocado oil, vegetable oil, or olive oil all work great. Cooking spray is the easiest application method.
Optional Add-ins – Black beans, corn, diced jalapeños, green onions, or cilantro can all be mixed into the filling for extra flavor, texture, and nutrition.
Equipment Needed
You don’t need any fancy equipment to make perfect taquitos! Here’s your simple setup:
- Large mixing bowl (for combining the filling)
- Baking sheet (at least one, preferably two for larger batches)
- Parchment paper or silicone baking mat (prevents sticking and makes cleanup easier)
- Cooking spray or oil brush (for coating the taquitos)
- Toothpicks (to secure the rolls while baking)
- Measuring cups and spoons (for accurate seasoning)
- Fork or potato masher (for shredding chicken if needed)
- Spatula or tongs (for turning taquitos halfway through baking)
- Small bowl (for oil if brushing instead of spraying)
- Wire cooling rack (optional, but helps maintain crispiness)
- Microwave or skillet (for warming tortillas if needed)
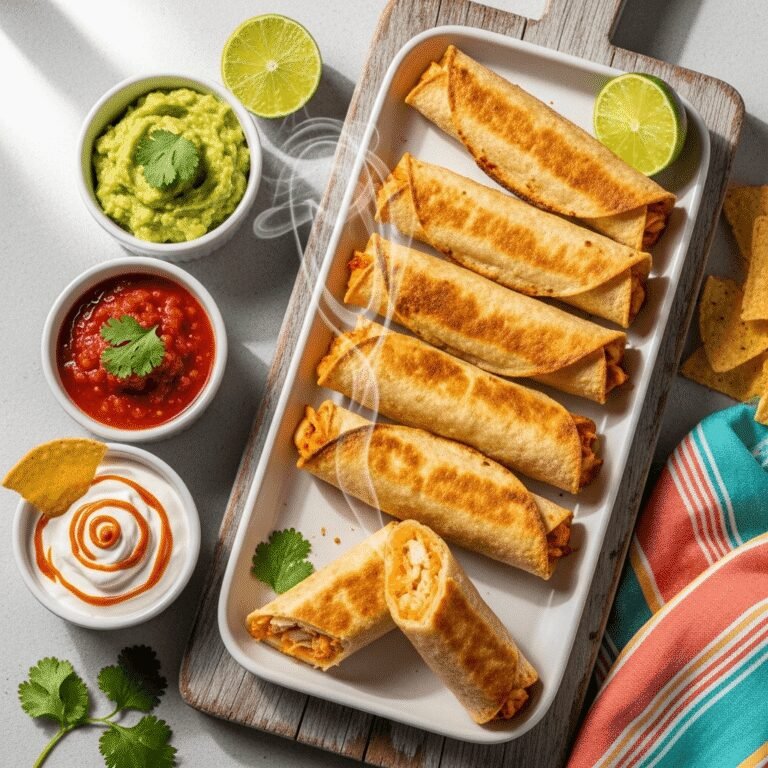
Baked Chicken Taquitos
Crispy baked chicken taquitos loaded with seasoned shredded chicken, cream cheese, and melty Mexican cheese blend, all rolled in flour tortillas and baked until golden and crunchy. Perfect for weeknight dinners, meal prep, or party appetizers. Serve with sour cream, guacamole, and salsa for the ultimate crowd-pleaser!
- Total Time: 30 minutes
- Yield: 12-14 taquitos (4-6 servings) 1x
Ingredients
For the Filling:
- 2½ cups cooked chicken, shredded (about 1 rotisserie chicken breast and thigh)
- 4 oz cream cheese, softened (half of an 8 oz package)
- 1 cup shredded Mexican cheese blend (or sharp cheddar)
- ½ cup salsa or canned diced tomatoes with green chilies, drained
- 1 teaspoon ground cumin
- 1 teaspoon chili powder
- ½ teaspoon garlic powder
- ½ teaspoon onion powder
- ½ teaspoon salt
- ¼ teaspoon black pepper
- 2 tablespoons fresh cilantro, chopped (optional)
- 2 green onions, sliced (optional)
For Assembly:
- 12-14 small flour tortillas (6-8 inch size)
- 2-3 tablespoons oil or cooking spray (for brushing/spraying)
- Toothpicks (for securing)
For Serving:
- Sour cream
- Guacamole or diced avocado
- Salsa (your favorite variety)
- Lime wedges
- Shredded lettuce
- Diced tomatoes
- Hot sauce (optional)
Instructions
Step 1: Preheat and Prepare
Preheat your oven to 425°F (220°C). Line a large baking sheet with parchment paper or a silicone baking mat. If you don’t have either, lightly grease the pan with cooking spray or oil to prevent sticking.
Step 2: Make the Filling
In a large mixing bowl, combine the shredded chicken, softened cream cheese, shredded Mexican cheese, drained salsa, cumin, chili powder, garlic powder, onion powder, salt, and pepper. Mix thoroughly until everything is well combined and the cream cheese is evenly distributed throughout. The mixture should be creamy and cohesive. If using, fold in the fresh cilantro and sliced green onions. Taste and adjust seasonings as needed – this is your chance to make it perfectly spiced to your preference!
Step 3: Warm the Tortillas
This step is crucial for preventing cracking and tearing! Warm your tortillas to make them pliable. You can do this by: (1) wrapping them in a damp paper towel and microwaving for 20-30 seconds, (2) warming them individually in a dry skillet over medium heat for about 10 seconds per side, or (3) wrapping them in foil and placing in the oven for 5 minutes. Work with a few at a time, keeping the rest covered with a clean kitchen towel to stay warm.
Step 4: Fill and Roll
Place a warm tortilla on your work surface. Spoon about 2-3 tablespoons of the chicken mixture in a line down the center of the tortilla, leaving about an inch of space at each end. Don’t overfill – more filling makes rolling difficult and can cause bursting during baking. Tightly roll the tortilla around the filling, creating a compact cylinder. Place seam-side down on your prepared baking sheet. Secure with a toothpick through the center to keep it from unrolling during baking. Repeat with remaining tortillas and filling, placing taquitos about ½ inch apart on the baking sheet.
Step 5: Brush with Oil
Once all taquitos are rolled and arranged on the baking sheet, lightly brush or spray the tops and sides with oil. This step is absolutely essential for achieving that crispy, golden exterior! Make sure every surface is coated – any spots you miss will remain pale and soft rather than crispy.
Step 6: Bake
Bake in the preheated oven for 15-18 minutes, flipping the taquitos halfway through at the 8-9 minute mark for even browning on all sides. They’re done when golden brown and crispy on the outside, with the filling heated through. The cheese should be melted and you might see some cheese bubbling out the ends – that’s perfect!
Step 7: Remove Toothpicks and Serve
Carefully remove the toothpicks from the hot taquitos (they’ll be hot, so use caution!). Let them cool for 2-3 minutes before serving – this allows the filling to set slightly and prevents burning your mouth on molten cheese. Serve immediately with your favorite toppings and dipping sauces.
Notes
- Tortilla size matters: Using smaller 6-8 inch tortillas creates the perfect taquito size. Larger burrito-sized tortillas become unwieldy and are harder to roll tightly.
- Don’t skip warming tortillas: Cold tortillas will crack and tear when you try to roll them. Taking 30 seconds to warm them saves so much frustration!
- Toothpick placement: Insert toothpicks at a slight diagonal through the center of each taquito for the most secure hold.
- Crispier results: For extra-crispy taquitos, turn them multiple times during baking, or finish under the broiler for 1-2 minutes (watch closely!).
- Make them spicier: Add diced jalapeños to the filling, use hot salsa instead of mild, or substitute pepper jack cheese for the Mexican blend.
- Rotisserie chicken shortcut: One rotisserie chicken yields about 3-4 cups of shredded meat, enough for a double batch!
- Prep Time: 15 minutes
- Cook Time: 15 minutes
- Category: Dinner
- Method: Baking
- Cuisine: American
- Diet: Gluten Free
Nutrition
- Serving Size: 3 taquitos
- Calories: 385
- Sugar: 2g
- Sodium: 745mg
- Fat: 18g
- Saturated Fat: 8g
- Unsaturated Fat: 9g
- Trans Fat: 0g
- Carbohydrates: 32g
- Fiber: 2g
- Protein: 24g
- Cholesterol: 72mg
Tips & Variations
The beauty of homemade chicken taquitos is how endlessly customizable they are! Here are some delicious ways to make this recipe your own:
Healthier Baked Version: Use low-fat cream cheese, reduced-fat cheese, and whole wheat tortillas. Add extra veggies like bell peppers, spinach, or zucchini to the filling to boost nutrition while reducing calories.
Spicy Chicken Taquitos: Mix in diced jalapeños, chipotle peppers in adobo sauce, or cayenne pepper to the filling. Use pepper jack cheese and hot salsa. Serve with jalapeño ranch or spicy crema for extra heat.
Southwest Style: Add black beans, corn, and red bell peppers to the filling. Season with smoked paprika and a squeeze of lime juice. Top with pico de gallo and avocado cilantro lime sauce.
Buffalo Chicken Taquitos: Replace half the salsa with buffalo sauce and add crumbled blue cheese to the filling. Perfect for game day! Serve with ranch dressing for dipping.
BBQ Chicken Version: Mix shredded BBQ chicken with the cheese and cream cheese (skip the cumin and chili powder). Add crispy bacon bits for extra smoky flavor.
Vegetarian Taquitos: Replace chicken with black beans, refried beans, or seasoned sweet potato. Add sautéed peppers, onions, and corn for a hearty meatless version.
Breakfast Taquitos: Fill with scrambled eggs, breakfast sausage or bacon, cheese, and diced peppers. Perfect for meal prepping grab-and-go breakfasts!
Crispy Air Fryer Method: Arrange taquitos in a single layer in your air fryer basket, spray with oil, and cook at 400°F for 8-10 minutes, turning halfway through.
Extra Cheesy: Add a sprinkle of shredded cheese on top during the last 2 minutes of baking for a crispy cheese crust.
Gluten-Free Option: Use corn tortillas and warm them well before rolling. You can also find gluten-free flour tortillas at most grocery stores.
Pro Chef Tips
Want to elevate your taquitos from good to absolutely restaurant-worthy? Here are insider techniques that make all the difference:
Season your chicken generously before shredding. If you’re cooking chicken specifically for this recipe rather than using rotisserie, season it aggressively with salt, pepper, cumin, and garlic while cooking. Well-seasoned meat is the foundation of incredible flavor – you can’t season just the surface and expect depth.
Let the cream cheese come to room temperature completely. Cold cream cheese creates lumps and doesn’t distribute evenly through the filling. Set it out 30-45 minutes before you start, or microwave for 10-15 seconds to soften (don’t melt it!). This ensures a smooth, creamy filling.
Roll as tightly as possible without tearing the tortilla. A tightly rolled taquito stays together better during baking, has a better filling-to-tortilla ratio in each bite, and crisps more evenly. Think of rolling it like a sleeping bag – snug but not so tight it bursts.
Use a cooling rack for ultimate crispiness. After baking, transfer taquitos to a wire cooling rack instead of leaving them on the baking sheet. This allows air to circulate underneath, preventing the bottoms from getting soggy from trapped steam.
Toast them seam-side down first. If not using toothpicks, place taquitos seam-side down for the first half of baking. This “seals” the seam closed before you flip them, reducing the chance they’ll unroll.
Brush with melted butter mixed with garlic and cilantro in the last 2 minutes of baking for an extra flavor boost and gorgeous golden sheen. This restaurant trick takes them from homemade to gourmet.
Don’t overstuff – use the “two-bite” rule. Each taquito should be substantial but still comfortable to eat in 2-3 bites. Overstuffed taquitos burst open, leak filling, and don’t crisp properly.
Add a tiny pinch of sugar to the filling. Just ¼ teaspoon balances the acidity from the salsa and enhances all the other flavors without making the filling taste sweet. This is a professional trick that creates more complex, rounded flavor.
Common Mistakes to Avoid
Even simple recipes can go wrong without proper technique. Here are the most common taquito pitfalls and how to prevent them:
Using cold tortillas straight from the fridge: This is the #1 mistake! Cold tortillas are stiff and crack when you try to roll them. Always warm them first until they’re pliable and soft. If you’re making a large batch, keep finished taquitos covered while you work to prevent them from drying out.
Overfilling the tortillas: More filling seems like a good idea, but it makes rolling impossible and causes the taquitos to burst open during baking, leaking filling everywhere. Use a modest 2-3 tablespoons of filling per tortilla – it’s plenty! The tortilla should be able to wrap around the filling with a slight overlap.
Not draining wet ingredients: If your salsa or tomatoes with green chilies are watery, drain off the excess liquid before mixing into the filling. Too much moisture creates a soggy filling that makes the tortillas wet and prevents crisping. The filling should be creamy but not runny.
Skipping the oil spray or brush: Without oil, your taquitos will bake up pale, dry, and leathery rather than golden and crispy. The oil is what creates that irresistible crunch and beautiful color. Don’t skip this step! Every surface needs a light coating.
Overcrowding the baking sheet: When taquitos touch each other, they steam instead of crisp. Leave about ½ inch of space between each one for proper air circulation. If you’re making a large batch, use two baking sheets or bake in batches rather than crowding them.
Baking at too low a temperature: Lower temperatures (350°F or below) cause the tortillas to dry out before they crisp, resulting in tough, chewy taquitos. The high heat of 425°F creates steam inside that keeps the filling moist while crisping the outside quickly.
Not removing toothpicks before serving: This seems obvious, but in the excitement of getting dinner on the table, it’s easy to forget! Always remove toothpicks before serving, especially when feeding kids.
Storage & Meal Prep
Homemade chicken taquitos are fantastic for meal prep and make-ahead meals! Here’s how to store them properly:
Refrigerator Storage (Cooked): Store leftover baked taquitos in an airtight container in the refrigerator for up to 4 days. Place parchment paper between layers to prevent them from sticking together. They’ll lose some crispiness in the fridge, but reheating properly (see below) restores much of the texture.
Reheating for Best Results: Never microwave taquitos if you want them to be crispy – they’ll turn soggy and rubbery. Instead, reheat in a 400°F oven for 8-10 minutes, or in an air fryer at 375°F for 5-6 minutes until heated through and crispy again. You can also reheat them in a skillet over medium heat, turning occasionally, for about 5-7 minutes.
Refrigerator Storage (Uncooked): Assembled but unbaked taquitos can be refrigerated for up to 24 hours before baking. Arrange them on a baking sheet, cover tightly with plastic wrap, and refrigerate. Bake directly from the fridge, adding 2-3 extra minutes to the cooking time.
Meal Prep Strategy: Make the filling up to 3 days in advance and store it in an airtight container in the refrigerator. When ready to eat, simply assemble and bake fresh taquitos in under 20 minutes. This gives you the convenience of meal prep with the quality of fresh-baked results.
Make-Ahead & Freezer Notes
Taquitos are absolutely PERFECT for freezing, making them ideal for batch cooking and future quick meals!
Freezing Unbaked Taquitos (Best Method): Assemble the taquitos completely with toothpicks, but don’t bake them. Arrange in a single layer on a parchment-lined baking sheet and freeze until solid (about 2-3 hours). Once frozen solid, transfer to a freezer-safe zip-top bag or airtight container, removing as much air as possible. They’ll keep for up to 3 months. Label with the date and cooking instructions!
Baking from Frozen: No need to thaw! Place frozen taquitos on a parchment-lined baking sheet, brush with oil, and bake at 425°F for 20-25 minutes (about 5-7 minutes longer than fresh), flipping halfway through. They’ll crisp up beautifully and taste freshly made.
Freezing Cooked Taquitos: You can also freeze fully cooked taquitos, though they won’t be quite as crispy when reheated as the unbaked method. Cool completely after baking, then freeze using the same method as above. Reheat from frozen in a 400°F oven for 12-15 minutes, or in an air fryer at 375°F for 8-10 minutes.
Batch Cooking Strategy: Triple or quadruple this recipe and spend one afternoon assembling taquitos for the freezer. You’ll have ready-made dinners for weeks! This is perfect for new parents, busy professionals, or anyone who loves having convenient homemade meals on hand.
Freezing Just the Filling: The chicken mixture freezes beautifully on its own for up to 3 months. Thaw overnight in the refrigerator, then assemble and bake fresh taquitos. This gives you maximum flexibility and the best texture.
Serving Suggestions
Crispy chicken taquitos are incredibly versatile and can be served in so many delicious ways! Here’s how to make them shine:
Classic Tex-Mex Style: Arrange taquitos on a platter with small bowls of sour cream, guacamole, salsa verde, and your favorite red salsa for dipping. Add lime wedges and fresh cilantro for garnish. Serve alongside Spanish rice and refried beans for a complete restaurant-style meal.
Taquito Bowl: Place 3-4 taquitos over a bed of shredded lettuce, black beans, corn, diced tomatoes, and avocado. Drizzle with cilantro-lime dressing or chipotle ranch for a satisfying taco salad variation.
Party Platter Presentation: Cut each taquito in half on a diagonal for easier eating as appetizers. Arrange on a large platter with multiple dipping sauces in the center. This presentation is perfect for game day, potlucks, or casual entertaining.
Street Taco Style: Top taquitos with shredded cabbage, pickled red onions, crumbled queso fresco, and drizzle with crema mexicana. Add a squeeze of lime and sprinkle of cilantro for authentic street food vibes.
Breakfast Style: Serve alongside scrambled eggs, breakfast potatoes, and fresh fruit for a hearty brunch. The combination is unexpectedly delicious!
Perfect Side Dishes:
- Mexican street corn (elote) or corn salad
- Cilantro-lime rice or Spanish rice
- Black beans or charro beans
- Fresh pico de gallo or mango salsa
- Tortilla chips with queso dip
- Mexican coleslaw
- Roasted sweet potato wedges
- Simple house salad with avocado ranch
Sauce & Dipping Options:
- Sour cream or Mexican crema
- Guacamole or avocado crema
- Salsa verde (tomatillo salsa)
- Chipotle ranch dressing
- Jalapeño ranch
- Queso dip
- Pico de gallo
- Enchilada sauce for dunking
Beverage Pairings: Serve with Mexican beer, margaritas (frozen or on the rocks), agua fresca, horchata, limeade, or a cold Mexican Coke for an authentic experience.
FAQs Section
Can I use corn tortillas instead of flour tortillas?
Yes, but they require extra care! Corn tortillas are more delicate and prone to cracking. Warm them until they’re very pliable (steam them wrapped in a damp towel in the microwave for 30-45 seconds, or quickly char over a gas flame). Work quickly while they’re warm. Corn tortillas create a more authentic, traditional flavor but are definitely trickier to roll without breaking.
What’s the best chicken to use for taquitos?
Rotisserie chicken is the ultimate shortcut – it’s already cooked, seasoned, and incredibly flavorful. You can also use leftover grilled chicken, poached chicken breasts, or slow cooker shredded chicken. Even canned chicken works in a pinch! The key is that the chicken should be moist and well-seasoned. Dry, bland chicken makes boring taquitos.
Can I fry these instead of baking them?
Absolutely! Heat about 1 inch of vegetable oil in a deep skillet to 350°F. Fry taquitos seam-side down first for 2-3 minutes, then turn and fry another 2 minutes until golden brown and crispy all over. Drain on paper towels. Fried taquitos are crispier and more indulgent, but baked versions are healthier and much less messy.
Why do my taquitos unroll during baking?
This usually happens for three reasons: (1) the tortillas weren’t warmed enough and sprang back open, (2) they weren’t rolled tightly enough, or (3) the toothpicks weren’t secured properly through the center. Make sure tortillas are very pliable, roll tightly, and use toothpicks at a slight diagonal through the middle to secure them best.
Can I make these ahead for a party?
Yes! You have several options: (1) Make and bake them up to 2 hours ahead, then reheat in the oven just before serving, (2) Assemble them completely and refrigerate for up to 24 hours before baking, or (3) Freeze assembled unbaked taquitos and bake from frozen, adding a few extra minutes. For parties, I recommend baking fresh if possible for maximum crispiness.
What can I substitute for cream cheese?
Greek yogurt, sour cream, or even mashed avocado can replace cream cheese, though the texture and flavor will be slightly different. For a dairy-free version, use vegan cream cheese or cashew cream. The cream cheese adds richness and helps bind the filling, so if you omit it entirely, you may need to add a bit more cheese or a binding ingredient.
How do I know when they’re done baking?
Taquitos are ready when they’re golden brown and crispy on the outside, the tortilla feels firm rather than soft when gently pressed, and you can see the filling bubbling slightly at the ends. The internal temperature should reach 165°F if you want to check with a meat thermometer. They typically take 15-18 minutes at 425°F.
Conclusion
And there you have it – everything you need to know to make the most incredible homemade chicken taquitos right in your own kitchen! These crispy, cheesy, flavor-packed rolled tacos are so much better than anything you’ll find in the frozen food aisle, and they’re surprisingly easy to make once you know the tricks.
Whether you’re making them for busy weeknight dinners, prepping a week’s worth of lunches, hosting game day, or just craving some seriously good Mexican-inspired comfort food, this easy chicken taquito recipe delivers every single time. The best part? You can customize them endlessly to suit your family’s tastes, dietary needs, and spice preferences. Make them mild for kids, spicy for heat lovers, or pack them with extra veggies for a healthier twist.
I absolutely love hearing from readers who’ve tried my recipes! Did you make these taquitos? How did they turn out? Did you try any of the variations I suggested? Drop a comment below and let me know – I read every single one and love seeing your creative twists! And if you’re as obsessed with these as my family is, please save this recipe to your Pinterest boards so you can find it easily next time. Sharing is caring, so pass this along to your fellow taquito lovers!
Now get in that kitchen and make some magic happen! Your family is going to flip when these golden, crispy beauties come out of the oven. Happy cooking, friends!