Easy BBQ Chicken Sliders – Perfect for Game Day & Parties!

Get ready to fall in love with these BBQ Chicken Sliders – the ultimate crowd-pleasing appetizer that’s packed with tender, saucy chicken, melted cheese, and all the flavors you crave! These mini sandwiches feature juicy shredded chicken smothered in tangy barbecue sauce, topped with melty cheese, and nestled in soft, buttery slider buns that are baked to golden perfection.
What makes these easy BBQ chicken sliders so incredibly popular? They’re ridiculously simple to make (especially using rotisserie chicken for a shortcut!), feed a crowd without breaking the bank, and disappear faster than you can say “pass the napkins.” Whether you’re hosting a Super Bowl party, planning a casual weeknight dinner, bringing a dish to a potluck, or celebrating game day with friends, these sliders are guaranteed to be the MVP of your menu.
These pulled BBQ chicken sliders work beautifully for so many occasions: serve them at tailgating parties where portable food is essential, make them for family dinners when you need something quick and satisfying, bring them to neighborhood gatherings where they’ll vanish in minutes, or whip them up for busy weeknights when you need dinner on the table fast. They’re kid-friendly, can be prepped ahead of time, and are endlessly customizable to suit different taste preferences.
The best part? These crowd-pleasing BBQ sliders come together in about 30 minutes from start to finish, require minimal hands-on work, and can be made with ingredients you probably already have in your pantry. Once you try this foolproof recipe, you’ll be making these sliders for every gathering!
History / Background
While sliders as we know them today – those adorable mini burgers and sandwiches – have become synonymous with casual American dining, their history is surprisingly rich. The term “slider” is believed to have originated from White Castle in the 1940s, referring to their small, square burgers that were so greasy they’d “slide” right down. However, the modern interpretation of sliders has evolved far beyond simple mini burgers.
BBQ chicken sliders specifically emerged as part of the broader comfort food revolution that gained momentum in American home cooking during the 2000s and 2010s. As food blogs, Pinterest, and social media transformed how we share recipes, easy, crowd-pleasing dishes like these sliders became viral sensations. The combination of barbecue – a deeply rooted American culinary tradition – with the convenience and portion control of slider-sized servings was a match made in heaven.
Barbecue itself has deep cultural significance across different regions of the United States. From Kansas City’s thick, sweet sauce to Carolina’s vinegar-based tang, from Memphis dry rubs to Texas brisket traditions, BBQ represents regional pride and culinary heritage. BBQ chicken sliders celebrate this American tradition in an accessible, party-friendly format that doesn’t require a smoker or hours of cooking time.
The genius of BBQ chicken sliders lies in their versatility and convenience. By using pre-cooked chicken (whether rotisserie, leftover grilled chicken, or even canned chicken in a pinch), home cooks discovered they could deliver all the flavors of slow-smoked barbecue in a fraction of the time. The slider format made these sandwiches perfect for parties, where guests could grab one (or three!) without committing to a full-sized sandwich.
Today, BBQ chicken sliders have earned their place as a modern American classic – featured at backyard cookouts, sports bars, game day spreads, and family dinner tables across the country. They represent the perfect fusion of traditional barbecue flavors with contemporary convenience cooking, proving that delicious food doesn’t have to be complicated!
Why You’ll Love This Recipe
These BBQ chicken sliders aren’t just another sandwich recipe – they’re genuinely special and will quickly become your go-to whenever you need to feed a crowd or satisfy hungry appetites! The combination of tender shredded chicken, tangy-sweet barbecue sauce, melted cheese, and buttery toasted buns creates an irresistible flavor experience that keeps everyone coming back for more.
Here’s why this recipe will become your new favorite:
- Ready in 30 Minutes – From prep to table, these sliders come together incredibly fast, perfect for busy weeknights or last-minute entertaining
- Rotisserie Chicken Shortcut – Using store-bought rotisserie chicken means no cooking chicken from scratch – major time saver!
- Feeds a Crowd – One batch makes 12 sliders, perfect for parties, potlucks, or feeding hungry families
- Budget-Friendly – Affordable ingredients that won’t strain your grocery budget, especially when chicken is on sale
- Make-Ahead Friendly – Assemble hours ahead and just pop in the oven when ready to serve
- Kid-Approved – Children absolutely love the mini size and familiar BBQ flavors
- Customizable Toppings – Easy to personalize with different cheeses, pickles, coleslaw, or jalapeños
- Minimal Cleanup – Everything bakes in one pan, meaning less mess and easier cleanup
- Perfect for Meal Prep – Make a batch for easy lunches throughout the week
- Portable & Party-Perfect – The small size makes them ideal for buffets, tailgating, and gatherings
- Restaurant-Quality at Home – Tastes like something you’d order out, made in your own kitchen
- Freezer-Friendly – Make multiple batches and freeze for future easy meals
- Uses Leftover Chicken – Brilliant way to transform leftover grilled or roasted chicken into something exciting
- No Special Skills Required – Even beginner cooks can nail this recipe perfectly
Ingredient Notes
The beauty of these sliders lies in their simple ingredient list that delivers maximum flavor. Let’s break down what you need:
Slider Buns (Hawaiian Rolls) – Sweet Hawaiian rolls are the classic choice for sliders because their subtle sweetness pairs perfectly with tangy BBQ sauce. King’s Hawaiian is the most popular brand, but any sweet dinner rolls work beautifully. For a different flavor profile, try regular slider buns or even small potato rolls. The key is buying them connected in a package so you can slice them all at once.
Cooked Chicken – This is where the magic shortcut happens! A rotisserie chicken from the grocery store is absolutely perfect – just remove the skin and shred the meat. You can also use leftover grilled chicken, baked chicken breasts, or even canned chicken if you’re in a pinch. You’ll need about 3-4 cups of shredded chicken. Dark meat adds more flavor, but breast meat works great too.
BBQ Sauce – Use your favorite store-bought brand or homemade BBQ sauce. Different regions have different styles – sweet and tangy Kansas City-style, vinegar-based Carolina sauce, or smoky Memphis-style all work wonderfully. Start with about 1 cup and adjust to your preference for sauciness. Sweet Baby Ray’s, Stubb’s, and Bull’s-Eye are popular choices.
Cheese – Cheddar is classic for BBQ chicken, but you have options! Sharp cheddar adds nice tang, mild cheddar is kid-friendly, pepper jack brings heat, and Monterey Jack offers creaminess. Colby jack is another great choice. Use sliced cheese for easy layering or shredded for even melting.
Butter – Essential for that golden, crispy top! Melted butter brushed on top of the buns creates an irresistible toasted finish and adds richness. Use salted or unsalted butter – if using unsalted, you might want to add a pinch of salt.
Seasonings for Butter – Garlic powder, onion powder, and dried parsley mixed into the melted butter create an amazing garlic bread-style topping. Worcestershire sauce adds umami depth. These are optional but highly recommended!
Optional Add-Ins: Red onion slices, pickles (dill or bread and butter), coleslaw (for extra crunch), jalapeños (for heat), bacon (because bacon makes everything better), or crispy fried onions for texture.
Equipment Needed
You’ll need minimal equipment for this easy recipe:
- 9×13-inch Baking Dish – The standard size for baking these sliders. Make sure it’s oven-safe!
- Sharp Serrated Knife – For slicing the connected rolls in half horizontally. A bread knife works perfectly.
- Large Mixing Bowl – For combining the shredded chicken with BBQ sauce.
- Small Bowl or Measuring Cup – For mixing the melted butter with seasonings.
- Pastry Brush – For brushing the seasoned butter on top of the sliders. A spoon works too if you don’t have a brush.
- Aluminum Foil – To cover the sliders during the first part of baking and prevent over-browning.
- Two Forks – For shredding the chicken if using rotisserie chicken or whole chicken pieces.
- Measuring Cups and Spoons – For accurate measurements.
- Cutting Board – For any prep work like slicing onions or shredding chicken.
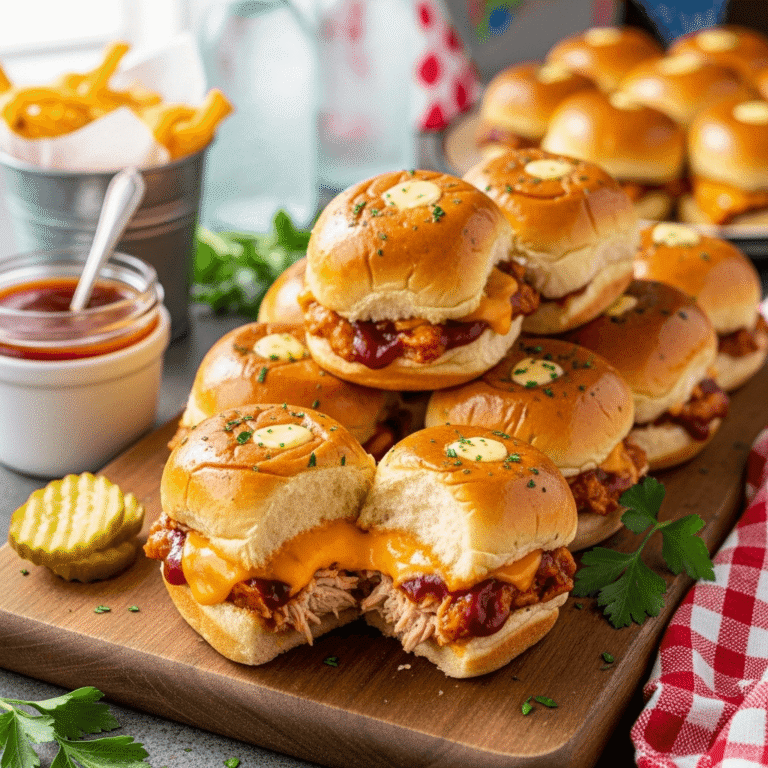
BBQ Chicken Sliders
These Easy BBQ Chicken Sliders are the perfect crowd-pleasing appetizer or dinner! Tender shredded chicken tossed in tangy BBQ sauce, topped with melted cheese, and baked in buttery Hawaiian rolls until golden and delicious. Ready in just 30 minutes!
- Total Time: 35 minutes
- Yield: 12 sliders 1x
Ingredients
For the Sliders:
- 1 package (12 count) Hawaiian sweet rolls or slider buns
- 3-4 cups cooked chicken, shredded (about 1 rotisserie chicken)
- 1 cup BBQ sauce (your favorite brand), plus more for serving
- 8-12 slices cheddar cheese (or 2 cups shredded cheese)
- ½ red onion, thinly sliced (optional)
- Dill pickle slices (optional)
For the Butter Topping:
- 4 tablespoons (½ stick) butter, melted
- 1 teaspoon garlic powder
- ½ teaspoon onion powder
- 1 teaspoon dried parsley
- ½ teaspoon Worcestershire sauce (optional)
Instructions
- Preheat and Prep: Preheat your oven to 350°F (175°C). Lightly spray a 9×13-inch baking dish with cooking spray or brush with a little butter to prevent sticking.
- Slice the Rolls: Without separating the individual rolls, use a large serrated knife to carefully slice the entire block of rolls in half horizontally, creating a top half and bottom half. This is easier than cutting them individually! Place the bottom half in your prepared baking dish, cut side up.
- Prepare the BBQ Chicken: In a large mixing bowl, combine the shredded chicken with the BBQ sauce. Mix well until all the chicken is evenly coated with sauce. Taste and add more BBQ sauce if you prefer it saucier. The mixture should be moist but not swimming in sauce.
- Assemble the Bottom Layer: Spread the BBQ chicken mixture evenly over the bottom layer of rolls in the baking dish. Make sure to get the chicken all the way to the edges for even distribution.
- Add Toppings: If using sliced red onion or pickles, layer them on top of the BBQ chicken now. Then add your cheese slices, overlapping them to cover all the chicken. If using shredded cheese, sprinkle it evenly over the entire surface.
- Top with Buns: Carefully place the top half of the rolls over the cheese layer, creating sandwiches. Gently press down slightly so everything adheres together.
- Make Butter Mixture: In a small bowl, mix together the melted butter, garlic powder, onion powder, dried parsley, and Worcestershire sauce (if using) until well combined.
- Brush with Butter: Using a pastry brush, generously brush the seasoned butter mixture over the top of the rolls, making sure to coat the entire surface. This creates that golden, flavorful crust we love!
- Cover and Bake: Cover the baking dish tightly with aluminum foil. Bake in the preheated oven for 15 minutes. This allows the cheese to melt and the flavors to meld without the tops browning too quickly.
- Uncover and Finish: Remove the foil and continue baking for an additional 5-7 minutes, or until the tops are golden brown and slightly crispy. Keep an eye on them to prevent over-browning.
- Slice and Serve: Remove from the oven and let cool for 2-3 minutes. Using a sharp knife, cut between each roll to separate into individual sliders. Serve immediately while hot and melty, with extra BBQ sauce on the side for dipping!
Notes
- Chicken Options: Rotisserie chicken is the ultimate shortcut, but leftover grilled chicken, baked chicken, or even canned chicken works in a pinch.
- Sauce Amount: Adjust BBQ sauce to your preference. Some people like them extra saucy, others prefer less. Start with 1 cup and add more as desired.
- Cheese Choices: Any melting cheese works – try pepper jack for spice, Swiss for a milder flavor, or a combination of cheeses.
- Make Ahead: Assemble completely (through step 6), cover tightly, and refrigerate up to 24 hours. When ready to bake, add the butter topping and bake as directed, adding 5 minutes to the covered baking time since they’ll be cold.
- Freezer Friendly: These freeze beautifully! See make-ahead section for details.
- Prep Time: 15 minutes
- Cook Time: 20 minutes
- Category: Appetizer
- Method: Baking
- Cuisine: American
- Diet: Gluten Free
Nutrition
- Serving Size: 1 slider
- Calories: 285
- Sugar: 8g
- Sodium: 620mg
- Fat: 12g
- Saturated Fat: 5g
- Unsaturated Fat: 6g
- Trans Fat: 0g
- Carbohydrates: 26g
- Fiber: 1g
- Protein: 18g
- Cholesterol: 55mg
Tips & Variations
These BBQ chicken sliders are wonderfully versatile! Here are some delicious ways to customize them:
Flavor Variations:
Hawaiian BBQ: Add pineapple chunks on top of the BBQ chicken and use teriyaki-style BBQ sauce for tropical vibes.
Buffalo Chicken Sliders: Replace BBQ sauce with buffalo sauce and use blue cheese or ranch dressing. Top with blue cheese crumbles.
Carolina-Style: Use vinegar-based Carolina BBQ sauce and top with creamy coleslaw for authentic pulled pork-style flavor.
Bacon Ranch: Add cooked crumbled bacon to the chicken mixture and drizzle with ranch dressing before adding cheese.
Smoky Chipotle: Mix chipotle peppers in adobo into your BBQ sauce for smoky heat, and use pepper jack cheese.
Sweet & Spicy: Mix honey into your BBQ sauce and add sliced jalapeños for a sweet-heat combination.
Cheese Variations:
- Pepper jack for spice lovers
- Smoked gouda for extra BBQ flavor
- Swiss for milder taste
- Colby jack for kid-friendly appeal
- Mix multiple cheeses for complex flavor
Topping Add-Ons:
- Crispy bacon strips
- Pickles (dill or bread and butter)
- Coleslaw for crunch
- Sliced jalapeños for heat
- Caramelized onions for sweetness
- Crispy fried onions for texture
- Fresh cilantro for brightness
Healthier Options:
- Use whole wheat slider buns
- Choose chicken breast only for lower fat
- Use reduced-sugar BBQ sauce
- Go lighter on the butter topping
- Add extra veggies like spinach or tomatoes
Pro Chef Tips
Want to take your sliders from good to absolutely incredible? Here are professional secrets:
Shred Your Chicken Right: For the best texture, shred chicken with your hands or two forks while it’s still warm. Don’t chop it with a knife – you want stringy, pulled pieces that soak up the sauce beautifully.
Season the Chicken First: Before mixing with BBQ sauce, lightly season the shredded chicken with a pinch of salt, pepper, and garlic powder. This builds flavor layers instead of relying solely on the sauce.
Don’t Oversaturate: The chicken should be coated with sauce but not drowning in it. Too much sauce makes the bottom buns soggy. You want moist but not wet. You can always serve extra sauce on the side.
Toast from Both Sides: For extra crispiness, lightly butter and toast the cut sides of the rolls in a skillet before assembling. This creates a moisture barrier that prevents soggy buns.
Layer Strategically: Place cheese directly on the chicken rather than on the buns. The cheese acts as a barrier between the saucy chicken and the bread, helping prevent sogginess.
Let Butter Soak In: After brushing with the seasoned butter, let the sliders sit for 2-3 minutes before baking. This allows the butter to soak into the bread for maximum flavor.
Cover Properly: When covering with foil, make sure it’s not touching the buttered tops – tent it slightly. If the foil touches the butter, it can stick and pull off that golden topping when you remove it.
Rest Before Cutting: Let the sliders rest for 2-3 minutes after baking before cutting. This allows the cheese to set slightly, making cleaner cuts and easier handling.
Sharp Knife is Key: Use a very sharp knife to cut between the sliders after baking. A dull knife will tear the soft buns and create a mess.
Common Mistakes to Avoid
Even though this recipe is simple, there are a few common pitfalls to watch out for:
Using Too Much Sauce: This is the #1 mistake! Over-saucing creates soggy bottom buns that fall apart when you try to eat them. The chicken should be coated but not swimming. Remember, you can always serve extra sauce on the side for dipping – it’s much better than soggy sandwiches.
Forgetting to Spray the Pan: Even with the butter on top, these can stick to the pan without proper greasing. Always spray or butter your baking dish before adding the bottom buns. There’s nothing more frustrating than having your beautiful sliders stick and fall apart when trying to serve them.
Cutting Rolls Individually: Don’t separate the rolls before slicing! Keep them connected and slice the entire block horizontally. This makes assembly so much easier and ensures even sizing. If you cut them apart first, you’ll have a harder time getting a clean cut and the buns might be uneven.
Over-Baking: The tops should be golden brown, not dark brown or burnt. Every oven is different, so start checking at 15 minutes when covered, then watch carefully during the uncovered phase. Over-baked sliders have dry, hard tops instead of buttery, soft ones.
Skipping the Covering Step: Don’t bake these uncovered the entire time! The foil covering during the first part of baking is crucial – it allows the cheese to melt completely and the flavors to meld without the tops burning. Only uncover for the final browning stage.
Not Letting Chicken Cool Enough: If using freshly cooked hot chicken, let it cool for 10-15 minutes before mixing with sauce and assembling. Hot chicken can start melting the cheese and making things soggy before they even go in the oven.
Storage & Meal Prep
These sliders are fantastic for meal prep and storing! Here’s how to keep them fresh:
Refrigerator Storage:
Baked Sliders: Store completely cooled sliders in an airtight container in the refrigerator for up to 3-4 days. Layer parchment paper between sliders if stacking to prevent them from sticking together.
Components Separately: For best results, store the BBQ chicken mixture separately from the buns. This prevents soggy bread. You can assemble fresh sliders throughout the week using the prepared chicken.
Reheating Baked Sliders:
Oven Method (Best): Preheat oven to 325°F. Place sliders on a baking sheet, cover loosely with foil, and heat for 10-12 minutes until warmed through. Remove foil for the last 2 minutes to re-crisp the tops.
Microwave (Quick): Place 1-2 sliders on a microwave-safe plate. Heat on 50% power for 45-60 seconds. The buns won’t be crispy, but they’ll be hot and melty.
Air Fryer: Reheat at 320°F for 4-5 minutes. This method restores some of the crispiness!
Toaster Oven: Great for individual servings. Toast at 325°F for 8-10 minutes.
Meal Prep Strategy:
Make the BBQ chicken mixture on Sunday and store in the fridge. Throughout the week, assemble individual sliders on demand and bake for 10 minutes at 350°F for fresh, hot sandwiches anytime. This is perfect for quick lunches or weeknight dinners!
Make-Ahead & Freezer Notes
These sliders are incredibly make-ahead and freezer friendly!
Make-Ahead Options:
Fully Assembled (Unbaked): Assemble the sliders completely through step 6 (before adding butter), cover tightly with plastic wrap, and refrigerate up to 24 hours before baking. When ready to bake, brush with the butter mixture and bake as directed, adding 5 extra minutes to the covered baking time since they’re cold from the fridge.
BBQ Chicken Mixture Only: Make the chicken and BBQ sauce mixture up to 3 days ahead. Store in an airtight container in the fridge. Assemble and bake when ready to serve.
Freezing Instructions:
Unbaked Sliders (Best Method):
- Assemble sliders completely (without butter topping) in an aluminum foil pan.
- Wrap tightly with plastic wrap, then cover with aluminum foil.
- Label with date and contents.
- Freeze for up to 3 months.
- To bake: Remove from freezer, discard plastic wrap, keep foil cover on. Bake at 350°F for 30 minutes covered, then prepare and add butter topping, uncover, and bake 10 minutes more until golden.
Baked Sliders:
- Bake sliders completely and let cool to room temperature.
- Wrap individual sliders tightly in plastic wrap, then place in a freezer bag.
- Freeze up to 2 months.
- To reheat: Unwrap, place on a baking sheet, and bake at 325°F for 15-20 minutes until heated through.
Quick Freezer-to-Table Tip: Keep a batch of unbaked sliders in your freezer for emergency entertaining or busy weeknights. You can have hot, delicious sliders ready in under an hour with zero active prep time!
Serving Suggestions
These BBQ chicken sliders pair beautifully with classic sides and accompaniments:
Classic BBQ Sides:
- Creamy coleslaw (traditional or vinegar-based)
- Baked beans (sweet or smoky)
- Mac and cheese (the ultimate comfort combo)
- Potato salad (classic picnic pairing)
- French fries or sweet potato fries
- Corn on the cob with butter
- Onion rings for extra indulgence
Lighter Options:
- Fresh green salad with ranch dressing
- Cucumber salad with dill
- Watermelon slices (refreshing contrast)
- Grilled vegetables
- Corn and black bean salad
- Broccoli slaw
- Caprese salad skewers
Party Spread Ideas:
- Serve with other sliders (beef, turkey, or veggie)
- Add wings, meatballs, and cheese platter
- Include veggie tray with ranch dip
- Offer multiple BBQ sauce options for variety
- Provide pickles, jalapeños, and coleslaw as topping stations
Beverage Pairings:
- Cold beer (lagers, pale ales, or pilsners)
- Sweet tea (classic Southern pairing)
- Lemonade or limeade
- Craft root beer or cream soda
- Iced tea
- Light red wines (Pinot Noir or Zinfandel)
- Ginger beer or Moscow Mules for adults
Complete Meal: Serve 2-3 sliders per person with coleslaw and chips for a satisfying, complete meal. Add a pickle spear and you’ve got the perfect casual dinner!
FAQs Section
Can I use a different type of bun?
Absolutely! While Hawaiian sweet rolls are traditional and their sweetness pairs perfectly with BBQ sauce, you can use regular slider buns, small potato rolls, dinner rolls, or even small burger buns. Just make sure whatever you choose comes in a connected pack for easier slicing, or be prepared to assemble individually.
Can I make these without an oven?
While baking is the traditional method, you can make these in a slow cooker! Assemble in your slow cooker instead of a baking dish, cover, and cook on LOW for 2 hours. They won’t get crispy tops, but they’ll be hot and delicious. You can also use an air fryer – place 3-4 assembled sliders in the air fryer basket and cook at 320°F for 8-10 minutes.
What’s the best BBQ sauce to use?
This is totally personal preference! Sweet and tangy Kansas City-style sauces (like Sweet Baby Ray’s) are most popular for these sliders. Smoky sauces, honey BBQ, or even spicy varieties all work great. Try different brands until you find your favorite, or make homemade BBQ sauce for ultimate customization.
Can I make these with ground chicken instead of shredded?
Yes! Brown 1½ pounds of ground chicken in a skillet with diced onions, then drain excess fat and mix with BBQ sauce. The texture will be different than shredded chicken (more like Sloppy Joes), but equally delicious. You could also use ground turkey or beef.
How do I prevent the bottom buns from getting soggy?
The key is not over-saucing! The chicken should be coated but not dripping with sauce. You can also lightly toast the cut sides of the buns before assembling, which creates a moisture barrier. Some people spread a thin layer of butter or mayo on the bottom buns before adding chicken. Serving extra sauce on the side is always better than over-saucing.
Can these be made gluten-free?
Yes! Simply use gluten-free slider buns or rolls. Many brands make gluten-free Hawaiian-style rolls now. Make sure to also check that your BBQ sauce is gluten-free (most are, but always verify). The rest of the ingredients are naturally gluten-free.
How many sliders should I plan per person?
For appetizers at a party with other food options, plan 2-3 sliders per person. As a main course, most adults will eat 3-4 sliders. Kids typically eat 1-2. For a party of 8 people as a main dish, make a double batch (24 sliders) to ensure you have enough!
Can I use canned chicken?
In a pinch, yes! Drain 3-4 cans (12.5 oz each) of canned chicken well, then mix with BBQ sauce. The texture won’t be quite as nice as rotisserie or freshly cooked chicken, but it definitely works for a quick, budget-friendly meal. Consider adding a bit of chicken broth to the canned chicken before mixing with BBQ sauce to add moisture and improve texture.
Conclusion
There you have it – everything you need to know to make the most amazing BBQ Chicken Sliders that will have everyone asking for seconds (and thirds!)! These easy slider sandwiches prove that impressive, crowd-pleasing food doesn’t have to be complicated or time-consuming. With just a handful of simple ingredients, minimal prep work, and about 30 minutes, you can create restaurant-quality sliders that taste like you slaved over them for hours.
Whether you’re feeding a crowd at your next game day party, looking for a quick weeknight dinner solution that the whole family will love, meal prepping for the week ahead, or bringing a guaranteed hit to your next potluck, these BBQ pulled chicken sliders deliver on every level. The fact that they’re budget-friendly, freezer-friendly, and endlessly customizable makes them an absolute staple recipe for any home cook!
I’d absolutely love to hear how your BBQ chicken sliders turn out! What toppings did you add? Did you try any of the flavor variations? How quickly did they disappear at your gathering? Drop a comment below and share your experience – I read every single one and love hearing from you! And if you loved this recipe as much as my readers do, please pin it to your favorite Pinterest boards so other home cooks can discover these incredible sliders. Your support helps me continue creating delicious, approachable recipes that make home cooking easier and more enjoyable!
Now grab those Hawaiian rolls and get ready to make the best sliders ever – your taste buds (and your guests!) will thank you! Happy cooking! 🍔