Cream Cheese Stuffed Mini Peppers: The Perfect Party Appetizer Everyone Loves
If you’re looking for the ultimate crowd-pleasing appetizer that’s as beautiful as it is delicious, these cream cheese stuffed mini peppers are about to become your new entertaining secret weapon! These colorful little bites feature sweet mini bell peppers filled with a luscious, herb-infused cream cheese mixture, then baked until the peppers are tender and the filling is warm and melty. They’re like edible jewels on your appetizer platter—vibrant, flavorful, and gone in seconds at any gathering.
These stuffed mini peppers are perfect for absolutely any occasion: holiday parties, game day gatherings, bridal showers, potlucks, cocktail hours, or even as a healthy snack for meal prep. They work beautifully as an appetizer before dinner, but they’re substantial enough to serve as a light lunch when paired with a fresh salad. The combination of sweet, crisp peppers with creamy, tangy filling creates an addictive flavor and texture contrast that keeps people coming back for more.
What makes cream cheese stuffed peppers so popular on Pinterest is their versatility and visual appeal. They’re naturally gluten-free, low-carb, and keto-friendly, making them inclusive for guests with various dietary needs. Plus, they photograph gorgeously with their rainbow of colors—red, orange, and yellow peppers arranged on a platter look like something from a gourmet catering company, but they take just minutes to prepare!
History / Background
While stuffed peppers have been a staple in cuisines around the world for centuries—from Greek gemista to Mexican chiles rellenos—the cream cheese stuffed mini pepper is a distinctly modern American creation that emerged from the low-carb and keto diet movement of the early 2000s. As home cooks searched for creative ways to enjoy flavorful appetizers without bread or crackers, mini peppers became the perfect edible vessel.
The genius of using mini sweet peppers instead of large bell peppers lies in their perfect portion control and natural sweetness. These petite peppers, also called mini bell peppers or sweet snacking peppers, became widely available in American grocery stores around the mid-2000s, marketed as a convenient, pre-portioned snack. Creative home cooks quickly realized that their hollow structure made them ideal for stuffing, and the cream cheese stuffed mini pepper appetizer was born.
This recipe represents the evolution of classic American party food—taking inspiration from beloved appetizers like jalapeño poppers and traditional stuffed bell peppers, but making them lighter, healthier, and more elegant. The combination draws from Italian-American cuisine’s love of cream cheese-based dips and the American entertaining tradition of bite-sized appetizers that are easy to eat while mingling.
What makes these stuffed peppers particularly special in contemporary food culture is how they bridge the gap between healthy eating and indulgent entertaining. They’ve become a Pinterest sensation because they solve a common problem: creating appetizers that look impressive, taste amazing, and accommodate various dietary preferences—all without spending hours in the kitchen or breaking the bank.
Why You’ll Love This Recipe
These easy cream cheese stuffed mini peppers are about to revolutionize your appetizer game! They deliver restaurant-quality presentation with minimal effort and ingredients you probably already have in your kitchen.
Here’s why this recipe will become your go-to appetizer:
- Ready in just 30 minutes – From prep to table, including baking time, this is one of the fastest impressive appetizers you’ll make
- Naturally low-carb and keto-friendly – Perfect for guests following low-carb diets without any modifications needed
- Gorgeous presentation – The colorful peppers arranged on a platter look professionally catered and Instagram-worthy
- Make-ahead friendly – Stuff them the night before and bake when guests arrive for stress-free entertaining
- Budget-friendly ingredients – Mini peppers and cream cheese are affordable and available year-round at any grocery store
- Endlessly customizable – From classic herb and garlic to spicy jalapeño or bacon-loaded versions
- No special equipment needed – Just a baking dish and basic kitchen tools you already own
- Crowd-pleaser guaranteed – Even picky eaters and kids love the sweet peppers and creamy filling
- Healthy appetizer option – Packed with vegetables and protein, these are guilt-free indulgence
- Great for meal prep – Make a big batch for healthy snacks throughout the week
Ingredient Notes
Mini Sweet Peppers: These are the star of the show! Look for packages labeled “mini bell peppers,” “sweet snacking peppers,” or “mini sweet peppers” in the produce section. They’re typically sold in 1-pound bags containing mixed colors—red, orange, and yellow. Choose peppers that are firm, glossy, and free from soft spots. The variety of colors isn’t just for looks—each color has a slightly different sweetness level, with red being the sweetest. If you can’t find mini peppers, you can use small regular bell peppers cut in half, but the mini ones are perfectly portioned and sweeter.
Cream Cheese: Full-fat cream cheese is essential for the richest, creamiest filling. It should be softened to room temperature before mixing—this takes about 30-60 minutes on the counter, or you can microwave it for 15-20 seconds (be careful not to melt it). Block cream cheese works better than spreadable tubs because it has a firmer texture that holds its shape better when baked. For a lighter option, you can use Neufchâtel cheese (⅓ less fat cream cheese), though the texture will be slightly less rich.
Shredded Cheese: A combination of sharp cheddar and mozzarella gives you the best of both worlds—cheddar adds bold flavor while mozzarella provides that coveted stretchy, melty quality. Pre-shredded cheese works fine, but freshly shredded cheese from a block melts more smoothly and doesn’t have anti-caking agents. You can substitute with Monterey Jack, pepper jack for heat, or even goat cheese for a tangy twist.
Garlic: Fresh minced garlic adds aromatic depth that makes the filling irresistible. One or two cloves is perfect—enough to add flavor without overwhelming the peppers’ natural sweetness. Garlic powder works in a pinch (use ½ teaspoon), but fresh garlic truly elevates the dish. If you’re a garlic lover, feel free to add an extra clove!
Fresh Herbs: Chives, parsley, or green onions add freshness and color to the filling. Fresh herbs are vastly superior to dried in this application because they add brightness and visual appeal. Chives have a mild onion flavor, parsley is fresh and slightly peppery, and green onions add a bit more bite. Use whatever you have or prefer—they’re all delicious.
Seasonings: Simple salt, black pepper, and paprika create a well-rounded flavor base. The paprika adds a subtle sweetness and beautiful color. Smoked paprika can add depth, while regular paprika keeps it lighter. Don’t skip the seasoning—cream cheese needs help to shine!
Optional Bacon: Crumbled cooked bacon mixed into the filling or sprinkled on top adds smoky, salty richness that takes these peppers to the next level. It’s optional but highly recommended if you’re not serving vegetarians.
Equipment Needed
- 9×13-inch baking dish – Large enough to hold all the peppers in a single layer without crowding
- Sharp paring knife – For cutting the peppers lengthwise and removing seeds
- Mixing bowl (medium) – For combining the cream cheese filling
- Hand mixer or sturdy spoon – To blend the cream cheese mixture until smooth and creamy
- Measuring cups and spoons – For accurate ingredient proportions
- Cutting board – For prep work
- Small spoon or piping bag – For filling the peppers (a piping bag makes it easier but isn’t necessary)
- Aluminum foil – To cover the baking dish initially for even cooking
- Oven mitts – Safety first when handling hot dishes!
- Serving platter – For beautiful presentation
Cream Cheese Stuffed Mini Peppers
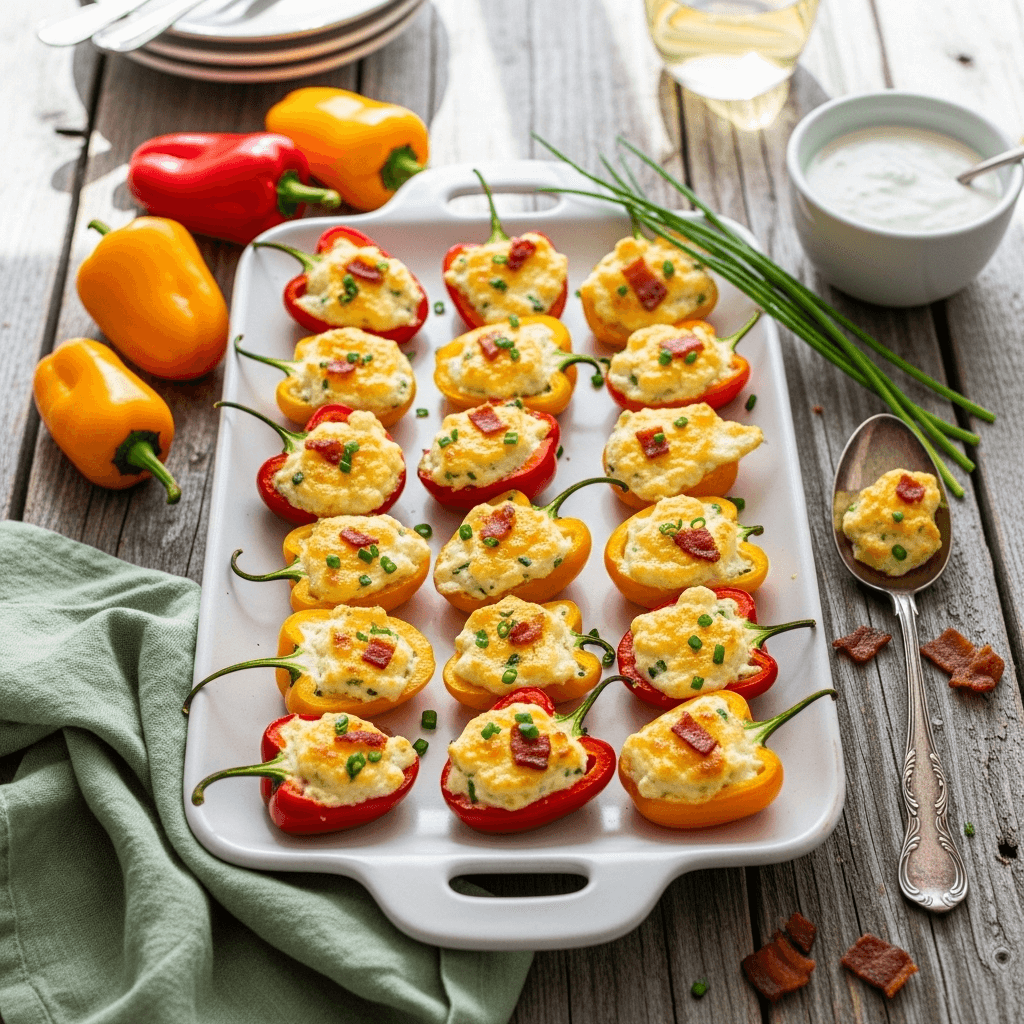
Cream cheese stuffed mini peppers are a colorful, easy appetizer featuring sweet mini bell peppers filled with a creamy herb and garlic cream cheese mixture, then baked until tender. These bite-sized stuffed peppers are perfect for parties, meal prep, or healthy snacking—naturally gluten-free, keto-friendly, and ready in just 30 minutes!
- Total Time: 30 minutes
- Yield: 24 stuffed pepper halves (serves 8-12 as appetizers) 1x
Ingredients
- 12 mini sweet peppers (mixed colors)
- 8 ounces cream cheese, softened to room temperature
- 1 cup shredded cheddar cheese
- ½ cup shredded mozzarella cheese
- 2 cloves garlic, minced
- 2 tablespoons fresh chives, finely chopped
- 1 tablespoon fresh parsley, chopped
- ½ teaspoon paprika
- ¼ teaspoon salt
- ¼ teaspoon black pepper
- 4 strips bacon, cooked and crumbled (optional)
- Fresh parsley for garnish (optional)
Instructions
- Preheat your oven to 375°F (190°C). Lightly grease a 9×13-inch baking dish with cooking spray or a thin layer of olive oil to prevent sticking.
- Prepare the peppers by washing and drying them thoroughly. Cut each mini pepper in half lengthwise from stem to tip, keeping the stem intact if possible for presentation. Use a small spoon or your fingers to scoop out all the seeds and white membranes inside. Arrange the pepper halves cut-side up in your prepared baking dish in a single layer. Pat the insides dry with a paper towel if there’s excess moisture.
- Make the cream cheese filling in a medium mixing bowl. Add the softened cream cheese, shredded cheddar, shredded mozzarella, minced garlic, chopped chives, parsley, paprika, salt, and black pepper. Using a hand mixer on medium speed or a sturdy spoon, beat the mixture until everything is well combined, smooth, and creamy—about 1-2 minutes. The mixture should be fluffy and easy to spread. If using bacon, fold in the crumbled bacon now.
- Fill the peppers by scooping about 1-2 tablespoons of the cream cheese mixture into each pepper half, depending on size. You can use a small spoon to fill them, or for neater presentation, transfer the filling to a piping bag or zip-top bag with a corner cut off and pipe it into each pepper. Fill them generously, mounding the filling slightly—it won’t overflow during baking and you want that nice stuffed appearance.
- Cover and bake by covering the baking dish tightly with aluminum foil. Bake for 10 minutes covered—this helps the peppers soften without the cheese topping browning too quickly.
- Uncover and finish baking by removing the foil and returning the dish to the oven for an additional 5-8 minutes, uncovered, until the cheese is bubbly and lightly golden on top and the peppers are tender when pierced with a fork. The peppers should still hold their shape but be easy to bite through.
- Cool and serve by removing from the oven and letting the stuffed peppers rest for 3-5 minutes before serving. This allows the filling to set slightly so it doesn’t spill out when picked up. Garnish with additional fresh parsley if desired. Transfer to a serving platter and watch them disappear!
Notes
- Pepper size variation: Mini peppers vary in size. Adjust filling amount accordingly—smaller peppers get less, larger ones can hold more.
- Room temperature cream cheese is crucial: If your cream cheese is too cold, it won’t mix smoothly. Plan ahead and let it sit out, or microwave for 15-20 seconds.
- Don’t skip covering initially: The foil helps the peppers cook evenly without drying out or having the cheese brown too quickly.
- Serving temperature: These are delicious hot, warm, or even at room temperature, making them perfect for buffets.
- Scaling the recipe: This recipe doubles or triples easily for large parties.
- Prep Time: 15 minutes
- Cook Time: 15 minutes
- Category: Appetizer
- Method: Baking
- Cuisine: American
- Diet: Gluten Free
Nutrition
- Serving Size: 2 stuffed pepper halves
- Calories: 142
- Sugar: 3g
- Sodium: 215mg
- Fat: 11g
- Saturated Fat: 6g
- Unsaturated Fat: 3g
- Trans Fat: 0g
- Carbohydrates: 5g
- Fiber: 1g
- Protein: 7g
- Cholesterol: 34mg
Tips & Variations
Jalapeño Popper Style: Mix in diced pickled jalapeños or fresh jalapeño to the cream cheese filling and top with extra bacon for that classic jalapeño popper flavor in a sweeter package.
Italian-Style: Replace cheddar with Parmesan and mozzarella, add Italian seasoning and sun-dried tomatoes to the filling, and top with panko breadcrumbs before baking for extra crunch.
Mexican-Inspired: Mix taco seasoning into the cream cheese, use pepper jack cheese, add black beans and corn to the filling, and top with cilantro and a squeeze of lime after baking.
Pizza Stuffed Peppers: Add mini pepperoni pieces, Italian seasoning, and marinara sauce to the filling. Top with mozzarella and bake until bubbly.
Greek-Style: Use feta cheese instead of cheddar, add diced cucumber, tomatoes, and olives to the filling, and drizzle with tzatziki sauce before serving.
Buffalo Chicken: Mix shredded rotisserie chicken and buffalo sauce into the cream cheese filling, use blue cheese or ranch dressing for dipping.
Everything Bagel: Mix everything bagel seasoning into the cream cheese filling and sprinkle more on top before baking for a fun flavor twist.
Spicy Sriracha: Add sriracha or hot sauce to the cream cheese mixture and top with crushed red pepper flakes for heat lovers.
Pro Chef Tips
Uniform pepper selection matters: Choose mini peppers that are similar in size so they cook evenly. Smaller peppers will be done before larger ones if there’s too much size variation. Sort through the bag and select the most uniform ones.
Create a stable base: If your peppers are rolling around and won’t sit flat in the baking dish, slice a tiny bit off the bottom (rounded side) to create a flat base. This prevents filling from spilling out and makes them easier to eat.
Room temperature is non-negotiable: Cold cream cheese will never mix smoothly, resulting in lumpy filling with pockets of unmixed cheese. Set it out 1 hour before making this recipe, or place the unwrapped block on a microwave-safe plate and microwave for 15-20 seconds—check and continue in 5-second intervals if needed.
Don’t overstuff: While it’s tempting to pile the filling high, overstuffed peppers can cause the filling to spill over during baking and make them messy to eat. Fill them generously but not so much that the filling extends far beyond the pepper’s natural cavity.
The foil cover is your friend: Starting with covered peppers creates a steaming environment that softens the peppers more quickly and evenly. Removing the foil for the final minutes allows the cheese to brown beautifully without overcooking the peppers.
Check for doneness properly: The peppers should be tender but not falling apart. Pierce one with a fork—it should go through easily but the pepper should still hold its shape. If they’re getting too brown on top but still tough, re-cover with foil for a few more minutes.
Let them rest: Those 3-5 minutes of resting time after baking are crucial. The filling is molten hot when it first comes out and will run everywhere if you try to serve immediately. As it cools slightly, it firms up and becomes easier to handle.
Boost flavor with roasting: For even more depth, roast the empty pepper halves in the oven for 5 minutes before filling. This concentrates their sweetness and adds a subtle char flavor.
Common Mistakes to Avoid
Using cold cream cheese: This is the #1 mistake! Cold cream cheese won’t incorporate with the other ingredients properly, resulting in a lumpy, unevenly flavored filling that’s difficult to work with. Always soften it completely to room temperature first.
Not removing all the seeds and membranes: Those white membranes can be bitter and the seeds can add unwanted texture. Take an extra minute to thoroughly clean out each pepper half—it makes a big difference in the final taste and eating experience.
Overbaking until peppers are mushy: These stuffed peppers should be tender but still have some structure. If you bake them too long, they’ll collapse and become difficult to pick up and eat. Start checking at 12-13 minutes total baking time.
Overcrowding the baking dish: When peppers are crammed together, they steam rather than bake, and you won’t get that nice slightly caramelized edge on the cheese. Leave a little space between each pepper for best results. Use two baking dishes if necessary.
Forgetting to season the filling: Cream cheese is fairly bland on its own and needs proper seasoning to shine. Don’t skip the salt, pepper, garlic, and herbs—they’re what make the filling truly delicious. Taste and adjust seasoning before filling the peppers.
Storage & Meal Prep
Refrigerator Storage: Store leftover cream cheese stuffed peppers in an airtight container in the refrigerator for up to 4 days. They’ll continue to soften as they sit, but they’re still delicious. The flavors actually meld together nicely overnight, making day-two peppers even more flavorful.
Reheating Instructions: Reheat stuffed peppers in a 350°F oven for 8-10 minutes until warmed through. You can also microwave them for 45-60 seconds, though they won’t retain the same texture—the peppers will be softer and less vibrant. For best results, always reheat in the oven.
Cold Serving Option: These stuffed mini peppers are actually delicious served cold straight from the fridge! Many people prefer them this way for meal prep or as a cold appetizer at summer parties. The flavors are just as good, though the texture of the filling is firmer.
Meal Prep Strategy: Make a double batch on Sunday and store in individual containers for grab-and-go healthy snacks throughout the week. They’re perfect for lunchboxes, afternoon snacks, or quick protein bites.
Best Quality Window: While safe to eat for up to 4 days, these stuffed peppers are at their absolute best within the first 48 hours when the peppers are still relatively crisp and the flavors are fresh.
Make-Ahead & Freezer Notes
Perfect Make-Ahead Appetizer: Stuff the peppers completely (but don’t bake them) up to 24 hours in advance. Cover the baking dish tightly with plastic wrap and refrigerate. When ready to serve, remove from refrigerator, let sit at room temperature for 15 minutes while the oven preheats, then bake as directed, adding 3-5 extra minutes to the covered baking time since they’re starting cold.
Freezing Unbaked Peppers: Stuff the peppers, arrange them on a parchment-lined baking sheet, and freeze until solid (about 2 hours). Transfer to a freezer-safe container or bag, separating layers with parchment paper. Store for up to 2 months. Bake from frozen, adding 5-8 extra minutes to the total baking time.
Freezing Baked Peppers: You can freeze already-baked stuffed peppers, though the texture of the peppers will be softer when thawed. Cool completely, arrange in a single layer on a baking sheet and freeze until solid, then transfer to freezer bags. Thaw overnight in the refrigerator and reheat in a 350°F oven for 10-12 minutes.
Prep the Filling in Advance: Make the cream cheese filling up to 3 days ahead and store it covered in the refrigerator. Bring to room temperature before stuffing the peppers so it’s easier to work with.
Best Freezing Practice: For best texture results, freeze unbaked peppers rather than already-baked ones. The peppers retain more of their crisp texture when they’re only baked once rather than baked, frozen, and reheated.
Serving Suggestions
These cream cheese stuffed mini peppers are versatile enough to pair with almost anything:
Appetizer Spreads: Arrange on a platter with other finger foods like meatballs, bruschetta, deviled eggs, cheese and crackers, and vegetable crudités for a complete appetizer spread.
Party Platters: Serve alongside chicken wings, sliders, chips and dip, and other game day favorites for sports viewing parties or casual gatherings.
Light Lunch: Pair with a fresh garden salad, soup, or grain bowl for a satisfying light lunch that’s packed with vegetables and protein.
Dipping Sauces: Offer ranch dressing, blue cheese dressing, sour cream, or marinara sauce on the side for guests who like extra sauce.
Wine Pairing: These pair beautifully with crisp white wines like Sauvignon Blanc or Pinot Grigio, or light reds like Pinot Noir. For non-alcoholic options, serve with sparkling water with lemon or iced tea.
Charcuterie Boards: Add these colorful stuffed peppers to a charcuterie or grazing board for visual interest and a fresh, light option among the meats and cheeses.
Brunch Option: Serve as part of a brunch spread alongside quiche, fruit salad, and pastries for a savory element that balances sweeter breakfast items.
Mediterranean Mezze: Include with hummus, olives, pita bread, feta, and grape leaves for a Mediterranean-inspired appetizer spread.
FAQs Section
Can I use regular bell peppers instead of mini peppers?
Yes, but you’ll need to adjust the recipe. Cut 3-4 large bell peppers into quarters or sixths (depending on size) and remove seeds and membranes. The filling amount will stay the same, and you’ll have fewer but larger pieces. Baking time may increase slightly—check for tenderness at 15-18 minutes total.
Do I have to bake these or can I serve them raw?
You absolutely can serve these unbaked! Mix the cream cheese filling and stuff the raw peppers, then refrigerate until serving. They’re refreshing and crispy this way. However, baking caramelizes the peppers’ natural sugars and melds the flavors together, which most people prefer. Try both ways and see which you like best!
Can I make these dairy-free?
Yes! Use dairy-free cream cheese alternatives (like Kite Hill or Tofutti) and dairy-free shredded cheese (or nutritional yeast for a cheesy flavor without actual cheese). The texture will be slightly different but still delicious. You may need to add a bit more seasoning since dairy-free alternatives can be milder.
Why is my cream cheese filling watery?
This usually happens if the cream cheese was too warm or if there was excess moisture in the peppers. Make sure the peppers are completely dry inside before filling, and don’t over-microwave the cream cheese—it should be soft but not melted. Also, drain any bacon well before adding to prevent excess grease from making the filling runny.
Can I prep these the morning of a party and bake them later?
Absolutely! This is actually ideal for party planning. Stuff the peppers in the morning, cover tightly with plastic wrap, and refrigerate. About 30 minutes before guests arrive, preheat the oven and bake as directed, adding just a few extra minutes since they’re starting cold. They’ll be fresh and hot when served.
What’s the best way to cut mini peppers for stuffing?
Cut them lengthwise from stem to tip for the classic stuffed pepper look. You can remove the stems completely or leave them attached for easier handling and prettier presentation. Using a sharp paring knife makes clean cuts easier. Cut on a stable cutting board and go slowly for safety.
Can I add meat to the filling?
Definitely! Cooked crumbled bacon, Italian sausage, ground beef, or shredded chicken all work wonderfully mixed into the cream cheese filling. Just make sure any meat is fully cooked before adding. This makes them more substantial and appealing to meat-eaters.
Conclusion
And there you have it—the complete guide to making cream cheese stuffed mini peppers that are guaranteed to disappear at any gathering! These colorful, creamy, bite-sized appetizers deliver big flavor with minimal effort, making them perfect for both experienced cooks and kitchen beginners. Whether you’re hosting a holiday party, bringing something to a potluck, prepping healthy snacks for the week, or just wanting a fun appetizer for family dinner, these stuffed peppers check all the boxes.
The beauty of this easy stuffed mini peppers recipe is how adaptable it is to your needs and preferences. Keep it classic with herbs and garlic, spice it up with jalapeños and hot sauce, load it with bacon, or go Mediterranean with feta and sun-dried tomatoes—the base recipe is your canvas for creativity. And because they’re naturally low-carb, gluten-free, and keto-friendly, they accommodate so many dietary preferences without feeling like “diet food.”
I’d love to hear how your cream cheese stuffed peppers turn out! What flavor variation did you try? Did you serve them hot or cold? Were they as big a hit at your party as I promised? Drop a comment below sharing your experience, and don’t forget to snap a photo and pin it to your favorite Pinterest boards so you can make these again and again! If this recipe made your appetizer game easier, please share it with your friends who need an impressive but easy recipe in their entertaining arsenal.
Happy cooking, and here’s to appetizers that look gorgeous, taste amazing, and actually get you compliments at every party!