Homemade Chocolate Covered Almonds (Just 3 Ingredients!)
There’s something absolutely magical about biting into a perfectly chocolate-coated almond – that satisfying crunch, the rich chocolate shell, and the nutty flavor all wrapped up in one little treat. And guess what? You don’t need to spend a fortune at fancy chocolate shops when you can make these chocolate covered almonds right in your own kitchen! This simple recipe uses just three basic ingredients and takes less than 30 minutes from start to finish. Whether you’re making them for holiday gifting, movie night snacking, or just because you deserve something special, these homemade chocolate covered almonds are about to become your new favorite treat.
Introduction to Chocolate Covered Almonds
Chocolate covered almonds are one of those timeless confections that never go out of style. These delightful little treats combine roasted almonds with a glossy chocolate coating, creating the perfect balance of textures and flavors in every bite. They’re incredibly versatile – elegant enough to package as homemade gifts during the holidays, yet casual enough to keep in a jar on your counter for everyday snacking. You’ll find them at weddings as favors, in candy dishes during Valentine’s Day, tucked into Christmas stockings, or simply enjoyed as an afternoon pick-me-up with your coffee. The beauty of making chocolate covered almonds at home is that you control the quality of ingredients, can customize the chocolate coating to your preference (dark, milk, or white chocolate), and create them fresh whenever the craving strikes. Plus, they’re naturally gluten-free and can easily be made vegan depending on your chocolate choice!
History & Background of Chocolate Covered Almonds
The marriage of chocolate and almonds has ancient roots that stretch back centuries. Almonds themselves have been cultivated for over 4,000 years, originating in the Middle East and Mediterranean regions. The practice of coating nuts in chocolate, however, really took off in Europe during the 19th century when chocolate manufacturing became more refined and accessible.
One of the most famous chocolate-covered almond confections is the Jordan almond, which actually predates chocolate coating. These sugar-coated almonds were traditionally given at weddings in ancient Rome as symbols of fertility and good fortune. When chocolate became popular in the 1800s, European chocolatiers began experimenting with coating almonds in chocolate instead of just sugar, creating what we now know as chocolate covered almonds.
In America, chocolate covered almonds gained mainstream popularity in the early 20th century when candy companies like Hershey’s and Blommer Chocolate Company began mass-producing them. They became a staple in movie theaters, candy stores, and gift boxes across the country. The iconic “chocolate almond” became synonymous with premium snacking – a little more sophisticated than your average candy bar.
Today, artisan chocolatiers around the world continue this tradition, while home cooks have discovered just how easy it is to recreate these gourmet treats in their own kitchens. Making them at home allows you to use high-quality chocolate and fresh almonds, resulting in a product that often surpasses what you can buy in stores – at a fraction of the cost!
Why You’ll Love This Chocolate Covered Almonds Recipe
This isn’t just another candy recipe – it’s your ticket to creating bakery-quality treats that will have everyone asking for your secret! What makes this recipe truly special is its beautiful simplicity combined with impressive results. You’ll feel like a professional chocolatier, but the process is actually incredibly straightforward and nearly foolproof.
Here’s why this recipe is absolutely perfect:
- Ridiculously Simple – Just 3 ingredients and basic kitchen equipment are all you need
- Budget-Friendly – Make gourmet chocolate almonds for a fraction of store-bought prices
- Customizable – Use dark chocolate for a sophisticated treat, milk chocolate for classic sweetness, or white chocolate for something different
- Perfect for Gifting – Package them in pretty jars or bags for thoughtful homemade gifts
- No Special Skills Required – If you can melt chocolate and stir, you can make these
- Quick Results – From start to finish in under 30 minutes
- Naturally Gluten-Free – Safe for those avoiding gluten
- Portion Control – Make exactly the amount you want
- Healthier Than Store-Bought – No preservatives, artificial ingredients, or mystery additives
- Impressive Results – They look and taste like they came from an expensive chocolate shop
Ingredient Notes
Let’s talk about what goes into these delicious treats. The beauty of this recipe is in the quality of your ingredients – since there are so few, each one really matters!
Raw or Roasted Almonds – You can use either, but I highly recommend roasted almonds for maximum flavor. Raw almonds work fine, but roasting them first (even just for 8-10 minutes in a 350°F oven) brings out their natural oils and deepens their nutty flavor. Whole almonds work best, as they’re easiest to coat evenly. If you have blanched almonds (skins removed), those create an even smoother bite, but skin-on almonds add a rustic touch and extra fiber.
Chocolate – This is where you can really customize! I prefer using chocolate chips or high-quality chocolate bars (chopped into small pieces). Semi-sweet or dark chocolate creates a sophisticated, not-too-sweet treat with health benefits from the cacao. Milk chocolate is creamier and sweeter – perfect if you’re making these for kids or prefer milder chocolate. White chocolate offers a completely different flavor profile. For best results, look for chocolate with at least 60% cacao content for dark chocolate, or a quality brand like Ghirardelli or Guittard. Avoid chocolate labeled “candy melts” or “almond bark” if you want authentic chocolate flavor, though these do melt more easily and create a smoother coating.
Coconut Oil (Optional) – Adding just a teaspoon or two of coconut oil to your melted chocolate helps create a thinner, glossier coating that hardens with a beautiful shine. It’s not absolutely necessary, but it does make the coating process easier and results in a more professional-looking finish. You can substitute with a neutral oil like avocado oil, or even a tiny bit of butter in a pinch.
Sea Salt (Optional but Recommended) – A light sprinkle of flaky sea salt on top of the chocolate before it sets elevates these from good to absolutely incredible. The salt enhances the chocolate flavor and creates that trendy sweet-salty combination everyone loves.
Equipment Needed
You won’t need any fancy equipment to make these chocolate covered almonds! Here’s what to gather:
- Microwave-safe bowl or double boiler – For melting chocolate evenly
- Baking sheet – For spreading out your coated almonds to set
- Parchment paper or silicone baking mat – Prevents sticking (don’t skip this!)
- Spatula or wooden spoon – For stirring and mixing
- Fork or dipping tool – For coating individual almonds (optional – you can also use your hands)
- Small bowl or ramekin – If using coconut oil
- Wire cooling rack – Optional, but helpful for excess chocolate to drip through
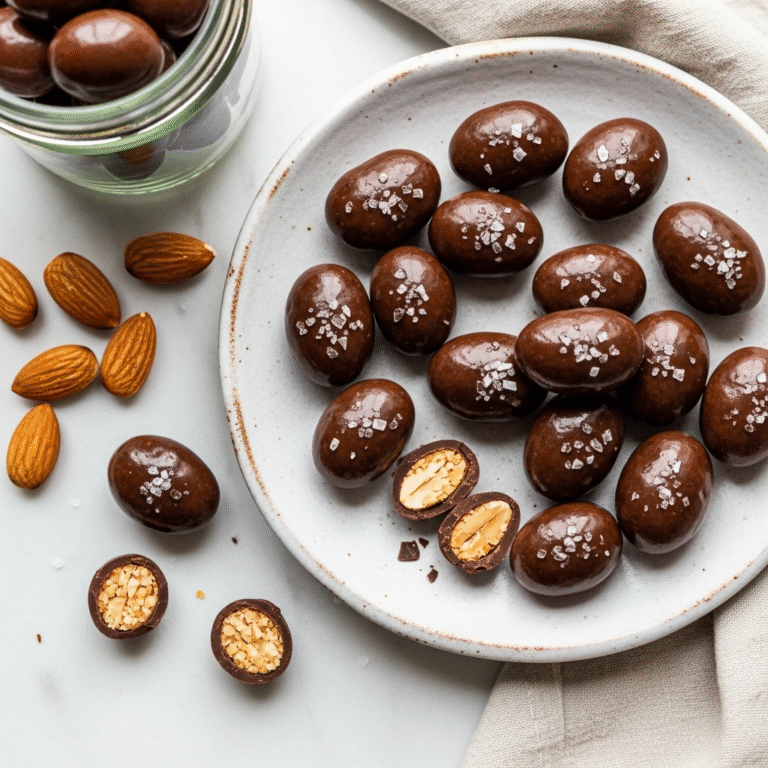
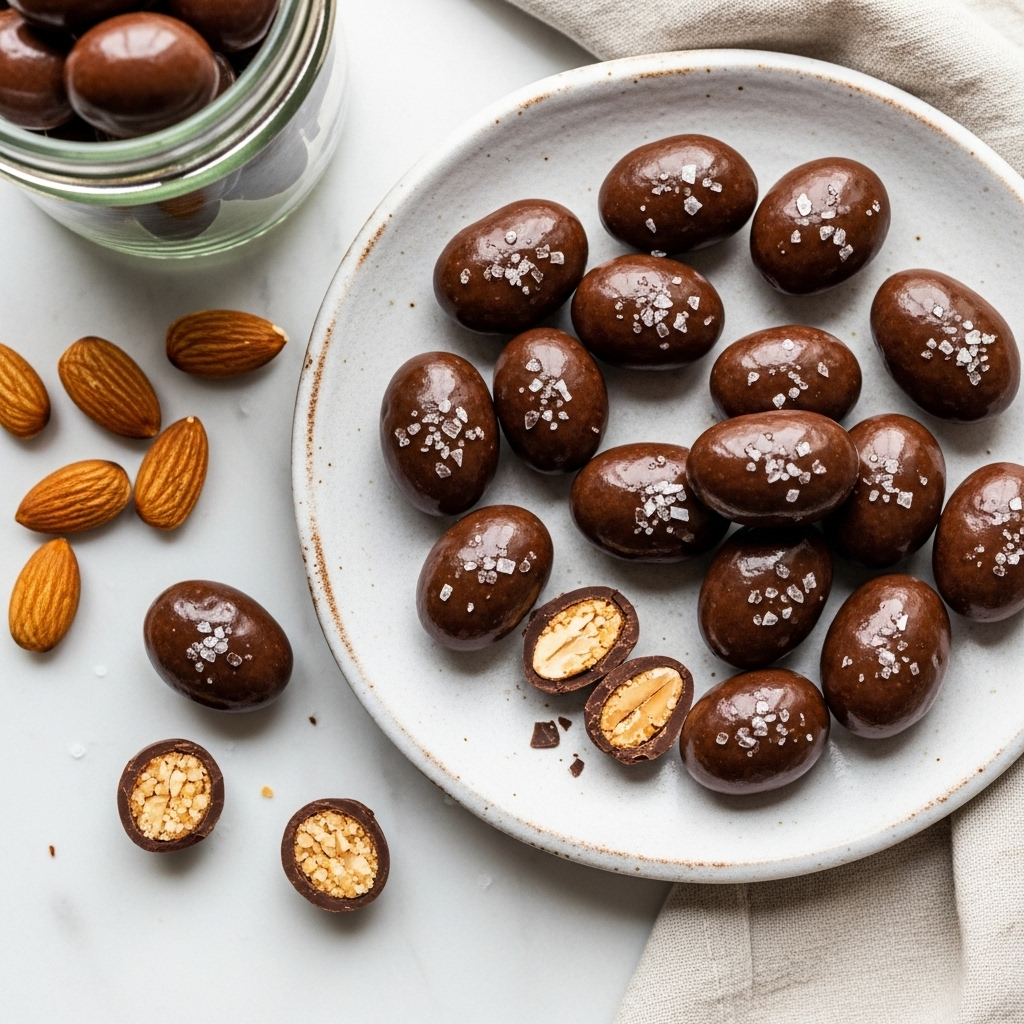
Chocolate Covered Almonds
These homemade chocolate covered almonds are incredibly easy to make with just 3 simple ingredients! Crunchy roasted almonds coated in rich, glossy chocolate create an irresistible treat that’s perfect for snacking, gifting, or serving at parties. This foolproof recipe produces bakery-quality results every single time.
- Total Time: 25 minutes
- Yield: About 2 cups (approximately 16 servings) 1x
Ingredients
- 2 cups whole almonds (raw or roasted)
- 12 ounces chocolate chips or chopped chocolate (dark, milk, or white)
- 2 teaspoons coconut oil (optional, for smoother coating)
- Flaky sea salt for topping (optional but recommended)
Instructions
- Prepare Your Workspace: Line a large baking sheet with parchment paper or a silicone baking mat. Set aside. If using raw almonds, roast them first by spreading on a baking sheet and baking at 350°F for 8-10 minutes until fragrant. Let cool completely.
- Melt the Chocolate: Place chocolate chips and coconut oil (if using) in a microwave-safe bowl. Microwave in 30-second intervals, stirring between each interval, until chocolate is completely smooth and melted (usually 90 seconds to 2 minutes total). Alternatively, melt in a double boiler over simmering water, stirring constantly until smooth.
- Coat the Almonds: Add all the almonds to the melted chocolate. Stir thoroughly with a spatula until every almond is completely coated in chocolate. Make sure to scrape the bottom and sides of the bowl to coat evenly.
- Spread to Set: Using a fork or your fingers, transfer the chocolate-coated almonds to your prepared baking sheet, spreading them out in a single layer. Try to separate them as much as possible so they don’t stick together in one big cluster (a few stuck together is fine and actually quite charming!).
- Add Sea Salt (Optional): While the chocolate is still wet, sprinkle with a light dusting of flaky sea salt if desired.
- Let Set: Allow the chocolate to set at room temperature for about 15-20 minutes, or place in the refrigerator for 10 minutes to speed up the process. The chocolate should be completely firm and no longer shiny when ready.
- Break Apart and Store: Once set, gently break apart any almonds that stuck together. Store in an airtight container at room temperature or in the refrigerator.
Notes
- For the glossiest coating, make sure your almonds are completely dry and at room temperature before coating.
- If your chocolate seems too thick, add more coconut oil one teaspoon at a time.
- Don’t let any water get into your chocolate or it will seize up and become grainy.
- For variety, try rolling some almonds in crushed nuts, coconut flakes, or cocoa powder before the chocolate sets.
- These keep well for up to 2 weeks at room temperature in an airtight container, or up to 1 month in the refrigerator.
- Prep Time: 10 minutes
- Cook Time: 15 minutes (including setting time)
- Category: Dessert
- Method: Stovetop/Microwave
- Cuisine: American
- Diet: Gluten Free
Nutrition
- Serving Size: 2 tablespoons (approximately 8-10 almonds)
- Calories: 180
- Sugar: 12g
- Sodium: 5mg (without added salt)
- Fat: 13g
- Saturated Fat: 4g
- Unsaturated Fat: 8g
- Trans Fat: 0g
- Carbohydrates: 15g
- Fiber: 3g
- Protein: 4g
- Cholesterol: 2mg
Tips & Variations
The basic recipe is fantastic, but here are some fun ways to customize your chocolate covered almonds:
Flavor Variations:
- Cinnamon Spice: Add 1 teaspoon of cinnamon and a pinch of cayenne pepper to the melted chocolate for a Mexican-inspired treat
- Orange Chocolate: Stir in 1 teaspoon of orange zest to the melted chocolate
- Espresso Almonds: Add 1 tablespoon of finely ground espresso powder to dark chocolate
- Mint Chocolate: Add 1/4 teaspoon peppermint extract to the chocolate
- Coconut Almond: Roll the chocolate-coated almonds in shredded coconut before they set
Texture Add-Ins:
- Sprinkle with crushed freeze-dried raspberries
- Dust with cocoa powder for a truffle-like finish
- Roll in finely chopped pistachios or hazelnuts
- Add a drizzle of contrasting chocolate (white on dark, or vice versa)
- Sprinkle with colorful sprinkles for holidays or celebrations
Dietary Modifications:
- Vegan: Use dairy-free chocolate chips and ensure they’re certified vegan
- Paleo: Use sugar-free dark chocolate with at least 85% cacao
- Keto-Friendly: Use sugar-free chocolate chips and your favorite keto-approved sweetened chocolate
Pro Chef Tips
Want to take your chocolate covered almonds from good to absolutely professional? Here are insider secrets:
Temperature Control is Everything: The ideal temperature for dipping chocolate is between 88-90°F. If it’s too hot, it will be too thin and won’t set properly. If it’s too cool, it will be too thick and create an uneven coating. Use an instant-read thermometer if you want perfect results every time.
Temper Your Chocolate for Snap: Professional chocolatiers temper their chocolate, which means carefully controlling the temperature to create stable crystals that give chocolate that perfect “snap” when you bite into it and prevent blooming (that white, powdery appearance). While not necessary for home cooks, if you want to try it, melt 2/3 of your chocolate to 115°F, remove from heat, add the remaining 1/3 cold chopped chocolate, and stir until it reaches 88-90°F.
The Shake and Tap Method: After coating each almond (if doing them individually), tap your fork or dipping tool gently on the side of the bowl to let excess chocolate drip off. This creates a thinner, more elegant coating and prevents chocolate puddles under each almond.
Two-Tone Technique: For an impressive presentation, coat almonds in one type of chocolate, let set completely, then drizzle with a contrasting chocolate using a piping bag or spoon. White chocolate drizzle over dark chocolate looks especially elegant.
Bloom Prevention: Store your finished chocolate covered almonds away from temperature fluctuations and moisture. If you see white streaks or spots on the chocolate (blooming), they’re still safe to eat but not as pretty. Proper storage prevents this.
Common Mistakes to Avoid
Learn from the mistakes others have made so your chocolate covered almonds turn out perfect the first time:
Mistake #1: Getting Water in Your Chocolate – Even a single drop of water will cause chocolate to “seize” and become grainy and clumpy. Make sure all your equipment is completely dry, and be careful of steam if using a double boiler. If this happens, you might be able to save it by whisking in a tablespoon of coconut oil or shortening.
Mistake #2: Overheating the Chocolate – Chocolate can burn easily, especially in the microwave. Always use short intervals and stir frequently. Burned chocolate tastes bitter and can’t be saved. If it starts to smell or look dull and separated, you’ve gone too far.
Mistake #3: Not Letting Almonds Cool After Roasting – If you roast your almonds first, they must be completely cool before coating. Hot almonds will cause the chocolate to melt off and create a mess.
Mistake #4: Coating Wet or Oily Almonds – Make sure your almonds are dry and free from excess oil. Pat them with a paper towel if needed. Moisture prevents the chocolate from adhering properly.
Mistake #5: Storing in Warm Locations – Chocolate melts! Don’t store your chocolate covered almonds near the stove, in direct sunlight, or anywhere warm. They’re best kept in a cool, dry place or in the refrigerator during hot weather.
Storage & Meal Prep
One of the best things about chocolate covered almonds is that they store beautifully:
Room Temperature Storage: Keep in an airtight container in a cool, dry place for up to 2 weeks. They’re perfect for keeping on your counter for snacking, though they might not last that long!
Refrigerator Storage: Store in an airtight container in the fridge for up to 1 month. This is especially important during warm weather when chocolate can soften or melt. Let them come to room temperature for about 10 minutes before eating for the best texture and flavor.
Container Tips: Use containers with tight-fitting lids to prevent moisture and odors from affecting your chocolate. Glass jars, plastic containers, or even resealable bags work well. Layer them with parchment paper if stacking to prevent sticking.
Signs They’ve Gone Bad: While they rarely spoil, chocolate covered almonds can develop fat bloom (white streaks), the almonds can become stale, or they can absorb odors. Trust your senses – if they smell off or the almonds taste rancid, it’s time to make a fresh batch.
Make-Ahead & Freezer Notes
Chocolate covered almonds are fantastic for making ahead, which makes them perfect for gift-giving or party planning:
Make-Ahead Timeline: These actually improve slightly after a day or two as the flavors meld together. Make them up to 2 weeks in advance and store at room temperature, or up to a month in advance if refrigerating.
Freezer Instructions: Yes, you can absolutely freeze chocolate covered almonds! Place them in a freezer-safe container or bag with as much air removed as possible. They’ll keep beautifully for up to 3 months. The texture remains perfect after freezing.
Thawing Method: When ready to enjoy, transfer the container to the refrigerator and let thaw overnight, or let them sit at room temperature for about 30 minutes. Never thaw them in the microwave or they’ll get soggy. Let them come to room temperature before eating for the best flavor and that perfect chocolate snap.
Gifting Prep: Make large batches during the holidays and freeze portions specifically for gifting. This way you can pull out a batch whenever you need a last-minute hostess gift or party favor.
Serving Suggestions
Chocolate covered almonds are incredibly versatile! Here’s how to serve them:
For Snacking:
- Keep a bowl on your coffee table during movie night
- Pack in small bags for hiking or road trip snacks
- Add to trail mix with dried fruit and other nuts
- Enjoy with your afternoon coffee or tea
For Entertaining:
- Arrange on a dessert board with other chocolates and candies
- Serve in small dishes at cocktail parties
- Include on a cheese board for a sweet-salty contrast
- Fill candy dishes for holiday gatherings
Pairings:
- Wine: Pairs beautifully with red wine (Cabernet, Merlot) or Port
- Coffee: The perfect accompaniment to espresso or cappuccino
- Tea: Lovely with Earl Grey or chai tea
- Cheese: Surprisingly delicious with sharp cheddar or creamy brie
For Gifting:
- Package in clear cellophane bags tied with ribbon
- Fill mason jars and add decorative labels
- Layer in gift tins with parchment paper between layers
- Add to homemade gift baskets with other treats
Frequently Asked Questions
Can I use chocolate chips or do I need to buy special chocolate? Chocolate chips work perfectly fine! They’re formulated to hold their shape, which makes them slightly thicker when melted, but the addition of coconut oil helps thin them out. For the absolute best flavor, use good-quality chocolate bars chopped into pieces, but chocolate chips are convenient and produce great results.
Why did my chocolate turn white or streaky? This is called “bloom” and happens when chocolate experiences temperature fluctuations or moisture exposure. Fat bloom (white streaks) occurs when fat crystals rise to the surface, while sugar bloom (grainy texture) happens from moisture. They’re still safe to eat, just not as pretty. Store in a consistent, cool, dry environment to prevent this.
Do I have to use coconut oil? No, it’s optional! Coconut oil helps create a thinner, glossier coating and makes the chocolate easier to work with, but you can skip it entirely. The almonds might have a slightly thicker coating, but they’ll still be delicious. You can also substitute with vegetable oil or even a tiny bit of butter.
Can I use other nuts instead of almonds? Absolutely! This method works beautifully with cashews, pecans, hazelnuts, macadamia nuts, or peanuts. Each nut brings its own unique flavor. Hazelnuts and dark chocolate is a classic combination, while cashews create a buttery, mild treat.
How do I prevent the almonds from all sticking together? Work quickly to spread them out on the parchment paper before the chocolate sets. Use a fork or your fingers to separate them into individual almonds or small clusters. You can also coat them individually by dropping almonds into melted chocolate one at a time, then removing with a fork – though this takes more time.
Can I make these dairy-free or vegan? Yes! Simply use dairy-free chocolate chips (many dark chocolate varieties are naturally vegan). Check the label to ensure there are no milk ingredients. Brands like Enjoy Life, Hu Kitchen, and Lily’s offer excellent dairy-free options.
What’s the best way to melt chocolate without burning it? The microwave method works great if you use short 30-second intervals and stir thoroughly between each burst. The double boiler method (a heat-safe bowl set over simmering water) gives you more control and is harder to burn. Never let the water touch the bottom of the bowl, and keep the heat low.
Conclusion
There you have it – everything you need to know to make absolutely perfect chocolate covered almonds at home! This simple three-ingredient recipe proves that some of the best treats are also the easiest to make. Whether you’re creating them for yourself, packaging them as thoughtful homemade gifts, or setting out a bowl for unexpected guests, these chocolate covered almonds deliver gourmet taste without the gourmet price tag or complicated techniques.
The beauty of this recipe is its flexibility – make them exactly to your taste with your favorite type of chocolate, add creative flavor twists, or keep them beautifully simple. Once you see how easy they are (and taste how incredible they turn out), you’ll wonder why you ever bought them from the store!
I’d love to hear how your chocolate covered almonds turn out! Drop a comment below with your favorite variation, share a photo on Pinterest to inspire other home cooks, or tag me on social media. And if you loved this recipe, please give it a five-star rating and share it with your friends who appreciate simple, delicious homemade treats. Happy chocolate making! 🍫