Easy Chicken Parmesan Sliders – The Perfect Party Sandwich

Chicken Parmesan Sliders are the ultimate comfort food meets convenience – taking everything you love about classic chicken parmesan and transforming it into adorable, shareable, bite-sized sandwiches that are perfect for any occasion. These mini Italian-inspired sandwiches feature crispy breaded chicken cutlets, tangy marinara sauce, melted mozzarella cheese, and Parmesan all nestled between soft, buttery slider buns that are baked together until golden and irresistible.
What makes these chicken parm sliders truly special is how they combine the beloved flavors of traditional chicken parmesan with the ease and portability of slider sandwiches. Instead of serving individual plated dinners, you create an entire pan of connected sliders that pull apart easily, making them ideal for casual entertaining, game day gatherings, potlucks, family dinners, or any time you want impressive results with minimal effort.
These sliders are incredibly versatile and work beautifully for virtually any occasion. Serve them at Super Bowl parties where guests can grab one (or three) without needing plates and utensils. Make them for easy weeknight dinners when you want something satisfying but don’t have time for elaborate cooking. Bring them to potlucks where they transport beautifully and stay warm. Pack them for tailgates, picnics, or school events. They’re even elegant enough for casual dinner parties when you want to serve something fun and interactive rather than formal plated meals.
The genius of this recipe lies in its assembly-line efficiency – you make everything in one pan, which means less cleanup and more consistent results. The buttery garlic topping that gets brushed over the buns before baking creates an addictive golden crust that tastes like the best garlic bread you’ve ever had, while keeping the sliders moist and flavorful. Once you discover how easy and delicious these chicken parmesan sliders are, they’ll become a regular in your recipe rotation.
History / Background
Chicken Parmesan Sliders represent a beautiful fusion of Italian-American culinary traditions with modern American casual dining culture. To understand these sliders, we need to trace their lineage back through two distinct food histories that eventually merged into this contemporary favorite.
The original chicken parmesan (or “chicken parmigiana”) has contested origins, though most food historians agree it emerged from Italian-American immigrant communities in the northeastern United States during the early-to-mid 20th century. While Italy has eggplant parmigiana (melanzane alla parmigiana), the chicken version appears to be an American innovation. Italian immigrants arriving in America found meat more affordable and accessible than in Italy, leading them to adapt traditional recipes using chicken instead of vegetables.
The dish gained popularity in Italian-American restaurants throughout New York, New Jersey, and Connecticut during the 1950s and 1960s, becoming a staple of red-sauce Italian-American cuisine alongside spaghetti and meatballs, lasagna, and baked ziti. Chicken parmesan embodied the Italian-American dream – taking humble ingredients (chicken, breadcrumbs, cheese, tomato sauce) and transforming them into something spectacular through technique and love.
The slider, meanwhile, has its own distinctly American origin story. While White Castle claims to have invented the slider in 1921 in Wichita, Kansas, the term “slider” didn’t become widespread until much later. These small hamburgers were designed to be affordable, easy to eat, and so delicious that they would “slide” down easily, encouraging customers to order multiple burgers. The slider concept exploded in popularity during the late 20th and early 21st centuries as casual dining embraced tapas-style small plates and shareable portions.
The fusion of chicken parmesan with slider-style presentation likely emerged in the 2000s as home cooks and recipe developers began reimagining classic dishes in more casual, party-friendly formats. Food blogs, Pinterest, and social media accelerated this trend, with home cooks sharing creative ways to transform restaurant favorites into easy entertaining options. The specific technique of baking multiple sliders together in one pan with a buttery topping appears to have been popularized by Hawaiian roll slider recipes that went viral on social media around 2010-2015.
Chicken Parmesan Sliders specifically gained traction as they solved multiple problems simultaneously: they delivered the beloved flavors of chicken parm in a format that was easier to make than traditional versions (no individual breading and frying), more portable and party-friendly, and absolutely irresistible to both kids and adults. They represent the evolution of Italian-American cuisine into the social media age – maintaining authentic flavor profiles while adapting to contemporary entertaining needs and visual appeal.
Why You’ll Love This Recipe
These Chicken Parmesan Sliders are about to become your new favorite go-to recipe for entertaining, weeknight dinners, and everything in between. They deliver all the satisfaction of restaurant-quality chicken parmesan but in a format that’s actually easier to make at home, incredibly shareable, and guaranteed to disappear within minutes of being served. The combination of crispy chicken, tangy marinara, melted cheese, and buttery garlic-topped buns creates flavor and texture magic in every bite.
Here’s why this recipe will revolutionize your cooking routine:
- Easier Than Traditional Chicken Parm – No individual breading, frying, or plating required; everything bakes together in one pan for consistent results
- Perfect for Crowds – Makes 12 sliders at once, ideal for feeding groups without making multiple batches
- Budget-Friendly – Costs approximately $12-15 to feed 6-8 people generously, making it economical for families and parties
- Kid-Approved Winner – Children absolutely love these mini sandwiches, making them perfect for picky eaters and family dinners
- Customizable to Your Taste – Adjust spice levels, cheese varieties, and toppings to suit any preference or dietary need
- Minimal Cleanup – One baking dish means less time washing dishes and more time enjoying your meal or guests
- Great for Meal Prep – Assemble ahead, refrigerate, and bake when ready; or freeze for future easy dinners
- Portable & Travel-Friendly – Transport easily to potlucks, tailgates, or parties while staying warm and delicious
- Leftovers Are Amazing – Reheat beautifully and taste just as good the next day (if there are any leftovers!)
- Impressive Presentation – The connected slider format looks stunning and feels special without requiring advanced cooking skills
- Versatile Serving Options – Works as appetizers, main course, lunch, dinner, or party food depending on portion size
- Restaurant Flavors at Home – Captures that beloved Italian-American restaurant taste in your own kitchen
Ingredient Notes
Understanding each ingredient’s role helps you make smart substitutions and achieve perfect results every time. Here’s what makes these chicken parmesan sliders so irresistibly delicious:
Hawaiian Sweet Rolls or Slider Buns – These soft, slightly sweet rolls are the foundation of perfect sliders. Hawaiian rolls (King’s Hawaiian brand is most popular) provide that ideal combination of soft, pillowy texture with a subtle sweetness that complements the savory filling beautifully. The 12-count package comes connected, which makes assembly easy and creates that signature pull-apart presentation. You can substitute regular slider buns, potato rolls, or even brioche slider buns, though you’ll miss that characteristic sweetness. For a less sweet option, use plain white slider buns or dinner rolls.
Chicken Cutlets or Chicken Tenders – The protein star of your sliders. Pre-breaded frozen chicken tenders are the ultimate shortcut and work perfectly (look for quality brands without excessive breading). You can also use fresh chicken breasts pounded thin and breaded yourself for maximum control over quality and seasoning. Rotisserie chicken works in a pinch but won’t have the crispy breaded texture. For vegetarian versions, substitute breaded eggplant, mozzarella sticks, or plant-based chicken alternatives.
Marinara Sauce – This provides the essential tomato flavor and moisture. Use your favorite jarred marinara for convenience (Rao’s is excellent if budget allows; budget options like Prego or Ragu work fine too). You can also use pizza sauce for a slightly different flavor profile, or make homemade marinara if you have time. Avoid using plain tomato sauce as it lacks the seasoning and depth of marinara.
Mozzarella Cheese – The classic melting cheese for chicken parmesan. Shredded mozzarella distributes most evenly and melts smoothly. Pre-shredded is convenient, though freshly shredded from a block melts more smoothly without anti-caking agents. Fresh mozzarella works but releases more moisture; pat it dry and slice thinly. For extra flavor, use a mozzarella-provolone blend or add some provolone slices.
Parmesan Cheese – Adds that characteristic sharp, salty, nutty flavor that makes chicken parm distinctive. Freshly grated Parmesan from a block tastes significantly better than pre-grated options and melts more evenly. The Parmigiano-Reggiano aged varieties offer the most complex flavor, but domestic Parmesan or even the shelf-stable grated versions work in a budget pinch.
Butter – The base for your garlic topping that creates that irresistible golden crust. Use real butter (salted or unsalted both work; if using unsalted, add a pinch of salt) rather than margarine for authentic flavor. The butter keeps the buns moist while creating a crispy, flavorful top layer.
Garlic – Fresh minced garlic provides aromatic flavor in the butter topping. Fresh is always best, but jarred minced garlic or garlic powder (1 teaspoon) can substitute in a pinch. Roasted garlic paste adds mellow sweetness if you have it.
Italian Seasoning – A blend of dried basil, oregano, thyme, and sometimes rosemary that brings those classic Italian flavors. You can make your own blend or substitute individual dried herbs. Fresh basil makes a beautiful garnish but shouldn’t replace the dried herbs in the butter mixture as fresh herbs don’t distribute as evenly when mixed with butter.
Optional Add-Ins – Red pepper flakes for heat, fresh basil for garnish, pepperoni slices for extra flavor, sautéed peppers and onions for vegetables, or additional Italian seasonings to taste.
Equipment Needed
The beauty of chicken parmesan sliders is that they require minimal specialized equipment. Here’s what you’ll need:
- 9×13-inch Baking Dish – The standard size that perfectly fits 12 connected Hawaiian rolls. Glass (Pyrex) or ceramic baking dishes work best as they distribute heat evenly and won’t react with acidic tomato sauce. Metal pans work too but may cause more browning on the bottom.
- Sharp Serrated Knife – Essential for cutting the connected slider rolls horizontally while keeping them attached. A bread knife works perfectly for this clean cut through soft buns.
- Baking Sheet (optional but recommended) – Place under your baking dish to catch any cheese or sauce that might bubble over, saving your oven from messy cleanup.
- Small Microwave-Safe Bowl – For melting butter and mixing with garlic and seasonings for the topping.
- Pastry Brush or Spoon – To apply the garlic butter mixture evenly over the top of the buns. A silicone pastry brush is ideal, but the back of a spoon works in a pinch.
- Aluminum Foil – For covering the sliders during the first part of baking to prevent over-browning while ensuring everything heats through properly.
- Cutting Board – For any prep work like mincing garlic or slicing chicken if using fresh.
- Measuring Cups and Spoons – For accurate ingredient measurements.
- Spatula or Large Serving Spoon – For serving the sliders once baked.
- Oven Mitts – Essential for safely handling hot baking dishes.
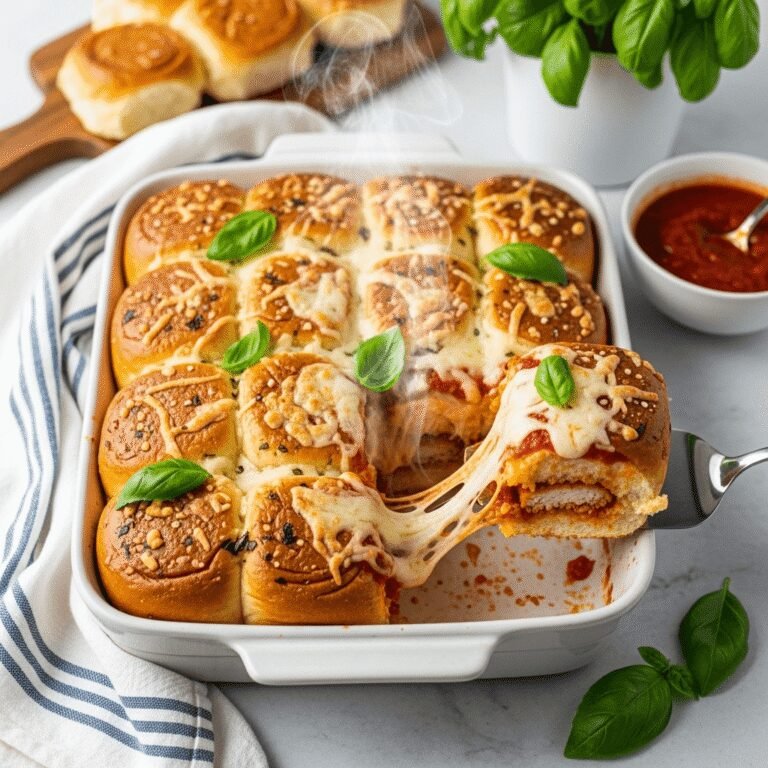
Easy Chicken Parmesan Sliders
These Easy Chicken Parmesan Sliders feature crispy breaded chicken, tangy marinara sauce, and melted mozzarella and Parmesan cheeses sandwiched between soft Hawaiian rolls with a buttery garlic topping. Baked together in one pan, they’re the perfect party appetizer or easy family dinner that everyone will love. Pull-apart, shareable, and absolutely irresistible!
- Total Time: 35 minutes
- Yield: 12 sliders (6-8 servings) 1x
Ingredients
- 12 Hawaiian sweet rolls (1 package, connected)
- 12 frozen breaded chicken tenders or 4-6 breaded chicken cutlets (enough to cover all sliders)
- 1½ cups marinara sauce or pizza sauce
- 2 cups shredded mozzarella cheese
- ½ cup freshly grated Parmesan cheese
- 4 tablespoons (½ stick) butter, melted
- 3 cloves garlic, minced
- 1 teaspoon Italian seasoning
- ½ teaspoon garlic powder
- ¼ teaspoon red pepper flakes (optional, for heat)
- Fresh basil leaves, for garnish (optional)
- Salt and pepper, to taste
Instructions
- Preheat and Prepare: Preheat your oven to 350°F (175°C). If your frozen chicken tenders need to be cooked first according to package directions, bake or air fry them now until crispy and cooked through, then set aside. If using pre-cooked chicken, proceed to the next step. Lightly spray a 9×13-inch baking dish with cooking spray.
- Slice the Rolls: Without separating the individual rolls, use a large sharp serrated knife to carefully slice the entire block of Hawaiian rolls horizontally in half, creating a top slab and a bottom slab. Keep each half intact. Place the bottom half of the rolls in your prepared baking dish, cut side up.
- Build the Bottom Layer: Spread about ¾ cup of marinara sauce evenly over the bottom layer of rolls, making sure to cover them completely. This creates a moisture barrier and ensures every bite has sauce. Sprinkle ¾ cup of the shredded mozzarella cheese over the sauce layer.
- Add the Chicken: Arrange your cooked chicken tenders or cutlets over the cheese layer in a single layer. You may need to trim or break them to fit perfectly so there’s chicken in every slider. If your chicken pieces are large, cut them to fit the individual slider sections. Season lightly with salt and pepper.
- Add More Sauce and Cheese: Spoon the remaining ¾ cup marinara sauce over the chicken layer, distributing it evenly. Don’t worry if it looks like a lot of sauce – the buns will soak it up beautifully. Sprinkle the remaining 1¼ cups mozzarella cheese over the sauce, followed by all of the Parmesan cheese. The double cheese layer creates that irresistible gooey, stretchy pull.
- Top with the Buns: Carefully place the top half of the slider rolls over the cheese layer, matching up the rolls with their bottoms as closely as possible to maintain the shape. Press down very gently to help everything connect.
- Make the Garlic Butter: In a small microwave-safe bowl, melt the butter (about 30 seconds in the microwave). Add the minced garlic, Italian seasoning, garlic powder, and red pepper flakes if using. Stir well to combine all the flavors.
- Brush with Butter Mixture: Using a pastry brush or the back of a spoon, generously brush the garlic butter mixture all over the top of the rolls, making sure to get into all the cracks between rolls. This creates that golden, flavorful crust. Don’t skip this step – it’s what makes these sliders truly special!
- Cover and Bake: Cover the baking dish tightly with aluminum foil (this prevents the tops from browning too quickly while the insides heat through). Place in the preheated oven and bake covered for 15 minutes.
- Uncover and Finish Baking: After 15 minutes, carefully remove the foil and return the dish to the oven. Bake uncovered for an additional 5-7 minutes, or until the tops are golden brown, the cheese is fully melted and bubbly, and everything is heated through. Watch carefully during this final stage to prevent over-browning.
- Rest and Serve: Remove from the oven and let the sliders rest for 3-5 minutes. This allows the cheese to set slightly and makes them easier to cut and serve. Garnish with fresh torn basil leaves if desired. Use a sharp knife to cut between the rolls to separate into individual sliders. Serve immediately while hot and melty!
Notes
- Chicken Options: Pre-cooked frozen breaded chicken tenders are the easiest option. You can also use rotisserie chicken (though you’ll miss the breaded texture), fresh breaded chicken cutlets you make yourself, or even breaded chicken patties. Just ensure whatever chicken you use is fully cooked before assembling.
- Bread Alternatives: While Hawaiian rolls are traditional and provide that signature slight sweetness, you can use regular slider buns, potato rolls, dinner rolls, or even sub rolls cut into slider-sized pieces. The texture and flavor will vary slightly.
- Cheese Variations: Feel free to experiment with cheese blends. Provolone, Italian cheese blend, or even a bit of fontina all work wonderfully. Some people add a layer of ricotta for extra creaminess.
- Sauce Control: If you prefer less saucy sliders, reduce the marinara to 1 cup total. For extra saucy versions (which I love), go up to 2 cups. Just ensure the buns can absorb it without becoming completely soggy.
- Make-Ahead Assembly: You can assemble these sliders completely (through step 8), cover tightly with plastic wrap, and refrigerate for up to 6 hours before baking. Add 5 extra minutes to the covered baking time if baking straight from the refrigerator.
- Crispy Top Preference: If you like an extra crispy top, broil for 1-2 minutes at the very end of baking, watching constantly to prevent burning.
- Prep Time: 15 minutes
- Cook Time: 20 minutes
- Category: Appetizer
- Method: Baking
- Cuisine: Italian-American
- Diet: Gluten Free
Nutrition
- Serving Size: 2 sliders
- Calories: 485
- Sugar: 8g
- Sodium: 920mg
- Fat: 22g
- Saturated Fat: 11g
- Unsaturated Fat: 9g
- Trans Fat: 0g
- Carbohydrates: 42g
- Fiber: 2g
- Protein: 28g
- Cholesterol: 85mg
Tips & Variations
Chicken Parmesan Sliders are wonderfully versatile and easy to customize to your preferences. Here are creative ways to make this recipe uniquely yours:
Spicy Version: Add sliced jalapeños or banana peppers between the cheese layers, use spicy marinara or arrabiata sauce, sprinkle extra red pepper flakes in the garlic butter, or add a layer of hot Italian sausage alongside the chicken for a spicy meat lovers’ version.
Extra Veggie Addition: Layer thin-sliced tomatoes, sautéed bell peppers and onions, roasted red peppers, fresh spinach, or thinly sliced mushrooms with the chicken for added nutrition and flavor. Just make sure vegetables are cooked and well-drained to prevent soggy sliders.
Pepperoni Pizza Style: Add a layer of pepperoni slices over the marinara sauce for a pizza-meets-chicken-parm flavor that kids especially love. You can also add Italian sausage crumbles for a meatier version.
Pesto Addition: Spread a thin layer of basil pesto on the bottom bun before adding marinara for an extra layer of Italian flavor. The combination of pesto and marinara is absolutely heavenly.
Four Cheese Version: Use a combination of mozzarella, provolone, fontina, and Parmesan for an ultra-cheesy, gourmet version. Add a layer of ricotta mixed with egg and herbs between the sauce layers for lasagna-style sliders.
Gluten-Free Option: Use gluten-free slider buns or rolls and ensure your breaded chicken is gluten-free (many brands offer gluten-free breaded chicken tenders, or make your own with gluten-free breadcrumbs). Check that your marinara sauce is gluten-free as well (most are).
Lower-Carb Version: Replace the slider buns with large portobello mushroom caps or use lettuce wraps. While this changes the concept significantly, it maintains the beloved flavors in a lower-carb format.
Supreme Slider: Add layers of cooked Italian sausage, pepperoni, bell peppers, onions, and mushrooms for a fully loaded supreme pizza-inspired version.
Caprese Style: Add fresh sliced tomatoes and fresh mozzarella slices, and finish with fresh basil and a drizzle of balsamic glaze after baking for an upscale Caprese chicken parm version.
Breading Options: Make your own chicken cutlets using panko breadcrumbs for extra crunch, or use Italian-seasoned breadcrumbs for more flavor.
Pro Chef Tips
Transform your chicken parmesan sliders from good to absolutely restaurant-quality with these professional techniques:
Toast the Buns First: For maximum texture contrast, lightly toast the cut sides of your Hawaiian rolls under the broiler for 1-2 minutes before assembling. This creates a slight barrier that prevents sogginess while adding a pleasant crunch. Just watch carefully to prevent burning.
Pat Everything Dry: Before assembling, pat your cooked chicken and any vegetables with paper towels to remove excess moisture. Wet ingredients are the enemy of crispy textures and can make your sliders soggy. This simple step dramatically improves the final texture.
Layer Strategically: Professional sandwich makers know that sauce placement matters. Always put sauce directly on bread first to create a moisture barrier, then add cheese, then proteins, then more cheese on top. This layering technique distributes flavors evenly and helps everything meld together during baking.
Don’t Skimp on the Garlic Butter: That buttery garlic topping is what transforms these from ordinary to extraordinary. Make sure to brush generously and get butter into all the crevices between rolls. The butter not only creates flavor but also helps the tops crisp up beautifully while keeping the insides moist.
Use an Instant-Read Thermometer: If you’re cooking raw chicken yourself, use an instant-read thermometer to ensure it reaches 165°F internal temperature before assembling your sliders. This guarantees food safety while preventing overcooking.
Let Them Rest: After baking, resist the urge to cut into your sliders immediately. Letting them rest for 3-5 minutes allows the cheese to set slightly, making them much easier to cut and serve without everything sliding out. The internal temperature will remain hot while the structure firms up just enough.
Score the Tops: Before brushing with garlic butter, use a sharp knife to lightly score the tops of the rolls where you’ll eventually cut them apart. This makes separating them after baking much easier and creates more surface area for the butter to soak into.
Broil for Restaurant Finish: For that professional golden-brown top reminiscent of high-end restaurants, finish your sliders under the broiler for 1-2 minutes. Position the rack about 6 inches from the heating element and watch constantly to prevent burning. This creates spectacular caramelization and visual appeal.
Common Mistakes to Avoid
Even straightforward recipes can go wrong, but knowing these common pitfalls ensures perfect chicken parmesan sliders every time:
Using Cold Ingredients: Assembling sliders with ingredients straight from the refrigerator increases baking time and can result in cold centers even when the tops look perfectly browned. Always let your marinara sauce come to room temperature and ensure your chicken is fully cooked and at least room temperature before assembling. This ensures everything heats evenly.
Over-Saucing: While sauce is delicious, too much turns your sliders into a soggy mess that falls apart when picked up. Stick to the 1½ cups total marinara recommended in the recipe. You want enough for flavor and moisture but not so much that it oversaturates the buns. If you love extra sauce, serve additional warmed marinara on the side for dipping instead of adding it all inside.
Skipping the Foil Cover: Baking uncovered from the start causes the tops to brown too quickly while the interior remains cold and the cheese doesn’t melt properly. The foil-covered baking period is essential for even heating and proper cheese melting. Only remove the foil for the final few minutes to achieve golden tops.
Cutting While Too Hot: Slicing into your sliders immediately after removing from the oven causes all the cheese, sauce, and toppings to slide out in a messy heap. The 3-5 minute rest period allows the cheese to set slightly while remaining melty, making serving much cleaner and more enjoyable.
Not Pressing Down: After placing the top buns on your assembled sliders, give them a gentle but firm press down with your hands. This helps all the layers connect and makes them less likely to fall apart when serving. Don’t press so hard that you squeeze out all the filling, but a firm press is important.
Using Low-Quality Ingredients: Since this recipe has relatively few ingredients, quality really matters. Cheap marinara sauce can taste tinny and artificial, low-quality frozen chicken can be more breading than meat, and substituting margarine for butter dramatically affects flavor. Invest in decent ingredients for the best results – it doesn’t have to be premium, just avoid the absolute bottom-shelf options.
Storage & Meal Prep
Properly storing your chicken parmesan sliders ensures you can enjoy leftovers (if you’re lucky enough to have any!) and makes advance preparation stress-free:
Room Temperature: Baked chicken parmesan sliders should not sit at room temperature for more than 2 hours due to food safety concerns with the chicken and dairy. If serving at a party, keep them in a warm oven (200°F) or serve within 2 hours of baking.
Refrigerator Storage: Store leftover sliders in an airtight container or wrap the baking dish tightly with plastic wrap or aluminum foil. Refrigerate for up to 3-4 days. The sliders will firm up and the cheese will solidify when cold, which is completely normal.
Reheating for Best Results: The key to reheating is restoring moisture and crispness simultaneously. The best method is reheating in a 350°F oven for 10-15 minutes, covered with foil for the first 8-10 minutes, then uncovered for the final 5 minutes to crisp the tops. You can also reheat individual sliders in the microwave for 45-60 seconds, though the buns won’t be as crispy. An air fryer works wonderfully – reheat at 350°F for 5-7 minutes for crispy exterior and hot interior.
Maintaining Texture: When storing, place a paper towel in the container to absorb excess moisture, which helps prevent soggy buns. Replace the paper towel when reheating if it’s damp.
Individual Portions: Consider separating leftover sliders and wrapping individually in aluminum foil or plastic wrap before refrigerating. This makes grabbing a quick lunch or snack easier and allows for faster, more even reheating.
Sauce Separation: If you notice the sauce has separated or looks watery after refrigeration, this is normal as the ingredients cool and solidify at different rates. Reheating will bring everything back together.
Make-Ahead & Freezer Notes
Chicken Parmesan Sliders are exceptionally make-ahead and freezer-friendly, making them perfect for meal prep and stress-free entertaining:
Assemble Ahead: The best make-ahead method is to assemble your sliders completely (including brushing with garlic butter) up to 6-8 hours before baking. Cover the baking dish tightly with plastic wrap and refrigerate. When ready to bake, remove from refrigerator, remove plastic wrap, cover with foil, and bake as directed, adding 5-7 extra minutes to the covered baking time to account for the cold start.
Freeze Unbaked: For maximum freshness, freeze assembled but unbaked sliders. Assemble completely in a disposable aluminum baking pan (or line your regular pan with heavy-duty foil for easy removal), wrap tightly with plastic wrap followed by aluminum foil, label with date and baking instructions, and freeze for up to 2 months. To bake, remove from freezer and let thaw completely in the refrigerator overnight (this takes 12-24 hours). Bake as directed once thawed. Do not bake from frozen as the centers won’t heat through properly.
Freeze Baked Sliders: You can also freeze already-baked sliders. Let them cool completely, wrap individual sliders tightly in plastic wrap, then place in a freezer bag or container. Freeze for up to 2 months. Reheat from frozen in a 350°F oven for 20-25 minutes, covered with foil for the first 15 minutes, then uncovered for the final 5-10 minutes until heated through and crispy on top.
Meal Prep Strategy: Make a double batch – serve one pan immediately and freeze the second for a future easy dinner. Having a complete meal in your freezer that requires no additional effort is invaluable for busy weeks.
Best Reheating from Frozen: For frozen baked sliders, the oven method produces the best results. Microwave reheating works but creates soggier buns. If you must use the microwave, wrap the slider in a slightly damp paper towel to prevent drying out, heat for 1-2 minutes, then transfer to a toaster oven for 2-3 minutes to crisp the exterior.
Component Freezing: You can also freeze components separately – freeze cooked breaded chicken in freezer bags, or freeze marinara sauce in portions. This allows you to assemble fresh sliders quickly using pre-prepped components.
Serving Suggestions
Chicken Parmesan Sliders pair beautifully with numerous sides and accompaniments to create a complete, satisfying meal. Here’s how to build the perfect menu:
Classic Italian Sides: Serve alongside garlic bread or cheesy garlic bread (though your sliders already have garlic butter!), Caesar salad with crispy romaine and homemade croutons, Caprese salad with fresh tomatoes, mozzarella, and basil drizzled with balsamic glaze, Italian pasta salad with pepperoni, olives, and Italian dressing, or antipasto platter with cured meats, cheeses, olives, and marinated vegetables.
Simple Green Salads: Balance the richness of the sliders with fresh, crisp salads like a simple mixed green salad with Italian vinaigrette, arugula salad with lemon and Parmesan, spinach salad with strawberries and balsamic, or wedge salad with blue cheese dressing and bacon bits.
Vegetable Sides: Roasted vegetables (zucchini, bell peppers, asparagus, broccoli) tossed with olive oil and Italian herbs, sautéed green beans with garlic and lemon, roasted Brussels sprouts with Parmesan, grilled or roasted asparagus, or a simple vegetable tray with ranch or Italian dressing for dipping.
Potato Sides: Crispy oven-baked fries or sweet potato fries, garlic Parmesan roasted potatoes, creamy mashed potatoes, potato wedges with herbs, or crispy tater tots (kids love these alongside sliders).
Pasta Options: While sliders are carb-heavy, a small side of pasta can round out Italian-themed dinners. Consider simple spaghetti aglio e olio (garlic and olive oil), pasta salad, or even just buttered noodles with Parmesan for kids.
Soup Pairings: A cup of tomato soup, Italian wedding soup, or minestrone makes a comforting pairing, especially on cooler days. The slider becomes like a gourmet grilled cheese dunked in soup.
Beverage Pairings: For adult gatherings, serve with Italian wines like Chianti, Pinot Grigio, or Prosecco. Beer lovers will enjoy light lagers or wheat beers. For family dinners, Italian sodas, lemonade, iced tea, or sparkling water with lemon work perfectly.
Party Presentation: When serving as party appetizers, arrange the slider pan on a buffet with small plates, napkins, and a variety of dipping sauces (extra marinara, ranch dressing, garlic aioli). Add picks or small skewers for easy handling.
Dipping Sauces: While sliders are complete on their own, some people love extra sauce. Offer warmed marinara, ranch dressing, garlic aioli, or even Alfredo sauce on the side for dipping.
FAQs Section
Can I use rotisserie chicken instead of breaded chicken?
Yes, you can use shredded rotisserie chicken, though the texture and flavor will be different without the crispy breaded coating that’s characteristic of chicken parmesan. If using rotisserie chicken, consider adding Italian-seasoned breadcrumbs mixed with melted butter between the chicken and top cheese layer to add some of that desired crunch. You’ll need about 2-3 cups of shredded rotisserie chicken. The sliders will be more like chicken sandwiches with marinara and cheese rather than true chicken parm sliders, but still delicious!
How do I prevent the bottom buns from getting soggy?
First, lightly toast the bottom halves of the buns before assembling (1-2 minutes under the broiler) to create a protective barrier. Second, start with a thinner layer of sauce on the bottom and add more on top of the chicken instead. Third, ensure your chicken is completely dry and at room temperature before assembling. Fourth, don’t assemble too far in advance – 6-8 hours maximum in the refrigerator. Finally, use quality Hawaiian rolls which hold up better to moisture than generic soft rolls. If you’re particularly concerned, you can spread a very thin layer of softened butter on the bottom buns before adding sauce, which creates a waterproof barrier.
Can I make these without an oven using a slow cooker or air fryer?
While the oven is ideal for this recipe, you have alternatives. For slow cooker preparation, assemble the sliders in a slow cooker-safe dish that fits inside your crockpot, cover, and cook on LOW for 2-3 hours until heated through and cheese is melted. The tops won’t get crispy, but they’ll be delicious. For air fryer method, you’ll need to work in batches depending on your air fryer size. Assemble 3-4 sliders at a time, place in the air fryer basket, and cook at 350°F for 8-10 minutes. The air fryer actually creates wonderfully crispy tops! You can also prepare individual sliders and heat them in a panini press or on a stovetop griddle, pressing down with a spatula for a grilled effect.
What’s the best bread to use if I can’t find Hawaiian rolls?
While Hawaiian rolls provide that signature sweet-savory flavor combination, several alternatives work well. Potato rolls or potato slider buns offer similar softness and slight sweetness. Regular white slider buns or dinner rolls work perfectly fine, though you’ll lose the subtle sweetness. Brioche slider buns create an upscale version with rich, buttery flavor. For a less sweet option, use regular sandwich slider buns or even make individual sliders using regular-sized hamburger or ciabatta buns (you’ll get fewer sliders but larger portions). The key is using soft, slightly sweet bread that can hold up to moisture without falling apart.
How do I keep the sliders warm for a party?
For parties, timing and temperature management are crucial. The best method is baking the sliders just before guests arrive, then keeping them in a warm oven (200°F) for up to 1 hour. You can also use a slow cooker – transfer baked sliders to a slow cooker set on WARM with a paper towel underneath to absorb moisture. If serving buffet-style, place the baking dish on a warming tray or over a chafing dish with a heat source underneath. For outdoor parties or tailgates, wrap the hot baking dish in aluminum foil and then wrap in thick towels to insulate and keep warm for 45-60 minutes during transport. Always serve within 2 hours of baking for food safety.
Can I make these sliders vegetarian?
Absolutely! Several delicious vegetarian variations work wonderfully. Replace the chicken with breaded eggplant slices (make eggplant parmesan sliders), thick slices of breaded and fried mozzarella, breaded and baked portobello mushroom caps, or plant-based chicken alternatives (like Gardein or MorningStar breaded chik’n). You can also create a veggie supreme version with layers of roasted vegetables, spinach, and multiple types of cheese. The assembly and baking method remains exactly the same. For vegan versions, use dairy-free cheese alternatives and vegan butter for the topping, though results vary significantly depending on the quality of dairy-free products used.
Why did my cheese not melt properly?
Several factors can cause cheese melting issues. Using cheese straight from the refrigerator without allowing it to come closer to room temperature can inhibit melting. Pre-shredded cheese contains anti-caking agents (cellulose) that prevent smooth melting – try using freshly shredded cheese from a block for better results. Not baking long enough or at too low a temperature won’t generate enough heat to melt cheese properly – ensure your oven is fully preheated to 350°F. Having too thick a layer of cheese can also cause uneven melting; the recommended amounts should melt perfectly. Finally, covering with foil during the entire baking time traps too much moisture and prevents proper melting – always remove foil for the final 5-7 minutes to allow direct heat on the cheese.
Can I double this recipe for a larger crowd?
Yes, chicken parmesan sliders double beautifully! For a double batch, you’ll need two 9×13-inch baking dishes or one very large catering pan. Use two packages of Hawaiian rolls (24 sliders total) and double all other ingredients. You can bake both pans simultaneously if your oven can accommodate them, though you may need to rotate their positions halfway through baking for even browning. Alternatively, bake one pan, keep it warm in a low oven while baking the second batch. The beauty of sliders is their scalability – this recipe can easily serve large crowds without requiring you to change your cooking method significantly. For parties of 20+ people, consider making a triple batch and keeping them coming out of the oven in waves so everyone gets hot, fresh sliders.
Conclusion
Congratulations – you now have everything you need to make absolutely spectacular Chicken Parmesan Sliders that will have everyone at your table asking for seconds and begging for the recipe! These little Italian-American sandwiches prove that the best recipes don’t have to be complicated; sometimes the most memorable dishes come from simple ingredients combined in clever ways and baked with love.
The beauty of chicken parmesan sliders lies in their incredible versatility and universal appeal. They work equally well as a casual weeknight dinner that gets kids excited about eating, an impressive party appetizer that looks like you spent hours in the kitchen, a potluck contribution that will make you the star of the event, or even a fun twist on traditional chicken parmesan that feels fresh and exciting. The pull-apart presentation creates a sense of fun and community, while the combination of crispy chicken, tangy marinara, melted cheese, and buttery garlic-topped buns delivers comfort food satisfaction in every single bite.
What I love most about sharing this recipe is knowing how many wonderful memories you’ll create with it. Picture game day gatherings where friends gather around the pan, pulling apart warm sliders while cheering for their team. Imagine family dinners where even picky eaters enthusiastically reach for seconds. Envision potlucks where your dish is the first to disappear and everyone wants to know your secret. These sliders bring people together, spark conversations, and create those warm, happy moments that make life delicious.
Now it’s your turn to experience the magic! I encourage you to try this recipe for your next gathering, family dinner, or meal prep session. Don’t be intimidated – these truly are as easy as they look, and the results are absolutely worth it. Once you make them, I’d love to hear all about your experience! What variations did you try? Did you add extra cheese (always a good choice!)? Did your family devour them as quickly as mine does? Drop a comment below sharing your chicken parmesan slider success story, post a photo of your beautiful creation, and please don’t forget to save this recipe to your Pinterest boards so you can find it easily whenever slider cravings strike.
Tag me in your photos using #ChickenParmesanSliders – I genuinely love seeing your versions and celebrating your cooking victories with you! Happy baking, and here’s to creating delicious, memorable meals that bring joy to your table and smiles to everyone who takes that first incredible bite. Get ready to become known as “the person who makes those amazing chicken parm sliders” – it’s a reputation you’ll absolutely love having