Easy Homemade Fruit Leather Recipe (No Refined Sugar!)
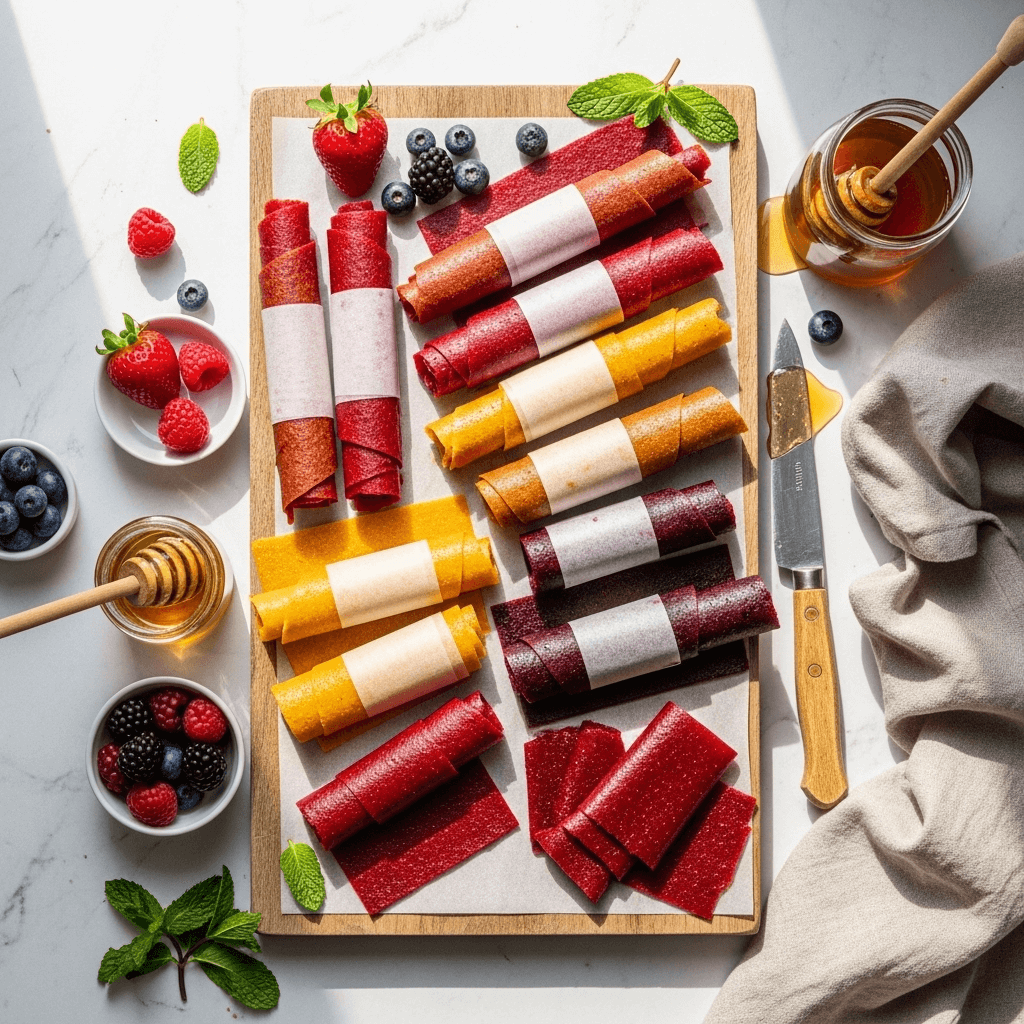
There’s something magical about unrolling a homemade fruit leather and taking that first chewy, naturally sweet bite. Homemade fruit leather is a healthy, delicious snack made from pureed fruit that’s been spread thin and slowly dehydrated until it reaches that perfect chewy texture we all love. Unlike store-bought fruit roll-ups loaded with artificial colors, high-fructose corn syrup, and preservatives, homemade fruit leather contains nothing but pure fruit—and maybe a touch of honey if you’d like.
This recipe is perfect for lunch boxes, after-school snacks, hiking trips, road trip treats, or anytime you need a portable, wholesome sweet treat. It’s also an absolutely brilliant way to use up overripe fruit that’s sitting on your counter or berries that are past their prime in the fridge. Kids absolutely adore helping make fruit leather, and parents love knowing exactly what’s in their children’s snacks. Whether you’re packing lunches for the week, preparing healthy snacks for a camping adventure, or simply looking for a fun weekend kitchen project, this homemade fruit leather recipe is about to become your new favorite.
History / Background
Fruit leather has roots that stretch back thousands of years, long before modern food preservation methods existed. Ancient civilizations in the Middle East discovered that pureed fruit, when spread thin and dried in the sun, would create a portable, shelf-stable food that retained most of the fruit’s natural sweetness and nutrients. This innovation was crucial for survival, allowing people to preserve their harvest and have access to fruit’s energy and vitamins during winter months and long journeys.
Native Americans were also making their own versions of fruit leather centuries ago, using local fruits like berries, plums, and apples. They would mash the fruit, spread it on flat rocks or woven mats, and let the sun do its work. Some tribes mixed the fruit paste with dried meat to create “pemmican,” an energy-dense travel food that sustained them through long hunting expeditions.
The modern fruit leather we know today gained popularity in the 1970s during the natural foods movement, when parents began seeking healthier alternatives to candy and processed snacks. Companies started mass-producing fruit roll-ups, but these commercial versions often contained more sugar and additives than actual fruit. That’s when creative home cooks rediscovered the ancient art of making fruit leather at home, adapting traditional methods to modern ovens and dehydrators.
Today, homemade fruit leather has experienced a wonderful renaissance as part of the whole foods movement. Parents, hikers, athletes, and health-conscious snackers have embraced this naturally sweet treat that delivers real fruit nutrition without any of the junk. It’s a beautiful example of how ancient food preservation wisdom remains relevant and valuable in our modern kitchens.
Why You’ll Love This Recipe
Making your own fruit leather at home might sound complicated, but I promise it’s one of the easiest kitchen projects you’ll ever tackle. Once you try this recipe, you’ll wonder why you ever bought those expensive store-bought fruit snacks! This homemade version tastes infinitely better, costs a fraction of the price, and gives you complete control over ingredients and sweetness levels.
Here’s why this recipe is about to become your go-to snack:
- Incredibly simple – Just blend fruit, spread it thin, and let your oven or dehydrator do the work
- Budget-friendly – Use up overripe fruit and save money compared to store-bought snacks
- Naturally sweet – No refined sugar needed; the fruit provides all the sweetness
- Customizable – Mix and match any fruits, add spices, adjust sweetness to your preference
- Kid-approved – Children love the fun, rollable texture and naturally sweet taste
- Healthy snacking – Packed with fiber, vitamins, and natural fruit sugars for sustained energy
- Allergy-friendly – Naturally gluten-free, dairy-free, vegan, and free from top allergens
- Long shelf life – Stores for weeks or even months when properly packaged
- Perfect for meal prep – Make a big batch and have snacks ready for weeks
- Zero waste – Uses up fruit that might otherwise go to waste
- Portable – Doesn’t require refrigeration, perfect for lunch boxes and travel
Ingredient Notes
The beauty of fruit leather lies in its simplicity. You really only need one essential ingredient: fruit! However, understanding how different fruits behave and what optional additions can enhance your leather will help you create the perfect batch every time.
Fresh or Frozen Fruit: The star of your fruit leather can be virtually any fruit you love. Strawberries, blueberries, raspberries, blackberries, mangoes, peaches, apples, pears, apricots, plums, and cherries all work beautifully. You can use fresh fruit or frozen fruit interchangeably—frozen is often more economical and available year-round. If using frozen, there’s no need to thaw it first; just blend it straight from the freezer. Overripe fruit is actually ideal because it’s naturally sweeter and blends more easily.
Sweetener (Optional): Depending on the ripeness and natural sweetness of your fruit, you may not need any added sweetener at all. If your fruit is tart (like raspberries or sour cherries), you can add honey, maple syrup, or agave nectar to taste. Start with just 1-2 tablespoons per 4 cups of fruit—you can always add more, but you can’t take it away. For a completely refined sugar-free version, dates or date paste work wonderfully as natural sweeteners.
Lemon or Lime Juice: A squeeze of citrus brightens the fruit flavor and helps preserve the vibrant color of your fruit leather. It also provides natural pectin, which helps the leather set properly. Use about 1-2 tablespoons per 4 cups of fruit.
Spices and Flavor Enhancers (Optional): This is where you can get creative! A pinch of cinnamon transforms apple leather into something magical. Vanilla extract adds depth to berry leathers. Ginger gives tropical fruits an exciting kick. Fresh mint puréed with watermelon creates a refreshing summer treat. Start with small amounts—you can always make another batch with more spice if you love it.
Equipment Needed
You don’t need any fancy equipment to make incredible fruit leather at home. Here’s what you’ll need:
- Blender or Food Processor – To purée the fruit until completely smooth
- Fine-Mesh Strainer (Optional) – For removing seeds from raspberries or blackberries if desired
- Baking Sheet (Rimmed) – A half-sheet pan (13×18 inches) works perfectly
- Parchment Paper or Silicone Baking Mat – Essential for preventing sticking (do not use wax paper!)
- Spatula or Offset Spreader – For spreading the purée evenly
- Oven or Dehydrator – Either works wonderfully; dehydrators are slightly more efficient
- Scissors or Pizza Cutter – For cutting the finished leather into strips
- Parchment Paper for Storage – To wrap individual pieces and prevent sticking

Homemade Fruit Leather Recipe
This easy homemade fruit leather recipe transforms fresh or frozen fruit into delicious, chewy, naturally sweet snacks with no refined sugar or artificial ingredients. Perfect for lunch boxes, hiking trips, and healthy snacking!
- Total Time: 6-8 hours
- Yield: 12-16 fruit leather strips 1x
Ingredients
- 4 cups fresh or frozen fruit (strawberries, blueberries, mangoes, peaches, or your choice)
- 1-3 tablespoons honey or maple syrup (optional, adjust to taste)
- 1-2 tablespoons fresh lemon juice
- 1/4 teaspoon cinnamon (optional, great with apples or stone fruits)
- Pinch of salt (enhances fruit flavor)
Instructions
- Prepare Your Fruit: If using fresh fruit, wash thoroughly and remove any stems, pits, or tough skins. Chop larger fruits into chunks. Frozen fruit can be used directly from the freezer.
- Blend Until Smooth: Add all fruit to a high-powered blender or food processor. Add lemon juice and blend on high speed for 1-2 minutes until completely smooth with no chunks remaining. The mixture should be the consistency of a smoothie or thick applesauce.
- Taste and Adjust: Taste your fruit purée. If it’s tart, add sweetener 1 tablespoon at a time, blending between additions. Add optional spices like cinnamon or vanilla if desired. Remember, the flavors will concentrate slightly as the leather dries, so make it taste just slightly sweeter than you want the final product to be.
- Strain if Needed (Optional): If using seedy berries like raspberries or blackberries and you prefer a smoother leather, pour the purée through a fine-mesh strainer to remove seeds. Use a spatula to press the pulp through, extracting as much purée as possible. This step is optional—many people enjoy the added texture and fiber from the seeds.
- Prepare Your Pan: Line a rimmed baking sheet (half-sheet size works best) with parchment paper or a silicone baking mat. Do not use wax paper as it will stick. Make sure your parchment paper is completely flat with no wrinkles for the most even drying.
- Spread the Purée: Pour the fruit purée onto your prepared pan. Use an offset spatula or the back of a spoon to spread it evenly across the entire surface. Aim for about 1/8 to 1/4 inch thickness—thinner at the edges (as edges dry faster) and slightly thicker in the center. The more even your layer, the more evenly it will dry.
- Dehydrate Using Oven Method: Preheat your oven to its lowest setting (170-200°F is ideal). Place the baking sheet on the center rack and prop the oven door open slightly with a wooden spoon to allow moisture to escape. Dry for 6-8 hours, checking every 2 hours. The leather is done when it’s no longer sticky to the touch but still pliable and slightly tacky. It should peel away from the parchment easily.
- Dehydrate Using Dehydrator Method: Pour the purée onto dehydrator trays lined with fruit leather sheets or parchment paper. Set your dehydrator to 135°F and dry for 8-10 hours. Check after 6 hours—the leather is ready when it’s dry to the touch but still flexible, not brittle.
- Cool Completely: Once the leather is done, remove it from the oven or dehydrator and let it cool completely on the baking sheet for 30 minutes. This allows it to firm up slightly and makes cutting easier.
- Cut and Roll: While the leather is still on the parchment paper, use scissors or a pizza cutter to cut it into strips about 1-2 inches wide and 6-8 inches long. If desired, cut pieces of parchment paper the same size and roll each fruit leather strip up with a piece of parchment to prevent sticking.
- Store Properly: Place rolled fruit leather strips in an airtight container or zip-top bag. Store at room temperature for up to 2 weeks, in the refrigerator for up to 1 month, or in the freezer for up to 6 months.
Notes
- Thickness Matters: The key to evenly dried fruit leather is consistent thickness. Use an offset spatula and take your time spreading the purée evenly, making the edges slightly thinner than the center.
- Oven Temperature: If your oven’s lowest setting is above 200°F, leave the door propped open more to prevent cooking the fruit instead of drying it. You want to dehydrate, not bake.
- Don’t Overdry: Fruit leather should be pliable and slightly tacky, not brittle or crispy. If it shatters when you try to roll it, it’s overdried. It will also become slightly firmer after cooling.
- Seed Removal: Removing seeds is personal preference. Seeds add fiber and nutrients but can create a slightly grainy texture. Strawberry seeds are small and unnoticeable; raspberry and blackberry seeds are more prominent.
- Mixture Variations: Try combining fruits for complex flavors: strawberry-banana, mango-pineapple, apple-cinnamon, cherry-vanilla, or mixed berry. The possibilities are endless!
- Testing for Doneness: The leather should be dry to the touch but still flexible. Press your finger into the center—if it leaves an indentation or feels wet, it needs more time. If it feels leathery and peels away from the parchment easily, it’s ready.
- Prep Time: 15 minutes
- Cook Time: 6-8 hours (oven) or 8-10 hours (dehydrator)
- Category: Dessert
- Method: Dehydrating
- Cuisine: American
- Diet: Vegan
Nutrition
- Serving Size: 1 strip (approximately 1 oz)
- Calories: 35-45
- Sugar: 8g
- Sodium: 2mg
- Fat: 0g
- Saturated Fat: 0g
- Unsaturated Fat: 0g
- Trans Fat: 0g
- Carbohydrates: 10g
- Fiber: 1g
- Protein: 0g
- Cholesterol: 0mg
Tips & Variations
The wonderful thing about homemade fruit leather is how easily you can customize it to suit your taste preferences and dietary needs. Here are some delicious ways to make this recipe your own:
Flavor Combinations to Try:
- Strawberry-Banana: Classic and kid-approved
- Apple-Cinnamon: Tastes like apple pie in snack form
- Mango-Peach: Tropical and sweet
- Mixed Berry Medley: Combine strawberries, blueberries, raspberries, and blackberries
- Pineapple-Coconut: Add a tablespoon of coconut cream for tropical bliss
- Cherry-Vanilla: Sweet cherries with a splash of vanilla extract
- Watermelon-Mint: Refreshing summer treat
- Pear-Ginger: Sophisticated and warming
Make It Tart: If you prefer tangy fruit snacks, reduce or eliminate sweetener and add extra lemon or lime juice. Cranberries, tart cherries, and green apples make wonderfully zingy leather.
Add Veggie Power: Sneak vegetables into your fruit leather for extra nutrition! Blend in a handful of spinach (it turns everything green but you won’t taste it), cooked sweet potato (amazing with apple-cinnamon), or even cooked beets (beautiful color with strawberries).
Superfood Boost: Blend in chia seeds, ground flaxseed, or a scoop of protein powder for added nutrition. These work especially well in thicker fruit bases like banana or mango.
Make It Sparkle: Before drying, sprinkle the surface lightly with coarse sugar, cinnamon-sugar, or even edible glitter for a fun, festive touch that kids will love.
Create Patterns: Pour two different colored purées onto your pan and swirl them together with a toothpick for a marble effect. Or pour them side by side for rainbow fruit leather.
Pro Chef Tips
After making countless batches of fruit leather, I’ve picked up some professional tricks that make a real difference in the final product:
Use a Kitchen Scale: For the most consistent results, weigh your fruit. Four cups can vary significantly depending on how you pack it, but 16-20 ounces of fruit will give you consistent results every time.
Blend in Stages: Start blending on low speed to break down the fruit, then increase to high speed gradually. This prevents splashing and ensures the smoothest possible purée. Blend for a full 2 minutes—longer than you think you need.
Check Your Oven Temperature: Invest in an oven thermometer. Many ovens run hot or cool, and even a 25-degree difference can dramatically affect drying time. The ideal temperature is 170°F.
Rotate Your Pan: Halfway through drying, rotate your baking sheet 180 degrees. Ovens have hot spots, and this ensures more even drying.
The Offset Spatula Trick: When spreading your purée, hold the spatula at a 45-degree angle and use long, smooth strokes from one end of the pan to the other. This creates the most even layer possible.
Add Pectin for Quick-Set: If your fruit is very watery (like watermelon), add 1/2 teaspoon of commercial pectin to help it set better and reduce drying time.
Test Multiple Spots: Don’t just check the center for doneness—test the edges and several spots in the middle. Different areas may dry at different rates.
The Bend Test: When you think it’s done, carefully peel up a corner. It should bend without cracking but not feel sticky or wet. If it tears easily, it needs more time. If it cracks, you’ve gone slightly too far (but it’s still edible!).
Common Mistakes to Avoid
Even simple recipes have pitfalls. Here are the most common fruit leather mistakes and how to avoid them:
Using Wax Paper Instead of Parchment: This is the number one mistake! Wax paper will melt and stick permanently to your fruit leather. Always use parchment paper or silicone baking mats specifically designed for heat.
Spreading Too Thick in the Center: Many people pour all the purée in the middle and spread outward, creating a thick center that takes forever to dry while the edges get overdone. Pour the purée onto the pan first, then spread it evenly, making the edges slightly thinner.
Setting Oven Temperature Too High: If your oven is too hot (above 200°F), you’ll cook the fruit instead of dehydrating it, creating a brittle, candy-like texture instead of pliable leather. Low and slow is the key.
Opening and Closing the Oven Too Much: Every time you open the oven door, you release heat and slow down the drying process. Check on your leather, but don’t obsessively peek every 15 minutes. Trust the process.
Underdrying: It’s disappointing to roll up beautiful fruit leather only to have it stick to itself and create a gummy mess. Make sure it’s completely dry to the touch—slightly tacky is okay, but wet spots mean it needs more time. When in doubt, give it another hour.
Forgetting to Cool Before Cutting: Hot fruit leather is much stickier and harder to work with. Always let it cool completely (30 minutes) before attempting to cut or roll it.
Improper Storage: Fruit leather that isn’t completely dry will develop mold in storage. If you’re not sure it’s fully dried, store it in the refrigerator to be safe. And always separate individual pieces with parchment paper to prevent sticking.
Storage & Meal Prep
Proper storage is essential for keeping your homemade fruit leather fresh, chewy, and delicious for as long as possible.
Room Temperature Storage: If your fruit leather is completely dry with no sticky spots, it can be stored at room temperature in an airtight container or zip-top bag for up to 2 weeks. Make sure to separate individual pieces with squares of parchment paper to prevent them from sticking together. Store in a cool, dark place like a pantry—avoid hot spots near the stove or in direct sunlight.
Refrigerator Storage: For longer storage or if you live in a humid climate, keep your fruit leather in the refrigerator. It will stay fresh for up to 1 month when properly wrapped and stored in an airtight container. The cool temperature may make the leather slightly firmer, but it will soften to room temperature within a few minutes.
Freezer Storage: Fruit leather freezes beautifully! Roll individual strips in parchment paper, place them in a freezer-safe container or bag, and freeze for up to 6 months. To enjoy, simply remove from the freezer and let it thaw for 5-10 minutes at room temperature. It will be perfectly chewy and delicious.
Meal Prep Tips: Making fruit leather is the perfect weekend meal prep project. Dedicate a few hours on Sunday to making 2-3 large batches using different fruits. Cut them into individual portions, wrap in parchment paper, and store in labeled containers or bags. Now you have healthy snacks ready to grab all week for lunch boxes, after-school snacks, or whenever hunger strikes.
Storing for Gifts: Homemade fruit leather makes a wonderful gift! Roll strips individually in parchment paper, tie with twine or ribbon, and package in a decorative box or mason jar. Include a note about refrigerator storage and the best-by date.
Make-Ahead & Freezer Notes
Fruit leather is inherently a make-ahead food—it’s designed to be prepared in large batches and enjoyed over time.
Make-Ahead Strategy: This is a perfect recipe to make when you have free time and let it work while you do other things. Start your fruit leather in the morning, and it will be ready by dinner time (or overnight if using a dehydrator). You can prep multiple batches using different baking sheets if you have oven space.
Batch Cooking: Take advantage of seasonal fruit sales or your garden’s abundance by making large quantities at once. If you have multiple baking sheets, you can dry several batches simultaneously in the oven (just make sure air can circulate). When strawberries are $0.99/pound in June, make enough fruit leather to last until fall!
Freezer-Friendly: As mentioned in storage, fruit leather is extremely freezer-friendly. There’s no texture degradation from freezing—it tastes just as good as the day you made it. Package individual portions in parchment paper, then store in a large freezer bag. You can pull out just what you need without thawing the entire batch.
Thawing: There’s no special thawing required. Simply remove from the freezer and let sit at room temperature for 5-10 minutes. It thaws quickly and can even be eaten partially frozen on a hot day for a cool, refreshing treat.
Shelf-Stable Travel: Because fruit leather doesn’t require refrigeration (if properly dried), it’s perfect for travel, camping trips, hiking, and road trips. Pack it in your carry-on luggage, toss it in your backpack, or keep it in your car console for emergency snacks. It won’t melt, leak, or spoil.
Serving Suggestions
While fruit leather is absolutely perfect enjoyed on its own as a portable snack, there are creative ways to incorporate it into other treats and meals:
Lunch Box Additions: Roll up fruit leather and pack alongside cheese cubes, whole grain crackers, apple slices with almond butter, and raw veggies for a balanced, kid-approved lunch.
Trail Mix Upgrade: Cut fruit leather into small pieces and mix into homemade trail mix with nuts, seeds, dark chocolate chips, and coconut flakes for a sweet element.
Breakfast Parfait Topping: Cut fruit leather into decorative shapes and use as an edible garnish on yogurt parfaits, oatmeal bowls, or smoothie bowls.
Cheese Board Companion: Fancy up your cheese board by adding strips of fruit leather alongside fresh and dried fruits, nuts, and honey. It pairs especially well with creamy cheeses like brie or goat cheese.
Ice Cream Topper: Cut fruit leather into thin strips and use as a colorful, chewy topping for vanilla ice cream or frozen yogurt.
Campfire S’mores Twist: Replace your chocolate bar with fruit leather in s’mores for a fruity, less sweet variation that’s still absolutely delicious.
Beverage Stirrers: Roll fruit leather into tight spirals and use as edible stirrers for sparkling water, lemonade, or cocktails.
Pair With:
- Fresh fruit salad
- String cheese or cheese cubes
- Handful of almonds or cashews
- Homemade granola bars
- Apple slices with peanut butter
- Hard-boiled eggs
- Hummus and veggie sticks
FAQs Section
Can I make fruit leather without a dehydrator? Absolutely! Your regular oven works perfectly for making fruit leather. Simply set it to the lowest temperature (ideally 170-200°F), prop the door open slightly with a wooden spoon to allow moisture to escape, and dry for 6-8 hours. The results are just as good as using a dehydrator.
Why is my fruit leather sticky even after hours of drying? This usually happens for one of three reasons: the layer was spread too thick (especially in the center), the oven temperature was too low, or there wasn’t enough air circulation. Make sure your layer is thin and even (about 1/8 to 1/4 inch), your oven is at least 170°F, and the door is propped open slightly. If it’s still sticky after 8 hours, continue drying in 30-minute increments until it’s dry to the touch.
Can I use vegetables in fruit leather? Yes! Many vegetables work wonderfully when combined with fruit. Spinach, kale, sweet potato, butternut squash, carrots, and beets all blend well with fruits. The fruit masks the vegetable flavor while you get the nutritional benefits. Start with a 3:1 ratio of fruit to vegetables and adjust from there.
How do I know when my fruit leather is done? The leather is ready when it’s dry to the touch but still pliable and slightly tacky. It should peel away from the parchment paper easily without leaving wet spots behind. Press your finger gently into the center—if it leaves an indentation or feels wet, it needs more time. The edges will dry faster than the center, so always test multiple spots.
Can I make fruit leather with frozen fruit? Frozen fruit works beautifully for fruit leather! In fact, it’s often more economical than fresh, especially for berries. There’s no need to thaw it first—just blend it straight from frozen. Frozen fruit may release more liquid than fresh, so your drying time might be slightly longer, but the results are equally delicious.
My fruit leather turned out too brittle and breaks when I try to roll it. What went wrong? This means your leather was overdried. Fruit leather should be flexible and pliable, not crispy or brittle. Reduce your drying time by 1-2 hours next batch, or check it more frequently toward the end of drying. The good news is that overdried fruit leather is still edible—it just breaks into pieces instead of rolling. You can still enjoy it as fruit chips!
How long does homemade fruit leather last? When stored properly in an airtight container at room temperature, fruit leather lasts about 2 weeks. In the refrigerator, it extends to 1 month. For longest storage, freeze it for up to 6 months. Always separate individual pieces with parchment paper to prevent sticking, and make sure the leather is completely dry before storing to prevent mold growth.
Conclusion
Making homemade fruit leather is one of those simple kitchen projects that delivers such incredible rewards. With just fruit and a few hours of mostly hands-off time, you can create dozens of healthy, delicious, portable snacks that beat anything you’ll find at the store. The pure fruit flavor, chewy texture, and vibrant colors make these fruit leathers irresistible to kids and adults alike.
I love that this recipe gives you complete control over ingredients—no artificial colors, no high-fructose corn syrup, no preservatives, and no mystery ingredients you can’t pronounce. Just pure, concentrated fruit goodness that you can feel great about serving your family. Plus, it’s an incredibly satisfying way to reduce food waste by using up fruit that’s past its prime or taking advantage of seasonal abundance.
Whether you’re meal-prepping snacks for the week, looking for healthy lunch box additions, planning for your next camping trip, or simply craving a naturally sweet treat, homemade fruit leather has you covered. The basic technique is so forgiving and simple that even beginning cooks will have success, while the endless flavor combinations keep it interesting for experienced kitchen enthusiasts.
I hope you’ll give this homemade fruit leather recipe a try! Once you make your first batch and taste the incredible difference compared to store-bought versions, you’ll be hooked. Take a photo of your beautiful fruit leather creations and share it on Pinterest to inspire other home cooks. And if you have questions or want to share your favorite flavor combinations, I’d love to hear from you in the comments below!
Happy fruit leather making—here’s to healthy, delicious snacking made with your own hands! 🍓