Irresistible Garlic Bread Cheese Dip – Warm, Cheesy, and Loaded with Flavor!
Imagine taking everything you love about garlic bread – that buttery, garlicky, herb-infused deliciousness – and transforming it into a warm, creamy, ultra-cheesy dip that’s perfect for scooping up with crusty bread pieces or crackers. That’s exactly what this garlic bread cheese dip delivers! This crowd-pleasing appetizer combines cream cheese, mozzarella, Parmesan, tons of roasted garlic, butter, and Italian herbs into one outrageously delicious baked dip that tastes exactly like your favorite garlic bread, but in dippable form.
This easy garlic bread dip has taken the internet by storm, and for good reason. It’s the ultimate party appetizer that looks impressive but requires minimal effort – just mix everything together, pop it in the oven, and watch it transform into a bubbling, golden, irresistibly cheesy masterpiece. The top gets gloriously golden and slightly crispy while the inside stays warm, gooey, and loaded with stretchy melted cheese.
Whether you’re hosting a game day party, planning a casual get-together, bringing something special to a potluck, or just craving some serious comfort food, this cheesy garlic bread dip is your answer. It’s rich, indulgent, packed with garlic flavor, and absolutely addictive. Serve it with toasted baguette slices, breadsticks, crackers, or even vegetables, and watch as everyone gathers around the dip bowl. Fair warning: this stuff disappears fast, so you might want to make two batches! Once people taste that perfect combination of garlic, butter, herbs, and melted cheese, there’s no stopping them from going back for more.
History / Background
Garlic bread cheese dip is a modern American creation that brilliantly combines two beloved classics: garlic bread and hot cheese dip. To understand this recipe’s appeal, we need to look at both of its delicious parent dishes.
Garlic bread itself has Italian-American roots. While Italians have been enjoying bread with garlic for centuries (bruschetta, anyone?), the butter-laden, heavily garlicked bread we know as “garlic bread” is distinctly Italian-American. It emerged in the United States in the early-to-mid 20th century as Italian immigrants adapted their traditional garlic-rubbed bread to American tastes and ingredients. The addition of generous amounts of butter, sometimes Parmesan cheese, and parsley created the garlic bread that became a staple of Italian-American restaurants and home dining rooms across America.
Hot cheese dips, on the other hand, became wildly popular in American cuisine during the 1950s through 1980s with the rise of casual entertaining and the Super Bowl party phenomenon. Dips like spinach artichoke dip, queso, and buffalo chicken dip became go-to party foods – they were easy to make, could feed a crowd, stayed warm in chafing dishes or slow cookers, and were universally loved.
The genius idea to combine these two concepts – transforming the flavors of garlic bread into a hot, cheesy dip – emerged in the food blogging and recipe development community of the 2010s. As home cooks sought creative twists on classic appetizers, someone had the brilliant idea to take all those beloved garlic bread flavors (butter, garlic, herbs, Parmesan) and incorporate them into a creamy, melted cheese base. The result was an instant hit.
This creamy garlic bread dip represents the best of modern American comfort food creativity – taking familiar, beloved flavors and reimagining them in new, exciting ways. It’s also part of the broader trend of “deconstructed” dishes where classic recipes are transformed into different formats. Just like how cookies became cookie dough dip and pizza became pizza dip, garlic bread became this incredible, shareable appetizer that captures all the magic of the original in a fun, interactive format.
The recipe spread rapidly through Pinterest, food blogs, and social media because it hits all the right notes: it’s easy to make, uses readily available ingredients, looks impressive when served, and most importantly, tastes absolutely amazing. Today, garlic bread dip is a staple at parties across America, with countless variations appearing as creative cooks add their own twists to this now-classic appetizer.
Why You’ll Love This Recipe
This garlic bread cheese dip is about to become your most-requested party recipe, and here’s exactly why: it captures every single thing you love about garlic bread – that rich butter, those aromatic roasted garlic cloves, the perfect herb blend, the toasty golden top – and amplifies it all with multiple kinds of melty cheese, creating an incredibly indulgent dip that’s impossible to resist.
The beauty of this recipe is how it delivers maximum flavor with minimum effort. You’re essentially just mixing ingredients together and baking – no complicated techniques, no special skills required. Yet the result looks and tastes like something from a fancy restaurant appetizer menu. The combination of cream cheese for smoothness, mozzarella for that gorgeous cheese pull, and Parmesan for sharp, nutty depth creates the perfect cheese blend that’s creamy without being heavy and flavorful without being overwhelming.
Here’s what makes this recipe absolutely irresistible:
- Ready in 30 minutes – From prep to table, this comes together incredibly quickly for such an impressive dish
- Perfect garlic flavor – Roasting the garlic mellows it and brings out sweet, nutty notes without harsh bite
- Ultimate cheese pull – The mozzarella creates those Instagram-worthy cheese strings everyone loves
- Crowd-pleaser guaranteed – I’ve never met anyone who doesn’t love garlic bread, and this dip version is even better
- Make-ahead friendly – Assemble hours ahead and bake when guests arrive, or bake ahead and reheat
- Budget-friendly – Uses simple, inexpensive ingredients that you probably already have
- Versatile serving – Works with bread, crackers, vegetables, or even as a spread for sandwiches
- Easy to scale – Double or triple the recipe easily for larger crowds
- Vegetarian-friendly – Perfect for vegetarian guests looking for satisfying party food
- No boiling required – Unlike traditional garlic bread, no need to toast separate bread slices
- Impressive presentation – Looks like you spent hours on it when you barely spent any time at all
- Customizable – Add your own twists with different cheeses, herbs, or mix-ins
Ingredient Notes
Let’s break down what makes this garlic bread cheese dip so incredibly delicious and why each ingredient matters:
Cream Cheese – The foundation of the dip, providing smooth, creamy texture and mild tanginess that balances the rich butter and cheese. Cream cheese helps bind everything together and creates that luxurious, spreadable consistency. Always use full-fat cream cheese for the best texture and richness. Let it soften to room temperature before mixing for smooth, lump-free results. Substitution: Mascarpone creates an even richer, slightly sweeter dip. Neufchâtel (lighter cream cheese) works but won’t be quite as creamy.
Mozzarella Cheese – This is what gives you those gorgeous cheese pulls! Mozzarella melts beautifully and creates that stretchy, gooey texture everyone loves. Use low-moisture mozzarella (the kind you shred yourself or buy pre-shredded) rather than fresh mozzarella, which has too much moisture and won’t melt properly. Shred your own if possible – pre-shredded has anti-caking agents that prevent the smoothest melting. Substitution: Provolone or Monterey Jack work well and provide similar meltability.
Parmesan Cheese – Adds sharp, nutty, umami-rich flavor that gives the dip depth and sophistication. Freshly grated Parmesan melts better and tastes significantly better than the pre-grated stuff in the green can. Parmigiano-Reggiano is ideal but any good-quality Parmesan works. The Parmesan also contributes to that golden, slightly crispy top when baked. Substitution: Pecorino Romano is saltier and sharper but works beautifully. Grana Padano is similar to Parmesan.
Roasted Garlic – The star flavor of the show! Roasting garlic transforms it from sharp and pungent to sweet, mellow, and almost buttery. Roasted garlic has a completely different flavor profile than raw garlic – it’s much more subtle and complex. One whole head of roasted garlic (about 8-10 cloves) provides robust garlic flavor without overwhelming heat. Substitution: If you’re short on time, you can use 2 teaspoons of garlic powder, but the flavor won’t be as complex. Sautéed minced fresh garlic works but is sharper.
Butter – Essential for that classic garlic bread richness and flavor. Butter adds silkiness to the dip and carries the garlic and herb flavors throughout. Use unsalted butter so you can control the salt level in the recipe. Room temperature butter incorporates more easily. Substitution: You can use olive oil for a slightly healthier option with different but still delicious flavor.
Mayonnaise – A secret ingredient that adds creaminess, moisture, and helps everything blend together smoothly. Mayo also helps prevent the dip from drying out during baking. Don’t skip it – you won’t taste it distinctly, but you’ll notice if it’s missing. Substitution: Sour cream works but adds tanginess. Greek yogurt can work but may thin the dip slightly.
Italian Seasoning – A blend of dried herbs (typically oregano, basil, thyme, and rosemary) that gives the dip its classic Italian flavor profile, just like garlic bread! This is convenient and provides consistent flavor. Substitution: Use individual dried herbs – 1 teaspoon each of oregano and basil, plus ½ teaspoon each of thyme and rosemary.
Fresh Parsley – Adds brightness, color, and fresh herb flavor that balances the rich, heavy cheese and butter. Fresh parsley is traditional on garlic bread and provides visual appeal. Substitution: Fresh basil is delicious. Dried parsley works but lacks the fresh, bright note.
Red Pepper Flakes (optional) – A pinch adds subtle warmth and complexity without making the dip spicy. This is traditional in many Italian dishes.
Salt and Black Pepper – Essential for bringing out all the other flavors. Don’t underestimate proper seasoning!
Equipment Needed
This recipe requires very minimal equipment, which is part of its appeal!
- Baking dish – An 8×8-inch square or 9-inch round baking dish works perfectly. You can also use a cast-iron skillet for rustic presentation.
- Mixing bowl – Medium to large bowl for combining all the ingredients
- Hand mixer or stand mixer (optional but helpful) – Makes mixing the cream cheese and other ingredients smooth and easy
- Spatula or wooden spoon – For stirring and spreading the dip
- Sharp knife and cutting board – For chopping parsley and preparing ingredients
- Measuring cups and spoons – For accurate ingredient amounts
- Box grater or food processor – For shredding cheese if not using pre-shredded
- Aluminum foil – For roasting garlic and covering the dip if needed during baking
- Oven mitts – The baking dish will be hot!
- Serving spoon or spatula – For serving the dip
Optional but nice to have:
- Cast iron skillet – For beautiful rustic presentation and even heat distribution
- Piping bag – For decorative presentation if you want to pipe the mixture into the dish
- Broiler-safe baking dish – If you want to broil the top for extra golden color

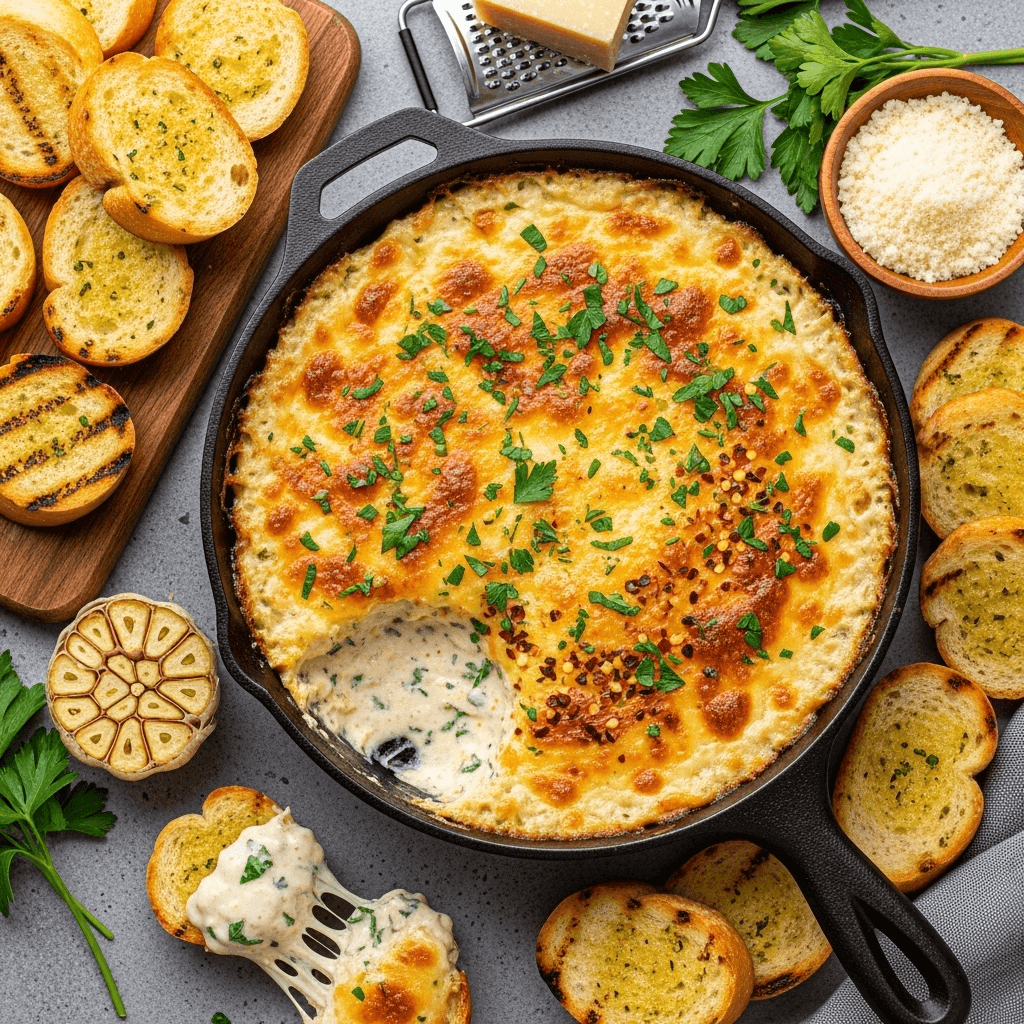
Irresistible Garlic Bread Cheese Dip
This warm, creamy garlic bread cheese dip combines cream cheese, mozzarella, and Parmesan with roasted garlic, butter, and Italian herbs for the ultimate party appetizer! It tastes just like garlic bread but in dippable form – rich, garlicky, cheesy, and absolutely irresistible. Baked until golden and bubbly, this easy dip is perfect for any gathering!
- Total Time: 30 minutes
- Yield: 8-10 servings (about 3 cups of dip) 1x
Ingredients
For Roasted Garlic:
- 1 whole head of garlic
- 1 teaspoon olive oil
- Pinch of salt
For the Dip:
- 8 oz cream cheese, softened to room temperature
- 1½ cups shredded mozzarella cheese (about 6 oz), divided
- ½ cup grated Parmesan cheese, divided
- ¼ cup mayonnaise
- 3 tablespoons unsalted butter, melted
- 1 whole head roasted garlic (about 8-10 cloves), mashed into a paste
- 2 teaspoons Italian seasoning
- ¼ cup fresh parsley, finely chopped, divided
- ¼ teaspoon red pepper flakes (optional)
- ½ teaspoon salt
- ¼ teaspoon black pepper
For Serving:
- Toasted baguette slices
- Crackers
- Breadsticks
- Vegetable sticks (optional)
- Extra fresh parsley for garnish
Instructions
- Roast the garlic (if not already prepared). Preheat oven to 400°F (200°C). Cut about ¼ inch off the top of the garlic head to expose the cloves. Place on a piece of aluminum foil, drizzle with olive oil and sprinkle with salt. Wrap tightly in foil. Roast for 35-40 minutes until the cloves are soft, golden, and caramelized. Let cool, then squeeze the soft cloves out of their skins and mash into a smooth paste with a fork. Set aside.
- Preheat your oven to 375°F (190°C) if not already hot from roasting garlic. Lightly grease an 8×8-inch baking dish or 9-inch cast-iron skillet with butter or cooking spray.
- Mix the dip base by combining the softened cream cheese, mayonnaise, melted butter, and roasted garlic paste in a large mixing bowl. Use a hand mixer or sturdy spatula to beat until smooth, creamy, and well combined with no lumps. The mixture should be fluffy and uniform in color.
- Add most of the cheese and seasonings by folding in 1 cup of the mozzarella cheese, ⅓ cup of the Parmesan cheese, Italian seasoning, 3 tablespoons of the fresh parsley, red pepper flakes (if using), salt, and black pepper. Stir until everything is evenly distributed throughout the cream cheese mixture. Taste and adjust seasoning if needed – it should be well-seasoned and garlicky!
- Transfer to baking dish by spreading the mixture evenly into your prepared baking dish, smoothing the top with a spatula. The mixture should fill the dish in an even layer about 1-1½ inches thick.
- Add the topping by sprinkling the remaining ½ cup mozzarella cheese and remaining Parmesan cheese evenly over the top of the dip. This creates that beautiful golden, bubbly, slightly crispy top layer.
- Bake for 18-22 minutes, until the dip is hot and bubbly throughout, and the cheese on top is melted and turning golden brown in spots. You should see the edges bubbling and the top should be beautifully golden. For extra browning, turn on the broiler for the last 1-2 minutes, watching carefully to prevent burning.
- Cool slightly for 3-5 minutes before serving. This allows the dip to set slightly and prevents burnt tongues! The dip will be extremely hot straight from the oven.
- Garnish and serve by sprinkling the remaining fresh parsley over the top and serving immediately while warm and gooey. Provide toasted baguette slices, crackers, or breadsticks for dipping.
Notes
- Roasted garlic ahead: Roast garlic up to 3 days ahead and store refrigerated in an airtight container. This saves time on party day!
- No roasted garlic? In a pinch, use 2 teaspoons garlic powder or 3-4 cloves of minced fresh garlic sautéed in butter, but roasted garlic provides the best flavor.
- Make it ahead: Assemble the dip completely (through step 5), cover, and refrigerate for up to 24 hours. Add the cheese topping and bake when ready to serve, adding 5 minutes to the baking time since it starts cold.
- Keeping warm: Keep the dip warm in a small slow cooker on low or warm setting for parties.
- Consistency: If the dip seems too thick, stir in 1-2 tablespoons of milk or cream before baking.
- Cast iron magic: Baking in a cast-iron skillet creates beautiful presentation and keeps the dip warm longer.
- Crispy top: For an extra crispy, golden top, broil for 1-2 minutes at the end of baking, watching carefully.
- Prep Time: 10 minutes
- Cook Time: 20 minutes
- Category: Appetizer
- Method: Baking
- Cuisine: Italian-American
- Diet: Vegetarian
Nutrition
- Serving Size: ⅓ cup dip (without bread/crackers)
- Calories: 245
- Sugar: 1g
- Sodium: 420mg
- Fat: 21g
- Saturated Fat: 12g
- Unsaturated Fat: 8g
- Trans Fat: 0g
- Carbohydrates: 4g
- Fiber: 0g
- Protein: 10g
- Cholesterol: 60mg
Tips & Variations
The basic garlic bread cheese dip is incredible, but here are some creative ways to customize it for different tastes:
Cheese Variations:
- Extra cheesy: Increase mozzarella to 2 cups and Parmesan to ¾ cup
- Four-cheese: Add ½ cup each of Asiago and Fontina for more complex flavor
- Sharp cheddar addition: Mix in ½ cup sharp white cheddar for extra tanginess
- Smoked mozzarella: Use smoked mozzarella for deeper, smokier flavor
- Burrata finish: Top with torn burrata cheese in the last 5 minutes of baking for ultra-creamy luxury
Flavor Add-Ins:
- Spinach artichoke style: Fold in 1 cup frozen spinach (thawed and squeezed dry) and ½ cup chopped artichoke hearts
- Sun-dried tomato: Add ⅓ cup chopped sun-dried tomatoes for sweetness and tang
- Bacon lovers: Stir in ½ cup crumbled cooked bacon
- Caramelized onions: Add ½ cup caramelized onions for sweet depth
- Roasted red peppers: Mix in ⅓ cup diced roasted red peppers
- Fresh basil: Use fresh basil instead of or in addition to parsley for more Italian flavor
- Lemon zest: Add 1 teaspoon lemon zest for brightness
Spice It Up:
- Add diced jalapeños or banana peppers
- Increase red pepper flakes to ½-1 teaspoon
- Mix in ¼ teaspoon cayenne pepper
- Swirl in some hot honey before baking
- Top with everything bagel seasoning instead of herbs
Healthier Modifications:
- Use reduced-fat cream cheese and part-skim mozzarella
- Replace half the cream cheese with Greek yogurt
- Use olive oil instead of butter
- Add vegetables like spinach, artichokes, or roasted red peppers for nutrition
- Serve with vegetable sticks instead of bread
Protein Additions:
- Shredded rotisserie chicken (1 cup) for a heartier dip
- Crab meat for an elegant seafood twist
- Crumbled Italian sausage for meaty richness
- Pepperoni pieces for pizza-style flavor
Different Herb Profiles:
- French style: Use herbes de Provence and add fresh thyme
- Greek inspired: Add oregano, lemon zest, and serve with pita
- Ranch style: Use ranch seasoning instead of Italian seasoning
- Everything bagel: Top with everything bagel seasoning
Pro Chef Tips
Want to take your garlic bread cheese dip from delicious to absolutely restaurant-worthy? Here are professional techniques:
Roast your own garlic: This is THE most important tip! Store-bought roasted garlic or garlic powder simply cannot compare to homemade roasted garlic. Roasting transforms harsh, pungent raw garlic into sweet, mellow, almost buttery cloves with complex, nutty flavors. The difference in the final dip is dramatic. Roast several heads at once and store extras in the fridge – you’ll use them in everything!
Room temperature ingredients are crucial: Cold cream cheese will never mix smoothly, leaving lumps in your dip. Let cream cheese, butter, and eggs (if using) sit at room temperature for 30-60 minutes before starting. If you’re in a rush, microwave cream cheese for 10-15 seconds (unwrapped) to soften quickly, being careful not to melt it.
Shred your own cheese: Pre-shredded cheese contains anti-caking agents (usually cellulose) that prevent smooth melting and can make your dip grainy or separated. Buying a block and shredding it yourself takes an extra 2 minutes but makes a noticeable difference in texture. The dip will be smoother and the cheese will melt more beautifully.
Season generously: Cheese and cream cheese are mild, so this dip needs assertive seasoning to taste amazing rather than bland. Don’t be shy with the salt, garlic, and Italian seasoning. Always taste the mixture before baking and adjust – it should taste well-seasoned and garlicky even before cooking. Remember that baking will mellow flavors slightly.
Create texture contrast: The beauty of this dip is the contrast between the creamy interior and the golden, slightly crispy top. Reserve some cheese for topping rather than mixing it all in – this creates that gorgeous broiled cheese crust. You can even add a layer of panko breadcrumbs mixed with melted butter on top for extra crunch.
Don’t overbake: The dip is done when it’s hot, bubbly around the edges, and the cheese on top is melted and golden. Overbaking dries out the dip and can make the cheese separate or become oily. Check at 18 minutes – if it’s bubbling and golden, it’s ready!
The broiler finish: For that restaurant-quality golden brown top with slight char spots, finish under the broiler for 1-2 minutes. Watch it like a hawk though – it goes from perfect to burnt in seconds. This creates amazing flavor and visual appeal.
Let it rest: As tempting as it is to dive right in, letting the dip rest for 3-5 minutes after baking allows it to set slightly. This makes it easier to scoop and prevents mouth-burning. The wait is worth it!
Serve in the right vessel: Cast iron retains heat beautifully, keeping your dip warm longer. If using a regular baking dish, consider placing it on a warming tray or thick cutting board to insulate it. A cold countertop will cool the dish quickly.
Toast your dippers: Whether using baguette slices, crackers, or breadsticks, warm or toasted dippers are infinitely better than room temperature ones. Brush baguette slices with olive oil or butter and toast until golden – they’ll taste amazing and hold up better to the thick dip.
Common Mistakes to Avoid
Even though this recipe is straightforward, a few common pitfalls can affect your results:
Using cold cream cheese – This is the number one mistake! Cold cream cheese is impossible to mix smoothly, leaving lumps throughout your dip no matter how much you stir. Those lumps won’t disappear during baking – they’ll just be hot lumps. Always let cream cheese soften to room temperature (it should be soft enough to easily press your finger into) or soften carefully in the microwave for 10-15 seconds. The dip should be completely smooth before baking.
Not roasting the garlic or using too little – Raw garlic is harsh and overwhelming in this dip, and garlic powder, while acceptable, doesn’t provide the same depth. Roasted garlic is what makes this taste authentically like garlic bread – sweet, mellow, complex. Don’t skimp! One whole head (8-10 cloves) seems like a lot but roasting tames it. If your dip doesn’t taste garlicky enough, you didn’t use enough roasted garlic.
Overmixing or undermixing – Mix just until the ingredients are combined and smooth. Overmixing can incorporate too much air, making the dip puffy and less creamy. Undermixing leaves streaks of cream cheese or pockets of seasoning. Mix until uniform in color and texture, then stop.
Baking at too high temperature – Temperatures above 400°F can cause the cheese to separate and become oily, or the top to brown before the inside is hot. Stick to 375°F for even heating and beautiful melting. If your oven runs hot, reduce to 350°F and bake a few minutes longer.
Not seasoning enough – Bland cheese dip is disappointing! The mixture should taste well-seasoned and garlicky before baking. Remember that cheese and cream cheese are mild bases that need assertive seasoning. Taste the mixture (it’s safe – no raw eggs or meat) and adjust salt, garlic, and herbs until it tastes delicious.
Serving too hot or too cold – Straight from the oven, this dip is lava-hot and will burn mouths. Let it rest 3-5 minutes. On the flip side, this dip is meant to be served warm – once it cools completely, the cheese firms up and it’s not nearly as good. Keep it warm in a slow cooker or reheat portions as needed during parties.
Wrong serving vessel – Serving this in a bowl on a cold counter means it will cool quickly and lose that melty, gooey texture. Use a cast-iron skillet, warming tray, or place the baking dish on a thick cutting board or trivet to insulate it from the cold counter.
Storage & Meal Prep
Garlic bread cheese dip stores well and reheats beautifully, making it great for meal prep or enjoying leftovers!
Refrigerator Storage: Store leftover dip in an airtight container in the refrigerator for up to 4 days. The dip will firm up and solidify as it cools (this is normal with cream cheese-based dips). It will look quite different from when it was hot and bubbly, but don’t worry – it comes right back to life when reheated!
Reheating Instructions: The microwave is quickest: transfer desired portion to a microwave-safe bowl, cover loosely, and heat in 30-second intervals, stirring between each, until hot and smooth (usually 1-2 minutes total depending on amount). For larger portions or the whole batch, reheat in a 325°F oven for 15-20 minutes until hot and bubbly again, covering with foil if the top is browning too much. You can also reheat in a small slow cooker on low for 45-60 minutes, stirring occasionally.
Restoring Texture: If the reheated dip seems too thick or separated, stir in 1-2 tablespoons of milk, cream, or melted butter until it reaches the desired consistency. Whisk vigorously as it heats to recombine any separated fats.
Shelf Life: Properly stored dip maintains good quality for 3-4 days refrigerated. The garlic flavor actually intensifies slightly over time, which many people love! After 4 days, the quality begins to decline and it should be discarded.
Portion Control: For meal prep or easy reheating, divide leftover dip into individual serving containers (about ½ cup each). Reheat only what you need for quick snacks throughout the week.
Make-Ahead & Freezer Notes
This garlic bread dip is fantastic for make-ahead preparation, taking all the stress out of entertaining!
Make-Ahead Option 1 (Fully Assembled, Unbaked): This is the best method! Prepare the entire dip through step 6 (assembled in the baking dish with cheese topping), cover tightly with plastic wrap or aluminum foil, and refrigerate for up to 24 hours. When ready to serve, remove from refrigerator, let sit at room temperature for 15 minutes, then bake as directed, adding 5-8 extra minutes to the baking time since it starts cold. The dip should be bubbling and golden when done.
Make-Ahead Option 2 (Fully Baked): Bake the dip completely, let it cool, cover, and refrigerate for up to 3 days. Reheat in a 325°F oven for 15-20 minutes until hot and bubbly again. This method is slightly less ideal because reheated dip won’t be quite as perfectly smooth as freshly baked, but it’s still delicious and incredibly convenient.
Roasted Garlic Prep: Roast garlic up to 1 week ahead! Store the roasted, peeled cloves in an airtight container covered with olive oil in the refrigerator. This saves significant time on party day and the garlic-infused oil can be used for other cooking.
Freezing Instructions: Yes, you can freeze this dip! Assemble completely (unbaked), wrap the baking dish tightly in plastic wrap then aluminum foil, and freeze for up to 2 months. To bake, you can either thaw overnight in the refrigerator then bake as directed (adding 5 minutes), or bake directly from frozen at 350°F for 35-45 minutes, covering with foil for the first 20 minutes. The dip should be hot throughout and bubbling.
Freezing Baked Dip: You can also freeze already-baked dip, though the texture may be slightly different when reheated. Let cool completely, transfer to a freezer-safe container, and freeze for up to 2 months. Thaw overnight in the refrigerator and reheat thoroughly before serving.
Texture After Freezing: Cream cheese-based dips can sometimes become slightly grainy after freezing due to the dairy separating slightly. Vigorous stirring while reheating and adding a tablespoon or two of cream usually fixes this. The flavor remains excellent!
Party Planning Tip: Make two smaller batches instead of one large one. Bake the first batch when guests arrive, and have the second one assembled and ready in the fridge to bake halfway through the party. This ensures you always have hot, fresh dip available!
Serving Suggestions
Garlic bread cheese dip is incredibly versatile! Here’s how to serve it for maximum enjoyment:
Classic Dippers:
- Toasted baguette slices (the traditional and best choice) – slice a French baguette into ½-inch rounds, brush with olive oil or butter, and toast until golden
- Garlic breadsticks – store-bought or homemade, for meta garlic bread experience
- Crackers – Triscuits, Wheat Thins, water crackers, or butter crackers all work beautifully
- Pita chips – sturdy and perfect for scooping
- Naan bread – torn into pieces or cut into triangles
- Focaccia – cut into squares
- Soft pretzel bites – the salt complements the dip perfectly
- Ciabatta – torn into rustic chunks
Vegetable Dippers:
- Bell pepper strips (red, yellow, orange – sweeter than green)
- Celery sticks
- Carrot sticks
- Cucumber slices
- Cherry tomatoes
- Broccoli florets (blanched or raw)
- Cauliflower florets
- Zucchini rounds
Creative Serving Ideas Beyond Dipping:
- Pasta sauce: Thin with pasta water and toss with fettuccine or penne
- Pizza topping: Spread on pizza crust as a white sauce base
- Sandwich spread: Use as a spread for grilled cheese, paninis, or Italian subs
- Stuffed chicken: Use as a filling for stuffed chicken breasts
- Baked potato topping: Dollop on baked potatoes
- Burger topping: Melt over burgers for gourmet flavor
- Stuffed mushrooms: Fill large mushroom caps and bake
Complete Appetizer Spread: Serve your garlic bread dip as part of an Italian-themed appetizer table:
- Antipasto platter with salami, prosciutto, olives, and marinated vegetables
- Caprese salad skewers
- Bruschetta with tomatoes and basil
- Italian meatballs in marinara
- Arancini (fried rice balls)
- Stuffed mushrooms
- Fresh fruit and cheese board
Beverage Pairings:
- Wine: Italian red wines (Chianti, Sangiovese, Barbera) or crisp white wines (Pinot Grigio, Vermentino, Soave)
- Beer: Light lagers, pilsners, or wheat beers that won’t overpower the garlic
- Cocktails: Aperol Spritz, Negroni, or Italian Margarita
- Non-alcoholic: Sparkling water with lemon, Italian sodas, or iced tea
- Prosecco: For a celebratory touch that pairs beautifully with cheese
Presentation Tips: Serve the dip directly in the baking dish or cast-iron skillet for rustic charm. Garnish with extra fresh parsley, a drizzle of olive oil, or a sprinkle of red pepper flakes. Arrange your dippers artfully around the dip on a large wooden board or platter. Add fresh herbs, lemon wedges, or cherry tomatoes for color and visual interest.
For Different Occasions:
- Game day: Serve in a slow cooker with plenty of sturdy chips and breadsticks
- Dinner party: Present in a beautiful ceramic dish with homemade crostini
- Potluck: Transport in the baking dish covered with foil, reheat at the host’s house
- Casual gathering: Serve family-style with a variety of dippers and let guests help themselves
- Holiday party: Elevate with fresh herbs, good bread, and an elegant serving vessel
FAQs Section
Q: Can I use fresh garlic instead of roasted garlic? A: While you technically can, I really don’t recommend it. Fresh garlic, even when minced and sautéed, has a much sharper, more pungent flavor that can be overwhelming in this dip. Roasted garlic is what gives this recipe its signature mellow, sweet, almost buttery garlic flavor that tastes exactly like garlic bread. The roasting process transforms the garlic completely, caramelizing the sugars and mellowing the harsh compounds. If you’re absolutely in a pinch, you can use 3-4 cloves of minced fresh garlic sautéed in butter until fragrant, or 2 teaspoons of garlic powder, but the flavor won’t be nearly as complex or authentic. Roasted garlic is truly worth the extra time!
Q: Why is my garlic bread dip grainy or separated? A: This usually happens for a few reasons: (1) Using cold cream cheese that didn’t mix smoothly – always use room temperature cream cheese. (2) Using pre-shredded cheese with anti-caking agents that prevent smooth melting – shred your own cheese from a block for best results. (3) Baking at too high a temperature, causing the cheese to separate – stick to 375°F or lower. (4) Overbaking, which can cause the fats to separate from the cheese. To fix separated dip, whisk vigorously while adding a tablespoon or two of milk or cream, which should help it come back together. For prevention, use quality ingredients at the right temperature and don’t overbake.
Q: How do I make this dip ahead for a party? A: The best method is to assemble the entire dip in your baking dish (through adding the cheese topping), cover tightly with plastic wrap or foil, and refrigerate for up to 24 hours before your party. About 30-40 minutes before you want to serve, remove from the fridge, let it sit at room temperature for 10-15 minutes, then bake as directed, adding 5-8 extra minutes since it’s starting cold. Alternatively, you can bake it completely 1-2 days ahead, refrigerate, and reheat in a 325°F oven for 15-20 minutes before serving. Both methods work great and eliminate last-minute stress!
Q: Can I make this garlic bread dip in a slow cooker? A: Yes, though the texture will be different – you won’t get that golden, slightly crispy top that makes baked dip so appealing. To make in a slow cooker, mix all ingredients together (including all the cheese mixed in rather than saved for topping), transfer to a greased slow cooker, and cook on low for 2-3 hours or high for 1-1.5 hours, stirring occasionally, until hot and melted throughout. This method is great for keeping the dip warm during parties. For best results, bake it in the oven first to get that golden top, then transfer to a slow cooker on warm to keep it perfect throughout your event.
Q: What can I substitute for mayonnaise? A: The mayonnaise adds moisture, creaminess, and helps bind everything together, but if you don’t like mayo or don’t have it, you can use sour cream (adds tanginess) or Greek yogurt (adds tanginess and protein) in equal amounts. You can also increase the cream cheese by 2-4 ounces and add a tablespoon of milk to maintain the right consistency. Some people successfully substitute with additional melted butter (2-3 tablespoons), though this makes the dip richer. Don’t skip the moisture element entirely or the dip will be too thick and dry.
Q: How do I keep the dip warm during a party? A: The best method is to bake the dip in the oven to get that beautiful golden top, then transfer it to a small slow cooker set on “warm” or “low” to maintain perfect serving temperature throughout your party. Stir occasionally and add a splash of milk if it thickens too much. Alternatively, you can keep the baking dish on a warming tray or over a candle warmer. For smaller gatherings, serve the dip in the baking dish placed on a thick cutting board or trivet (to insulate from the cold counter) – it will stay warm for 20-30 minutes. You can also bake in batches, making smaller amounts fresh as needed.
Q: Can I make this dip dairy-free or vegan? A: Yes, with some substitutions! Use vegan cream cheese (Kite Hill or Miyoko’s work well), vegan mozzarella shreds (Violife melts nicely), and nutritional yeast in place of Parmesan. Replace butter with vegan butter or olive oil, and use vegan mayo. The texture and flavor will be somewhat different from the original, but it can still be delicious. Roasted garlic, herbs, and proper seasoning are key to making the vegan version flavorful. You may need to add a bit more salt since vegan cheeses tend to be milder than dairy versions.
Q: Why is my dip too thick or too thin? A: Consistency can vary based on the moisture content of your specific cream cheese and mayonnaise brands. If your dip is too thick (hard to scoop, more like a spread), stir in milk or cream 1 tablespoon at a time before baking until it reaches a scoopable, dippable consistency. If it’s too thin (runny, not holding together), you can add more shredded cheese (especially mozzarella, which melts thick and stretchy) or an extra 2-4 ounces of cream cheese. Remember that the dip will thicken slightly as it bakes and firms up a bit as it cools, so aim for slightly thinner than your ideal consistency before baking.
Conclusion
And there you have it – everything you need to know to make the most incredible, utterly addictive garlic bread cheese dip that’ll have everyone at your party fighting over the last scoop! This warm, gooey, outrageously cheesy dip proves that sometimes the best recipes come from taking two beloved classics and combining them into something even better. It’s got all the buttery, garlicky, herb-infused deliciousness of traditional garlic bread, but in a shareable, dippable format that’s perfect for parties and gatherings.
The magic of this easy garlic bread dip lies in its perfect balance of flavors and textures. The roasted garlic provides that sweet, mellow depth that makes it taste authentically like garlic bread, while the combination of cream cheese, mozzarella, and Parmesan creates a dip that’s creamy, stretchy, and full of that irresistible cheese pull. The golden, slightly crispy top gives way to a warm, velvety interior that clings beautifully to every piece of toasted bread or cracker. It’s comfort food heaven in a baking dish!
What I absolutely love about this recipe is how it manages to look and taste like something from a fancy restaurant appetizer menu while being incredibly simple to make. You’re literally just mixing ingredients together and baking – no complicated techniques, no special skills required. Yet when you bring this golden, bubbling masterpiece to the table, everyone will think you spent hours on it. It’s the kind of recipe that makes you look like a culinary genius with minimal effort!
Once you make this cheesy garlic bread dip, it’s going to become your signature party dish – the one people specifically request, the one that disappears first at every gathering, the one you’ll find yourself making over and over again because it’s just that good. And because it’s so easy to customize with different cheese combinations, add-ins, and flavor variations, you’ll never get bored making it. Each time can be a little different based on your mood or what you have on hand!
So preheat that oven, grab your cream cheese and roasted garlic, and get ready to create some seriously delicious magic. This garlic bread cheese dip is about to become your most-requested recipe, and you’ll love how simple it is to make something that brings so much joy to your table. Your friends and family are going to absolutely lose their minds over this stuff!
I can’t wait to hear about your garlic bread dip adventures! Drop a comment below and tell me all about it – did you make it for a party or just for your family? What did you serve it with? Did you try any creative variations? How quickly did it disappear? Did anyone guess it was so easy to make? Share your experiences, photos, and any tips you discovered along the way. Your stories and feedback help other home cooks and make this community so amazing!
Don’t forget to save this recipe to your Pinterest boards so you’ll always have it ready when you need an impressive appetizer! Pin it to your “Party Appetizers,” “Cheese Dip Recipes,” “Easy Entertaining,” “Italian Recipes,” or “Game Day Food” boards – wherever you keep your favorite crowd-pleasing recipes. This garlic bread cheese dip is absolutely Pinterest-worthy and your followers are going to love it!
If this recipe made your day (or your party!), please leave a rating and review! It helps other readers find this recipe and lets me know you loved it. Did the dip turn out perfectly? Were your guests impressed? Any modifications you made? I read every single comment and absolutely treasure hearing your stories. Now go make some cheesy, garlicky magic happen – your taste buds (and your party guests) will thank you! 🧄