Ingredients
For the Garlic Butter Mixture:
- 1 large round sourdough or Italian bread loaf (about 1 pound, 8-10 inches diameter)
- ¾ cup (1½ sticks) unsalted butter, softened to room temperature
- 4-5 large garlic cloves, minced or pressed (about 2 tablespoons)
- ¼ cup fresh parsley, finely chopped
- 2 tablespoons fresh chives, finely chopped (or 2 green onions, sliced thin)
- ½ teaspoon salt
- ¼ teaspoon black pepper
- ¼ teaspoon red pepper flakes (optional, for subtle heat)
For the Cheese Filling:
- 2 cups mozzarella cheese, shredded (about 8 ounces)
- 1 cup sharp cheddar cheese, shredded (about 4 ounces)
- Optional: ¼ cup Parmesan cheese, grated
For Garnish:
- Extra fresh parsley, chopped
- Flaky sea salt
Instructions
Step 1: Prepare Your Workspace and Preheat
Preheat your oven to 350°F (175°C). Line a large baking sheet with aluminum foil, leaving enough excess to fully wrap the bread later. Set aside.
Step 2: Make the Garlic Butter
In a medium bowl, combine softened butter, minced garlic, chopped parsley, chives, salt, black pepper, and red pepper flakes (if using). Mix thoroughly with a spoon until all ingredients are evenly distributed and the mixture is smooth and spreadable. The butter should be soft enough to spread easily but not melted.
Step 3: Cut the Bread in Crosshatch Pattern
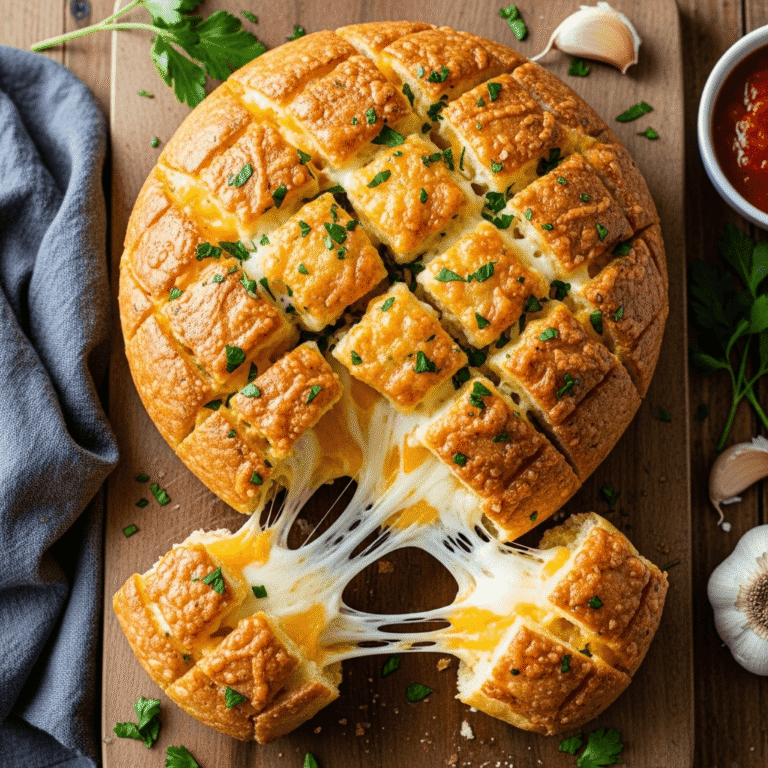
Place your bread loaf on a cutting board. Using a sharp serrated knife, make diagonal cuts across the bread about 1 inch apart, cutting down to about ¾ inch from the bottom – don’t cut all the way through the base. Turn the bread 90 degrees and repeat the diagonal cuts in the opposite direction, creating a diamond/crosshatch pattern. You should have a grid of cuts that create pull-apart sections while keeping the loaf intact at the bottom.
Step 4: Stuff with Garlic Butter
Place the cut bread on the foil-lined baking sheet. Using your fingers or a small spatula, gently pull apart the cuts to open up the crevices. Spread the garlic butter mixture generously into every cut, getting deep into each crack. Use about two-thirds of the butter mixture, making sure to coat all the exposed bread surfaces. You can also brush some butter on the top of the loaf.
Step 5: Add the Cheese
Stuff the shredded mozzarella and cheddar cheese into the cuts, distributing it as evenly as possible throughout all the crevices. Push the cheese down into the cuts so it reaches the bottom. Don’t worry if some cheese sits on top – it will melt down during baking. Reserve a small handful of cheese for topping.
Step 6: Add Final Butter and Cheese
Spread the remaining garlic butter over the top of the bread and into any spots you might have missed. Sprinkle the reserved cheese over the top surface of the bread for extra cheesy goodness and a golden finish.
Step 7: Wrap and Bake (Phase 1)
Wrap the bread completely in the aluminum foil, creating a sealed packet. Make sure it’s fully enclosed but not wrapped too tightly – you want to trap steam while allowing some room for heat circulation. Place in the preheated oven and bake for 15 minutes. This allows the butter to melt and soak into the bread while the cheese begins melting.
Step 8: Unwrap and Finish Baking (Phase 2)
Carefully remove the bread from the oven and open the foil, folding it down around the sides to expose the top of the bread. Return to the oven and bake uncovered for an additional 10-15 minutes, until the cheese is fully melted, bubbly, and the top of the bread develops golden-brown crispy edges. Watch carefully during the last few minutes to prevent over-browning.
Step 9: Garnish and Serve
Remove from oven and let rest for 3-5 minutes (this allows the cheese to set slightly and prevents burning mouths). Transfer the bread to a wooden serving board or platter. Sprinkle with extra fresh parsley and a pinch of flaky sea salt if desired. Serve immediately while hot and gooey, encouraging guests to pull apart the pieces with their hands.
Notes
- Cutting tip: Keep the base of the loaf intact by stopping your cuts about ¾ inch from the bottom. This keeps the bread together while allowing easy pull-apart pieces.
- Butter temperature matters: If butter is too cold, it won’t spread; if too melted, it will run off. Room temperature (soft but not melted) is perfect.
- Cheese distribution: Take time to really stuff cheese deep into the cuts for maximum gooeyness. Surface cheese alone won’t give you that full pull-apart experience.
- Foil wrapped baking: The initial covered baking steams the bread and ensures even melting; the uncovered phase creates the crispy top.
- Bread selection: Choose a bread with a sturdy crust and good structure. Soft sandwich bread will become too soggy.
- Make it ahead: Prepare completely through Step 6, wrap tightly, and refrigerate up to 24 hours before baking.
- Prep Time: 15 minutes
- Cook Time: 25 minutes
- Category: Appetizer
- Method: Baking
- Cuisine: American
- Diet: Vegetarian
Nutrition
- Serving Size: 1/10 of loaf (approximately 2-3 pull-apart pieces)
- Calories: 340
- Sugar: 2g
- Sodium: 520mg
- Fat: 22g
- Saturated Fat: 13g
- Unsaturated Fat: 7g
- Trans Fat: 0g
- Carbohydrates: 25g
- Fiber: 1g
- Protein: 11g
- Cholesterol: 60mg