Ingredients
Scale
For the Sliders:
- 1 package (12 count) Hawaiian sweet rolls
- ½ pound sliced deli salami
- ½ pound sliced deli ham
- ¼ pound sliced pepperoni
- 8-10 slices provolone cheese
- ½ cup sliced banana peppers or pepperoncini (optional but recommended)
- 2 tablespoons Dijon mustard (optional)
For the Garlic Butter Topping:
- ½ cup (1 stick) unsalted butter
- 3 cloves garlic, minced
- 1 tablespoon Italian seasoning
- ½ teaspoon onion powder
- ¼ teaspoon salt
- ¼ teaspoon black pepper
- 2 tablespoons grated Parmesan cheese (optional)
- 1 tablespoon fresh parsley, chopped (optional)
Instructions
- Preheat and Prep: Preheat your oven to 350°F (175°C). Lightly spray a 9×13-inch baking dish with cooking spray or line with parchment paper for easier cleanup.
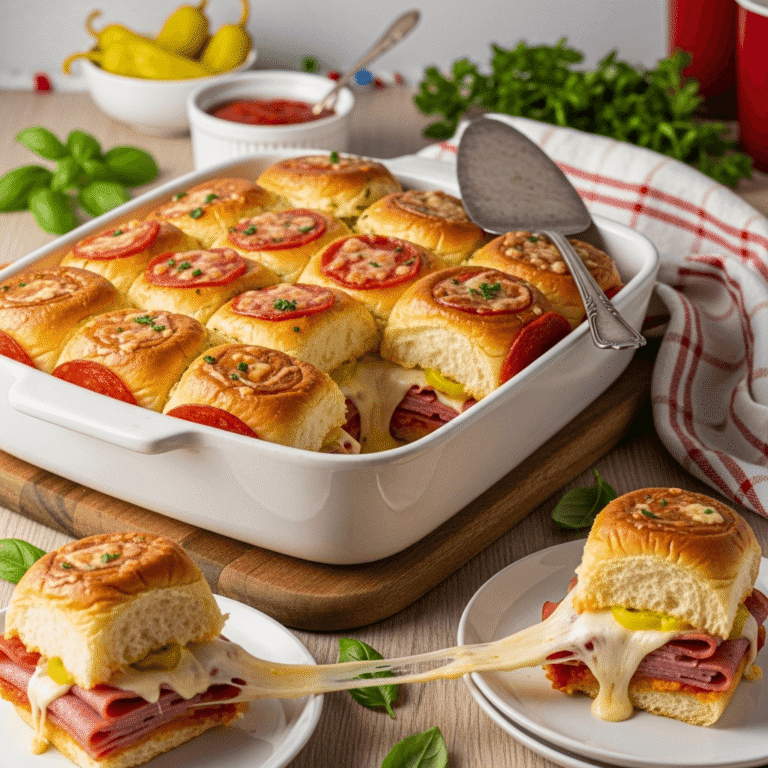
- Slice the Rolls: Without separating the individual rolls, use a large serrated knife to slice the entire block of Hawaiian rolls horizontally, creating a top half and bottom half. Keep the rolls connected—this makes assembly easier and creates that signature pull-apart effect. Place the bottom half of the rolls in your prepared baking dish.
- Add Mustard Layer (Optional): If using, spread the Dijon mustard evenly across the bottom layer of rolls. This adds a tangy kick that complements the meats beautifully.
- Layer the Meats: Start building your sliders by layering the meats. Fold each slice of salami in quarters and arrange evenly across the rolls. Do the same with the ham and pepperoni, creating even layers that cover all the rolls. Don’t worry about perfection—rustic layering works great and ensures every slider gets plenty of meat.
- Add Cheese and Peppers: Lay the provolone cheese slices over the meats, tearing pieces as needed to cover the entire surface. If using banana peppers or pepperoncini, scatter them evenly over the cheese layer. The peppers add authentic Italian sub flavor, so don’t skip them if you like a little tang!
- Top the Sliders: Place the top half of the rolls over the filling, creating a complete “sandwich slab.” Press down gently to compact everything slightly.
- Make the Garlic Butter: In a small saucepan over low heat (or in a microwave-safe bowl), melt the butter. Add the minced garlic, Italian seasoning, onion powder, salt, and pepper. Stir to combine and let it sit for 1-2 minutes to allow the flavors to infuse. The garlic will become fragrant and start to soften slightly.
- Brush the Topping: Using a pastry brush, generously brush the entire top of the rolls with the garlic butter mixture. Make sure to get into all the crevices between rolls—this ensures maximum flavor! If you have extra butter mixture, brush it on the sides of the rolls too. Sprinkle with Parmesan cheese and fresh parsley if using.
- Cover and Bake: Cover the baking dish tightly with aluminum foil. This is important—the foil traps steam, which helps the cheese melt and keeps the sliders moist. Bake covered for 10 minutes.
- Uncover and Finish: Remove the foil and continue baking for an additional 5-7 minutes, or until the tops are golden brown and the cheese is fully melted. The tops should be slightly crispy while the insides remain soft and gooey.
- Slice and Serve: Remove from the oven and let rest for 2-3 minutes (this makes slicing easier and prevents burns). Using a sharp serrated knife, cut along the lines between the rolls to separate into individual sliders. Serve immediately while warm and melty!
Notes
- Don’t Separate Rolls: Keep the rolls connected throughout assembly and baking—this is what makes them “sliders” and creates the pull-apart experience everyone loves.
- Meat Quantities: The amounts listed are guidelines. You want roughly 2-3 slices of meat per slider. Adjust based on your preference for meat-to-bread ratio.
- Cheese Coverage: Make sure cheese covers all the rolls. Overlap slices and tear pieces as needed to avoid any bare spots.
- Butter Application: Be generous with the garlic butter! It’s what makes these sliders truly special. Brush it thoroughly and don’t skip the edges.
- Foil is Important: Covering during the first part of baking creates steam that melts the cheese perfectly. Uncovering at the end crisps the tops.
- Serving Timing: These are best served immediately while the cheese is melty, but they’re still delicious at room temperature for up to 2 hours.
- Prep Time: 15 minutes
- Cook Time: 15 minutes
- Category: Appetizer
- Method: Baking
- Cuisine: Italian-American
- Diet: Gluten Free
Nutrition
- Serving Size: 1 slider
- Calories: 285
- Sugar: 6g
- Sodium: 890mg
- Fat: 16g
- Saturated Fat: 8g
- Unsaturated Fat: 7g
- Trans Fat: 0g
- Carbohydrates: 21g
- Fiber: 6g
- Protein: 14g
- Cholesterol: 45mg