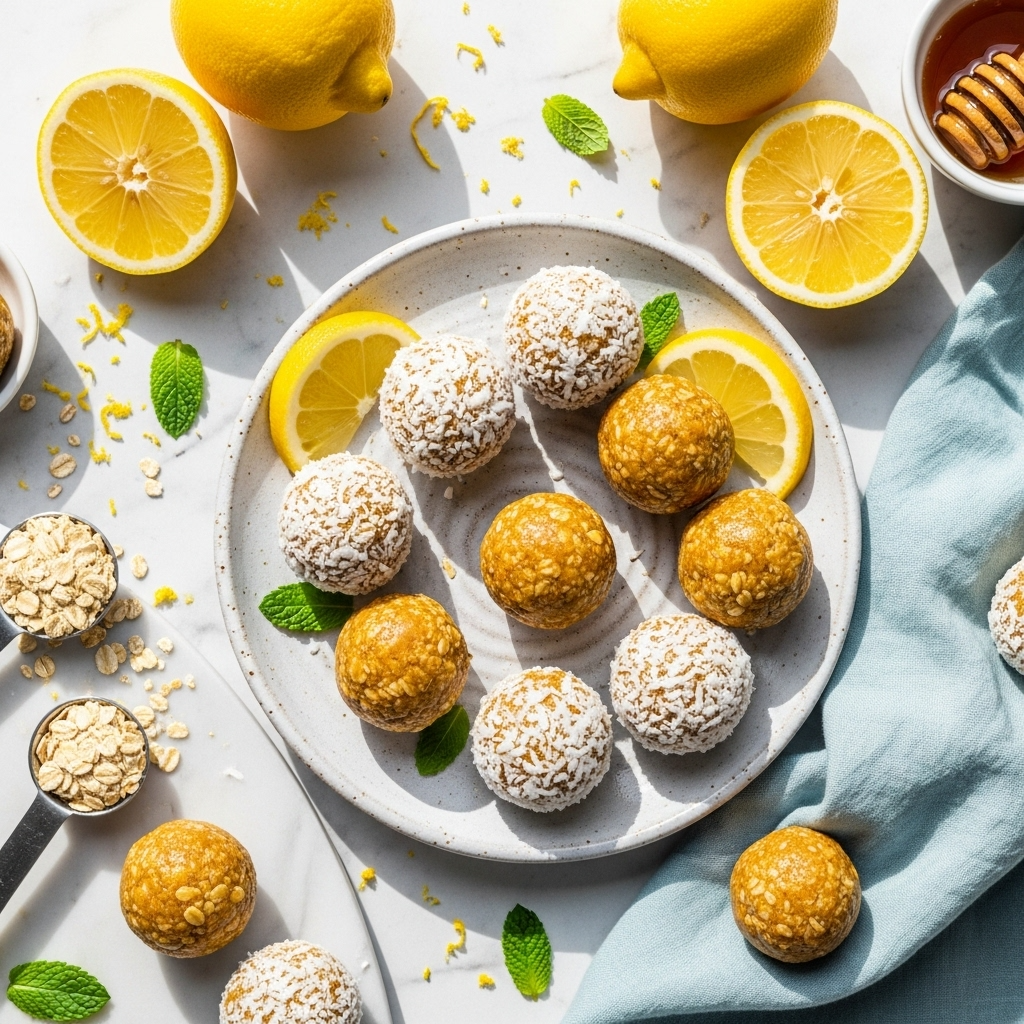
Lemon Protein Balls: Easy No-Bake Energy Bites Recipe

If you’re looking for a healthy snack that tastes like sunshine in every bite, these Lemon Protein Balls are about to become your new obsession! These no-bake energy bites combine the bright, refreshing flavor of fresh lemon with protein-packed ingredients to create the perfect guilt-free treat. Whether you need a quick breakfast on-the-go, a post-workout snack, or a sweet treat that won’t derail your healthy eating goals, these lemon protein balls deliver on all fronts.
What makes these easy lemon energy bites so special is their incredible versatility and simplicity. There’s no oven required, no complicated techniques, and you can whip up a batch in less than 15 minutes. They’re perfect for meal prep, lunchbox additions, afternoon pick-me-ups, or even as a healthier dessert option when you’re craving something sweet and tangy. The combination of protein powder, oats, and natural sweeteners creates a satisfying texture that’s chewy, slightly dense, and absolutely delicious.
These healthy lemon protein snacks are ideal for busy parents, fitness enthusiasts, students, professionals, or anyone who wants nutritious snacks readily available. They’re also wonderfully customizable – you can adjust the sweetness, add different mix-ins, or even coat them in shredded coconut for extra flair. Best of all, they stay fresh for over a week in the refrigerator, making them the ultimate make-ahead snack solution.
History / Background
While protein balls as we know them today are a relatively modern invention, the concept of combining nuts, seeds, dried fruits, and natural binders into portable energy-dense snacks dates back centuries. Ancient travelers and warriors often carried similar nutrient-packed foods for sustenance during long journeys. Think of the Persian travelers who made “haroseth” – a mixture of dates, nuts, and honey – or the Native American “pemmican” that combined dried meat with rendered fat and berries.
The modern protein ball trend emerged in the early 2000s alongside the fitness and wellness movement. As more people became interested in clean eating, plant-based nutrition, and convenient healthy snacks, food bloggers and health coaches began experimenting with no-bake energy bite recipes. The beauty of these creations was their simplicity: no cooking required, just wholesome ingredients blended together and rolled into perfectly portable spheres.
The lemon protein ball variation specifically gained popularity around 2015-2016 when citrus-flavored fitness snacks started trending on social media platforms like Pinterest and Instagram. Home cooks discovered that adding lemon zest and juice to the traditional protein ball formula created a refreshing alternative to the more common chocolate or peanut butter varieties. The bright, zesty flavor profile made these bites feel less like a “health food” obligation and more like a treat you actually wanted to eat.
Today, lemon protein balls have become a staple in the repertoires of meal prep enthusiasts, busy parents, and anyone following a health-conscious lifestyle. They represent the perfect intersection of convenience, nutrition, and flavor – proving that healthy eating doesn’t have to be boring or time-consuming.
Why You’ll Love This Recipe
These no-bake lemon energy balls are genuinely one of those recipes that checks every single box. They’re not just healthy – they’re actually delicious, which is sometimes rare when it comes to homemade protein snacks. The lemony brightness cuts through the natural sweetness and creates a flavor that’s refreshing and satisfying without being overly sugary or artificial-tasting.
Here’s why this recipe will become your go-to healthy snack:
- Super Quick & Easy – Ready in just 15 minutes with minimal hands-on time and zero baking required
- Protein-Packed – Each ball contains approximately 4-5 grams of protein to keep you satisfied between meals
- Naturally Sweetened – Uses honey or maple syrup instead of refined sugars for a cleaner ingredient list
- Budget-Friendly – Made with pantry staples that won’t break the bank, and one batch makes 20-24 balls
- Perfect for Meal Prep – Store in the fridge for up to 2 weeks or freeze for up to 3 months
- Kid-Approved – The sweet-tart lemon flavor appeals to children and adults alike
- Customizable – Easily adapt the recipe to accommodate dietary preferences or allergies
- Energy-Boosting – Complex carbs and protein provide sustained energy without the sugar crash
- Gluten-Free Friendly – Just use certified gluten-free oats and you’re all set
- Portion-Controlled – Pre-portioned snacks help with mindful eating and portion management
Whether you’re a fitness enthusiast looking for clean fuel, a busy parent needing healthy snacks for lunchboxes, or someone who simply loves the combination of lemon and sweet treats, this recipe delivers. Plus, they look absolutely adorable, making them perfect for sharing at potlucks, gifting to friends, or posting on your Pinterest board!
Ingredient Notes
Let’s break down what makes these healthy lemon protein bites so nutritious and delicious. Understanding your ingredients helps you make smart substitutions and truly own this recipe.
Rolled Oats – The base of our protein balls, providing fiber, complex carbohydrates, and a satisfying chewy texture. Old-fashioned rolled oats work best here (not instant or steel-cut). If you need gluten-free, just use certified GF oats. The oats also act as a binder and absorb the wet ingredients beautifully.
Protein Powder – This is where your protein boost comes from! Vanilla protein powder works wonderfully with lemon, but unflavored is also great. You can use whey protein, plant-based protein (pea, hemp, rice), or collagen powder. Each type will slightly affect the texture and flavor, so choose what aligns with your dietary needs.
Honey or Maple Syrup – Natural liquid sweeteners that provide sweetness while also acting as the binding agent. Honey creates a slightly chewier texture, while maple syrup makes them a bit softer. Both work beautifully, so use whichever you prefer or have on hand.
Almond Butter or Cashew Butter – Provides healthy fats, creaminess, and helps bind everything together. Natural nut butter (just nuts, no added oils or sugars) works best. If you have nut allergies, sunflower seed butter is an excellent substitute that works just as well.
Fresh Lemon Zest and Juice – The star of the show! Fresh lemon zest provides intense citrus flavor and aromatic oils, while the juice adds tanginess and moisture. Always use fresh lemons rather than bottled juice for the best flavor. You’ll need about 2-3 medium lemons total.
Vanilla Extract – Enhances all the other flavors and adds depth. Pure vanilla extract is worth the investment, but imitation vanilla works in a pinch.
Salt – Just a pinch brings out all the flavors and balances the sweetness. Don’t skip it!
Optional Add-Ins – Shredded coconut, white chocolate chips, chia seeds, or poppy seeds can all be mixed in for extra flavor and texture variations.
Equipment Needed
One of the best things about this easy no-bake lemon snack recipe is that you probably already have everything you need in your kitchen. No special equipment required!
- Food Processor or High-Powered Blender – For blending the oats into a finer texture (optional but recommended for smoother balls)
- Large Mixing Bowl – For combining all ingredients
- Microplane or Zester – For zesting the lemons to get those flavorful oils
- Citrus Juicer or Reamer – Makes getting fresh lemon juice much easier
- Measuring Cups and Spoons – For accurate measurements
- Rubber Spatula or Wooden Spoon – For mixing everything together thoroughly
- Small Cookie Scoop or Tablespoon – Helps create uniformly sized balls
- Baking Sheet or Plate – Lined with parchment paper for placing the rolled balls
- Airtight Container – For storing your finished protein balls
- Parchment Paper or Wax Paper – Prevents sticking during storage

Lemon Protein Balls
Bright, zesty, and protein-packed, these No-Bake Lemon Protein Balls are the perfect healthy snack! Made with oats, protein powder, almond butter, and fresh lemon, these easy energy bites are ready in 15 minutes and stay fresh for weeks. Perfect for meal prep, post-workout fuel, or a guilt-free sweet treat!
- Total Time: 15 minutes
- Yield: 20-24 balls 1x
Ingredients
- 1½ cups old-fashioned rolled oats
- ½ cup vanilla protein powder
- ½ cup almond butter (or cashew butter)
- ⅓ cup honey (or maple syrup)
- 2 tablespoons fresh lemon juice
- 2 tablespoons lemon zest (about 2-3 lemons)
- 1 teaspoon vanilla extract
- ¼ teaspoon salt
- 2 tablespoons chia seeds (optional)
- ¼ cup shredded coconut for rolling (optional)
Instructions
- Prepare Your Lemons: Wash and dry your lemons thoroughly. Zest 2-3 lemons using a microplane or fine zester until you have 2 tablespoons of zest. Then juice the lemons to get 2 tablespoons of fresh lemon juice. Set aside.
- Process the Oats (Optional but Recommended): Add the rolled oats to a food processor and pulse 8-10 times until they’re broken down into a coarse flour-like consistency. This creates a smoother texture for your protein balls. If you prefer a chunkier texture, you can skip this step and use whole oats.
- Combine Dry Ingredients: In a large mixing bowl, combine the processed (or whole) oats, protein powder, chia seeds (if using), and salt. Whisk together until evenly distributed.
- Mix Wet Ingredients: In a separate medium bowl, combine the almond butter, honey, fresh lemon juice, lemon zest, and vanilla extract. Stir vigorously until smooth and well combined. If your almond butter is very thick, you can microwave it for 15-20 seconds to make mixing easier.
- Combine Everything: Pour the wet ingredients into the dry ingredients. Using a sturdy wooden spoon or rubber spatula, mix everything together thoroughly. The mixture should be slightly sticky and hold together when pressed. If it’s too dry and crumbly, add an extra tablespoon of honey or a splash of water. If it’s too wet, add 1-2 tablespoons more oats.
- Chill the Mixture: Cover the bowl and refrigerate for 10-15 minutes. This makes the mixture easier to roll and helps the flavors meld together.
- Roll into Balls: Using a small cookie scoop or tablespoon, scoop out portions of the mixture. Roll between your palms to form smooth balls, about 1 inch in diameter. If the mixture sticks to your hands, lightly wet your palms with water or coat them with a tiny bit of coconut oil.
- Optional Coconut Coating: If using shredded coconut, roll each ball in the coconut to coat the exterior. This adds extra texture and makes them look beautiful!
- Store Properly: Place the finished protein balls in an airtight container with parchment paper between layers to prevent sticking. Refrigerate for at least 30 minutes before eating to allow them to firm up completely.
Notes
- For a stronger lemon flavor, increase the lemon zest to 3 tablespoons
- The mixture should be moldable but not overly sticky. Adjust consistency with more oats (if too wet) or honey (if too dry)
- Different brands of protein powder absorb liquid differently, so you may need to adjust slightly
- These balls taste even better after 24 hours in the fridge as the flavors develop
- Store away from strong-smelling foods as they can absorb odors
- For easier rolling, keep a small bowl of water nearby to dampen your hands
- Prep Time: 15 minutes
- Cook Time: 0 minutes
- Category: Dessert
- Method: No-Bake
- Cuisine: American
- Diet: Gluten Free
Nutrition
- Serving Size: 1 protein ball
- Calories: 95
- Sugar: 6g
- Sodium: 25mg
- Fat: 4g
- Saturated Fat: 0.5g
- Unsaturated Fat: 3.5g
- Trans Fat: 0g
- Carbohydrates: 11g
- Fiber: 2g
- Protein: 5g
- Cholesterol: 5mg
Tips & Variations
The beauty of this lemon protein ball recipe is how easily you can customize it to suit your taste preferences and dietary needs. Here are some delicious ways to mix things up:
Flavor Variations:
- Lemon Poppy Seed: Add 1 tablespoon of poppy seeds for that classic lemon-poppy flavor combination and a delightful crunch
- Lemon Blueberry: Fold in ¼ cup of dried blueberries for a fruity twist
- Lemon Coconut: Double the coconut and mix half into the batter for intense coconut flavor
- Lemon Lavender: Add ½ teaspoon of dried culinary lavender for an elegant, sophisticated flavor
- White Chocolate Lemon: Mix in 2 tablespoons of white chocolate chips for a dessert-like treat
Dietary Adaptations:
- Vegan Version: Use maple syrup instead of honey and plant-based protein powder
- Keto-Friendly: Replace oats with almond flour and use a keto-approved sweetener like monk fruit
- Paleo: Use almond flour instead of oats and ensure your protein powder is paleo-compliant
- Nut-Free: Substitute sunflower seed butter for almond butter and use seeds instead of nuts for mix-ins
Texture Modifications:
- Crunchier Balls: Add 2 tablespoons of chopped almonds or granola
- Softer Balls: Use quick oats instead of rolled oats and add an extra tablespoon of almond butter
- Cake-Like Texture: Process all the oats into flour for a smoother, denser ball
Pro Chef Tips
Want to take your homemade lemon energy bites from good to absolutely phenomenal? Here are some professional insights that make all the difference:
Use Room Temperature Ingredients: When your almond butter and honey are at room temperature, they mix together much more smoothly and create a better texture. Cold nut butter can be stubborn and create lumps in your mixture.
Don’t Skip the Chill Time: Refrigerating the mixture before rolling makes a huge difference. The ingredients firm up slightly and become much easier to work with. Plus, the oats absorb the moisture during this time, creating better texture.
Zest Before You Juice: Always zest your lemons before cutting and juicing them. It’s nearly impossible to zest a halved lemon! Also, use a light touch when zesting to avoid the bitter white pith underneath the yellow skin.
Taste and Adjust: Before rolling all your balls, taste the mixture and adjust seasonings. Want more lemon? Add more zest. Too tart? Add a drizzle more honey. Too sweet? A tiny pinch more salt balances everything out.
Uniform Sizing Matters: Use a cookie scoop or measuring spoon to ensure all your protein balls are the same size. This isn’t just for aesthetics – uniform balls ensure consistent nutrition information and even texture throughout.
Roll with Damp Hands: If the mixture is sticking to your hands, slightly dampen your palms with water. This creates a barrier and makes rolling smooth and easy without adding extra ingredients.
Let Them Set Completely: While it’s tempting to eat them right away, letting your protein balls sit in the fridge for at least 30 minutes (or overnight) allows them to firm up to the perfect texture and lets the flavors meld together beautifully.
Common Mistakes to Avoid
Even though this recipe is incredibly forgiving, here are some pitfalls to watch out for when making no-bake lemon protein snacks:
Using Instant Oats: Instant oats are too fine and will create a mushy, paste-like texture. Always use old-fashioned rolled oats for the best texture and structure. Steel-cut oats won’t work either as they’re too hard and won’t bind properly.
Not Measuring Protein Powder Properly: Different protein powders have vastly different densities. Always use the scoop-and-level method rather than packing it into your measuring cup. Too much protein powder makes your balls dry and crumbly; too little and they won’t hold together well.
Adding Too Much Liquid: It’s tempting to add extra lemon juice for more flavor, but too much liquid will make your mixture impossible to roll. The balls will be sticky, won’t hold their shape, and will fall apart. Stick to the measurements and add lemon zest instead for more flavor without extra moisture.
Skipping the Salt: Salt might seem like an odd addition to a sweet snack, but it’s crucial for balancing the sweetness and bringing out the lemon flavor. Without it, your protein balls will taste flat and one-dimensional.
Using Old or Bottled Lemon Juice: Fresh lemon juice makes ALL the difference in this recipe. Bottled lemon juice tastes artificial and lacks the bright, fresh flavor that makes these protein balls special. Always squeeze fresh lemons for the best results – it takes just an extra minute and transforms the entire recipe.
Storage & Meal Prep
One of the best features of these easy lemon protein balls is how well they store, making them perfect for meal prep and grab-and-go snacking.
Refrigerator Storage: Place your protein balls in an airtight container with parchment or wax paper between layers to prevent sticking. They’ll stay fresh in the refrigerator for up to 2 weeks. The texture actually improves after a day or two as the oats fully absorb the moisture and the flavors develop.
Counter Storage: While you can keep these at room temperature for a day or two (perfect for lunchboxes or travel), they’re best stored chilled. The protein powder and nut butter can become soft and oily at room temperature, especially in warm weather.
Preventing Stickiness: If your balls stick together in storage, lightly dust them with a bit of coconut flour or extra shredded coconut before storing. This creates a barrier that prevents them from clumping together.
Meal Prep Strategy: Make a double batch on Sunday and you’ll have healthy snacks for the entire week (or longer). These are perfect for portion-controlled snacking – just grab one or two when you need an energy boost.
Taking Them On-the-Go: Pack them in small containers or snack bags for workouts, road trips, hiking, or daily commutes. They’re sturdy enough to travel well without refrigeration for several hours.
Make-Ahead & Freezer Notes
These protein-packed lemon energy bites are an absolute dream for advance preparation, making healthy eating effortless even on your busiest days.
Make-Ahead Instructions: You can prepare the entire recipe up to 2 weeks in advance. Store in an airtight container in the refrigerator and grab them as needed. They actually taste better after sitting for 24 hours as the flavors meld and mature.
Freezer-Friendly: Yes! These protein balls freeze beautifully for up to 3 months. Arrange them on a parchment-lined baking sheet and freeze until solid (about 1-2 hours), then transfer to a freezer-safe bag or container. This prevents them from freezing in one big clump.
Thawing Instructions: For the best texture, thaw frozen protein balls in the refrigerator overnight. If you’re in a hurry, let them sit at room temperature for 20-30 minutes. You can also eat them partially frozen for a firmer, almost fudge-like texture that’s especially refreshing in summer.
Batch Cooking: Consider making multiple batches at once when lemons are in season or on sale. You can store different flavor variations (plain lemon, lemon coconut, lemon blueberry) in the freezer and rotate them for variety.
Freezer Organization Tip: Label your container with the date and flavor variation. When you have multiple batches in the freezer, this helps you rotate through them and use the oldest ones first.
Serving Suggestions
While these homemade lemon protein balls are perfect as a standalone snack, here are some creative ways to enjoy them:
As Part of Breakfast: Pair 2-3 protein balls with Greek yogurt and fresh berries for a quick, balanced breakfast that will keep you satisfied until lunch.
Post-Workout Fuel: Eat 1-2 balls immediately after your workout alongside a protein shake or smoothie for optimal muscle recovery and energy replenishment.
Afternoon Tea or Coffee Companion: These make an excellent afternoon pick-me-up with your favorite hot beverage. The lemon flavor pairs beautifully with green tea, chamomile tea, or a light roast coffee.
Kid-Friendly Lunchbox Addition: Pack 1-2 protein balls in your children’s lunchboxes alongside their sandwich and fruit for a healthier dessert alternative that provides sustained energy for afternoon activities.
Dessert Platter: Arrange these on a platter with fresh fruit, dark chocolate squares, and nuts for an elegant, health-conscious dessert board perfect for entertaining.
Trail Mix Addition: Chop them into quarters and mix into your homemade trail mix for extra protein and a burst of lemony sweetness.
Yogurt Parfait Topping: Crumble a protein ball over Greek yogurt parfaits for added texture, protein, and lemony flavor.
FAQs Section
Can I use quick oats instead of rolled oats?
While rolled oats are recommended for the best texture, quick oats will work in a pinch. Your protein balls will have a slightly softer, less chewy texture, but they’ll still taste great and hold together well. Avoid instant oats entirely as they’re too fine.
My mixture is too dry and won’t stick together. What should I do?
Add liquid one tablespoon at a time until the mixture holds together when pressed. Try adding more honey, maple syrup, almond butter, or even a splash of lemon juice or water. Different protein powder brands absorb liquid differently, so you may need to adjust.
Can I make these without protein powder?
Absolutely! Replace the protein powder with equal amounts of additional oats, almond flour, or coconut flour. Keep in mind that your protein content per ball will be lower (about 2-3g instead of 5g), but they’ll still be nutritious and delicious.
How can I make these balls less tart?
Reduce the lemon juice to 1 tablespoon instead of 2, but keep the lemon zest as is (the zest provides lemony flavor without the tartness). You can also increase the honey by 1-2 tablespoons to balance the acidity.
Are these suitable for kids?
Yes! These protein balls are kid-friendly and make an excellent healthier snack option for children. The sweet-tart lemon flavor appeals to many kids, and you can adjust the tartness if needed. They’re also great for picky eaters who need more protein in their diet.
Why are my protein balls falling apart?
This usually means you need more binding agents. Add more honey, almond butter, or a tablespoon of water and mix thoroughly. Also, make sure you’re refrigerating the mixture before rolling, as this helps everything stick together better.
Can I use lime instead of lemon?
Definitely! Lime protein balls are equally delicious. Use the same measurements of lime zest and juice as you would lemon. You can also do a combination of both citrus fruits for a unique tropical flavor.
Conclusion
There you have it – everything you need to know to make these incredible Lemon Protein Balls that are healthy, delicious, and perfect for your busy lifestyle! These bright, zesty energy bites prove that nutritious snacking doesn’t have to be boring or complicated. With just a few simple ingredients and 15 minutes of your time, you can create a batch of protein-packed treats that will last you all week long.
What I love most about this recipe is its versatility. Whether you’re a fitness enthusiast looking for clean post-workout fuel, a busy parent needing nutritious lunchbox additions, or simply someone who appreciates a good lemon-flavored treat, these protein balls deliver on every level. They’re naturally sweetened, packed with wholesome ingredients, and that burst of fresh lemon flavor makes them feel more like a treat than a “health food.”
Remember, the key to perfect protein balls is using fresh lemons, quality ingredients, and not being afraid to adjust the recipe to suit your preferences. Don’t skip the refrigeration time, and let those flavors develop overnight if you can wait that long!
I’d absolutely love to hear how your lemon protein balls turn out! Did you try any of the variations? Do you have your own creative twist to add? Drop a comment below and share your experience. And if you loved this recipe, please save it to your Pinterest boards so you can find it easily next time – and so other home cooks can discover it too! Happy snacking, friends! 🍋