Crispy Loaded Potato Skins Recipe – The Ultimate Game Day Appetizer
There’s something utterly irresistible about biting into a perfectly crispy potato skin loaded with melted cheese, crispy bacon, and a dollop of cool sour cream. These crispy loaded potato skins are the ultimate crowd-pleaser that transforms humble russet potatoes into an addictive appetizer that disappears within minutes. Whether you’re hosting game day parties, feeding hungry teenagers, or just craving something indulgent and delicious, this easy potato skins recipe delivers restaurant-quality results right in your own kitchen.
Potato skins hit that perfect sweet spot between comfort food and finger food—they’re substantial enough to satisfy real hunger but fun and shareable enough for parties. The contrast of textures is what makes them so addictive: the crispy, golden exterior gives way to a thin layer of fluffy potato, all topped with gooey melted cheese and your favorite fixings. This homemade potato skins recipe is endlessly customizable, budget-friendly, and guaranteed to make you the hero of any gathering.
The Delicious History Behind Potato Skins
The story of potato skins as we know them today began in the 1970s at a restaurant called The Prime Rib in Washington, D.C., though the exact origin is debated among food historians. The innovation came from creative kitchen staff who wanted to use the potato shells left over from making twice-baked potatoes. Rather than tossing them out, they deep-fried the skins, loaded them with cheese and bacon, and created an instant sensation.
However, it was TGI Friday’s that truly popularized potato skins across America in 1974. The chain added them to their menu as a bar snack, and they quickly became their best-selling appetizer. The timing was perfect—Americans were embracing casual dining and shareable appetizers, and potato skins fit the bill perfectly. They were hearty, flavorful, affordable to make, and had that addictive quality that kept customers ordering round after round.
The beauty of potato skins lies in their resourcefulness. In an era when “nose-to-tail” cooking and reducing food waste have become culinary buzzwords, potato skins were doing it decades earlier. What might have been discarded became the star of the show. Today, potato skins have evolved far beyond their bar-snack origins. Home cooks have embraced them as a canvas for creativity, topping them with everything from buffalo chicken to vegetarian black bean variations.
The dish also represents a uniquely American approach to appetizers—bigger, bolder, and more indulgent than traditional European starters. While other cultures were serving delicate canapés, America was serving up hearty, cheese-covered potato skins that could practically serve as a meal. This unpretentious, satisfying approach to food is part of what makes potato skins a beloved classic that has stood the test of time.
Why You’ll Love This Potato Skins Recipe
This loaded potato skins recipe is about to become your go-to appetizer for every occasion. It’s the kind of recipe that looks and tastes impressive but is surprisingly simple to execute, making it perfect for both novice cooks and experienced home chefs who want maximum impact with minimal fuss.
Here’s why this recipe deserves a permanent spot in your cooking rotation:
- Incredibly versatile – Use this recipe as a base and customize the toppings to match any craving or dietary preference
- Budget-friendly comfort food – Potatoes are inexpensive, and you can use whatever cheese and toppings you already have on hand
- Perfect for meal prep – The potato shells can be baked ahead of time and filled right before serving
- Crowd-pleasing guarantee – I’ve never served these at a party without getting requests for the recipe
- Kid-friendly and customizable – Everyone can build their perfect potato skin with their favorite toppings
- Restaurant-quality at home – Achieve that signature crispy texture and loaded flavor without paying restaurant prices
- Great for game day gatherings – Feeds a crowd, easy to eat while watching TV, and pairs perfectly with cold beverages
- Uses simple, everyday ingredients – No specialty items required, just pantry staples and basic fresh ingredients
The best part? Once you master the basic technique of getting those skins perfectly crispy, you’ll find yourself making these constantly. They’re equally at home at a Super Bowl party, a casual weeknight dinner, or even as a fun weekend brunch item topped with scrambled eggs.
Ingredient Notes for Perfect Potato Skins
Understanding your ingredients is the key to potato skin perfection. Let’s break down what you’ll need and why each component matters:
Russet Potatoes – These are non-negotiable for the best potato skins. Russets have thick skins that crisp up beautifully and a starchy interior that’s easy to scoop out. Their large size also gives you more surface area for toppings. Avoid waxy potatoes like red potatoes or Yukon golds, as they don’t achieve the same crispy texture. Plan on 1-2 potato halves per person for appetizer portions.
Olive Oil or Melted Butter – This is what gives your potato skins that golden, crispy exterior. Olive oil is a healthier choice, while butter adds incredible flavor. You can also use a combination of both. Some cooks swear by bacon drippings for extra savory flavor, which is absolutely delicious if you’re already cooking bacon for the topping.
Sharp Cheddar Cheese – Sharp or extra-sharp cheddar provides the best flavor punch. Pre-shredded cheese is convenient, but freshly shredded melts better and has superior flavor without the anti-caking agents. You can substitute with pepper jack for spice, mozzarella for mild flavor, or a Mexican cheese blend for variety.
Bacon – Thick-cut bacon provides the best texture and flavor, giving you substantial, crispy bits. Cook it until it’s truly crispy—any softness and it will become chewy when cooled. Turkey bacon works if you prefer, though it won’t have quite the same rich flavor. For vegetarian versions, try coconut bacon or simply omit.
Sour Cream – This cooling, tangy element balances the rich, salty potato skins perfectly. Greek yogurt is an excellent substitute that adds protein and works equally well. For dairy-free options, try cashew cream or a plant-based sour cream alternative.
Green Onions (Scallions) – These add a fresh, mild onion flavor and beautiful color contrast. Use both the white and green parts, sliced thin. Chives work wonderfully as well and are slightly more delicate in flavor.
Salt and Black Pepper – Season generously! Potatoes need plenty of salt to taste their best. Use kosher salt for even distribution and freshly ground black pepper for the best flavor. You can also add garlic powder, paprika, or your favorite seasoning blend.
Equipment Needed
Having the right tools makes this recipe even easier. Here’s what you’ll need:
- Large baking sheet – A heavy-duty rimmed baking sheet prevents warping and ensures even cooking
- Sharp knife – For halving potatoes and chopping toppings
- Spoon or melon baller – To scoop out the potato flesh cleanly
- Pastry brush – For brushing oil or butter onto the potato skins evenly
- Box grater or food processor – For shredding cheese (if not using pre-shredded)
- Large skillet – For cooking the bacon until perfectly crispy
- Parchment paper or aluminum foil – Makes cleanup easier (optional but recommended)
- Oven mitts – Essential for handling hot baking sheets
- Small bowls – For organizing your toppings before assembly
Loaded Potato Skins Recipe
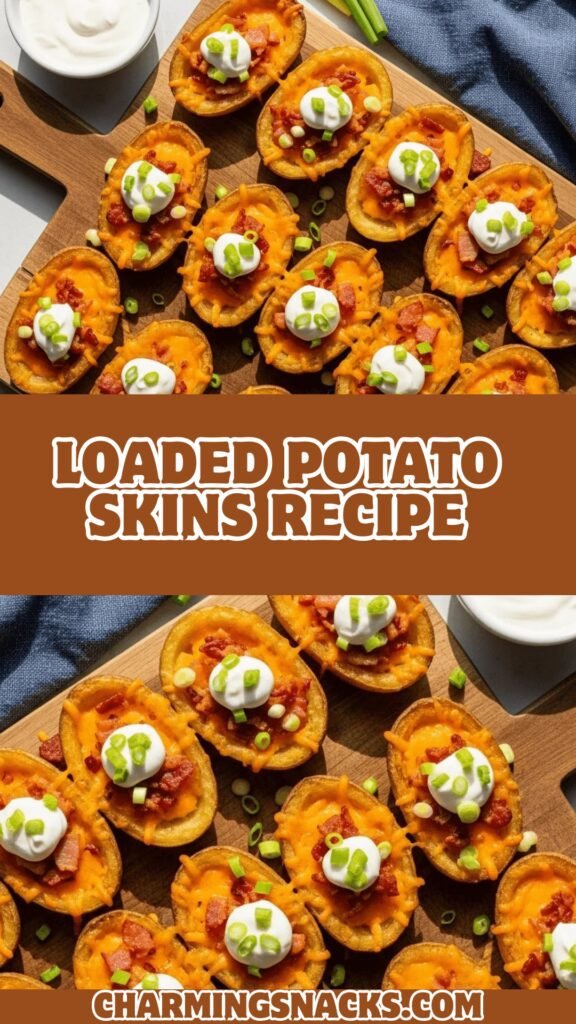
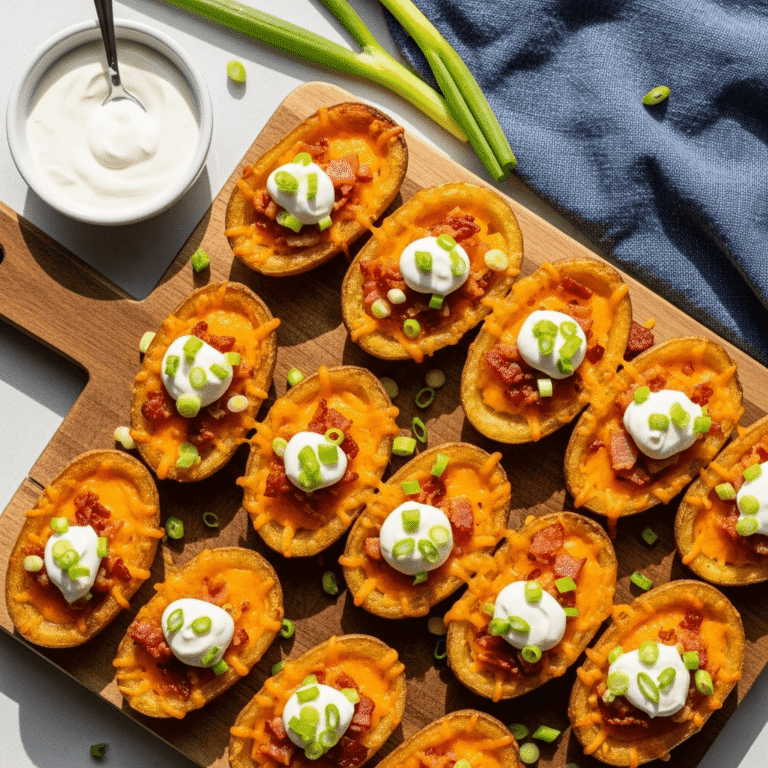
These crispy loaded potato skins are the ultimate game day appetizer or party snack. Russet potato shells are baked until golden and crispy, then loaded with melted cheddar cheese, crispy bacon, sour cream, and fresh green onions. This easy recipe delivers restaurant-quality results that will have everyone asking for seconds!
- Total Time: 1 hour 30 minutes
- Yield: 8 servings (16 potato skin halves) 1x
Ingredients
- 8 medium russet potatoes (about 4-5 pounds total)
- ¼ cup olive oil or melted butter
- 1 teaspoon kosher salt
- ½ teaspoon black pepper
- ½ teaspoon garlic powder
- 2 cups sharp cheddar cheese, freshly shredded
- 8-10 slices thick-cut bacon, cooked crispy and crumbled
- 1 cup sour cream
- ½ cup green onions, thinly sliced
- Optional: hot sauce, jalapeños, additional seasonings
Instructions
Step 1: Bake the Potatoes
Preheat your oven to 400°F (200°C). Scrub the potatoes thoroughly under cold water and pat them completely dry with paper towels. Pierce each potato 3-4 times with a fork to allow steam to escape. Place potatoes directly on the oven rack (or on a baking sheet) and bake for 50-60 minutes, until the skins are crispy and the potatoes are tender when pierced with a fork. The exact timing depends on potato size.
Step 2: Cool and Halve
Remove potatoes from the oven and let them cool for about 10 minutes until they’re cool enough to handle comfortably. Slice each potato in half lengthwise using a sharp knife. Use a spoon to carefully scoop out most of the potato flesh, leaving about ¼-inch of potato attached to the skin to provide structure. Save the scooped potato for another use like mashed potatoes or potato soup.
Step 3: Season the Shells
Increase oven temperature to 450°F (230°C). In a small bowl, mix together the olive oil (or melted butter), salt, pepper, and garlic powder. Using a pastry brush, generously brush the oil mixture on both sides of each potato skin, making sure to coat the inside especially well. Arrange the potato skins skin-side up on a large baking sheet lined with parchment paper.
Step 4: Crisp the Skins
Bake for 10 minutes skin-side up, then carefully flip them over so the inside faces up. Bake for another 8-10 minutes until the edges are golden brown and crispy. Watch carefully during the last few minutes to prevent burning.
Step 5: Add the Cheese and Bacon
Remove the baking sheet from the oven. Sprinkle the shredded cheddar cheese evenly inside each potato skin, followed by the crumbled bacon. Return to the oven and bake for 3-5 minutes more, just until the cheese is fully melted and bubbly.
Step 6: Add Final Toppings and Serve
Remove from the oven and transfer potato skins to a serving platter. Top each one with a dollop of sour cream and a generous sprinkle of sliced green onions. Serve immediately while hot and crispy.
Notes
- Make-ahead tip: Complete steps 1-3, then refrigerate the seasoned, unbaked potato shells for up to 24 hours. When ready to serve, proceed with step 4.
- Crispier skins: For extra-crispy results, brush with oil and bake an additional 5 minutes before adding toppings.
- Bacon shortcut: Use pre-cooked bacon crumbles to save time, or cook bacon in the oven on a separate sheet while potatoes bake.
- Potato flesh uses: Don’t waste the scooped potato! Use it for mashed potatoes, potato soup, shepherd’s pie filling, or breakfast hash.
- Serving temperature: These are best enjoyed hot from the oven when the cheese is melted and gooey.
- Prep Time: 15 minutes
- Cook Time: 1 hour 15 minutes
- Category: Appetizer
- Method: Baking
- Cuisine: American
- Diet: Gluten Free
Nutrition
- Serving Size: 2 potato skin halves
- Calories: 385
- Sugar: 2g
- Sodium: 625mg
- Fat: 3g
- Saturated Fat: 9g
- Unsaturated Fat: 11g
- Trans Fat: 0g
- Carbohydrates: 32g
- Fiber: 14g
- Protein: 14g
- Cholesterol: 45mg
Tips & Variations to Customize Your Potato Skins
The beauty of potato skins is their versatility. Once you’ve mastered the basic technique, the topping possibilities are truly endless:
Buffalo Chicken Potato Skins – Toss shredded cooked chicken with buffalo sauce, stuff into the potato skins with blue cheese or ranch dressing, and top with celery leaves.
Vegetarian Mediterranean – Skip the bacon and top with feta cheese, sun-dried tomatoes, Kalamata olives, and fresh herbs like basil or oregano.
Breakfast Potato Skins – Fill with scrambled eggs, breakfast sausage, shredded cheese, and top with salsa or hot sauce for a brunch-worthy creation.
BBQ Pulled Pork – Use leftover pulled pork, BBQ sauce, cheddar cheese, and coleslaw for a Southern-inspired twist.
Loaded Veggie – Top with sautéed mushrooms, bell peppers, onions, and a blend of cheeses for a heartier vegetarian option.
Tex-Mex Style – Season with taco spices, add pepper jack cheese, black beans, corn, jalapeños, and top with guacamole and cilantro.
Lighter Version – Use Greek yogurt instead of sour cream, turkey bacon instead of regular bacon, and reduce the cheese by half for a lighter but still delicious version.
Spicy Jalapeño Popper – Mix cream cheese with shredded cheddar, add diced jalapeños, and top with crispy bacon for a spicy kick.
Pro Chef Tips for Restaurant-Quality Potato Skins
Want to take your potato skins from good to absolutely phenomenal? Here are professional techniques that make all the difference:
Dry the potatoes thoroughly before the initial baking. Any moisture on the skin will create steam instead of crispness. Pat them completely dry with paper towels and even let them air-dry for a few minutes.
Don’t skip the high-temperature final bake after adding cheese. That blast of 450°F heat is what creates those beautifully crispy, golden edges that make restaurant potato skins so irresistible.
Layer your cheese strategically by putting a thin layer directly on the potato first, then bacon, then more cheese on top. This ensures the bacon sticks to the potato and every bite has cheese throughout.
Use a melon baller for scooping instead of a spoon if you have one. It creates a cleaner, more uniform cavity and makes it easier to leave the perfect amount of potato attached to the skin.
Brush oil on the baking sheet too where the potato skins will sit. This prevents sticking and adds extra crispiness to the bottom of each skin.
Let bacon cool before crumbling so it stays crispy. If you add hot bacon, the residual heat can make it steam and become chewy.
Add fresh herbs at the end like chives, cilantro, or parsley for a pop of color and fresh flavor that cuts through the richness.
Serve on a warm platter to keep potato skins hot longer. Run your serving dish under hot water, dry it completely, then arrange your potato skins on it.
Common Mistakes to Avoid
Even a simple recipe like potato skins can go wrong without proper technique. Here are the pitfalls to watch out for:
Mistake 1: Scooping out too much potato. Leave at least ¼-inch of potato flesh attached to the skin, or they’ll become too fragile and break when you try to flip them. The potato layer provides structure and a creamy contrast to the crispy skin.
Mistake 2: Not cooking the initial potatoes long enough. Undercooked potatoes will have tough, chewy skins that never achieve that signature crispness. The potatoes should be fork-tender all the way through before you proceed to making skins.
Mistake 3: Using waxy potatoes instead of russets. Waxy varieties like red potatoes or fingerlings have thin skins that don’t crisp up properly and lack the starchy interior that makes for good scooping.
Mistake 4: Overcrowding the baking sheet. Give potato skins space to breathe—if they’re touching, steam gets trapped and prevents crisping. Use two baking sheets if necessary.
Mistake 5: Adding toppings too early. If you add cheese and bacon before the skins are fully crisped, the toppings can burn while you’re waiting for the potatoes to finish. Get those skins golden and crispy first, then add toppings for just the final few minutes.
Mistake 6: Serving them lukewarm. Potato skins lose their appeal when they cool down—the cheese solidifies, the skins lose their crispness, and the bacon becomes chewy. Time your final baking so they come out of the oven right before serving.
Storage & Meal Prep
Proper storage ensures you can enjoy leftover potato skins or prepare components ahead of time for stress-free entertaining.
Refrigerator Storage: Store cooled, leftover potato skins in an airtight container in the refrigerator for up to 3 days. Keep the sour cream and green onions separate and add them fresh when reheating. The skins will lose some crispness, but reheating properly can restore much of their texture.
Reheating Instructions: The oven is your best friend for reheating. Place potato skins on a baking sheet and reheat at 375°F for 10-12 minutes until heated through and crispy again. Avoid the microwave if possible, as it makes the skins soggy and rubbery. An air fryer works beautifully at 350°F for 5-7 minutes.
Meal Prep Strategy: You can prepare the potato shells through step 3 up to 24 hours in advance. Store the seasoned, un-baked shells covered in the refrigerator. When ready to serve, bring them to room temperature for 15 minutes, then proceed with the crisping and topping steps. This makes them perfect for party prep—do the time-consuming work ahead, then just finish them off when guests arrive.
Toppings Prep: Cook and crumble bacon up to 3 days ahead and store in the refrigerator. Shred cheese in advance and keep it refrigerated. Slice green onions the day of serving for the freshest flavor. Having all your toppings prepped makes assembly quick and easy.
Make-Ahead & Freezer Notes
Planning ahead can make serving potato skins even more convenient, especially when entertaining.
Freezing Potato Shells: You can freeze the scooped, seasoned potato shells before the final baking and topping. Arrange them in a single layer on a baking sheet and freeze until solid (about 2 hours), then transfer to a freezer-safe container or bag. They’ll keep for up to 2 months. No need to thaw—just add 5-7 minutes to the baking time when you’re ready to make them.
Freezing Fully Loaded Skins: While possible, I don’t recommend freezing fully assembled potato skins as the toppings don’t maintain their quality. The cheese can become grainy, bacon loses its crispness, and the skins can become soggy. It’s better to freeze just the shells and add fresh toppings when ready to serve.
Best Make-Ahead Timeline: For optimal results, bake the potatoes up to 2 days ahead, scoop and season the shells up to 1 day ahead, then do the final crisping and topping the day of serving. This breaks the work into manageable chunks without compromising quality.
Thawing and Reheating from Frozen: If you’ve frozen the shells, you can bake them directly from frozen. Brush with a little extra oil, then bake at 450°F for 15-18 minutes before adding toppings. They’ll crisp up beautifully without any sogginess.
Serving Suggestions
Potato skins are incredibly versatile and pair well with numerous dishes and occasions. Here’s how to build the perfect spread:
Classic Game Day Spread: Serve alongside chicken wings, mozzarella sticks, onion rings, and a variety of dipping sauces like ranch, blue cheese, and BBQ sauce. Add some fresh veggie sticks with hummus to balance the richness.
Party Appetizer Platter: Arrange potato skins on a large platter surrounded by other finger foods like sliders, stuffed mushrooms, and shrimp cocktail. Provide small plates and plenty of napkins.
Casual Dinner Main: Potato skins can absolutely be a meal! Serve 3-4 halves per person alongside a fresh green salad with vinaigrette dressing and some crusty bread. The lightness of the salad balances the richness of the skins.
Beverage Pairings: Potato skins pair beautifully with cold beer (try a crisp lager or IPA), sparkling water with lime, sweet tea, or even a bold red wine if you’re feeling fancy. For non-alcoholic options, lemonade or iced tea work wonderfully.
Side Dishes That Complement: Consider serving with coleslaw, corn on the cob, baked beans, or a pasta salad for a backyard BBQ vibe. For something lighter, try a cucumber salad, grilled vegetables, or fresh fruit.
Sauce Station: Set up a DIY topping bar with various sauces and extras—ranch dressing, salsa, guacamole, extra sour cream, hot sauce, BBQ sauce, and pickled jalapeños. Let guests customize their potato skins to their taste.
Frequently Asked Questions
Q: Can I use sweet potatoes instead of russet potatoes?
A: Absolutely! Sweet potato skins are delicious and add a slightly sweet flavor that pairs wonderfully with savory toppings. They take about the same baking time, though their skins are a bit thinner. Try topping sweet potato skins with feta cheese, pecans, and a drizzle of maple syrup for a unique twist.
Q: Why are my potato skins soggy instead of crispy?
A: Sogginess usually comes from not baking them long enough at high heat, not using enough oil, or overcrowding the pan. Make sure you’re brushing the skins generously with oil on both sides and baking at 450°F with space between each skin. Also, ensure the potatoes are fully cooked through in step 1—undercooked potatoes have more moisture that prevents crisping.
Q: How do I prevent the potato skins from breaking when I flip them?
A: Leave enough potato attached to the skin (about ¼-inch) to provide structure. Also, make sure the potatoes are fully cooled before handling them—trying to work with hot potatoes makes them more likely to tear. Using a thin metal spatula to flip them helps too.
Q: Can I make potato skins in an air fryer?
A: Yes! After scooping and seasoning, air fry the shells at 400°F for 8-10 minutes, flip, then air fry for another 5-7 minutes until crispy. Add cheese and bacon, then air fry for 2-3 more minutes until cheese melts. This method is faster and produces excellent results with even less oil.
Q: What should I do with all the scooped-out potato?
A: Don’t waste it! Use the potato flesh to make mashed potatoes, add it to soups for thickness, make potato cakes or hash browns, use it in shepherd’s pie, or mix it with eggs and cheese for a breakfast scramble. It’s already cooked, so it’s super easy to repurpose.
Q: Can I make these dairy-free?
A: Definitely! Use dairy-free cheese alternatives (many brands melt quite well now), swap sour cream for coconut cream or cashew cream, and brush the skins with olive oil instead of butter. The result is still delicious and satisfying.
Q: How far in advance can I prep potato skins for a party?
A: You can bake the potatoes up to 2 days ahead and store them whole in the refrigerator. Scoop and season the shells up to 24 hours before serving, keeping them covered in the fridge. Then do the final crisping and topping right before your party. This keeps them fresh and crispy while minimizing last-minute work.
Conclusion
There’s a reason crispy loaded potato skins have remained an American favorite for decades—they’re the perfect combination of crispy, cheesy, savory goodness that satisfies every craving. This easy potato skins recipe transforms simple russet potatoes into an impressive appetizer that looks like you spent hours in the kitchen, but is actually straightforward enough for even beginner cooks to master.
Whether you’re planning the ultimate game day spread, need a crowd-pleasing party appetizer, or simply want to treat yourself to something indulgent and delicious, these homemade potato skins deliver every single time. The best part is how customizable they are—once you’ve mastered the basic technique of getting those skins perfectly golden and crispy, you can experiment with endless topping combinations to suit any taste or occasion.
So grab those russet potatoes, fire up your oven, and get ready to make the potato skins that will have everyone asking for your recipe. Don’t forget to save the scooped potato flesh for another delicious meal—nothing goes to waste here!
I’d love to hear how your potato skins turned out! Leave a comment below with your favorite topping combinations, and don’t forget to pin this recipe to your Pinterest boards so you can find it again when those potato skin cravings hit. Share your creations on Instagram and tag me—I can’t wait to see your beautiful, crispy, loaded potato skins! Happy cooking! 🥔