Mini Corn Dogs Recipe: Easy Homemade Bite-Sized Perfection
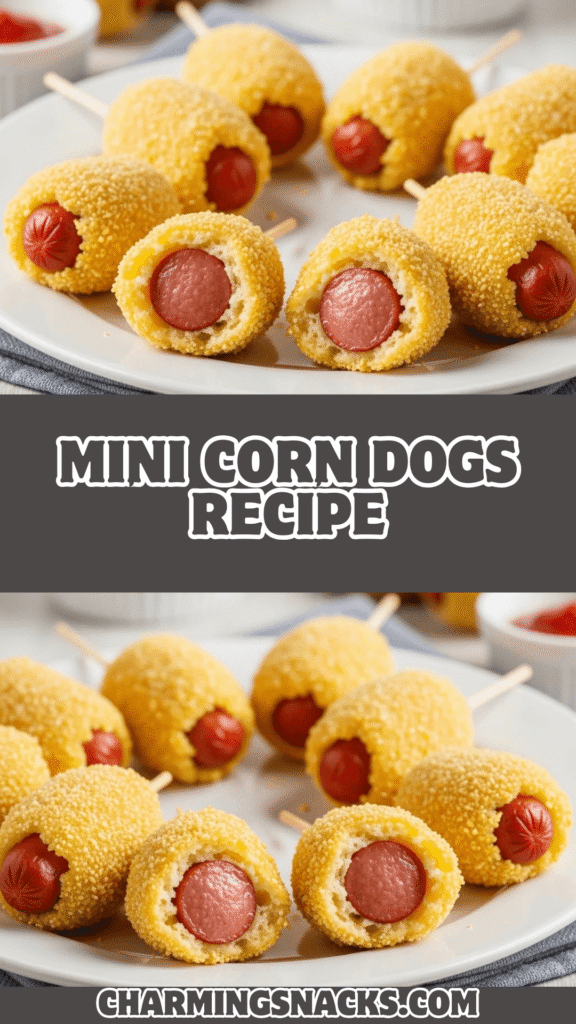
Mini corn dogs are the ultimate crowd-pleasing finger food—bite-sized hot dogs coated in sweet, golden cornmeal batter and fried to crispy perfection. These homemade mini corn dogs capture all the nostalgic fun of carnival and state fair treats, but you can make them right in your own kitchen with simple ingredients and easy techniques. Whether you’re serving them as party appetizers, kid-friendly dinners, game day snacks, or fun lunch box additions, these little bites deliver big flavor in an adorable, poppable package.
What makes these easy mini corn dogs so irresistible is their perfect balance of textures and flavors. The crispy, slightly sweet cornbread coating gives way to juicy hot dogs inside, creating that iconic combination that has made corn dogs an American classic for generations. The mini size makes them ideal for parties where guests can grab several pieces, for kids who love anything they can dip in ketchup and mustard, and for anyone who believes that smaller portions mean you can (and should) eat more of them.
These homemade corn dog bites work beautifully for countless occasions—Super Bowl parties, birthday celebrations, kids’ sleepovers, potlucks, after-school snacks, family movie nights, tailgating events, or casual weeknight dinners when you want something fun and different. They’re incredibly budget-friendly, using affordable ingredients you likely already have in your pantry. Best of all, you can make them ahead and freeze them, then simply reheat whenever cravings strike or unexpected guests arrive, making these mini corn dogs the ultimate convenient comfort food that brings smiles to faces of all ages.
History / Background
The corn dog—a hot dog on a stick coated in cornmeal batter and deep-fried—is a quintessentially American invention that emerged during the early-to-mid 20th century. While several people and places claim to have invented the corn dog, most food historians agree the concept developed sometime in the 1920s-1940s, with various vendors and cooks experimenting with coating sausages in batter for easier handheld eating at fairs and outdoor events.
The most widely accepted origin story credits the Fletcher brothers—Neil and Carl Fletcher—who began selling “Corny Dogs” at the Texas State Fair in 1942. Their version featured hot dogs dipped in cornmeal batter, deep-fried, and served on sticks, quickly becoming a fair food sensation. Around the same time, other vendors at fairs across the Midwest were developing similar concepts, making it likely that the corn dog was invented somewhat simultaneously in multiple locations as vendors sought portable, mess-free foods for fairgoers.
The name “corn dog” derives from the cornmeal batter coating, while the “dog” comes from hot dogs or frankfurters used inside. Throughout the 1940s and 1950s, corn dogs spread from state fairs and carnivals to become fixtures at drive-ins, diners, and eventually frozen food sections of grocery stores, cementing their place in American food culture.
Mini corn dogs emerged as a natural evolution in the 1970s-1980s when bite-sized appetizers became increasingly popular at parties and social gatherings. The smaller format made corn dogs more versatile—no longer just fair food or kids’ meals, they could be elegant party appetizers when served with gourmet dipping sauces. The mini version also addressed practical concerns: they cook faster, provide better portion control, and work better for young children who might struggle with full-sized corn dogs on sticks.
Today, mini corn dogs represent comfort food nostalgia while remaining incredibly relevant. They bridge generations—grandparents remember them from county fairs, parents grew up with frozen versions as after-school snacks, and kids today love them at birthday parties. The recipe has remained remarkably unchanged over decades because, simply put, it works perfectly: the sweet cornbread coating complementing savory hot dogs is a flavor combination that transcends food trends and remains eternally satisfying.
Why You’ll Love This Recipe
These homemade mini corn dogs are about to become your go-to recipe for parties, snacks, and fun family meals. This easy corn dog bites recipe delivers that perfect carnival taste you remember from childhood, but made fresh in your own kitchen with control over ingredients and quality. Whether you’re an experienced cook or just starting out, you’ll appreciate how achievable and impressive these mini corn dogs are.
Here’s why this recipe deserves a permanent spot in your cooking rotation:
- Kid-Approved Favorite – Children absolutely love these bite-sized treats they can eat with their hands
- Perfect Party Food – Ideal finger food for game day, birthdays, and casual gatherings
- Budget-Friendly – Uses inexpensive ingredients to feed a crowd without breaking the bank
- Make-Ahead Friendly – Prepare in advance and reheat, or freeze for up to 3 months
- Better Than Store-Bought – Homemade versions taste fresher with customizable ingredients
- Fun Family Activity – Kids love helping make these, turning meal prep into quality time
- Versatile Serving Options – Works as appetizers, main courses, or party snacks
- Nostalgic Comfort Food – Brings back happy memories of fairs and carnivals
- Quick Cooking Time – Fries up in just 2-3 minutes per batch
- Customizable Recipe – Easily adapt with different sausages, add-ins, or coatings
- Crowd-Pleasing Appeal – Universally loved by both kids and adults
- Portable and Mess-Free – Easy to eat without utensils, perfect for outdoor events
Ingredient Notes
Understanding your ingredients helps you make the best mini corn dogs possible. Let’s break down each component:
Hot Dogs or Cocktail Sausages – The protein center of your corn dogs. Beef hot dogs are classic, offering robust flavor that stands up to the cornmeal coating. All-beef franks from quality brands (Oscar Mayer, Hebrew National, Nathan’s) deliver the best taste. Regular hot dogs (beef and pork blend) work perfectly too and are often more budget-friendly. Turkey or chicken hot dogs create lighter versions. For truly mini corn dogs, use cocktail sausages or cut regular hot dogs into thirds or halves. Little smokies (small smoked sausages) are another excellent option with great flavor. Choose hot dogs you enjoy eating plain—the coating enhances but doesn’t mask the hot dog flavor.
Cornmeal – Provides the signature corn dog flavor and texture. Yellow cornmeal is traditional and creates that classic golden color. Medium or fine grind works best—coarse cornmeal can be too gritty. Stone-ground cornmeal offers more corn flavor if you prefer it. Don’t substitute cornmeal entirely with flour or the coating won’t taste like corn dogs, though you can use a cornmeal-flour blend (see recipe).
All-Purpose Flour – Works with cornmeal to create batter structure that adheres to hot dogs and fries up crispy. Flour provides gluten structure that helps batter stick and creates lighter texture than cornmeal alone. For gluten-free corn dogs, substitute with gluten-free all-purpose flour blend (not just cornmeal alone, as you need the binding properties).
Sugar – Adds sweetness that balances savory hot dogs and creates that classic corn dog flavor profile. Granulated white sugar is standard. You can reduce sugar slightly if you prefer less sweet coating, but don’t omit entirely—some sweetness is essential to authentic corn dog taste.
Baking Powder – The leavening agent that makes batter light and fluffy rather than dense and heavy. Make sure your baking powder is fresh (check expiration date) for proper rise. Old baking powder produces flat, dense coating.
Milk – Creates the liquid base for batter, providing moisture and richness. Whole milk produces the richest batter, but 2% or even skim milk works fine. Buttermilk creates tangier, more tender coating with extra moisture. For dairy-free, use unsweetened almond milk or oat milk.
Egg – Binds ingredients together and adds structure and richness to batter. The egg helps batter adhere to hot dogs and creates tender interior. For egg-free version, use flax egg (1 tablespoon ground flaxseed mixed with 3 tablespoons water, let sit 5 minutes).
Vegetable Oil for Frying – High smoke point oil is essential for deep frying. Vegetable oil, canola oil, or peanut oil all work well. Avoid olive oil, which has a low smoke point and can smoke or burn at frying temperatures. You’ll need enough oil for deep frying—at least 2-3 inches in your pot.
Equipment Needed
Having the right tools makes preparing mini corn dogs much easier and safer:
- Large Heavy-Bottomed Pot or Dutch Oven – For deep frying with stable heat (at least 3-4 inches deep)
- Candy/Deep Fry Thermometer – Essential for monitoring oil temperature (350-375°F)
- Medium Mixing Bowl – For preparing the cornmeal batter
- Whisk – To mix batter until smooth and lump-free
- Tall Glass or Cup – Perfect vessel for dipping hot dogs into batter
- Toothpicks or Small Wooden Skewers – For holding hot dogs while dipping and frying
- Paper Towels – For draining excess oil after frying
- Wire Cooling Rack – Keeps fried corn dogs crispy by allowing air circulation
- Slotted Spoon or Spider Strainer – For safely removing corn dogs from hot oil
- Tongs – For handling hot dogs and turning them while frying
- Baking Sheet – To hold prepared corn dogs before frying and for cooling after
- Sharp Knife and Cutting Board – If cutting hot dogs into smaller pieces

Mini Corn Dogs Recipe
Homemade mini corn dogs feature juicy hot dog pieces coated in sweet cornmeal batter and fried until golden and crispy. These easy corn dog bites are perfect for parties, game day snacks, or fun family dinners—ready in just 35 minutes!
- Total Time: 35 minutes
- Yield: 24-30 mini corn dogs (6-8 servings) 1x
Ingredients
For the Mini Corn Dogs:
- 8-10 hot dogs (beef, pork, or turkey)
- Wooden skewers or toothpicks
For the Cornmeal Batter:
- 1 cup yellow cornmeal
- 1 cup all-purpose flour
- ¼ cup granulated sugar
- 1 tablespoon baking powder
- ½ teaspoon salt
- 1 cup milk (whole or 2%)
- 1 large egg
- 2 tablespoons vegetable oil (for batter, not frying)
For Frying:
- Vegetable oil for deep frying (about 6-8 cups)
For Serving:
- Ketchup
- Yellow mustard
- Honey mustard
- Ranch dressing
- BBQ sauce
Instructions
- Prepare Hot Dogs: Cut each hot dog into thirds (for mini corn dogs) or halves (for slightly larger bites). Pat them very dry with paper towels—this is crucial for batter adhesion. Insert a toothpick or small wooden skewer into one end of each hot dog piece, leaving enough stick to hold while dipping and eating.
- Make Batter: In a medium mixing bowl, whisk together cornmeal, flour, sugar, baking powder, and salt until well combined. In a separate small bowl or measuring cup, whisk together milk, egg, and 2 tablespoons vegetable oil. Pour wet ingredients into dry ingredients and whisk until just combined and smooth. The batter should be thick but pourable, similar to pancake batter. Let batter rest for 5 minutes.
- Transfer Batter to Tall Glass: Pour the batter into a tall, narrow glass or cup (at least 6 inches tall). This makes dipping hot dogs much easier than using a wide bowl. The batter should be deep enough to almost cover the hot dog pieces when dipped.
- Heat Oil: In a large, heavy-bottomed pot or Dutch oven, heat 2-3 inches of vegetable oil over medium-high heat until it reaches 350-375°F on a deep-fry thermometer. Maintaining proper temperature is crucial for crispy, non-greasy corn dogs. Don’t skip using a thermometer.
- Coat Hot Dogs: Working with one at a time, hold a hot dog by the stick and dip it into the batter, rotating to coat completely. Let excess batter drip back into the glass for 2-3 seconds. If batter isn’t coating evenly, it may be too thin—add 1-2 tablespoons more cornmeal. If too thick, add 1 tablespoon milk.
- Fry in Batches: Carefully lower 4-5 coated hot dogs into the hot oil, being cautious of splattering. Don’t overcrowd—this drops oil temperature and causes soggy coating. Fry for 2-3 minutes, turning occasionally with tongs or a slotted spoon, until deep golden brown all over.
- Drain: Remove fried mini corn dogs with a slotted spoon or spider strainer and transfer to a wire cooling rack set over paper towels or a baking sheet lined with paper towels. This allows excess oil to drip away while keeping the coating crispy.
- Continue Frying: Repeat coating and frying process with remaining hot dogs, working in batches. Monitor oil temperature between batches and adjust heat as needed to maintain 350-375°F.
- Serve: Let mini corn dogs cool for 2-3 minutes before serving (they’ll be very hot inside!). Serve warm with ketchup, mustard, and other favorite dipping sauces.
Notes
- Dry hot dogs thoroughly before dipping—moisture prevents batter from sticking.
- Batter should be thick enough to coat hot dogs without running off, but not so thick it’s pasty. Adjust consistency with cornmeal (to thicken) or milk (to thin).
- Maintain oil temperature at 350-375°F. If too hot, coating burns before hot dogs heat through. If too cool, corn dogs absorb excess oil and become greasy.
- Don’t overcrowd the pot—fry in small batches for consistent results.
- These are best served fresh and hot, but can be reheated in the oven.
- For extra crispy coating, double-dip: coat once, let excess drip, then dip again before frying.
- Leftover batter can be poured into a greased pan and baked as cornbread.
- Prep Time: 15 minutes
- Cook Time: 20 minutes
- Category: Appetizer
- Method: Deep Frying
- Cuisine: American
- Diet: Vegetarian
Nutrition
- Serving Size: 3-4 mini corn dogs
- Calories: 385
- Sugar: 8g
- Sodium: 748mg
- Fat: 24g
- Saturated Fat: 5g
- Unsaturated Fat: 18g
- Trans Fat: 0g
- Carbohydrates: 31g
- Fiber: 2g
- Protein: 11g
- Cholesterol: 55mg
Tips & Variations
Transform your mini corn dogs to match any preference with these creative variations:
Jalapeño Cheddar Corn Dogs: Add ½ cup shredded sharp cheddar cheese and 2 tablespoons finely diced pickled jalapeños to the batter for spicy, cheesy kick. These are perfect for adult parties and game day gatherings.
Sweet Honey Corn Dogs: Increase sugar in batter to ⅓ cup and add 2 tablespoons honey. Serve with honey mustard for dipping. Kids especially love these sweeter versions.
Chili Cheese Corn Dogs: Use cheese-filled hot dogs (hot dogs with cheese inside) and add 1 teaspoon chili powder to the batter. Serve with warm chili for dipping for ultimate comfort food.
Mini Sausage Corn Dogs: Use breakfast sausage links cut into pieces, or cocktail smokies instead of hot dogs for different flavor profile. These work great for brunch or breakfast-for-dinner.
Gluten-Free Corn Dogs: Replace all-purpose flour with gluten-free all-purpose flour blend (1:1 ratio). Make sure hot dogs are gluten-free (check labels). The texture will be nearly identical.
Baked Mini Corn Dogs (Healthier): Instead of deep frying, bake at 400°F for 15-18 minutes, turning halfway through, until golden brown. They won’t be quite as crispy but are significantly lighter.
Air Fryer Corn Dogs: Spray coated corn dogs with cooking spray and air fry at 390°F for 8-10 minutes, turning halfway, until golden and crispy. This produces crispy results with less oil.
Pretzel-Coated Corn Dogs: Replace half the cornmeal with finely crushed pretzels for salty, crunchy coating with pretzel flavor. Serve with cheese sauce for dipping.
Pro Chef Tips
Elevate your mini corn dogs from good to absolutely perfect with these professional techniques:
Dry Those Hot Dogs Thoroughly: This is the single most important step for success. Wet hot dogs repel batter, causing it to slide off or create bald spots. After patting dry with paper towels, let hot dogs sit on fresh paper towels for 5 minutes to release additional moisture. Seriously dry hot dogs make all the difference.
Perfect Batter Consistency: The batter should be thick enough to coat the back of a spoon but still drip slowly. Too thin and it won’t cling to hot dogs; too thick and it creates heavy, doughy coating. Test consistency with your first hot dog and adjust as needed before coating the rest.
Use a Tall Glass for Dipping: Professional corn dog vendors use tall, narrow containers because they allow you to dip hot dogs vertically in one smooth motion, creating even coating. Wide bowls force horizontal dipping that creates uneven coverage and makes a mess.
Maintain Consistent Oil Temperature: Use a thermometer and monitor constantly. Oil naturally cools when you add cold battered hot dogs. Fry in small batches (4-5 pieces maximum) and let oil return to temperature between batches. Consistent temp = consistent results.
The Two-Rotation Fry Method: After lowering corn dogs into oil, let them fry undisturbed for 30-45 seconds until coating begins to set. Then rotate them 90 degrees and let cook another 30-45 seconds. Rotate once more and finish frying. This ensures even browning and prevents batter from sliding off.
Double-Dip for Extra Coating: Professional corn dogs have thick, substantial coating. To achieve this at home, dip hot dogs in batter, let excess drip for a few seconds, then dip again before frying. This double-coating creates that classic thick corn dog shell.
Let Them Rest Before Serving: Fresh-from-the-oil corn dogs are volcano-hot inside. Let them rest on the cooling rack for 2-3 minutes before serving. This prevents burnt mouths while allowing steam to escape, which actually helps maintain crispy coating.
Common Mistakes to Avoid
Sidestep these frequent pitfalls for perfect mini corn dogs every time:
Not Drying Hot Dogs: Trying to coat wet hot dogs results in batter that slides right off or creates spotty, uneven coverage that looks homemade in the worst way. Moisture is your enemy. Pat hot dogs bone-dry with paper towels and let them rest on paper towels for a few minutes before coating. This extra step is non-negotiable for success.
Incorrect Oil Temperature: Eyeballing oil temperature is unreliable and leads to disappointing results. Too-cool oil (below 325°F) produces greasy, soggy corn dogs that absorb excess oil. Too-hot oil (above 400°F) burns coating before hot dogs heat through. Always use a thermometer and maintain 350-375°F consistently.
Overcrowding the Pot: Adding too many corn dogs at once dramatically drops oil temperature, resulting in oil-logged, greasy coating. It also makes pieces stick together and increases splatter risk. Fry in small batches of 4-5 pieces with space between each one for even cooking and crispy results.
Batter Too Thin or Too Thick: Thin batter runs off hot dogs before you can get them into the oil, leaving bare spots. Thick batter creates heavy, doughy coating that doesn’t cook properly. The goldilocks zone: batter should coat the back of a spoon and drip slowly. Adjust with cornmeal to thicken or milk to thin.
Skipping the Rest Time for Batter: Immediately frying after mixing batter doesn’t give flour time to hydrate and baking powder time to activate. Let batter rest 5 minutes after mixing for improved texture and better rising during frying.
Moving Corn Dogs Too Soon: Touching or rotating corn dogs immediately after lowering into oil causes wet batter to tear or slide off. Let them fry undisturbed for 30-45 seconds until coating begins to set, then rotate gently. Patience prevents batter catastrophes.
Storage & Meal Prep
Proper storage keeps your mini corn dogs delicious and ready to reheat:
Room Temperature (Not Recommended): Don’t leave fried corn dogs at room temperature for more than 2 hours. The coating becomes soggy and hot dogs are potentially hazardous if left out too long.
Refrigerator Storage: Let corn dogs cool completely, then store in an airtight container lined with paper towels (to absorb moisture) for up to 3 days. Separate layers with parchment paper to prevent sticking. The coating will soften in the refrigerator—reheating in the oven crisps it back up.
Reheating from Refrigerator: For best results, reheat in a 375°F oven on a wire rack over a baking sheet for 10-12 minutes until hot throughout and coating crisps up. You can also reheat in an air fryer at 375°F for 5-7 minutes. Avoid microwave reheating, which makes coating soggy and rubbery.
Freezing Cooked Corn Dogs: This is the best storage method for make-ahead convenience. Let corn dogs cool completely, arrange in a single layer on a baking sheet, and freeze until solid (about 2 hours). Transfer frozen corn dogs to freezer bags or airtight containers, separating layers with parchment paper. Store for up to 3 months. Label with date and reheating instructions.
Reheating from Frozen: Bake frozen corn dogs (no need to thaw) at 375°F for 15-18 minutes until hot throughout and crispy. Air fryer works too: 375°F for 10-12 minutes. This method produces results almost as good as freshly fried.
Freezing Uncooked Corn Dogs: You can freeze battered (but unfried) corn dogs, though this requires more careful handling. Freeze on a baking sheet until solid, then transfer to containers. Fry directly from frozen, adding 1-2 extra minutes to cooking time. The coating may be slightly less smooth than fresh, but still tasty.
Make-Ahead & Freezer Notes
Plan ahead with these time-saving strategies for stress-free parties and meals:
Complete Make-Ahead (Best Method): Fry all corn dogs according to recipe directions, let cool completely, and freeze as described above. On party day or meal time, simply reheat in the oven for 15-18 minutes. This approach eliminates all cooking stress and fills your house with amazing corn dog aroma right before serving.
Partial Prep Strategy: Prepare and cut hot dogs, make batter, and refrigerate batter for up to 24 hours before frying. Let refrigerated batter come to room temperature and give it a good stir before dipping hot dogs. This splits the work across two days while maintaining freshest-fried quality.
Party Timeline: For events, fry corn dogs 2-3 hours before guests arrive, keep them at room temperature (if within 2-hour window), and reheat in a low oven (250°F) for 10 minutes just before serving. Or fry them in batches throughout the party for hot-and-fresh appeal.
Freezer Stockpiling: Make double or triple batches when you’re already set up for frying. Freeze extras for quick future meals—perfect for busy weeknights when you need dinner fast or unexpected guests drop by.
School Lunch Prep: Fry a large batch on Sunday, freeze individually wrapped corn dogs, and pack frozen ones in insulated lunch boxes with ice packs. They’ll thaw by lunchtime and kids can eat them at room temperature or slightly warm.
Best Reheating Method: Whether from refrigerator or freezer, oven or air fryer reheating produces the crispiest coating that most closely mimics fresh-fried results. The oven’s dry heat revives the crispy exterior while heating the hot dog interior perfectly.
Serving Suggestions
Create memorable meals and party spreads with these serving ideas:
Classic Dipping Station: Set out small bowls of ketchup, yellow mustard, honey mustard, Dijon mustard, BBQ sauce, ranch dressing, and cheese sauce. Let guests mix their own combinations or try different sauces with each corn dog.
Game Day Spread: Serve mini corn dogs alongside buffalo wings, mozzarella sticks, loaded nachos, onion rings, potato skins, and a vegetable platter with ranch. Add chips, pretzels, and beer for the ultimate sports-watching feast.
Kids’ Birthday Party: Arrange corn dogs on colorful platters with fun themed toothpicks. Serve with macaroni and cheese, fruit kabobs, carrot and celery sticks with ranch, juice boxes, and birthday cake. The corn dogs will be the first food to disappear.
Family Dinner: Make corn dogs the main course and serve with crispy french fries or tater tots, coleslaw, baked beans, corn on the cob, watermelon slices, and lemonade for a fun, casual dinner that feels like a summer cookout.
Tailgating Menu: Mini corn dogs are perfect portable party food. Pack them in an insulated container to keep warm, bring sauces in squeeze bottles, and serve with chips, cookies, and cold beverages from the cooler.
Appetizer Platter: For adult parties, serve corn dogs with gourmet dipping sauces: sriracha mayo, chipotle aioli, truffle ketchup, or spicy brown mustard. Arrange on a platter with pretzel bites and cheese cubes for sophisticated snacking.
Movie Night: Set up a concession-style spread with corn dogs, popcorn (regular and caramel), candy, nachos with cheese, and various sodas or movie theater candy. Let family members serve themselves for at-home theater experience.
Beverage Pairings: Mini corn dogs pair well with cold beer (especially lagers), hard cider, lemonade, iced tea, root beer floats, or classic Coca-Cola. For kids, serve with fruit punch, chocolate milk, or apple juice.
FAQs Section
Q: Can I bake mini corn dogs instead of frying them?
A: Yes! Arrange battered corn dogs on a greased baking sheet, spray generously with cooking spray, and bake at 400°F for 15-18 minutes until golden brown, turning once halfway through. They won’t be quite as crispy as fried versions but are much lighter and still delicious. The coating will be more muffin-like than crispy.
Q: Why isn’t the batter sticking to my hot dogs?
A: This almost always means the hot dogs are wet. Pat them extremely dry with paper towels and let them sit on fresh paper towels for 5 minutes to release additional moisture. Dry hot dogs are essential for batter adhesion. Also check that your batter is thick enough—thin batter won’t cling properly.
Q: Can I use pancake or muffin mix instead of making batter from scratch?
A: You can use a shortcut! Mix 1 cup cornmeal with 1 cup pancake mix (like Bisquick or Krusteaz) and add enough milk to create thick batter. Or use a box of Jiffy corn muffin mix prepared according to package directions. The flavor won’t be quite as authentic but it’s a convenient time-saver.
Q: What’s the best oil temperature for frying corn dogs?
A: Maintain oil between 350-375°F for optimal results. At this temperature range, the coating crisps and browns beautifully in 2-3 minutes while the hot dog inside heats through. Lower temps produce greasy coating; higher temps burn outside before inside cooks. Always use a thermometer rather than guessing.
Q: Can I make these ahead and freeze them?
A: Absolutely! This is one of the best features of homemade corn dogs. Fry them completely, cool, freeze on a baking sheet until solid, then store in freezer bags for up to 3 months. Reheat from frozen in a 375°F oven for 15-18 minutes. They’re perfect for quick meals and parties.
Q: How do I prevent corn dogs from being greasy?
A: Maintain proper oil temperature (350-375°F) throughout frying. Too-cool oil causes corn dogs to absorb excess grease. Don’t overcrowd the pot, which drops temperature. After frying, drain on a wire rack (not just paper towels) so air circulates and excess oil drips away from all sides.
Q: Can I make these with different types of sausages?
A: Yes! Try bratwurst pieces, Italian sausages, chorizo, chicken sausages, or vegetarian hot dogs. Each creates different flavor profiles. Fully cooked sausages work best since they only need heating through. Raw sausages require pre-cooking before coating and frying.
Q: How do I get an even coating of batter?
A: Use a tall, narrow glass for dipping so you can dip hot dogs vertically in one smooth motion. Make sure batter is the right consistency (thick but pourable). Rotate the hot dog slowly as you lift it out, letting excess drip back into the glass. For extra-thick coating like at fairs, dip twice before frying.
Conclusion
There you have it—everything you need to create absolutely irresistible, golden-brown mini corn dogs that taste better than anything from a carnival or frozen food aisle! These homemade corn dog bites prove that classic comfort food is easy to make at home, delivering that perfect combination of sweet cornbread coating and savory hot dogs that brings joy to kids and adults alike. Whether you’re making them for game day parties, family dinners, kids’ celebrations, or simply satisfying a craving, these easy mini corn dogs deliver crowd-pleasing results every single time.
Remember the keys to success: dry those hot dogs thoroughly before coating, maintain consistent oil temperature at 350-375°F, use a tall glass for even dipping, fry in small batches without overcrowding, and don’t skip the cooling rest time before serving. Master these fundamentals and you’ll create professional-quality corn dogs that rival any state fair.
The beauty of this mini corn dog recipe lies in its incredible versatility and make-ahead convenience. Customize with different meats, add cheese or jalapeños to the batter, try various dipping sauces, or make huge batches to freeze for quick future meals. This recipe adapts beautifully to your preferences and schedule.
Ready to bring carnival fun to your kitchen? Pin this recipe to your favorite Pinterest board so you’ll always have it ready when corn dog cravings strike! Make these mini corn dogs this weekend and let me know in the comments how they turned out. What dipping sauce was your favorite? Did your kids help make them? I absolutely love hearing about your kitchen adventures and seeing your delicious creations!
Don’t forget to snap a photo of your gorgeous, golden mini corn dogs—especially that perfect cross-section showing the layers—and share it on social media. Tag me so I can see your masterpiece and celebrate with you! Here’s to homemade goodness, happy kids, and comfort food that never goes out of style!