Perfect Mini Quiche Recipe – Bite-Sized, Make-Ahead Breakfast Cups!

Is there anything more delightful than a perfectly golden mini quiche with its flaky crust and creamy, savory filling? These adorable bite-sized quiches are the ultimate crowd-pleaser, combining the elegance of French cuisine with the convenience of grab-and-go American breakfast culture. Whether you call them mini quiches, quiche bites, or breakfast egg cups, one thing’s for sure—they’re absolutely irresistible!
This mini quiche recipe has taken the home cooking world by storm, and it’s easy to see why. They’re perfect for busy mornings when you need a protein-packed breakfast, ideal for brunch gatherings where presentation matters, and fantastic for meal prep Sunday. I love making a big batch on the weekend and having these delicious savory pastries ready to grab throughout the week. They’re elegant enough for baby showers and wedding brunches, yet practical enough for lunchboxes and after-school snacks.
These versatile little gems work beautifully for any occasion—serve them warm at breakfast, pack them cold for lunch, offer them as appetizers at parties, or enjoy them as a light dinner alongside a crisp salad. The beauty of homemade mini quiches is that you can customize every single one with different fillings, making them perfect for satisfying various tastes and dietary preferences all at once!
History / Background
The quiche as we know it today has fascinating roots that trace back centuries through European culinary history. While many people associate quiche exclusively with French cuisine (and rightfully so—the French certainly perfected it), the concept of egg custard baked in pastry actually originated in medieval Germany in the kingdom of Lothringen, which the French know as Lorraine. The word “quiche” itself is believed to derive from the German word “kuchen,” meaning cake.
The most famous version, Quiche Lorraine, emerged in the 16th century in the Lorraine region of northeastern France. The original recipe was quite simple compared to what we know today—it contained only eggs, cream, and smoked bacon (lardons) baked in a bread dough crust. Cheese wasn’t even part of the traditional recipe initially! It was only later that Gruyère or Emmental cheese became standard additions.
Quiche made its way across the Atlantic and became wildly popular in America during the 1950s and 1960s, particularly after Julia Child introduced French cooking to American home cooks through her television shows and cookbooks. It became a staple of ladies’ luncheons, brunch menus, and elegant entertaining. However, the traditional large quiche presented challenges—it required advance planning, precise baking, and careful slicing.
Enter the mini quiche revolution! American home cooks, always looking for convenience without sacrificing flavor, began adapting the classic quiche into individual portions using muffin tins. This innovation solved multiple problems at once: no need for perfect slicing, better portion control, easier serving for parties, and the ability to customize individual quiches with different fillings. The mini quiche became particularly popular in the 1980s and has experienced multiple waves of popularity since then, especially with the rise of meal prep culture and Pinterest-inspired breakfast ideas.
Today, mini quiches represent the perfect marriage of French culinary sophistication and American practicality. They’ve transcended their brunch origins to become an all-day food solution—breakfast, lunch, snack, appetizer, or light dinner. The mini format also made quiche more approachable and less intimidating for home cooks who might have shied away from making a full-sized quiche. These charming little egg cups have earned their place as a beloved recipe in American kitchens, proving that sometimes the best innovations come from scaling down tradition into perfectly portioned bites!
Why You’ll Love This Recipe
This easy mini quiche recipe is about to become your secret weapon for effortless entertaining and stress-free meal prep! I’ve tested this recipe countless times to create the perfect balance of flaky crust, creamy custard filling, and delicious mix-ins. Whether you’re an experienced baker or someone who’s never made pastry before, this recipe delivers foolproof results every single time.
Here’s why these mini quiches will change your breakfast game:
- Ultimate make-ahead convenience – Bake on Sunday, enjoy all week long without any morning stress
- Perfectly portioned – No cutting, no mess, just grab and go
- Freezer-friendly excellence – Make double batches and stock your freezer for up to 3 months
- Endlessly customizable – Create different flavor combinations in the same batch
- Kid-approved nutrition – Sneaky way to add vegetables to breakfast
- Budget-friendly meal – Uses simple, affordable ingredients you likely have on hand
- Impressive presentation – Looks fancy but incredibly easy to make
- Protein-packed energy – Keeps you full and satisfied for hours
- No special skills required – Even baking beginners can master these
- Perfect for any occasion – Works for breakfast, brunch, lunch, snacks, or appetizers
- One-bowl simplicity – Minimal dishes and easy cleanup
Ingredient Notes
The magic of perfect mini quiches lies in using quality ingredients that create that signature creamy, custardy texture. Let’s break down what makes these so delicious:
Pie Crust – You can absolutely use store-bought refrigerated pie dough to save time (each package contains 2 crusts, which is perfect for this recipe). However, homemade pie crust tastes amazing if you have the time! Puff pastry also works beautifully for a flakier, lighter texture. For a completely crustless version, simply grease your muffin tin well and skip the pastry—they’ll be more like frittata muffins.
Eggs – The star ingredient! Large eggs create the custard base that makes quiche so luxuriously creamy. They provide structure, richness, and protein. Always use room temperature eggs for the smoothest custard—they blend more easily and bake more evenly.
Heavy Cream – This is what gives quiche its signature silky, rich texture. You can substitute half-and-half for a lighter version, or use whole milk in a pinch (though the texture will be slightly less creamy). For dairy-free versions, unsweetened oat milk or coconut cream work surprisingly well.
Cheese – Shredded cheese adds flavor, creaminess, and helps bind the filling. Sharp cheddar provides robust flavor, Gruyère adds authentic French flair, Swiss offers mild nuttiness, and mozzarella creates excellent melting. Mix and match to your preference! Freshly shredded cheese melts better than pre-shredded.
Vegetables and Meat – This is where you can get creative! Sautéed spinach, bell peppers, onions, mushrooms, tomatoes, broccoli, or asparagus all work beautifully. For protein, consider cooked bacon, diced ham, crumbled sausage, or smoked salmon. Always pre-cook vegetables to release excess moisture.
Seasonings – Salt, black pepper, garlic powder, and a pinch of nutmeg (traditional in quiche!) elevate the egg custard from bland to brilliant. Fresh herbs like chives, parsley, thyme, or dill add brightness and sophistication.
Butter – For greasing the muffin tin to ensure easy release. Cooking spray works too, but butter adds extra flavor.
Equipment Needed
You don’t need a fancy kitchen to make bakery-worthy mini quiches! Here’s your equipment list:
- 12-cup muffin tin – Standard size works perfectly for mini quiches (not mini muffin tins)
- Rolling pin – For rolling out pie crust to the right thickness
- Round cookie cutter or glass – About 4 inches in diameter for cutting pastry circles
- Large mixing bowl – For whisking together the egg custard
- Whisk or fork – For blending eggs and cream smoothly
- Measuring cups and spoons – For accurate ingredient proportions
- Sharp knife and cutting board – For chopping vegetables and preparing fillings
- Small skillet – For pre-cooking vegetables or meat
- Pastry brush (optional) – For brushing crusts with egg wash
- Cooling rack – Essential for cooling quiches to the right texture
- Spatula or butter knife – For releasing quiches from the muffin tin
Mini Quiche Recipe
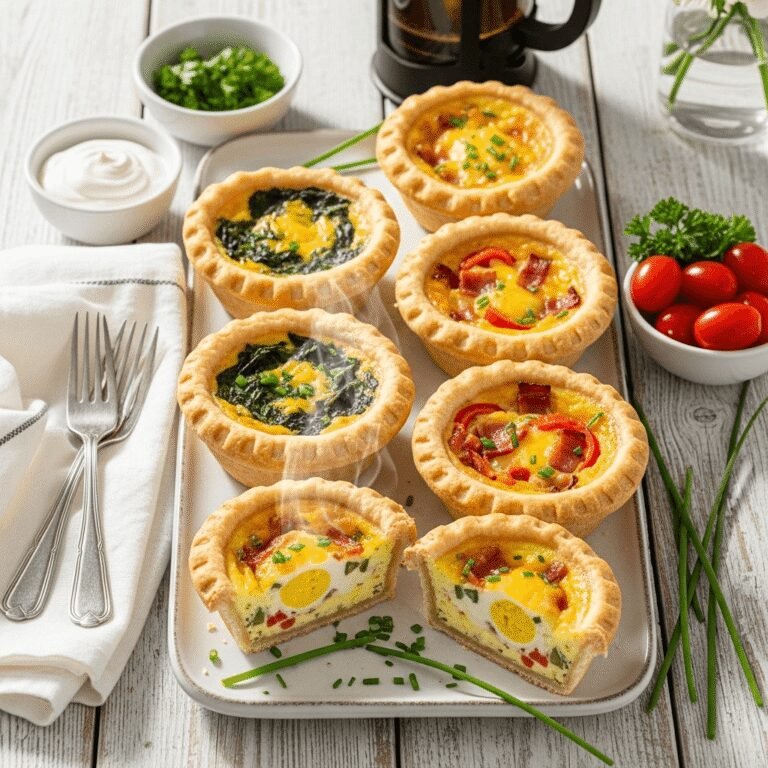
These easy mini quiches feature flaky pastry crusts filled with creamy egg custard, melted cheese, and your choice of delicious mix-ins. Perfect for meal prep, brunch gatherings, or grab-and-go breakfasts. Make them ahead and freeze for up to 3 months for the ultimate breakfast convenience!
- Total Time: 45 minutes
- Yield: 12 mini quiches 1x
Ingredients
For the Crust:
- 2 refrigerated pie crusts (or homemade pie dough)
- 1 tablespoon butter, melted (for greasing)
For the Egg Custard:
- 6 large eggs
- ¾ cup heavy cream (or half-and-half)
- ½ teaspoon salt
- ¼ teaspoon black pepper
- ¼ teaspoon garlic powder
- ⅛ teaspoon ground nutmeg (optional, but traditional)
- 1 cup shredded cheese (cheddar, Gruyère, or Swiss)
Filling Options (choose 1-2 cups total):
- ½ cup cooked, crumbled bacon
- ½ cup diced cooked ham
- ½ cup cooked, crumbled breakfast sausage
- ½ cup sautéed mushrooms
- ½ cup sautéed spinach (squeezed dry)
- ½ cup diced bell peppers (sautéed)
- ½ cup caramelized onions
- ¼ cup sun-dried tomatoes, chopped
- 2 tablespoons fresh chives or herbs, chopped
Instructions
- Preheat and prep: Preheat your oven to 375°F (190°C). Generously brush a 12-cup muffin tin with melted butter, making sure to coat the bottom and sides of each cup. This ensures easy release after baking.
- Prepare the crust: Unroll the pie crusts on a lightly floured surface. Using a 4-inch round cookie cutter or the rim of a glass, cut out 12 circles from the two pie crusts (you should get 6 circles per crust; re-roll scraps if needed). Gently press each pastry circle into a muffin cup, making sure it comes up the sides and sits flush with the rim. If the dough tears, simply press it back together with your fingers.
- Pre-cook your fillings: If using vegetables like spinach, mushrooms, or peppers, sauté them in a skillet over medium heat for 3-4 minutes until softened and any moisture has evaporated. Squeeze spinach completely dry using paper towels. If using bacon or sausage, cook until fully done and drain on paper towels. Set all fillings aside to cool slightly.
- Make the custard: In a large mixing bowl, whisk together the eggs, heavy cream, salt, black pepper, garlic powder, and nutmeg until smooth and well combined. The mixture should be homogeneous with no streaks of egg white visible.
- Assemble the mini quiches: Distribute your chosen fillings evenly among the 12 pastry-lined muffin cups (about 1-2 tablespoons of filling per cup). Sprinkle shredded cheese over the fillings in each cup. Carefully pour the egg custard mixture into each cup, filling to about ¾ full (leave a little room for expansion). The egg mixture should just cover the fillings.
- Bake: Place the muffin tin in the preheated oven and bake for 22-27 minutes, until the quiches are puffed, golden brown on top, and set in the center. A toothpick inserted into the center should come out clean. The edges of the pastry should be golden and crispy.
- Cool and serve: Remove from the oven and let the mini quiches cool in the pan for 5 minutes. This cooling period is crucial—it allows the custard to set properly, making the quiches much easier to remove. Run a butter knife around the edges of each quiche and gently lift out using a spoon or small offset spatula. Serve warm or at room temperature.
Notes
- Preventing soggy bottoms: Blind baking the crusts isn’t necessary, but if you want extra-crispy bottoms, prick the pastry with a fork before adding fillings and bake empty for 5 minutes first.
- Moisture management: Always pre-cook and thoroughly drain vegetables. Excess moisture is the enemy of good quiche! Squeeze spinach completely dry.
- Even baking: If your oven has hot spots, rotate the muffin tin halfway through baking for even browning.
- Doneness test: The center should be just set with a slight jiggle. They’ll continue cooking slightly from residual heat as they cool.
- Crustless version: Skip the pastry entirely and pour egg mixture directly into well-greased muffin cups. Reduce baking time by 3-5 minutes.
- Size variations: This recipe works for regular muffin tins (shown here) or mini muffin tins (reduce baking time to 12-15 minutes for mini).
- Prep Time: 20 minutes
- Cook Time: 25 minutes
- Category: Breakfast
- Method: Baking
- Cuisine: French
- Diet: Vegetarian
Nutrition
- Serving Size: 1 mini quiche
- Calories: 195
- Sugar: 1g
- Sodium: 285mg
- Fat: 14g
- Saturated Fat: 7g
- Unsaturated Fat: 6g
- Trans Fat: 0g
- Carbohydrates: 11g
- Fiber: 0g
- Protein: 7g
- Cholesterol: 115mg
Tips & Variations
The beauty of mini quiches is their incredible versatility! Here are countless ways to customize them to your taste:
Flavor Combination Ideas:
- Classic Lorraine: Bacon, Gruyère cheese, and caramelized onions
- Spinach and Feta: Sautéed spinach, crumbled feta, sun-dried tomatoes
- Western: Diced ham, bell peppers, onions, and cheddar
- Mushroom Swiss: Sautéed mushrooms, Swiss cheese, fresh thyme
- Caprese: Cherry tomatoes, fresh mozzarella, basil, balsamic drizzle
- Greek: Spinach, feta, kalamata olives, roasted red peppers
- Southwestern: Black beans, corn, pepper jack, cilantro, diced green chiles
- Smoked Salmon: Smoked salmon, cream cheese, dill, capers
- Italian: Italian sausage, mozzarella, sun-dried tomatoes, basil
- Garden Veggie: Zucchini, tomatoes, spinach, goat cheese
Dietary Modifications:
- Gluten-Free: Use gluten-free pie crust or make them crustless
- Dairy-Free: Substitute dairy-free cream alternative and omit cheese (or use vegan cheese)
- Keto/Low-Carb: Skip the crust entirely for a low-carb breakfast option
- Vegetarian: Use any combination of vegetables and cheese without meat
- Lighter Version: Use half-and-half or whole milk instead of cream, reduce cheese
- Whole Grain: Use whole wheat pie crust for added fiber
Crust Alternatives:
- Phyllo dough for ultra-crispy, flaky texture
- Hash brown crust for a potato-based option
- Crustless for easiest, lowest-carb option
- Tater tot crust for kid-friendly fun
Cheese Variations:
- Gruyère (traditional and sophisticated)
- Sharp cheddar (bold flavor)
- Goat cheese (tangy and creamy)
- Feta (salty and crumbly)
- Pepper jack (spicy kick)
- Boursin or herbed cheese (already seasoned)
Pro Chef Tips
Want bakery-quality mini quiches? These professional techniques make all the difference:
1. Room temperature ingredients are crucial. Cold eggs and cream don’t emulsify properly, leading to a grainy custard. Let eggs and cream sit at room temperature for 30 minutes before mixing, or place eggs in warm water for 5 minutes.
2. Don’t skip the nutmeg. Just a tiny pinch of nutmeg adds an indefinable depth and traditional French flavor to quiche. It’s subtle but makes the custard taste more complex and sophisticated.
3. Strain your custard for silk-smooth texture. Professional bakers strain the egg mixture through a fine-mesh sieve after whisking to remove any chalazae (those stringy bits in eggs) for the smoothest possible custard.
4. Use a measuring cup with a spout for filling. Whisking the custard in a large measuring cup (like a 4-cup glass measure) makes pouring into muffin cups much easier and neater. You can fill each cup precisely without spills.
5. Don’t overfill the cups. Fill only to about ¾ full. The custard will puff up during baking, and overfilled quiches will overflow and create a mess. They’ll also have a better texture if not overfilled.
6. Let them cool before removing. This is the most important tip! Removing quiches immediately will cause them to break apart. The 5-minute rest allows the custard to set and firm up, making removal much easier.
7. Blind bake for professional results. For the crispiest, most professional crusts, blind bake the pastry shells for 5 minutes before adding filling. Line each pastry cup with a small piece of parchment and a few dried beans or pie weights, bake, then remove weights and proceed.
8. Create an egg wash for golden crusts. Brush the exposed edges of the pastry with a beaten egg before baking for a beautiful, glossy, golden-brown finish.
Common Mistakes to Avoid
Even simple recipes have pitfalls. Here’s what to watch out for:
1. Using raw, watery vegetables. This is the number one mistake! Vegetables like spinach, mushrooms, zucchini, and tomatoes release significant moisture during baking, which creates soggy, watery quiches. Always pre-cook vegetables and squeeze or drain them thoroughly before adding to your custard.
2. Overfilling the muffin cups. It’s tempting to use all the custard, but overfilled quiches will overflow in the oven, creating a burnt mess and uneven texture. Fill only ¾ full and save any extra custard for another use (it makes great scrambled eggs!).
3. Overbaking until the custard is rubbery. Quiche should be removed from the oven when the center is just set with a slight jiggle—like Jell-O. Overbaked quiche becomes rubbery, dry, and develops an unpleasant eggy texture. Start checking at 20 minutes and watch carefully.
4. Trying to remove them too soon. Patience is key! Hot quiches are delicate and will fall apart if you remove them immediately. Wait the full 5 minutes for the custard to set properly. They’ll release much more easily when slightly cooled.
5. Skipping the greasing step. Even non-stick muffin tins need greasing for easy quiche release. Use butter or cooking spray generously, making sure to coat the sides and bottom of each cup thoroughly. This simple step prevents frustrating sticking.
Storage & Meal Prep
Mini quiches are a meal prepper’s dream! Here’s how to store and reheat them perfectly:
Refrigerator Storage: Store cooled mini quiches in an airtight container in the refrigerator for up to 4-5 days. Place parchment paper between layers to prevent sticking. They’re delicious cold, at room temperature, or reheated!
Best Reheating Methods:
- Microwave (fastest): 30-45 seconds per quiche on 50% power. This keeps them from getting rubbery.
- Oven (best texture): Preheat to 350°F, place quiches on a baking sheet, and heat for 8-10 minutes until warmed through. The crust stays crispy this way!
- Toaster oven: 350°F for 5-7 minutes—perfect for reheating just one or two.
- Air fryer: 300°F for 3-4 minutes creates wonderfully crispy crusts.
Meal Prep Strategy:
- Bake mini quiches on Sunday
- Cool completely on a wire rack
- Store in meal prep containers (2-3 quiches per container with fruit or veggies)
- Grab and go throughout the week
- Reheat at work or eat cold/room temperature
Cold Serving: Mini quiches are delicious served cold or at room temperature, making them perfect for lunchboxes, picnics, or on-the-go breakfasts. The flavors actually develop and meld beautifully when chilled!
Make-Ahead & Freezer Notes
Mini quiches are incredibly freezer-friendly, making them perfect for bulk meal prep!
Freezing Baked Mini Quiches (Recommended Method):
- Bake quiches completely according to recipe instructions
- Cool completely to room temperature on a wire rack (very important!)
- Flash freeze: Place cooled quiches on a parchment-lined baking sheet and freeze for 1-2 hours until solid
- Transfer frozen quiches to freezer-safe zip-top bags or containers, removing as much air as possible
- Label with date and contents
- Freeze for up to 3 months
- To reheat from frozen: Microwave for 1-2 minutes, or bake at 350°F for 15-20 minutes until heated through
Freezing Unbaked Mini Quiches: You can also freeze assembled but unbaked mini quiches:
- Assemble quiches completely in the muffin tin
- Freeze the entire muffin tin until solid (2-3 hours)
- Pop out frozen unbaked quiches and store in freezer bags
- When ready to bake, place frozen unbaked quiches in a greased muffin tin
- Bake at 375°F for 30-35 minutes (no need to thaw)
Make-Ahead Without Freezing:
- Prep fillings: Cook and chop all fillings up to 2 days ahead; store in airtight containers
- Make custard: Whisk egg mixture up to 1 day ahead; store covered in refrigerator
- Assemble night before: Assemble quiches completely, cover muffin tin tightly with plastic wrap, refrigerate overnight, and bake in the morning (add 3-5 extra minutes to baking time)
Best Practices:
- Always cool completely before freezing to prevent ice crystals
- Individual wrapping prevents freezer burn for longer storage
- Quiches taste best within 2 months of freezing (safe up to 3 months)
- Thaw overnight in refrigerator for best texture, or reheat from frozen
Serving Suggestions
Mini quiches are wonderfully versatile! Here’s how to serve them for any occasion:
For Breakfast/Brunch:
- Fresh fruit salad with berries and melon
- Crispy hash browns or breakfast potatoes
- Mixed green salad with vinaigrette
- Yogurt parfaits with granola
- Fresh-squeezed orange juice or mimosas
- Coffee cake or cinnamon rolls for a sweet element
- Sliced tomatoes with fresh basil
For Lunch:
- Simple mixed greens with balsamic dressing
- Tomato soup for dipping
- Roasted vegetables
- Coleslaw or potato salad
- Fresh fruit or vegetable crudités
- Chips or crackers
For Appetizers/Parties:
- Arrange on a platter with garnishes
- Serve alongside other finger foods
- Offer variety with different fillings
- Provide small plates and napkins
- Keep warm in a slow cooker on low
Beverage Pairings:
- Coffee or tea (breakfast)
- Fresh juice or smoothies
- Mimosas or Bellinis (brunch)
- White wine or rosé (lunch/dinner)
- Sparkling water with lemon
Presentation Ideas:
- Garnish with fresh herbs (chives, parsley, dill)
- Drizzle with hot sauce or sriracha mayo
- Serve on a bed of fresh greens
- Arrange on a tiered serving stand for elegant presentation
- Provide small bowls of hot sauce, salsa, or hollandaise for dipping
For Kids:
- Cut in half for smaller portions
- Pair with fruit and veggie sticks
- Add a fun dipping sauce
- Make with their favorite fillings
- Pack in lunchboxes with ice packs
FAQs Section
Q: Can I make mini quiches without a crust? A: Absolutely! Crustless mini quiches are actually easier to make and lower in carbs. Simply grease your muffin tin very well with butter or cooking spray, add your fillings and cheese directly to the cups, pour in the egg custard, and bake. They’ll be more like frittata muffins but equally delicious. Reduce baking time by 3-5 minutes since there’s no pastry to cook.
Q: Why are my mini quiches soggy? A: Soggy quiches usually result from excess moisture in the fillings. Always pre-cook vegetables like spinach, mushrooms, or zucchini to release their water content. Squeeze cooked spinach completely dry using paper towels or a clean kitchen towel. Also, don’t overfill the cups with custard—leave some room at the top. Make sure your muffin tin is properly greased so steam can escape around the edges.
Q: Can I use milk instead of heavy cream? A: Yes, but the texture will be less rich and creamy. Heavy cream creates that signature luxurious, custardy texture that makes quiche so special. If you prefer a lighter option, half-and-half works well as a compromise. Whole milk will work in a pinch but will produce a slightly firmer, less creamy result. For best results, stick with at least half-and-half.
Q: How do I know when my mini quiches are done? A: Mini quiches are done when the tops are puffed and golden, the edges are set, and the center has just a slight jiggle—like Jell-O. Insert a toothpick into the center; it should come out clean or with just a few moist crumbs (not liquid). The internal temperature should reach 160-165°F if you’re using a thermometer. They’ll continue to cook slightly from residual heat as they cool.
Q: Can I use store-bought pie crust? A: Absolutely! Refrigerated pie crusts from the grocery store work perfectly and save significant time. Each package typically contains 2 crusts, which is exactly what you need for 12 mini quiches. Just unroll, cut circles, and press into muffin cups. Puff pastry is another store-bought option that creates wonderfully flaky, light crusts.
Q: My quiches stuck to the pan—how do I prevent this? A: Proper greasing is absolutely essential! Use softened butter and brush it generously on the bottom and all the way up the sides of each muffin cup. Don’t just spray quickly—really coat every surface. Also, letting the quiches cool for 5 minutes before removing allows them to release naturally. Run a butter knife or small offset spatula around the edges before gently lifting out.
Q: Can I make different flavors in the same batch? A: Yes, this is one of the best features of mini quiches! Simply divide your custard mixture among the cups first (about ¾ full in each), then customize each one with different fillings and cheeses. This is perfect for feeding picky eaters or when you can’t decide on just one flavor. Just keep track of which ones contain which ingredients!
Q: How long do mini quiches last in the freezer? A: Properly stored mini quiches will maintain good quality in the freezer for up to 3 months. Make sure they’re completely cooled, flash freeze them first on a baking sheet, then transfer to airtight freezer bags with as much air removed as possible. Label them with the date and contents. While they’re safe to eat beyond 3 months, the texture and flavor are best within that timeframe.
Conclusion
There you have it—the ultimate guide to making perfect mini quiches that will revolutionize your breakfast routine! These adorable egg cups deliver all the elegance and delicious flavor of traditional French quiche in a convenient, portable format that fits modern busy lifestyles. With their flaky crusts, creamy custardy centers, and endless customization options, these mini quiches are about to become your most-requested recipe.
The beauty of this recipe is its incredible flexibility. Make them with bacon for meat lovers, load them with vegetables for a healthy start to your day, or create a variety of flavors to please everyone at your brunch table. They’re just as appropriate for meal prep Sundays as they are for elegant wedding showers. And knowing you can freeze dozens of them for grab-and-go breakfasts all month long? That’s the kind of kitchen win we all need!
I can’t wait to hear about your mini quiche adventures! What flavor combinations did you create? Are you team crispy crust or team crustless? Did you meal prep them for the week or serve them at a special gathering? Drop a comment below and share your experience—I read and respond to every single one!
If you loved this recipe, please save it to your favorite Pinterest board so you can make these delicious mini quiches again and again. Don’t forget to share it with friends who need easy breakfast solutions or love hosting brunch. Trust me, they’ll be thanking you after their first bite of these golden, cheesy, perfectly portioned beauties!
Happy baking, and here’s to many mornings made easier and more delicious with homemade mini quiches! 🥚