Homemade Onion Dip From Scratch: Creamy, Flavorful, and So Much Better Than Store-Bought
Forget everything you know about onion dip from a packet! This homemade onion dip from scratch is a revelation—rich, creamy, packed with sweet caramelized onions, and bursting with fresh flavor that no store-bought mix can match. Made with real sour cream, freshly caramelized onions, and a blend of herbs and seasonings, this easy onion dip recipe transforms simple ingredients into an addictively delicious appetizer that disappears within minutes at every gathering.
This classic onion dip is the perfect addition to game day parties, holiday gatherings, potlucks, barbecues, or casual movie nights at home. It’s incredibly versatile—serve it with potato chips (the traditional pairing), fresh vegetables, crackers, pretzels, or even as a spread on burgers and sandwiches. What makes this caramelized onion dip truly special is the depth of flavor from slowly cooked onions that become sweet, golden, and jammy, creating layers of taste that packet mixes simply cannot replicate.
The beauty of this sour cream onion dip lies in its simplicity and impressive results. While it requires a bit more time than tearing open a packet, the actual hands-on work is minimal, and the flavor payoff is enormous. The caramelized onions can even be made ahead, making this a convenient option for busy hosts. Whether you’re a seasoned home cook or just starting your culinary journey, this recipe is straightforward, forgiving, and guaranteed to make you the star of any party. Trust me, once your guests taste this homemade version, they’ll never be satisfied with powdered mix again!
History / Background
Onion dip as we know it today has a fascinating American origin story that begins in the 1950s—the golden age of convenience cooking and cocktail parties. The iconic French onion dip, made with Lipton’s dried onion soup mix and sour cream, was created in 1954 by an unknown home cook. Legend has it that a party guest mixed the two ingredients together on a whim, and the combination was so successful that Lipton began printing the recipe on their soup mix packets. It became an instant sensation and a staple of American entertaining.
This simple two-ingredient dip perfectly captured the mid-century American love affair with convenience foods and entertaining at home. The post-World War II era saw an explosion of suburban living, and with it came a culture of casual home entertaining. Hosts needed appetizers that were quick, easy, crowd-pleasing, and looked impressive without requiring culinary expertise. French onion dip fit the bill perfectly, requiring just two ingredients and about 30 seconds of effort.
The dip became so ubiquitous that it earned the nickname “California Dip,” though its origins are debated. Some food historians claim this name came from the Los Angeles area where it supposedly first became popular, while others suggest it was a marketing term to make the dip sound more glamorous and West Coast-chic during the 1950s and 60s.
However, the concept of combining onions with dairy for a savory dip or spread is hardly new. French cuisine has long featured onion-based preparations like soubise (onion sauce) and various onion gratins. Eastern European cuisines have traditional dishes combining caramelized onions with sour cream. What made the American version unique was its accessibility and the clever marketing that made it a household staple.
In recent decades, as the farm-to-table movement and scratch cooking have gained popularity, home cooks have begun returning to the roots of this classic, making homemade versions with fresh ingredients. This scratch-made onion dip represents the best of both worlds: the nostalgic, crowd-pleasing appeal of the 1950s classic, elevated with real caramelized onions and fresh herbs that honor traditional cooking techniques. It’s a full-circle moment that proves sometimes the old ways—with fresh, quality ingredients—really are the best ways.
Why You’ll Love This Recipe
This homemade caramelized onion dip is about to become your new go-to party appetizer, and here’s why it completely outshines any store-bought alternative. The difference in flavor is night and day—instead of artificial onion powder taste, you get the deep, sweet, complex flavor of slowly caramelized fresh onions. The texture is luxuriously creamy, and every bite delivers genuine onion pieces that add interest and substance to the dip.
Here’s what makes this recipe absolutely irresistible:
- Incredible Depth of Flavor – Caramelized onions create sweet, savory, complex taste that powdered mixes can’t replicate
- No Artificial Ingredients – Made with real, whole foods you can pronounce and feel good about serving
- Make-Ahead Friendly – Caramelize onions in advance and assemble when ready; flavors actually improve overnight
- Crowd-Pleasing Guarantee – Even picky eaters and kids love this dip; familiar yet elevated
- Budget-Friendly – Uses simple, inexpensive ingredients that cost less than premium store-bought dips
- Customizable – Easily adapt with different herbs, spices, or add-ins to suit your taste
- Impressive Yet Simple – Tastes gourmet but requires only basic cooking skills
- Versatile Usage – Works as a dip, spread, burger topping, baked potato topping, or sandwich condiment
- Healthier Option – Control the ingredients, sodium, and quality; no preservatives or fillers
- Perfect Texture – Thick, creamy, scoopable consistency that clings to chips instead of dripping off
- Conversation Starter – Guests always ask for the recipe and are amazed it’s homemade
Ingredient Notes
Understanding your ingredients helps you achieve the best possible homemade French onion dip every single time.
Yellow Onions – The foundation of this recipe! Yellow onions have the perfect balance of sweetness and pungency. When caramelized slowly, they develop incredible depth and natural sweetness. You’ll need about 2 large onions (roughly 1 pound). Sweet onions like Vidalia work beautifully too, creating an even sweeter result. Avoid red onions for this recipe as they’re too sharp and don’t caramelize as well. White onions can work in a pinch but have less sweetness.
Butter – Essential for caramelizing the onions and adding rich flavor. Use unsalted butter so you can control the salt level in your final dip. The butter helps the onions cook evenly and develop that gorgeous golden-brown color. For a lighter version, you can use half butter and half olive oil, though you’ll sacrifice some richness.
Sour Cream – The creamy base that makes this dip irresistible! Use full-fat sour cream for the best flavor and texture. Low-fat versions can make the dip thinner and less satisfying. The tanginess of sour cream perfectly balances the sweetness of caramelized onions. Make sure it’s fresh and cold from the refrigerator.
Cream Cheese – Adding a small amount of cream cheese creates extra creaminess and helps the dip hold together without being runny. It should be softened to room temperature for easy mixing—about 30 minutes on the counter. This ingredient is what elevates this from a basic onion dip to something truly luxurious. You can omit it for a lighter dip, though the texture won’t be quite as thick.
Mayonnaise – Adds richness and helps create the perfect creamy consistency. Full-fat mayo works best, but you can use light mayo to reduce calories. For a tangier dip, increase the sour cream and reduce or omit the mayo. Greek yogurt can substitute for half the mayo if you prefer, though the flavor will be more tangy.
Worcestershire Sauce – This secret ingredient adds savory umami depth that makes people wonder what the magic ingredient is. Just a tablespoon goes a long way in enhancing the overall flavor profile. Soy sauce can substitute in a pinch, though it will taste slightly different.
Fresh Herbs – Fresh chives, parsley, or dill add bright, fresh flavor and beautiful green flecks throughout. Chives are traditional and pair perfectly with onions. Fresh herbs make a huge difference over dried ones in this application. If you must use dried, reduce the amount to one-third and add them to the onions while cooking.
Garlic – A clove or two of fresh minced garlic adds aromatic depth. Add it near the end of caramelizing the onions so it doesn’t burn. Garlic powder can substitute (about ½ teaspoon), but fresh is always better.
Seasonings – Salt, black pepper, and optionally a pinch of smoked paprika or cayenne for subtle warmth and complexity. Season to taste, remembering that flavors intensify as the dip chills.
Equipment Needed
You don’t need any special equipment to make this easy homemade onion dip—just basic kitchen tools:
- Large skillet or sauté pan – Preferably 10-12 inches with a heavy bottom for even heat distribution when caramelizing onions
- Sharp chef’s knife – For slicing onions thinly and evenly
- Cutting board – Stable surface for prep work
- Wooden spoon or spatula – For stirring onions as they caramelize
- Medium mixing bowl – For combining the creamy dip ingredients
- Measuring cups and spoons – For accurate ingredient portions
- Rubber spatula – For folding ingredients together and scraping down bowl sides
- Serving bowl – A nice presentation bowl for your finished dip
- Plastic wrap or airtight container – For storage and make-ahead preparation
- Small bowl – For letting cream cheese soften if needed

Homemade Onion Dip From Scratch
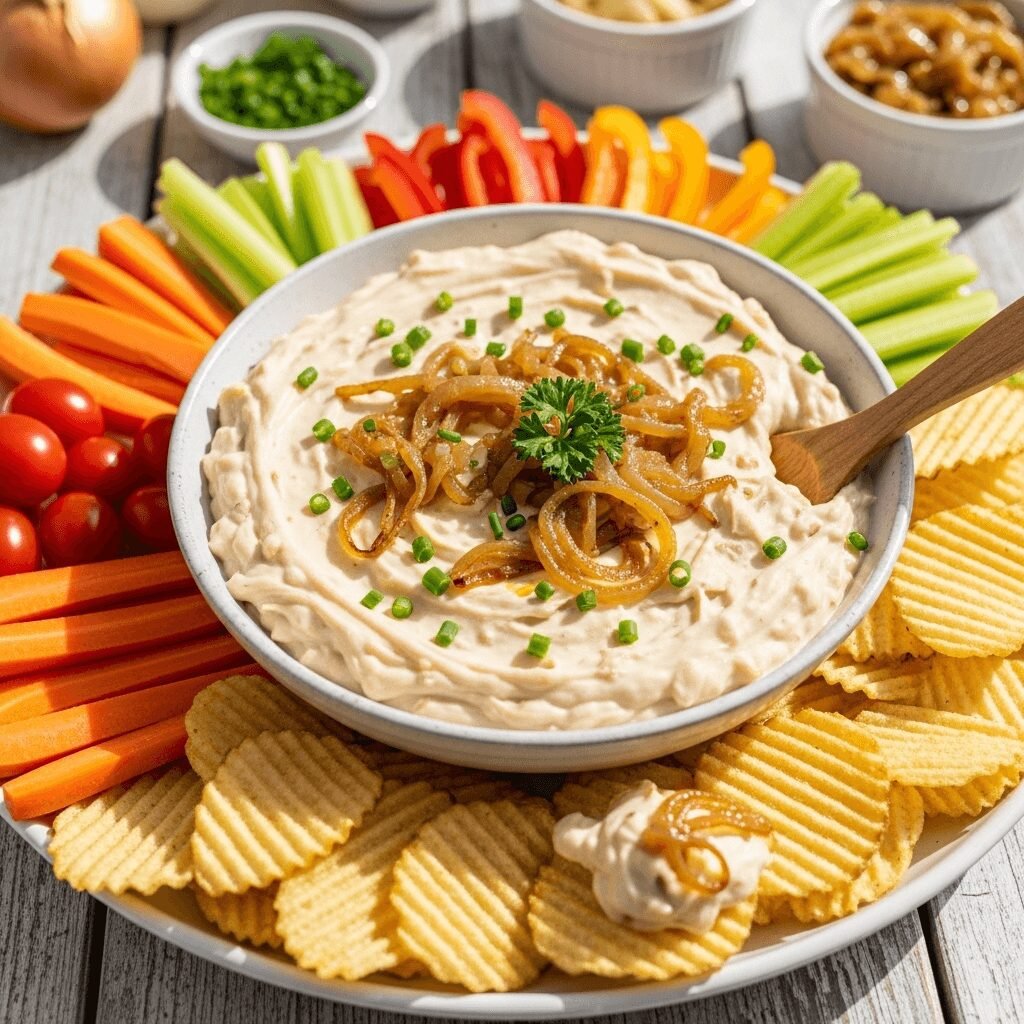
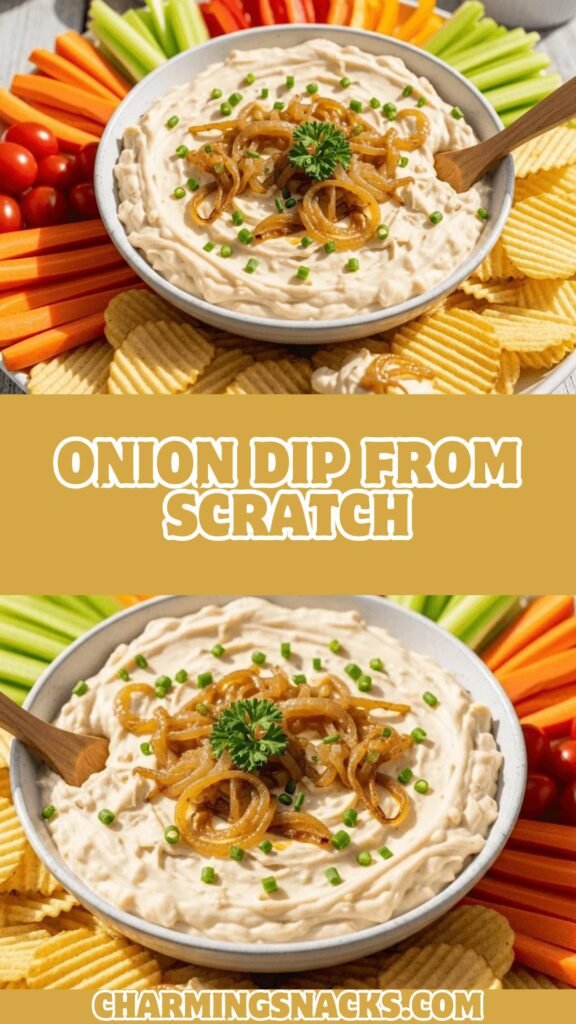
This incredible homemade onion dip features sweet, golden caramelized onions folded into a creamy base of sour cream and cream cheese. It’s worlds better than any packet mix—rich, flavorful, and guaranteed to be the hit of any party. Perfect with chips, vegetables, or crackers!
- Total Time: 45 minutes
- Yield: 8-10 servings (about 2½ cups) 1x
Ingredients
For the Caramelized Onions:
- 2 large yellow onions (about 1 pound), thinly sliced
- 2 tablespoons unsalted butter
- 1 tablespoon olive oil
- ¼ teaspoon salt
- 1 teaspoon sugar (optional, helps caramelization)
- 2 cloves garlic, minced
For the Dip:
- 1½ cups sour cream (full-fat)
- 4 oz cream cheese, softened to room temperature
- ¼ cup mayonnaise
- 1 tablespoon Worcestershire sauce
- 2 tablespoons fresh chives, finely chopped
- 1 tablespoon fresh parsley, finely chopped
- ½ teaspoon salt (or to taste)
- ¼ teaspoon black pepper
- ¼ teaspoon smoked paprika (optional)
- Pinch of cayenne pepper (optional, for subtle heat)
Instructions
- Prepare the onions: Peel and halve the onions, then slice them thinly into half-moons, about ⅛-inch thick. Try to keep slices uniform for even cooking.
- Start caramelizing: Heat butter and olive oil in a large skillet over medium heat. Once the butter melts and foam subsides, add the sliced onions and salt. Stir to coat all onions in the fat.
- Cook low and slow: Reduce heat to medium-low. Cook the onions, stirring every 5 minutes, for 25-30 minutes. The onions will slowly soften, release moisture, and turn golden brown. If they’re browning too quickly or sticking, reduce heat to low and add a tablespoon of water.
- Add sugar (optional): After about 15 minutes, when onions are soft and beginning to color, sprinkle with 1 teaspoon sugar. This helps speed caramelization and enhances sweetness.
- Add garlic: When onions are deeply golden and jammy (after 25-30 minutes total), add the minced garlic. Cook for 1-2 minutes until fragrant, stirring constantly so the garlic doesn’t burn.
- Cool the onions: Remove skillet from heat and transfer caramelized onions to a plate. Spread them out to cool to room temperature, about 15 minutes. This prevents the hot onions from making your dip watery or causing the sour cream to separate.
- Prepare the creamy base: While onions cool, combine sour cream, softened cream cheese, and mayonnaise in a medium bowl. Use a rubber spatula or electric mixer to beat until completely smooth and well combined with no lumps.
- Add seasonings: Stir in Worcestershire sauce, chopped chives, parsley, salt, black pepper, smoked paprika, and cayenne (if using). Mix until evenly distributed throughout the creamy base.
- Fold in onions: Once the caramelized onions are completely cool, add them to the creamy mixture. Fold gently but thoroughly to distribute onions evenly throughout the dip. Taste and adjust seasoning if needed.
- Chill and develop flavors: Transfer the dip to a serving bowl or storage container. Cover with plastic wrap pressed directly against the surface to prevent a skin from forming. Refrigerate for at least 2 hours, or preferably overnight, to allow flavors to meld together.
- Serve: Remove from refrigerator 10-15 minutes before serving to take the chill off slightly for best flavor and texture. Garnish with extra fresh chives if desired. Serve with potato chips, vegetable crudité, crackers, or pretzels.
Notes
- Caramelization patience: Don’t rush the onion cooking process. Low, slow heat creates the best flavor. High heat will burn them.
- Cooling is crucial: Always let caramelized onions cool completely before mixing with dairy ingredients to prevent separation and wateriness.
- Flavor development: This dip tastes significantly better after chilling overnight as the flavors marry and deepen.
- Texture adjustment: If your dip is too thick, thin it with a tablespoon of milk or sour cream. If too thin, add more cream cheese.
- Make-ahead advantage: Caramelize onions up to 3 days ahead and store separately, then make the dip the day before your event.
- Serving temperature: Serve cold or at cool room temperature, not warm, for best texture and food safety.
- Prep Time: 10 minutes
- Cook Time: 35 minutes
- Category: Appetizer
- Method: Stovetop
- Cuisine: American
- Diet: Gluten Free
Nutrition
- Serving Size: ¼ cup (about 2.5 oz)
- Calories: 165
- Sugar: 3g
- Sodium: 245mg
- Fat: 15g
- Saturated Fat: 8g
- Unsaturated Fat: 6g
- Trans Fat: 0g
- Carbohydrates: 6g
- Fiber: 0g
- Protein: 2g
- Cholesterol: 35mg
Tips & Variations
This versatile onion dip recipe welcomes customization to suit different tastes and dietary preferences.
French Onion Dip Style: Add ½ cup shredded Gruyère or Swiss cheese and an extra splash of Worcestershire sauce for a classic French onion soup-inspired version. Serve warm if desired.
Spicy Caramelized Onion Dip: Increase cayenne to ¼ teaspoon, add ½ teaspoon red pepper flakes to the onions while cooking, or stir in 1-2 tablespoons minced jalapeño for serious heat lovers.
Bacon Onion Dip: Cook 4-6 strips of bacon until crispy, crumble, and fold into the finished dip along with a tablespoon of the bacon fat mixed into the caramelized onions. This creates an incredibly savory, smoky variation.
Lighter Version: Use Greek yogurt in place of sour cream and mayonnaise, reduce or omit cream cheese, and use only 1 tablespoon butter for the onions. The texture will be thinner but still delicious with significantly fewer calories.
Herb Garden Variation: Add fresh dill, thyme, or tarragon along with or instead of parsley. Each herb brings a different flavor profile that complements the sweet onions beautifully.
Blue Cheese Onion Dip: Fold in ½ cup crumbled blue cheese or gorgonzola for a sophisticated, tangy twist that’s perfect with buffalo wings or steak.
Vegan Adaptation: Use vegan butter for caramelizing onions, and substitute the dairy with cashew cream or coconut cream mixed with lemon juice, plus vegan cream cheese and mayo alternatives.
Roasted Garlic Addition: Replace raw garlic with 4-5 cloves of roasted garlic, mashed into a paste, for a sweeter, mellower garlic flavor.
Pro Chef Tips
These professional techniques will take your scratch-made onion dip from delicious to absolutely extraordinary:
The Caramelization Sweet Spot: True caramelization takes time—don’t rush it. Onions should be deeply golden, almost mahogany in color, and reduced to about one-third their original volume. They should taste intensely sweet with no sharp bite. If you stop cooking too early, you’ll miss out on the complex flavors that develop in the final 10 minutes.
Temperature Control is Everything: Medium-low to low heat is key. If onions are sizzling loudly, your heat is too high and they’ll burn on the outside while staying raw inside. You want a gentle sizzle, almost a quiet bubble. Patience here pays enormous dividends in flavor.
The Deglaze Technique: If your onions stick to the pan or you see brown bits forming on the skillet bottom, add a tablespoon of water, wine, or broth and scrape with your wooden spoon. Those browned bits (fond) contain concentrated flavor—incorporate them back into the onions rather than letting them burn.
Seasoning Layers: Season the onions at the beginning with salt to help draw out moisture, again midway through cooking, and taste the finished onions to adjust. Then season the creamy base separately. This layered approach ensures balanced flavor throughout the dip rather than one salty bite and one bland bite.
Room Temperature Ingredients: Beyond just the cream cheese, let your sour cream sit out for 10-15 minutes before mixing. Cold ingredients don’t blend as smoothly, and you might work the mixture too much trying to get them to combine, which can make it runny.
The Overnight Advantage: While you can serve this dip the same day, letting it rest overnight in the refrigerator transforms it. The flavors meld together, the onions release more of their essence into the cream, and the entire dip becomes more cohesive and flavorful. Professional caterers always make dips the day before.
Proper Mixing Technique: When folding in the cooled onions, use a rubber spatula and a folding motion rather than stirring vigorously. This keeps the dip thick and creamy rather than breaking it down into a thinner consistency.
Common Mistakes to Avoid
Even simple recipes can go wrong. Here’s how to sidestep the most common pitfalls:
Mistake #1: Rushing the onion caramelization. This is the number one error that results in sharp, underwhelming onion flavor instead of sweet, complex depth. Caramelization cannot be rushed—it’s a chemical process that takes 25-35 minutes at the proper temperature. Trying to speed it up with high heat will burn the onions on the outside while leaving them raw and harsh on the inside. Set aside the time, keep the heat low, and be patient. The reward is worth it.
Mistake #2: Adding hot onions to the dairy base. Hot onions will cause the sour cream and cream cheese to separate, become grainy, and release water, resulting in a broken, soupy dip instead of a thick, creamy one. Always let the caramelized onions cool completely to room temperature—wait a full 15-20 minutes—before mixing them into the creamy ingredients.
Mistake #3: Using cold, hard cream cheese. Rock-hard cream cheese straight from the refrigerator will never blend smoothly, no matter how long you mix. You’ll end up with lumps of cream cheese throughout your dip, which is unpleasant texturally. Always soften cream cheese to room temperature (it should be easily smushed with your finger) before mixing, or beat it separately until smooth before adding other ingredients.
Mistake #4: Over-seasoning before chilling. Flavors intensify significantly as the dip chills and the ingredients meld together. What tastes perfectly seasoned when warm might taste over-salted or too garlicky after overnight refrigeration. Season conservatively at first, let the dip chill, then taste and adjust before serving.
Mistake #5: Skipping the chill time. Serving this dip immediately after making it means missing out on its full flavor potential. The ingredients haven’t had time to marry, the dip is too soft to scoop properly, and the onion flavor hasn’t fully permeated the cream. Give it at least 2 hours, or preferably overnight, for the best results.
Storage & Meal Prep
Proper storage keeps your caramelized onion dip recipe fresh and safe to eat, while strategic prep makes entertaining effortless.
Refrigerator Storage: Store the dip in an airtight container in the refrigerator for up to 4-5 days. Press plastic wrap directly onto the surface before sealing the container to prevent a skin from forming and to keep onions from oxidizing and darkening on top.
Signs of Spoilage: Discard the dip if you notice any off smell (sour or rancid), visible mold, or if it’s been left at room temperature for more than 2 hours during serving. Dairy-based dips are perishable and should be treated with care.
Serving During Parties: For food safety, don’t let the dip sit at room temperature for more than 2 hours (or 1 hour in hot weather above 90°F). For longer parties, keep backup portions in the refrigerator and refresh your serving bowl partway through the event, or nest your serving bowl in a larger bowl filled with ice to keep it cold.
Leftover Revival: If your dip seems dry or thickened after storage, stir in a tablespoon of sour cream or milk to restore the creamy consistency. Always stir well before serving as ingredients can separate slightly during storage.
Component Storage: Store caramelized onions separately from the cream mixture if making components ahead. The onions keep for up to 5 days refrigerated in an airtight container. This prevents the dip from becoming too loose as the onions release moisture over time.
Make-Ahead & Freezer Notes
This onion dip from scratch is one of the best make-ahead appetizers, perfect for stress-free entertaining.
2-3 Days Ahead: Caramelize your onions up to 3 days in advance. Store them in an airtight container in the refrigerator. This is actually ideal—you complete the time-consuming step when you have time, then quickly assemble the dip the day before or morning of your event.
1 Day Ahead (Best Timeline): Make the complete dip the day before your party. The overnight rest period is when the magic happens—flavors meld beautifully, the dip thickens to perfect scooping consistency, and the onion flavor infuses throughout. This is the professional catering approach and results in the best-tasting dip.
Morning-Of Preparation: If you can’t make it the day before, morning-of works well too. Aim for at least 4-6 hours of chill time before serving. This gives adequate time for flavor development, though overnight is still superior.
2 Hours Minimum: The absolute minimum chill time is 2 hours. Any less and the dip will be too soft, too warm, and the flavors won’t have melded. Plan accordingly if working on a tight timeline.
Freezing Caramelized Onions: The onions themselves freeze beautifully for up to 3 months. Freeze them in portions (½ cup amounts work well) in freezer bags with air pressed out. Thaw in the refrigerator overnight before mixing into your dip. This is a great strategy if you have time one weekend to caramelize a large batch for multiple future uses.
Don’t Freeze the Complete Dip: Unfortunately, the finished dip does not freeze well. Sour cream, cream cheese, and mayonnaise all separate and become grainy and watery when frozen and thawed. The texture will be completely compromised and unappealing. Always make this fresh or refrigerated only.
Day-Of Assembly: If you’ve frozen the caramelized onions, thaw them the night before, then assemble the complete dip the morning of your event. This gives you the convenience of make-ahead onions with the optimal texture of a freshly mixed dip.
Serving Suggestions
The right accompaniments showcase your homemade French onion dip and create a complete snacking experience.
Classic Chips: Ridged potato chips are the traditional pairing—the ridges hold dip beautifully. Kettle-cooked chips add extra crunch. Try regular, salt and vinegar, or sour cream and onion chips for layers of flavor. Thick-cut chips work better than thin, which break easily.
Fresh Vegetables: For a healthier option, serve with carrot sticks, celery sticks, bell pepper strips, cucumber rounds, cherry tomatoes, radish slices, and snap peas. This creates a colorful crudité platter that’s as beautiful as it is nutritious.
Crackers and Crisps: Water crackers, wheat thins, pita chips, bagel chips, or artisan crackers all work wonderfully. Choose sturdy crackers that won’t break when scooped.
Bread Options: Toasted baguette slices, garlic bread rounds, breadsticks, or soft pretzels offer a more substantial vehicle. The bread can also be grilled or toasted for extra texture.
Alternative Uses Beyond Dipping: This versatile dip works as a burger topping, baked potato topping, sandwich spread, or even stirred into hot pasta for a quick sauce. Dollop it on grilled steak or chicken for an elegant restaurant-style presentation.
Complete Appetizer Spread: Pair your onion dip with complementary appetizers like spinach artichoke dip, buffalo chicken dip, a cheese board, fresh fruit, and mixed nuts. This gives guests variety and makes for an impressive spread.
Beverage Pairings: This rich, savory dip pairs beautifully with crisp white wines (Sauvignon Blanc, Pinot Grigio), light beers, hard cider, or for non-alcoholic options, sparkling water with lemon, iced tea, or lemonade.
Game Day Presentation: Serve in a bread bowl for impressive presentation—hollow out a round sourdough loaf and fill it with dip, using the bread pieces for dipping. This always gets rave reviews at Super Bowl parties!
FAQs Section
Can I use Greek yogurt instead of sour cream for a healthier onion dip?
Yes, Greek yogurt is an excellent substitute for all or part of the sour cream. Use full-fat Greek yogurt for the best texture and richness. The dip will be tangier and slightly thinner than the sour cream version, but still delicious and significantly lower in calories and fat. Keep in mind that Greek yogurt is more prone to separating if the onions aren’t fully cooled, so be extra careful about temperature.
How do I know when my onions are properly caramelized?
Properly caramelized onions should be deeply golden to mahogany brown in color, reduced to about one-third their original volume, and have a jammy, almost spreadable consistency. They should taste intensely sweet with no sharp or bitter notes. The process takes 25-35 minutes of patient, low-heat cooking. If your onions are still pale yellow or have any crunch, they need more time. Trust the color and texture more than the clock.
Can I make onion dip without cream cheese?
Absolutely! For a lighter, more traditional version, simply omit the cream cheese and increase the sour cream to 2 cups. You can also add an extra 2 tablespoons of mayonnaise to maintain richness. The dip will be slightly thinner and less stable but still delicious. Some people prefer this classic, lighter texture that’s closer to the original French onion dip.
Why is my onion dip runny or watery?
This usually happens for one of three reasons: (1) the caramelized onions weren’t fully cooled before mixing, causing the dairy to break down, (2) the onions released moisture into the dip over time (this is why storing onions separately for make-ahead is beneficial), or (3) low-fat dairy products were used, which have more water content. To fix runny dip, stir in additional cream cheese or a few tablespoons of powdered ranch mix to thicken it.
What’s the difference between French onion dip and regular onion dip?
Traditionally, “French onion dip” refers to the classic 1950s recipe made with dried onion soup mix (specifically Lipton French Onion) and sour cream. “Regular onion dip” or homemade onion dip uses fresh caramelized onions instead of the dried packet. The homemade version has infinitely more depth and complex flavor from real caramelized onions, while the packet version offers convenience and a more uniform, salty flavor profile.
Can I caramelize the onions in advance and how long do they keep?
Yes! Caramelized onions are perfect for advance preparation. Cook them fully, let them cool completely, then store in an airtight container in the refrigerator for up to 5 days. For even longer storage, freeze them in portions for up to 3 months. This make-ahead approach actually makes entertaining easier—do the time-consuming step when you have time, then quickly assemble the dip when needed.
Is this onion dip recipe gluten-free?
Yes, this recipe is naturally gluten-free as written. All the ingredients (onions, butter, sour cream, cream cheese, mayonnaise, herbs, and seasonings) contain no gluten. However, always check your specific product labels, especially for Worcestershire sauce (some brands contain malt vinegar, which has gluten). Serve with gluten-free chips or vegetables to keep the entire snack gluten-free.
Conclusion
And there you have it—the ultimate homemade onion dip that will spoil you for packet mixes forever! This scratch-made version proves that the extra 30 minutes of caramelizing onions is absolutely worth it for the incredible depth of flavor you achieve. The sweet, jammy onions combined with the tangy, creamy base create a dip that’s sophisticated enough for dinner parties yet comfortable enough for casual game day snacking.
The beauty of this easy onion dip recipe lies in its perfect balance of simplicity and impressive results. While it requires a bit more effort than tearing open a packet, the actual technique is straightforward, the ingredients are basic and affordable, and the make-ahead nature means you can prep stress-free. Most importantly, the flavor is in a completely different league—once you serve this at a party, you’ll have guests begging for the recipe and refusing to settle for store-bought ever again.
I absolutely can’t wait to hear how this caramelized onion dip turns out in your kitchen! Did you try any of the variations? What did you serve it with? How did your guests react? Drop a comment below and share your experience—I love hearing from fellow home cooks. And if this recipe wins you as many compliments as it’s won me, please pin it to your favorite appetizer board on Pinterest so other food lovers can discover it too. Share it with friends who appreciate real, from-scratch cooking!
Now grab those onions, fire up your skillet, and get ready to make a dip so good that you’ll be asked to bring it to every single gathering from now on. Trust me, that’s a delicious problem to have! Happy cooking, friends, and enjoy every creamy, oniony, absolutely irresistible bite!