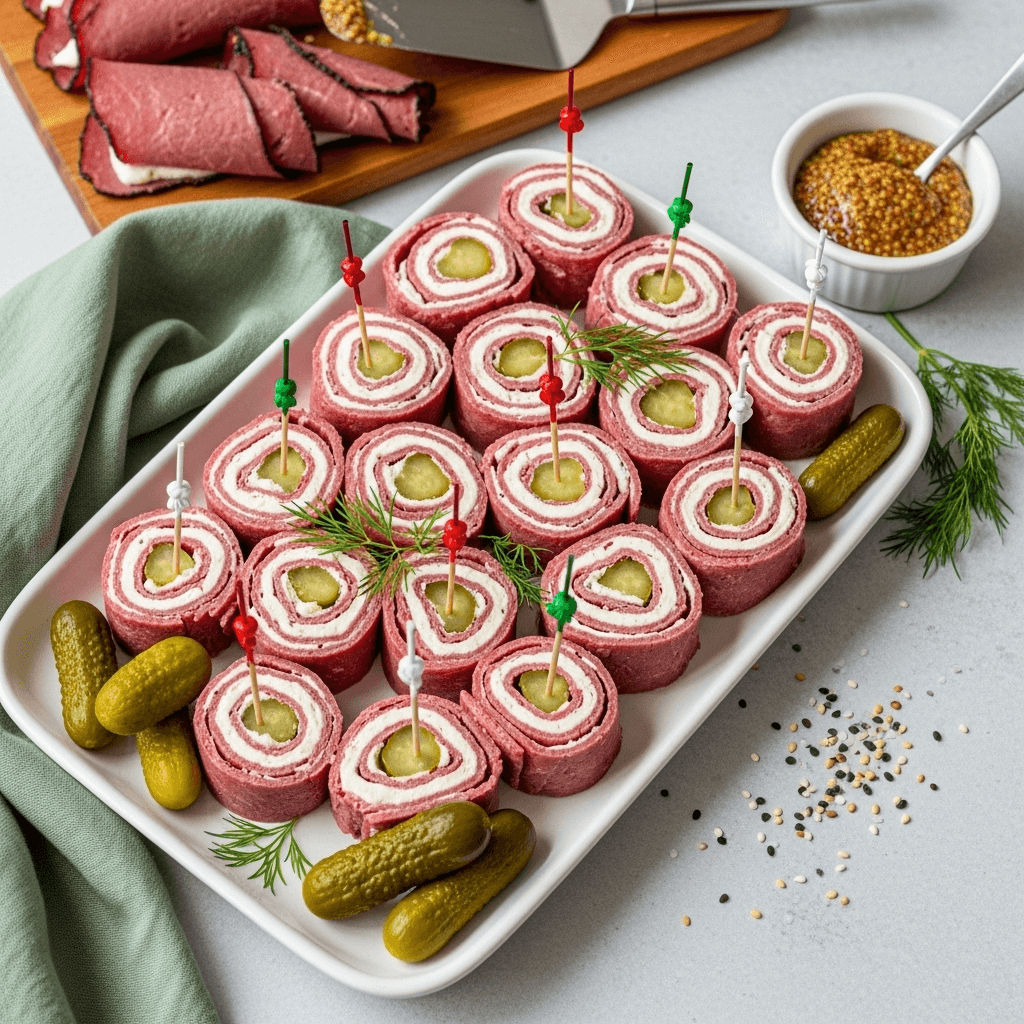
Easy Pastrami Roll Ups: The Ultimate 5-Minute Appetizer Everyone Will Devour

Looking for an appetizer that’s incredibly simple yet impressively delicious? These Pastrami Roll Ups are about to become your secret weapon for effortless entertaining! Imagine tender, peppery pastrami wrapped around a luscious cream cheese filling, creating little flavor-packed bundles that disappear from the platter almost as fast as you can arrange them.
These easy pastrami roll ups are the definition of minimal effort, maximum impact. With just a handful of ingredients and literally five minutes of prep time (no cooking required!), you’ll have an elegant appetizer that looks like you spent hours in the kitchen. The combination of rich, smoky pastrami with tangy cream cheese and crisp pickles creates an addictive flavor profile that keeps guests coming back for more.
Perfect for game day gatherings, holiday parties, baby showers, or even as a quick protein-packed snack, these no-bake pastrami appetizers are incredibly versatile. They’re low-carb, keto-friendly, and can be customized with endless variations to suit your taste preferences. Whether you’re hosting a crowd or meal prepping for the week ahead, these roll ups deliver serious satisfaction without the fuss. Plus, they’re naturally gluten-free and require zero cooking skills—if you can spread and roll, you’ve got this!
Serve them as-is for a casual gathering, or arrange them beautifully on a platter with toothpicks for a more elegant presentation. Either way, prepare for compliments and recipe requests, because these little roll ups pack a seriously delicious punch.
History / Background
While pastrami roll ups as we know them today are a relatively modern creation, they’re deeply rooted in Jewish delicatessen traditions that trace back over a century. Pastrami itself has a fascinating immigrant story that reflects the beautiful melting pot of American cuisine.
Pastrami originated in Romania, where the preservation technique involved salting and drying meat (usually goose or mutton) called “pastrama.” When Romanian Jewish immigrants arrived in New York City in the late 1800s, they adapted their traditional recipe to use beef brisket, which was more readily available and affordable in America. The pastrami we know today—brined, heavily seasoned with black pepper and coriander, smoked, and steamed to tender perfection—became a cornerstone of Jewish deli culture.
By the early 1900s, pastrami sandwiches were legendary in New York delis, particularly on Manhattan’s Lower East Side. Katz’s Delicatessen, which opened in 1888, became famous for its towering pastrami on rye sandwiches that remain iconic to this day. The traditional pastrami sandwich featured thick-cut, hand-carved pastrami piled high on rye bread with mustard, sometimes with a pickle on the side.
Pastrami roll ups emerged much later, likely in the 1960s-1980s, as home cooks and caterers began deconstructing classic deli sandwiches into bite-sized party foods. This era saw the rise of “finger foods” and cocktail party culture, where hosts needed elegant, easy-to-eat appetizers that didn’t require plates or utensils. The genius of pastrami roll ups was taking those beloved deli flavors and transforming them into a portable, poppable format.
The cream cheese filling became popular because it provided the perfect creamy counterpoint to the peppery, smoky pastrami while also acting as an edible “glue” that held the rolls together. Some food historians credit this innovation to creative Jewish homemakers who were already familiar with cream cheese from bagels and lox spreads, naturally extending that pairing to other deli meats.
Today, pastrami cream cheese roll ups have become a beloved staple at everything from Super Bowl parties to elegant bridal showers, proving that sometimes the simplest recipes have the most enduring appeal.
Why You’ll Love This Recipe
These keto pastrami roll ups are about to revolutionize your appetizer game, and I’m not exaggerating! There’s something magical about a recipe that requires almost zero effort but delivers restaurant-quality flavor and presentation. These roll ups check every box for busy home cooks who still want to impress.
Here’s why this recipe is an absolute winner:
- Lightning-Fast Prep: Ready in just 5 minutes with no cooking required—seriously, that’s faster than ordering takeout!
- Only 4-5 Ingredients: A short, simple grocery list means you can make these on a whim without special shopping trips
- No Cooking or Baking Required: Perfect for hot summer days when you don’t want to turn on the oven, or when your kitchen is already maxed out during holiday cooking
- Keto and Low-Carb Friendly: At less than 2g carbs per serving, these fit perfectly into low-carb and ketogenic diets
- Naturally Gluten-Free: No modifications needed—they’re already gluten-free as written
- Make-Ahead Perfection: Prepare hours or even a day in advance, making party planning stress-free
- Budget-Friendly: Uses affordable deli meat and pantry staples—no expensive ingredients required
- Kid-Approved: Even picky eaters love these! The familiar deli flavors appeal to all ages
- Endlessly Customizable: Easily adapt to your taste preferences or dietary needs with simple swaps
- Impressive Presentation: They look elegant and professional despite requiring minimal skill
- Protein-Packed: Each roll up delivers satisfying protein, making them a substantial snack or light meal option
- Perfect for Any Occasion: Works equally well at casual game day parties, elegant brunches, or as a quick weeknight snack
Ingredient Notes
Let’s break down the simple yet essential ingredients that make these pastrami pinwheels so irresistible:
Deli Pastrami: The star of the show! Look for quality deli pastrami sliced medium-thick (not paper-thin, but not deli sandwich thick either). Each slice should be about 4-6 inches in diameter for optimal rolling. Hebrew National, Boar’s Head, and other premium deli brands work beautifully. The pastrami should be well-seasoned with that characteristic black pepper crust. If you can, ask the deli counter to slice it fresh for maximum flavor and flexibility.
Cream Cheese: Full-fat cream cheese is essential for the best flavor and spreading consistency. It should be softened to room temperature for at least 30 minutes—this makes spreading smooth and easy without tearing the pastrami. Philadelphia is the gold standard, but any quality brand works. Avoid using whipped cream cheese, as it’s too airy and won’t provide enough structure. Low-fat cream cheese can work in a pinch but won’t be as rich and creamy.
Dill Pickles: Dill pickle spears (not bread and butter pickles) add that essential tangy crunch and bright acidity that cuts through the richness of the cream cheese and pastrami. Look for crunchy, not mushy pickles—Claussen refrigerated pickles are exceptional. You’ll want long spears rather than chips for easy rolling. Pat them very dry with paper towels before using to prevent soggy roll ups.
Fresh Dill (Optional but Recommended): Fresh dill elevates these from good to exceptional. It adds herbaceous brightness and makes the rolls look more professional. If you can’t find fresh dill, you can mix ½ teaspoon of dried dill into the cream cheese instead.
Everything Bagel Seasoning (Optional): This trendy topping adds garlic, onion, sesame seeds, and poppy seeds for extra flavor dimension. It’s become wildly popular for good reason—it makes everything taste better! Trader Joe’s version is legendary, but many brands now make it.
Yellow Mustard or Dijon (Optional): Some people love adding a thin swipe of mustard to the cream cheese layer for that classic deli sandwich flavor. This is entirely optional and based on personal preference.
Equipment Needed
You’ll need minimal equipment for these no-cook pastrami appetizers—likely just items you already have in your kitchen:
- Cutting board: For assembling the roll ups; a clean surface is essential
- Sharp knife: For slicing the rolls into pinwheels (a serrated knife works particularly well)
- Small bowl: For mixing the cream cheese with seasonings
- Spoon or small offset spatula: For spreading cream cheese evenly on the pastrami
- Paper towels: Essential for patting pickles dry to prevent moisture
- Plastic wrap or parchment paper: For rolling the pastrami tightly before slicing
- Serving platter: For arranging your beautiful finished roll ups
- Toothpicks: Optional, for securing and serving individual pinwheels
- Measuring spoons: Only if adding seasonings to the cream cheese
That’s it! No mixers, no appliances, no cooking equipment whatsoever. This is one of the most equipment-minimal recipes you’ll ever make.
Print
Easy Pastrami Roll Ups
These incredibly easy Pastrami Roll Ups feature tender deli pastrami wrapped around tangy cream cheese and crisp dill pickles for a no-cook appetizer that’s ready in just 5 minutes. Perfect for parties, snacking, or meal prep!
- Total Time: 5 minutes
- Yield: 24 roll ups (serves 8-12) 1x
Ingredients
- 12 oz deli pastrami, sliced medium-thick (approximately 12 slices)
- 8 oz cream cheese, softened to room temperature
- 4 dill pickle spears, patted very dry
- 2 tablespoons fresh dill, finely chopped (optional)
- 1 tablespoon everything bagel seasoning (optional)
- 1 teaspoon garlic powder (optional)
- ¼ teaspoon black pepper
- Toothpicks for serving (optional)
Instructions
- Prep Your Cream Cheese: In a small bowl, combine the softened cream cheese with fresh dill (if using), garlic powder (if using), and black pepper. Mix with a spoon until smooth and well combined. If you’re keeping it simple, you can use plain cream cheese without any additions—it’s delicious either way!
- Prepare Your Pickles: Remove pickle spears from the jar and pat them completely dry using paper towels. This step is crucial! Any moisture will make your roll ups soggy. Press firmly with paper towels to remove as much liquid as possible. If your pickles are particularly thick (more than ½ inch diameter), consider slicing them in half lengthwise so they’re easier to roll.
- Set Up Your Assembly Line: Lay out a clean cutting board or work surface. Place your pastrami slices, cream cheese mixture, and dried pickles within easy reach. This makes assembly quick and efficient.
- Spread the Cream Cheese: Take one slice of pastrami and lay it flat on your cutting board. Using a spoon or small offset spatula, spread about 1-2 tablespoons of the cream cheese mixture evenly over the entire surface of the pastrami, going almost to the edges. Don’t skimp—you want a nice layer, but not so thick that it squishes out when you roll.
- Add the Pickle: Place one dried pickle spear at one end of the pastrami slice, positioning it perpendicular to you so you’ll be rolling away from yourself. Make sure the pickle is centered.
- Roll Tightly: Starting from the end with the pickle, roll the pastrami around the pickle tightly but gently, like you’re rolling a sleeping bag. The cream cheese should help everything stick together. Roll all the way to create a compact cylinder.
- Secure and Chill (Optional): If your rolls seem loose, you can wrap each one tightly in plastic wrap and refrigerate for 15-30 minutes to firm up. This makes slicing much easier and neater. However, if your rolls are tight and you’re serving immediately, you can skip this step.
- Slice Into Pinwheels: Using a sharp knife (a serrated knife works especially well), trim off the uneven ends of each roll, then slice the roll into 2-inch pieces. You should get about 4-6 pinwheels per large pastrami slice, or 2-3 per smaller slice. Wipe your knife clean between cuts for the prettiest presentation.
- Garnish and Serve: Arrange the pinwheels cut-side up on a serving platter so the beautiful spiral is visible. If desired, sprinkle with everything bagel seasoning for extra flavor and visual appeal. Insert toothpicks for easy grabbing if serving at a party. Serve immediately or cover and refrigerate until ready to serve.
Notes
- Pastrami Thickness: Ask your deli counter for pastrami sliced medium-thick—about ⅛ inch. Too thin and it tears; too thick and it won’t roll properly.
- Room Temperature Cream Cheese: This is non-negotiable for easy spreading. Cold cream cheese will tear the pastrami and make spreading frustrating.
- Pickle Moisture: Seriously, dry those pickles well! This is the #1 mistake that leads to soggy roll ups.
- Make Them Ahead: These can be assembled, wrapped in plastic wrap (before slicing), and refrigerated for up to 24 hours. Slice just before serving for the freshest look.
- Size Variations: For larger rolls, use 2 pickle spears per pastrami slice. For bite-sized appetizers, slice into 1-inch pieces instead of 2-inch.
- Keeping Them Cold: If serving outdoors or at a long party, set your platter over a larger dish filled with ice to keep everything fresh and food-safe.
- Prep Time: 5 minutes
- Cook Time: 0 minutes
- Category: Appetizer
- Method: No-Bake
- Cuisine: American
- Diet: Gluten Free
Nutrition
- Serving Size: 2 roll ups
- Calories: 142
- Sugar: 1g
- Sodium: 567mg
- Fat: 11g
- Saturated Fat: 6g
- Unsaturated Fat: 4g
- Trans Fat: 0g
- Carbohydrates: 2g
- Fiber: 0g
- Protein: 9g
- Cholesterol: 42mg
Tips & Variations
Spicy Pastrami Roll Ups: Add a thin spread of horseradish cream cheese or mix prepared horseradish into your regular cream cheese (start with 1 teaspoon and adjust to taste). You can also use pepper jack cheese instead of cream cheese, or add sliced jalapeños alongside the pickle.
Vegetarian Version: Replace pastrami with roasted red peppers or grilled portobello mushroom slices. The mushrooms provide a similar meaty texture and smoky flavor when seasoned with liquid smoke.
Turkey or Roast Beef Version: Use deli turkey or roast beef instead of pastrami for a milder flavor. This works especially well for kids who might find pastrami too peppery.
Italian-Style Roll Ups: Use salami or prosciutto instead of pastrami, add sun-dried tomatoes instead of pickles, and mix Italian herbs into the cream cheese. Sprinkle with parmesan cheese before rolling.
Smoked Salmon Version: For an elegant twist, use smoked salmon (lox) instead of pastrami, keep the cream cheese and dill, and add capers and thinly sliced red onion. These are perfect for brunch!
Lighter Version: Use reduced-fat cream cheese (Neufchatel) and look for lower-sodium pastrami. The taste is still excellent but with fewer calories and less sodium.
Loaded Roll Ups: Add thinly sliced cheese (Swiss, provolone, or cheddar), thinly sliced red onion, or shredded lettuce for extra crunch and flavor layers.
Different Pickle Types: Experiment with bread and butter pickles for sweetness, spicy pickles for heat, or even pepperoncini for a tangy kick.
Pro Chef Tips
The Right Pastrami Makes All the Difference: Quality truly matters here since pastrami is the star. Look for pastrami with a visible peppercorn crust and good marbling. Freshly sliced from the deli counter is exponentially better than pre-packaged—it’s more pliable, flavorful, and easier to roll.
Master the Spread Technique: When spreading cream cheese, use the back of a spoon in smooth, confident strokes. Don’t press too hard or you’ll tear the meat. Think of it like frosting a cake—even, gentle pressure creates a smooth layer without creating holes.
Temperature Control Is Key: Everything should be at the right temperature. Cream cheese at room temperature (70°F) spreads like a dream. If your pastrami is too cold from the fridge, it becomes stiff and cracks when you try to roll it. Let it sit at room temperature for 10-15 minutes before assembling for maximum flexibility.
The Pickle Placement Trick: Position your pickle not quite at the very edge, but about ¼ inch in from the edge. This prevents the pickle from poking through the end when you roll and creates a cleaner finish.
Use Plastic Wrap for Perfect Rolls: Here’s a pro technique: place each filled pastrami slice on a piece of plastic wrap, then use the plastic wrap to help you roll tightly (like rolling sushi). The plastic wrap creates pressure that makes a tighter, more professional roll. Refrigerate wrapped, then unwrap and slice.
The Sharp Knife Principle: A dull knife smashes your beautiful rolls and makes the filling squish out. Use your sharpest knife or a serrated bread knife, and make smooth, confident cuts with a gentle sawing motion. Clean the blade between cuts.
Presentation Matters: Arrange your pinwheels with the cut side facing up so everyone can see that beautiful spiral. Create patterns on your platter—concentric circles, straight rows, or a decorative spiral arrangement makes them look even more impressive.
Common Mistakes to Avoid
Using Cold Cream Cheese: This is the most common mistake! Cold cream cheese won’t spread—it’ll just tear the pastrami and create frustration. Always, always let it soften at room temperature for at least 30 minutes, or soften carefully in the microwave at 50% power in 10-second intervals.
Not Drying the Pickles Thoroughly: Wet pickles = soggy, falling-apart roll ups. Take an extra minute to really press those pickles dry with paper towels. Some people even let them air-dry on paper towels for 5-10 minutes before using.
Rolling Too Loosely: Loose rolls fall apart when sliced and don’t have that tight, professional appearance. Roll firmly (but not so hard you squeeze out all the filling). The cream cheese should act as glue holding everything together.
Slicing Immediately After Rolling: Freshly rolled pastrami is warm and soft from your hands. Give the rolls at least 15 minutes in the refrigerator to firm up before slicing—you’ll get much cleaner cuts with filling that stays in place.
Using Low-Quality or Pre-Packaged Pastrami: Those thin, pre-packaged pastrami slices from the lunchmeat section are often too thin, too dry, and lack flavor. The few extra dollars for deli counter pastrami makes a massive difference in both taste and rollability.
Cutting with a Dull Knife: A dull blade crushes rather than cuts, creating mangled roll ups with filling oozing everywhere. Use a sharp knife and wipe it clean between cuts for picture-perfect pinwheels.
Storage & Meal Prep
Refrigerator Storage: These make-ahead pastrami roll ups store beautifully! Once assembled and sliced, arrange them in a single layer in an airtight container with a paper towel underneath to absorb any moisture. They’ll keep fresh in the refrigerator for 2-3 days. If you’ve made whole rolls but haven’t sliced them yet, wrap each roll tightly in plastic wrap—they’ll keep even better this way, up to 4 days.
Best Storage Practice: For optimal freshness, store unsliced rolls in plastic wrap and slice just before serving. The exposed surfaces of sliced pinwheels can dry out slightly over time, though they’re still perfectly delicious.
Meal Prep Magic: These are fantastic for weekly meal prep! Make a big batch on Sunday and you’ll have grab-and-go protein snacks all week. Store them in individual containers for easy portion control—perfect for low-carb lunch boxes or afternoon snacks.
Avoiding Sogginess: If you’re making these more than a few hours ahead, consider storing the components separately (rolled logs wrapped in plastic) and slicing just before serving. This prevents any moisture from the pickles gradually softening the cream cheese layer.
Food Safety Note: Since these contain dairy and deli meat, don’t leave them at room temperature for more than 2 hours (1 hour if it’s hot outside). At parties, refresh the serving platter from the refrigerator rather than leaving one platter out all evening.
Make-Ahead & Freezer Notes
Make-Ahead Timeline: These roll ups are incredibly make-ahead friendly, which makes them perfect for stress-free entertaining:
- 2-3 hours ahead: Absolutely perfect timing. Make them, slice them, arrange on your platter, cover with plastic wrap, and refrigerate.
- 24 hours ahead: Assemble the rolls but don’t slice them yet. Wrap each roll tightly in plastic wrap and refrigerate. Slice 1-2 hours before serving for the freshest appearance.
- 48 hours ahead: At this maximum window, definitely keep them as whole rolls in plastic wrap. The cut surfaces can begin to dry out after this point.
Freezing Pastrami Roll Ups: Here’s the honest truth—I don’t recommend freezing these. The cream cheese texture changes when frozen and thawed, becoming grainy and separated. The pickles also release moisture when thawed, making everything soggy. If you must freeze them (maybe you accidentally made way too many), here’s how to minimize quality loss:
- Freeze whole rolls (not sliced) wrapped extremely well in plastic wrap, then in aluminum foil
- Freeze for no more than 1 month
- Thaw overnight in the refrigerator, never at room temperature
- Expect some texture changes and possible moisture issues
- Pat dry with paper towels after thawing if needed, then slice and serve
Better Freezing Alternative: If you want to prep way ahead, consider freezing the pastrami by itself (it freezes beautifully), then assembling fresh roll ups with fresh cream cheese and pickles when needed.
Party Planning Strategy: For big parties, I recommend making these in waves rather than one giant batch days ahead. Make half the batch 24 hours ahead (as whole rolls), then make the second half the morning of your event. This ensures maximum freshness.
Serving Suggestions
These pastrami pinwheels are incredibly versatile and work beautifully as part of many different serving scenarios:
Classic Appetizer Spread: Arrange your pastrami roll ups as part of a deli-themed spread alongside:
- A variety of crackers and breadsticks
- Cheese cubes or cheese board
- Cherry tomatoes and raw vegetables
- Mixed nuts
- Assorted olives
- Deli mustards and horseradish sauce for dipping
Game Day Platter: Perfect for football parties! Serve with:
- Chicken wings (buffalo or BBQ)
- Loaded nachos
- Potato skins
- Mozzarella sticks
- Ranch or blue cheese dressing for dipping
Brunch Board: These work surprisingly well at brunch:
- Bagels with spreads
- Fresh fruit platter
- Mini quiches
- Smoked salmon
- Assorted breakfast pastries
Low-Carb Lunch: Pack these for lunch alongside:
- Mixed green salad with vinaigrette
- Cheese cubes
- Hard-boiled eggs
- Mixed nuts
- Fresh berries
Beverage Pairings: The rich, salty pastrami pairs beautifully with:
- Cold beer (especially pilsners or lagers)
- Dry white wines (Sauvignon Blanc or Pinot Grigio)
- Sparkling water with lemon
- Iced tea (sweetened or unsweetened)
- Bloody Marys for brunch
- Dill pickle juice shots (for the adventurous!)
Dipping Sauces: While they’re delicious on their own, some people love dipping options:
- Spicy brown mustard or Dijon
- Horseradish sauce
- Ranch dressing
- Thousand Island dressing (makes them taste like a Reuben!)
- Garlic aioli
Presentation Ideas:
- Arrange in a spiral pattern on a round platter
- Create rows on a rectangular serving board
- Stack them in a pyramid for dramatic height
- Alternate with cherry tomatoes on skewers
- Surround with fresh dill sprigs for garnish
- Serve on a bed of shredded lettuce for color contrast
FAQs Section
Can I use turkey or ham instead of pastrami?
Absolutely! Turkey and ham both work beautifully with this same method. Deli turkey creates a milder, more kid-friendly version, while ham adds sweetness that some people prefer. You can even mix and match—make some with pastrami and some with turkey to offer variety.
Do I have to use pickles?
Not at all! While pickles add that classic deli flavor and important crunch, you can substitute with roasted red peppers, sun-dried tomatoes, strips of cucumber, blanched asparagus spears, or even cheese sticks. Some people skip the vegetable center entirely and just do pastrami with flavored cream cheese.
How do I prevent the roll ups from falling apart?
The keys to structurally sound roll ups are: using room temperature cream cheese that acts as glue, spreading the cream cheese all the way to the edges, rolling tightly, and refrigerating for at least 15 minutes before slicing. Also, make sure your pickles are very dry—moisture is the enemy of structural integrity!
Can I make these dairy-free?
Yes! Use dairy-free cream cheese (Kite Hill makes an excellent almond-based version, and Miyoko’s makes a cultured cashew cream cheese). The technique remains exactly the same. You might need to experiment with brands to find one that spreads easily and holds the roll together well.
What’s the best way to transport these to a party?
Transport whole unsliced rolls in a cooler with ice packs, wrapped in plastic wrap. Bring your cutting board and sharp knife, and slice them when you arrive. This ensures they look their freshest. Alternatively, arrange sliced pinwheels in a flat container with a tight-fitting lid, placing parchment paper between layers to prevent sticking.
Can I warm these up?
These are designed to be served cold and warming them isn’t recommended—the cream cheese will melt and become runny. If you want a warm version, consider making a true hot pastrami sandwich instead!
Why did my roll ups turn out soggy?
Soggy roll ups almost always result from pickles that weren’t dried thoroughly enough. The pickle brine gradually soaks into the cream cheese and makes everything mushy. Next time, pat those pickles obsessively dry, and consider letting them air-dry on paper towels for 10 minutes before using.
How many roll ups should I make per person?
For an appetizer at a party with other food, plan on 2-3 roll ups per person. If they’re the main appetizer or the only food, increase to 4-5 per person. Pastrami roll ups tend to be so popular that people often eat more than you’d expect, so when in doubt, make extra!
Conclusion
And there you have it—the easiest, most crowd-pleasing pastrami roll ups recipe that will make you look like a kitchen superstar with minimal effort! These little bundles of deli deliciousness prove that you don’t need complicated techniques or hours of cooking time to create something truly special. Sometimes the simplest recipes are the most memorable, and these definitely fall into that category.
I love how versatile these keto pastrami appetizers are—equally at home at an elegant brunch, a casual game day gathering, or simply as your personal snack stash for the week. They’re proof that good food doesn’t have to be complicated or time-consuming. Just quality ingredients, smart technique, and five minutes of your time!
The beauty of this recipe is how you can make it your own. Once you’ve mastered the basic technique, feel free to experiment with different deli meats, flavored cream cheeses, and creative fillings. Let your imagination run wild—that’s what makes home cooking so fun and personal.
Now it’s your turn to experience the magic! I’d absolutely love to hear how your easy pastrami pinwheels turned out. Did you add your own creative twist? Serve them at a party where they were the star of the show? Make them for meal prep and discover your new favorite snack? Drop a comment below and share your experience—I read every single one and genuinely love hearing from you!
Please save this recipe to your Pinterest boards so you can find it easily whenever you need a quick appetizer solution! Share it with friends who love easy entertaining, tag me in your photos on social media, and let me know if you discovered any genius variations. Your feedback and creativity inspire me to keep creating and sharing recipes that make your life easier and more delicious.
Happy rolling, and here’s to effortless entertaining that always impresses!