Thai Chicken Skewers: The Easy Grilled Chicken Recipe with Restaurant-Quality Flavor

Get ready to fall in love with Thai chicken skewers – those incredibly flavorful, perfectly charred sticks of marinated chicken that taste like they came straight from your favorite Thai restaurant, but are surprisingly simple to make at home. These grilled Thai chicken skewers are about to become your go-to recipe for summer cookouts, weeknight dinners, and impressive entertaining.
What makes these easy Thai chicken skewers so irresistible? It’s all about the marinade. We’re talking coconut milk, fish sauce, lime juice, garlic, ginger, and a touch of sweetness that creates the most tender, flavorful chicken you’ve ever grilled. Each bite delivers that perfect balance of sweet, salty, tangy, and savory that Thai cuisine is famous for. The chicken comes off the grill with beautiful char marks, juicy interior, and flavors that make everyone ask for seconds (and the recipe).
These skewers are perfect for so many occasions: summer BBQs, meal prep Sunday (they reheat beautifully), game day appetizers, party platters, quick weeknight dinners, or those times when you want to impress guests without spending hours in the kitchen. Serve them with peanut sauce for dipping, pile them on rice, or stuff them into lettuce wraps – however you serve them, these Thai grilled chicken skewers are guaranteed crowd-pleasers.
Whether you’re firing up the outdoor grill, using a grill pan indoors, or even broiling in your oven, this recipe delivers big, bold flavors with minimal effort. Let’s make some magic happen!
History / Background
Thai chicken skewers, known as gai yang or satay gai in Thailand, have a rich history that spans centuries and reflects the beautiful fusion of cultures in Southeast Asian cuisine. While satay originated in Indonesia, Thai cooks adopted and adapted the concept, creating their own distinctive versions that showcase Thailand’s unique flavor profiles.
The tradition of skewered, grilled meat dates back to the Ayutthaya period (1351-1767) in Thailand, when street vendors would grill marinated meats over charcoal for travelers and workers who needed quick, affordable, portable meals. The skewer format made the food easy to eat while walking or working – Thailand’s original fast food!
What makes Thai chicken skewers distinctly Thai is the marinade. Unlike Indonesian satay which relies heavily on peanuts in the marinade, Thai versions incorporate coconut milk, lemongrass, galangal (Thai ginger), cilantro roots, fish sauce, and palm sugar. These ingredients create a complex flavor profile that’s simultaneously sweet, salty, sour, and aromatic – the hallmark of Thai cooking. The coconut milk not only adds flavor but also tenderizes the chicken and helps create that gorgeous caramelized exterior when grilled.
In Thailand, you’ll find these skewers at virtually every street food market, night market, and roadside stall. Vendors grill them over charcoal grills, and the smoky aroma draws crowds from blocks away. They’re typically served with two accompaniments: a sweet and tangy cucumber relish (ajad) and rich peanut sauce for dipping. The dish represents the Thai philosophy of balancing flavors and textures in every meal.
Thai chicken skewers gained international popularity in the 1960s and 70s as Thai cuisine spread globally. Today, they’re a beloved staple in Thai restaurants worldwide and have inspired countless home cooks to recreate that authentic Thai flavor in their own kitchens. The beauty of this dish is that while it tastes exotic and complex, it’s actually quite simple to prepare – a perfect example of Thai cooking’s genius simplicity.
Why You’ll Love This Recipe
Listen, I’m going to be straight with you: these Thai chicken skewers taste like you hired a Thai street food vendor to cook in your backyard, but the reality is you just mixed some ingredients together and threw chicken on the grill. That’s the magic of this recipe – minimal effort, maximum flavor, and everyone thinks you’re a culinary genius.
Here’s why these grilled Thai chicken skewers deserve a permanent spot in your dinner rotation:
- Insanely Flavorful: That coconut-lime-garlic marinade creates layers of flavor that make plain grilled chicken seem boring forever.
- Tender and Juicy: The coconut milk and acid in the marinade tenderize the chicken beautifully, so even chicken breast stays moist.
- Quick Marinating Time: Just 30 minutes to 2 hours needed, though overnight works if you’re planning ahead. No all-day marinating required.
- Versatile Cooking Methods: Grill outdoors, use a grill pan, broil in the oven, or even use an air fryer. Summer or winter, you can make these.
- Meal Prep Champion: Make a big batch on Sunday and you’ve got protein for salads, rice bowls, wraps, and quick dinners all week.
- Crowd-Pleaser: Kids love them, adults rave about them, picky eaters request them. Universal appeal is rare – treasure it.
- Budget-Friendly: Chicken thighs or breasts are affordable, and the marinade ingredients go a long way.
- Customizable Heat Level: Control the spice to suit your family’s preferences, from mild and sweet to fiery hot.
- Impressive Presentation: Skewers always look more special than regular grilled chicken, perfect for entertaining.
- Gluten-Free Friendly: Easily made gluten-free with tamari instead of soy sauce, accommodating various diets.
Ingredient Notes
The secret to authentic-tasting Thai chicken skewers is the marinade. Each ingredient plays a crucial role in building those complex, crave-worthy flavors:
Chicken (Thighs or Breasts): Boneless, skinless chicken thighs are the traditional choice and my strong recommendation. They stay juicier on the grill and have more flavor than breasts. However, chicken breasts work perfectly if that’s your preference – just watch them carefully to avoid overcooking. Substitutions: Turkey breast, pork tenderloin, or firm tofu for vegetarians. Shrimp also works beautifully with this marinade but needs much shorter cooking time.
Coconut Milk (Full-Fat): This is the base of your marinade and creates that creamy, rich coating that caramelizes beautifully on the grill. Use full-fat, not light, for best flavor and tenderizing effect. Shake the can well before opening. Substitutions: Coconut cream works but is richer; thin with a bit of water. In a pinch, you could use Greek yogurt mixed with a little oil, but you’ll lose the authentic Thai coconut flavor.
Fish Sauce: The umami bomb that gives Thai food its distinctive savory depth. Don’t skip this! It smells strong in the bottle but mellows when cooked, adding incredible savoriness. Substitutions: Soy sauce or tamari works in a pinch but won’t be as authentically Thai. Use slightly less soy sauce as it’s saltier than fish sauce.
Lime Juice (Fresh): Provides the sour/tangy element that brightens all the other flavors. Always use fresh lime juice – bottled just doesn’t compare. You’ll need about 2-3 limes. Substitutions: Fresh lemon juice works, though lime is more authentically Thai.
Brown Sugar or Coconut Sugar: Balances the salty fish sauce and tangy lime with sweetness. Also helps create that gorgeous caramelized crust on the grill. Substitutions: Honey, maple syrup, or palm sugar (most authentic) all work. Avoid artificial sweeteners as they won’t caramelize.
Garlic: Fresh garlic cloves, minced fine or grated. Garlic is essential to Thai cooking and provides aromatic depth. Substitutions: Garlic powder in a pinch (use 1 teaspoon per 3 cloves), but fresh is vastly superior.
Fresh Ginger: Adds that warm, spicy, aromatic note that’s distinctly Asian. Substitutions: Ground ginger works (use ¼ of the amount), but fresh grated ginger is much better.
Soy Sauce: Adds extra saltiness and depth beyond the fish sauce. Substitutions: Tamari for gluten-free, or use extra fish sauce.
Curry Powder or Turmeric: Provides color and that warm, earthy note. Yellow curry powder is traditional. Substitutions: Turmeric alone, garam masala, or Thai curry paste (reduce other liquids slightly).
Optional: Lemongrass, Cilantro, Thai Chili: These take it to the next level of authenticity. Fresh lemongrass (tender white part only, minced), cilantro stems, and Thai bird chilies make it taste like street food in Bangkok.
Equipment Needed
Good news – you don’t need fancy equipment for restaurant-quality Thai chicken skewers:
- Bamboo or Metal Skewers: Bamboo skewers (10-12 inches) are traditional and inexpensive. Soak in water for 30 minutes before using to prevent burning. Metal skewers are reusable and don’t need soaking.
- Large Mixing Bowl or Zip-Top Bag: For marinating the chicken
- Sharp Knife and Cutting Board: For cutting chicken into uniform pieces
- Measuring Cups and Spoons: For accurate marinade proportions
- Whisk or Fork: To mix marinade ingredients
- Grill, Grill Pan, or Broiler: Any of these work perfectly
- Tongs: For flipping skewers on the grill
- Basting Brush (optional): For brushing extra marinade while grilling
- Instant-Read Thermometer (optional but recommended): Ensures perfectly cooked chicken every time

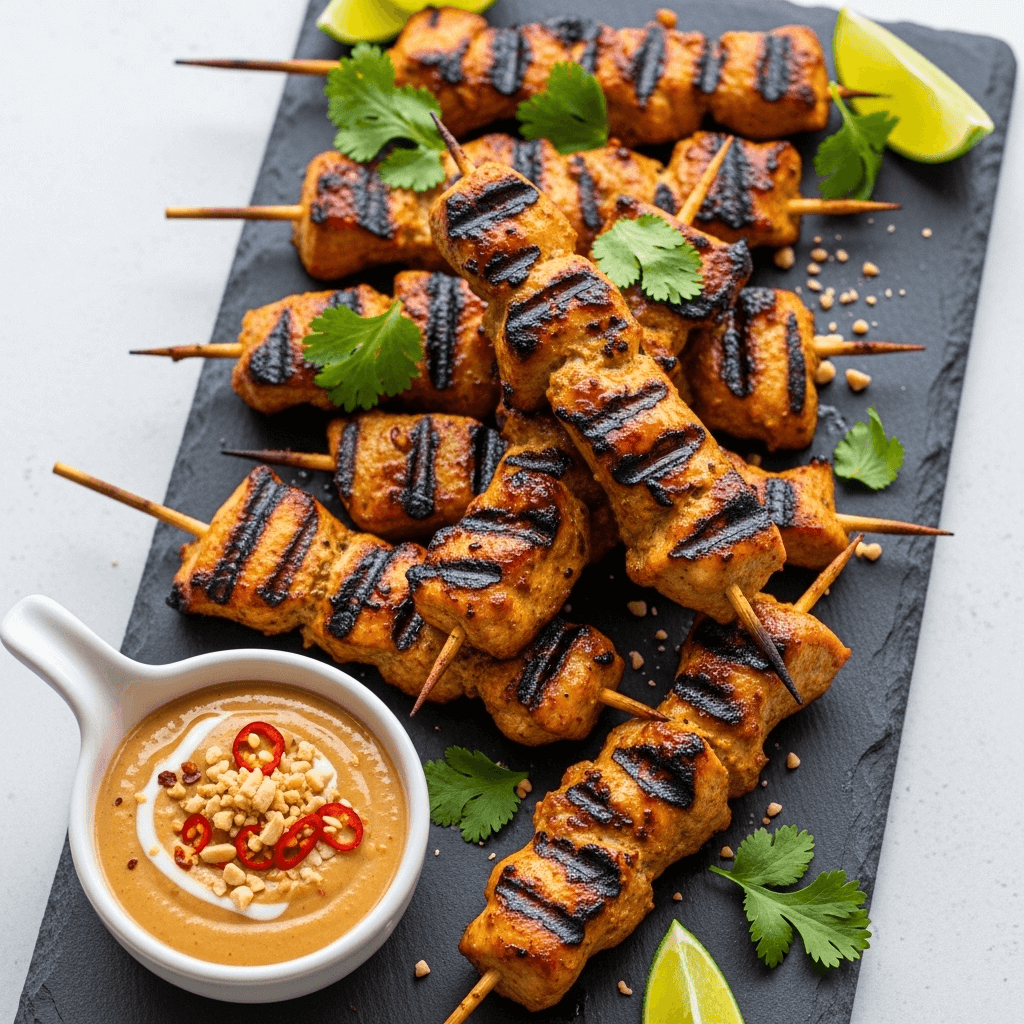
Thai Chicken Skewers
These Thai chicken skewers are marinated in a flavorful coconut-lime marinade, then grilled to perfection with beautiful char marks. Tender, juicy, and packed with authentic Thai flavors, these easy grilled chicken skewers taste like restaurant takeout but are made right in your backyard. Perfect for summer grilling, meal prep, or impressive entertaining!
- Total Time: 55 minutes (minimum)
- Yield: 6 servings (about 12-15 skewers) 1x
Ingredients
For the Marinade:
- ¾ cup full-fat coconut milk (shake can well before measuring)
- 3 tablespoons fish sauce
- 3 tablespoons fresh lime juice (about 2 limes)
- 3 tablespoons brown sugar or coconut sugar
- 3 tablespoons soy sauce or tamari (for gluten-free)
- 4 cloves garlic, minced or grated
- 2 tablespoons fresh ginger, grated
- 1 tablespoon curry powder (yellow or Thai curry)
- 1 tablespoon vegetable oil or avocado oil
- 1 teaspoon ground coriander (optional)
- ½ teaspoon black pepper
For the Skewers:
- 2 pounds boneless, skinless chicken thighs or breasts, cut into 1½-inch pieces
- Bamboo or metal skewers
- Fresh cilantro for garnish
- Lime wedges for serving
- Peanut sauce for dipping (optional)
Instructions
- Prepare the Marinade: In a large mixing bowl, whisk together the coconut milk, fish sauce, lime juice, brown sugar, soy sauce, minced garlic, grated ginger, curry powder, oil, coriander (if using), and black pepper. Whisk vigorously for about a minute until the sugar dissolves and everything is well combined. The mixture should be smooth and aromatic.
- Cut and Add Chicken: Cut your chicken into uniform 1½-inch pieces – consistency in size ensures even cooking. Add all the chicken pieces to the marinade and toss well, making sure every piece is completely coated. You can do this in the bowl or transfer everything to a large zip-top bag for easier coating.
- Marinate: Cover the bowl with plastic wrap or seal the bag, removing as much air as possible. Refrigerate for at least 30 minutes, up to 4 hours for maximum flavor. (Overnight works too but isn’t necessary.) Flip or massage the bag halfway through marinating time to ensure even coverage.
- Prepare Skewers: If using bamboo skewers, soak them in water for at least 30 minutes while the chicken marinates to prevent burning. If using metal skewers, no prep needed.
- Thread Chicken onto Skewers: Remove chicken from marinade, letting excess drip off (reserve the marinade if you want to make a sauce). Thread 4-5 pieces of chicken onto each skewer, leaving a small gap between pieces so they cook evenly. Don’t pack them too tightly – air circulation helps with browning.
- Preheat Your Grill: Heat your outdoor grill, grill pan, or broiler to medium-high heat (about 400°F). Oil the grates well to prevent sticking. For broiler method, position the oven rack 6 inches from the heating element.
- Grill the Skewers: Place skewers on the preheated grill. Cook for 5-6 minutes on the first side without moving them – this creates those beautiful char marks. Flip and cook for another 5-6 minutes on the second side. The chicken should be cooked through (internal temperature 165°F) with nice caramelization and char marks.
- Optional Basting: During the last 2 minutes of cooking, you can brush the skewers with reserved marinade for extra flavor (make sure they cook for at least 2 minutes after basting to kill any bacteria from the raw chicken).
- Rest and Serve: Remove skewers from heat and let rest for 3-4 minutes. This allows juices to redistribute, keeping the chicken juicy. Garnish with fresh cilantro, serve with lime wedges for squeezing, and your favorite peanut sauce for dipping.
Notes
- Marinating Time: Minimum 30 minutes, maximum overnight. More than 8 hours can make the chicken mushy from the acid.
- Chicken Choice: Thighs stay juicier, but breasts work perfectly with careful timing.
- Don’t Overcrowd: Leave space between chicken pieces on the skewer for even cooking and browning.
- Temperature Check: Use an instant-read thermometer to ensure chicken reaches 165°F internal temperature.
- Leftover Marinade: Never reuse marinade that touched raw chicken unless you boil it for 5 minutes first to kill bacteria.
- Make It Spicy: Add 1-2 teaspoons of Thai chili paste (sambal oelek) to the marinade, or serve with spicy dipping sauce.
- Prep Time: 15 minutes (plus 30 minutes-2 hours marinating time)
- Cook Time: 10-12 minutes
- Category: Appetizer
- Method: Grilling
- Cuisine: Thai
- Diet: Gluten Free
Nutrition
- Serving Size: 2-3 skewers
- Calories: 285
- Sugar: 6g
- Sodium: 920mg
- Fat: 14g
- Saturated Fat: 6g
- Unsaturated Fat: 7g
- Trans Fat: 0g
- Carbohydrates: 9g
- Fiber: 0g
- Protein: 30g
- Cholesterol: 125mg
Tips & Variations
The basic Thai chicken skewers are phenomenal, but here are creative ways to customize them:
Spicy Thai Chicken Skewers: Add 1-2 tablespoons of Thai red curry paste to the marinade, or stir in sriracha or sambal oelek. For extreme heat lovers, add minced Thai bird chilies directly to the marinade. You can also serve with spicy peanut sauce instead of regular.
Extra Aromatic Version: Add 2 stalks of lemongrass (white part only, minced fine), ¼ cup cilantro stems (chopped), and 2-3 kaffir lime leaves (torn) to the marinade. These authentic Thai aromatics take the flavor to the next level.
Pineapple Chicken Skewers: Alternate chicken pieces with fresh pineapple chunks on the skewers. The pineapple caramelizes beautifully and adds sweet-tart contrast. This is stunning for parties!
Thai Chicken Veggie Skewers: Thread chicken with bell peppers, red onion, and cherry tomatoes for a complete meal on a stick. Gorgeous presentation and built-in vegetables.
Lettuce Wrap Style: Skip the skewers entirely and grill the marinated chicken pieces loose. Serve in butter lettuce cups with rice noodles, fresh herbs, and peanut sauce for DIY lettuce wraps.
Sheet Pan Version: No grill? Thread chicken on skewers and arrange on a foil-lined baking sheet. Broil on high for 10-12 minutes, flipping once, until charred and cooked through.
Air Fryer Method: Place skewers in air fryer basket (you may need to break skewers in half to fit). Cook at 400°F for 10-12 minutes, flipping halfway through.
Pork or Shrimp Variation: Use pork tenderloin cut into cubes, or large shrimp (marinate shrimp for only 15-20 minutes and cook for just 2-3 minutes per side).
Pro Chef Tips
Want to elevate your Thai chicken skewers from delicious to absolutely restaurant-quality? Here’s what professional chefs know:
Uniform Chicken Pieces: Cut all your chicken into the same size – about 1½ inches. This ensures everything cooks at the same rate. Uneven pieces mean some dry out while others are undercooked. Take an extra two minutes on this step and your results will be dramatically better.
Double Skewer Technique: For thicker chicken pieces, use two parallel skewers instead of one. This prevents the chicken from spinning when you flip them, making grilling much easier and ensuring even cooking on all sides. Restaurant chefs always do this.
The Marinade Rest: After mixing your marinade, let it sit for 5-10 minutes before adding chicken. This allows the sugar to fully dissolve and the flavors to meld, creating a more cohesive taste.
Pat Chicken Dry First: Before adding to marinade, pat chicken pieces dry with paper towels. Dry chicken absorbs marinade better than wet chicken. This simple step improves flavor penetration significantly.
Reserve Marinade for Sauce: Before adding raw chicken, take out ½ cup of marinade and refrigerate. After grilling, bring this unused portion to a boil in a small saucepan, simmer for 5 minutes, and reduce slightly for a delicious drizzling sauce.
The Two-Zone Fire: If using a charcoal or gas grill, create two heat zones – one direct high heat, one indirect medium heat. Start skewers on high heat to char and caramelize (2-3 minutes per side), then move to cooler zone to finish cooking through. This prevents burning while ensuring tender, juicy interior.
Don’t Overcrowd: Leave about ¼ inch space between chicken pieces on the skewer. They need air circulation to cook evenly and develop that gorgeous char. Tightly packed pieces steam instead of grill.
Rest is Essential: After grilling, let skewers rest for 3-5 minutes before serving. This allows juices to redistribute throughout the meat. Cut into a skewer immediately and juices run out; wait a few minutes and they stay in the chicken.
Finishing Squeeze: Always serve with fresh lime wedges and encourage guests to squeeze them over the skewers right before eating. That bright acid cuts through the richness and makes every flavor pop.
Common Mistakes to Avoid
Even straightforward recipes have pitfalls. Here’s how to avoid the most common Thai chicken skewer mistakes:
Over-Marinating: The acids in the marinade (lime juice, fish sauce) will start to “cook” the chicken if left too long, making the texture mushy. Maximum 8 hours, but 1-2 hours is truly the sweet spot. Overnight is fine if you must, but don’t go beyond 12 hours.
Skipping the Skewer Soak: If using bamboo skewers, forgetting to soak them means they’ll burn on the grill, potentially catching fire and definitely leaving charred wood taste on your chicken. Soak for at least 30 minutes in water before using.
Grill Temperature Too Low: Low heat means no char marks, no caramelization, and bland flavor. You need medium-high heat (around 400°F) to get that beautiful browning and flavor development. If your grill isn’t hot enough, the chicken steams instead of grills.
Moving the Skewers Too Soon: Place chicken on the hot grill and leave it alone for 5-6 minutes. Resist the urge to move, flip, or adjust constantly. The chicken will naturally release from the grates when it’s properly seared. Flipping too early tears the meat and ruins those gorgeous grill marks.
Overcooking Chicken Breast: If using chicken breasts, watch them like a hawk. They cook faster than thighs and dry out quickly. Pull them at 165°F internal temperature and no higher. Thighs are more forgiving and can handle up to 175°F while staying juicy.
Not Using Reserved Marinade Safely: Never use marinade that touched raw chicken without boiling it first for at least 5 minutes to kill bacteria. Either set aside unused marinade before adding chicken, or boil the used marinade thoroughly before brushing on cooked chicken.
Storage & Meal Prep
Thai chicken skewers are meal prep champions! Here’s how to store and enjoy them throughout the week:
Refrigerator Storage: Store cooked chicken skewers in an airtight container in the refrigerator for up to 4 days. You can leave them on the skewers or slide the chicken off for easier storage. Layer with parchment paper between layers to prevent sticking.
Reheating Methods: The best way to reheat is in a 350°F oven for 8-10 minutes until warmed through – this maintains texture better than microwaving. You can also reheat in a skillet over medium heat for 3-4 minutes, or microwave in 30-second increments (though this makes them slightly less tender). For maintaining maximum juiciness, add a tablespoon of water to the container before reheating.
Meal Prep Strategy: These skewers are PERFECT for meal prep. Grill a double or triple batch on Sunday. For the week ahead, use them in: grain bowls with rice and vegetables, chopped salads, lettuce wraps, stir-fries, or just reheated and served with fresh sides. The versatility is endless.
Marinated Chicken Storage: Raw chicken in marinade keeps for 2-3 days in the refrigerator. You can marinate, then store for a day or two before grilling – convenient for planning ahead.
Best Served: While these are delicious cold (great for lunchboxes or picnics), they’re best served warm or at room temperature. The flavors are most vibrant when not straight-from-the-fridge cold.
Food Safety Note: Never leave cooked chicken at room temperature for more than 2 hours (1 hour if it’s above 90°F outside). Always refrigerate promptly after serving.
Make-Ahead & Freezer Notes
Great news for planners – Thai chicken skewers are incredibly freezer-friendly and make-ahead options abound:
Freezing Marinated Raw Chicken: This is my favorite make-ahead method. Mix your marinade, add chicken, and freeze in a zip-top freezer bag for up to 3 months. When ready to cook, thaw in the refrigerator overnight. The chicken marinates as it thaws – genius double-duty! Label the bag with cooking instructions for ultimate convenience.
Freezing Cooked Skewers: Fully cooked skewers freeze beautifully for up to 3 months. Let them cool completely, then arrange in a single layer on a baking sheet and freeze until solid (about 2 hours). Transfer to freezer bags, removing as much air as possible. This flash-freezing method prevents them from sticking together.
Thawing Frozen Cooked Skewers: The safest method is overnight in the refrigerator. For quicker thawing, place sealed bag in cold water, changing water every 30 minutes. Never thaw at room temperature.
Reheating from Frozen: Cooked frozen skewers can go straight from freezer to oven. Reheat at 350°F for 15-18 minutes until heated through (internal temp 165°F). You can also microwave, but oven reheating maintains better texture.
Make-Ahead Timeline: For party planning, marinate chicken up to 4 hours ahead, thread onto skewers, cover, and refrigerate. Grill just before serving. Or grill up to 2 days ahead and reheat gently before serving.
Marinade Prep: Mix the marinade up to 3 days ahead and refrigerate in a sealed container. Give it a good stir before using as coconut milk may separate.
Best Quality: While freezing works great for convenience, freshly grilled skewers will always have the best texture and flavor. Frozen and reheated are still delicious, just slightly less tender.
Serving Suggestions
Thai chicken skewers are versatile stars that shine in many serving scenarios. Here’s how to create a complete, delicious meal:
Classic Thai Plate: Serve skewers over jasmine rice with a side of cucumber salad (thinly sliced cucumbers in rice vinegar, sugar, and a pinch of salt). Add fresh cilantro, lime wedges, and peanut sauce for dipping. This is the traditional street food presentation.
Rice Bowls: Create DIY rice bowls with jasmine or coconut rice as the base, top with sliced chicken from skewers, shredded carrots, cucumber, edamame, avocado, and drizzle with peanut sauce and sriracha mayo. Sprinkle with crushed peanuts and cilantro.
Salad Topper: Slice chicken off skewers and serve over mixed greens, cabbage, carrots, and bell peppers with Thai peanut dressing. Add mandarin oranges, crispy wonton strips, and chopped peanuts for an amazing Thai chicken salad.
Noodle Bowls: Serve with rice noodles or soba noodles, fresh herbs (mint, cilantro, Thai basil), bean sprouts, and peanut sauce. This makes a complete, satisfying meal.
Appetizer Platter: For parties, arrange skewers on a large platter with multiple dipping sauces: peanut sauce, sweet chili sauce, and spicy mayo. Add cucumber slices and lime wedges around the edges for gorgeous presentation.
Lettuce Wraps: Provide butter lettuce leaves, vermicelli noodles, fresh herbs, pickled vegetables, and peanut sauce. Guests build their own wraps with sliced chicken – interactive and fun!
Side Dishes That Complement: Spring rolls, mango salad, papaya salad, coconut rice, stir-fried vegetables, Thai basil fried rice, or simple steamed edamame.
Beverage Pairings: Thai iced tea, limeade, coconut water, light beer (Singha or Thai beer), Riesling or Gewürztraminer wine, or ginger lemonade.
Party Tip: For outdoor entertaining, grill the skewers fresh while guests mingle. The aroma is incredible and watching them cook builds anticipation!
FAQs Section
Q: Can I make these without a grill?
A: Absolutely! You have several options. Use a grill pan on your stovetop over medium-high heat – works beautifully and creates nice grill marks. Broil in your oven by placing skewers on a foil-lined baking sheet 6 inches from the heating element, cooking 5-6 minutes per side. You can also use an air fryer at 400°F for 10-12 minutes, flipping halfway. Or simply bake in a 425°F oven for 18-22 minutes, flipping once. All methods work well!
Q: What’s the best chicken to use – thighs or breasts?
A: Chicken thighs are my strong recommendation. They have more fat, which means they stay juicier on the grill and have richer flavor. They’re also more forgiving if you slightly overcook them. However, chicken breasts absolutely work if you prefer white meat – just watch the timing carefully and pull them at exactly 165°F to avoid drying out. Many people do half and half to satisfy different preferences.
Q: Do I really need fish sauce? What if I can’t find it?
A: Fish sauce is truly essential for authentic Thai flavor – it provides that umami depth that makes these taste restaurant-quality. However, if you absolutely can’t find it or have dietary restrictions, substitute with soy sauce or tamari (use the same amount). It won’t be quite as authentically Thai, but it will still be delicious. Most grocery stores carry fish sauce in the Asian foods aisle – look for brands like Red Boat or Three Crabs.
Q: Can I make these ahead for a party?
A: Yes! You have two great options. Option 1: Marinate and skewer the chicken up to 4 hours ahead, keep refrigerated, and grill just before serving. Option 2: Grill completely up to 2 days ahead, refrigerate, and reheat gently in a 350°F oven for 8-10 minutes before serving. Both work well. Freshly grilled is ideal, but reheated is still delicious and much less stressful when entertaining.
Q: How long should I marinate the chicken?
A: Minimum 30 minutes, maximum 8 hours for best results. The sweet spot is 1-2 hours – this gives you maximum flavor penetration without the acids breaking down the chicken texture. If you marinate overnight (12+ hours), the chicken can become mushy from the lime juice. If you’re really short on time, even 15 minutes is better than nothing.
Q: Why are my skewers burning on the grill?
A: If using bamboo skewers, you must soak them in water for at least 30 minutes before grilling – this prevents burning. Also, make sure your grill isn’t too hot. Medium-high heat (around 400°F) is ideal. If you’re using very high heat, the skewers will burn before the chicken cooks through. You can also wrap the exposed ends of skewers with aluminum foil for extra protection.
Q: Can I make these with other proteins?
A: Definitely! This marinade works beautifully with pork tenderloin (cut into cubes), large shrimp (reduce marinating time to 15-20 minutes and cooking time to 2-3 minutes per side), firm tofu (press well first and marinate for 1 hour), or even steak. The Thai flavors complement all of these proteins wonderfully.
Conclusion
And there you have it – your new favorite grilled chicken recipe that’s going to make you feel like a Thai street food master! These Thai chicken skewers are proof that incredibly flavorful, restaurant-quality food doesn’t have to be complicated. A quick marinade, a hot grill, and about 30 minutes is all that stands between you and some of the most delicious chicken you’ve ever made.
What I love most about this recipe is how it transforms ordinary chicken into something extraordinary. The coconut-lime marinade creates this perfect balance of sweet, salty, tangy, and savory that keeps everyone coming back for more. Whether you’re meal-prepping for the week, firing up the grill for a summer cookout, or trying to impress dinner guests, these skewers deliver every single time.
The versatility is another huge win – serve them as appetizers with peanut sauce, make them the star of a rice bowl, toss them on salads, or wrap them in lettuce cups. However you choose to serve these grilled Thai chicken skewers, you’re guaranteed smiles all around the table.
I can’t wait to hear how your Thai chicken skewers turn out! Did you try the spicy version? Serve them in lettuce wraps? Make a double batch for meal prep? Drop a comment below and let me know! And if you’re as obsessed with these as I am (you will be), please share this recipe on Pinterest so other home cooks can discover it. Pin it to your “Grilling Recipes,” “Easy Dinner Ideas,” or “Thai Food” boards – your followers will absolutely thank you!
Happy grilling, and get ready for some serious flavor!