Easy Tuna Salad Pinwheels: The Perfect Make-Ahead Appetizer Everyone Will Love
If you’re looking for an easy, crowd-pleasing appetizer that looks impressive but takes minimal effort, these tuna salad pinwheels are about to become your new best friend! These colorful, bite-sized rolls combine creamy, protein-packed tuna salad with fresh vegetables all wrapped up in soft tortillas and sliced into beautiful spirals that are as delicious as they are photogenic.
Tuna salad pinwheels are the ultimate party food—they’re perfectly portable, can be made ahead of time, and offer that irresistible combination of creamy, crunchy, and fresh flavors in every bite. Whether you’re hosting a baby shower, packing school lunches, planning a game day spread, or need a quick and healthy snack, these easy tuna pinwheels deliver on all fronts. They’re also incredibly versatile, working beautifully for everything from elegant bridal showers to casual backyard gatherings.
The best part? You can whip up a platter of these tuna tortilla roll ups in about 20 minutes, and they actually taste better after chilling in the fridge for a bit. No cooking required, no hot oven to turn on, and minimal cleanup—just fresh, flavorful pinwheels that look like you spent hours in the kitchen. Once you discover how simple it is to make tuna salad pinwheels recipe favorites, you’ll find yourself making them on repeat for every occasion!
History / Background
While pinwheel sandwiches might seem like a modern party food innovation, the concept of rolled sandwiches has roots that span multiple cultures and decades. The pinwheel sandwich as we know it in American cuisine became popular in the mid-20th century, appearing in women’s magazines and community cookbooks as an elegant yet practical solution for entertaining. These rolled sandwiches were originally seen as a sophisticated alternative to traditional tea sandwiches, perfect for ladies’ luncheons and social gatherings.
The use of tortillas for pinwheels is actually a more recent adaptation that gained momentum in the 1990s and early 2000s. As tortillas became a mainstream staple in American kitchens beyond just Mexican cuisine, creative home cooks began using them as a convenient vessel for all sorts of fillings. The tortilla’s flexibility and ability to hold together when rolled made it ideal for creating beautiful spiraled sandwiches that stayed intact when sliced.
Tuna salad itself has a much longer history in American cuisine. Canned tuna became widely available in the United States in the early 1900s, and by the 1940s and 1950s, tuna salad had become a lunchtime staple. Originally considered an economical way to stretch protein during wartime rationing, tuna salad evolved into a beloved classic that transcended its humble beginnings. The combination of tuna with mayonnaise, celery, and various seasonings became as American as apple pie.
The genius of tuna salad pinwheels lies in taking two beloved concepts—classic tuna salad and convenient rolled sandwiches—and combining them into one portable, party-perfect package. These pinwheels represent the evolution of American entertaining food: they maintain the nostalgia and comfort of traditional tuna salad while presenting it in a modern, Instagram-worthy format that’s perfect for today’s casual yet stylish gatherings. They’ve become especially popular among busy parents, meal preppers, and anyone looking for healthy, protein-rich snacks that don’t sacrifice flavor or visual appeal.
Why You’ll Love This Recipe
Tuna salad pinwheels are the answer to so many entertaining and meal prep dilemmas, and once you make them, you’ll understand why they’ve become such a Pinterest favorite!
These tortilla pinwheels are incredibly practical while still feeling special enough for any occasion. They offer that perfect combination of being easy enough for weeknight meal prep but impressive enough to serve at your next party. The creamy tuna salad filling paired with crisp vegetables and soft tortillas creates an addictive texture contrast that keeps everyone coming back for more.
Here’s why this recipe will become your go-to:
- No cooking required – Completely make-ahead with zero time at the stove or in the oven
- Ready in 20 minutes – From start to finish, including assembly and chilling time
- Perfect for meal prep – Make a batch on Sunday and enjoy them all week long
- Budget-friendly – Uses affordable pantry staples and stretches protein beautifully
- Kid-approved – Even picky eaters love these bite-sized rolls
- Easily customizable – Adapt the filling to accommodate any dietary preferences or taste preferences
- Portable perfection – Great for lunchboxes, picnics, potlucks, and road trips
- Visually stunning – The colorful spiral presentation looks professionally catered
- Protein-packed – Each pinwheel delivers satisfying protein to keep you full
- No soggy sandwiches – Unlike traditional sandwiches, these stay fresh and delicious
- Crowd-pleaser guaranteed – Appeals to all ages and always disappears first at parties
- Minimal cleanup – Just a bowl, knife, and cutting board required
Whether you’re a busy parent looking for healthy lunch options, a host planning your next gathering, or simply someone who loves easy, delicious food, these tuna pinwheels check every box. They’re the kind of recipe you’ll make once and then keep coming back to because they’re just that good and that versatile!
Ingredient Notes
Let’s break down what makes these tuna salad pinwheels so delicious, and why each ingredient plays an important role:
Canned Tuna (2 cans, 5 oz each) – The star protein of your pinwheels! Use tuna packed in water for a lighter option, or oil-packed for richer flavor. Why it’s important: Quality matters here—albacore or solid white tuna has a better texture and milder flavor than chunk light tuna. Substitution note: Try canned salmon, canned chicken, or even chickpeas mashed for a vegetarian version.
Mayonnaise (¼-⅓ cup) – Creates that signature creamy texture and binds everything together. Why it’s important: The mayo keeps the filling moist and helps it spread easily without tearing the tortilla. Substitution note: Greek yogurt, light mayo, or a combination of mayo and Greek yogurt works beautifully for a lighter version. Avocado can also provide creaminess for a mayo-free option.
Celery (½ cup, finely diced) – Adds essential crunch and fresh flavor. Why it’s important: The crisp texture contrasts beautifully with the creamy tuna salad. Substitution note: Cucumber, bell peppers, or water chestnuts provide similar crunch.
Red Onion (2-3 tablespoons, finely minced) – Provides sharp, savory bite. Why it’s important: A little onion adds depth and prevents the filling from tasting flat. Substitution note: Green onions, shallots, or even a sprinkle of onion powder work in a pinch.
Large Flour Tortillas (4-5, burrito-size) – The wrapper that holds everything together. Why it’s important: Larger tortillas (10-inch) give you more surface area for filling and make prettier spirals. Substitution note: Whole wheat tortillas, spinach wraps, or tomato basil wraps add color and nutrition. For gluten-free, use gluten-free tortillas.
Cream Cheese (4 oz, softened) – The secret ingredient for extra creaminess and adhesion. Why it’s important: Cream cheese spread on the tortilla acts as “glue” and adds richness. Substitution note: Omit if calorie-conscious, or use light cream cheese or hummus as a spread.
Fresh Spinach or Lettuce (1-2 cups) – Adds color, nutrition, and freshness. Why it’s important: The greens create visual appeal and provide a fresh, crisp layer. Substitution note: Baby kale, arugula, or even thinly sliced cucumber ribbons work great.
Seasonings:
- Lemon juice (1 tablespoon) – Brightens all the flavors
- Dijon mustard (1 teaspoon) – Adds tangy depth
- Salt and pepper – Essential for seasoning
- Garlic powder (optional) – Extra savory note
- Dill or parsley (optional) – Classic herbs that complement tuna beautifully
The beauty of this recipe is its flexibility—you can adjust quantities and ingredients based on your preferences and what you have on hand!
Equipment Needed
One of the best things about tuna salad pinwheels is how little equipment you need:
- Mixing Bowl – Medium-sized for combining the tuna salad ingredients
- Can Opener – For opening the tuna cans
- Colander or Strainer – To drain the tuna thoroughly
- Fork – For flaking the tuna and mixing the salad
- Sharp Knife – Essential for cleanly slicing the pinwheels
- Cutting Board – For prep work and slicing
- Measuring Cups and Spoons – For accurate ingredient proportions
- Butter Knife or Offset Spatula – For spreading cream cheese and tuna salad evenly
- Plastic Wrap or Parchment Paper – For wrapping the rolls before slicing
- Large Plate or Cutting Board – For rolling and assembling
- Serving Platter – To display your beautiful pinwheels
Optional but helpful:
- Food Processor – For finely chopping vegetables quickly
- Toothpicks – To secure the roll-ups if they’re being stubborn
That’s it! No appliances, no cooking equipment—just simple kitchen basics that you definitely already own.
Print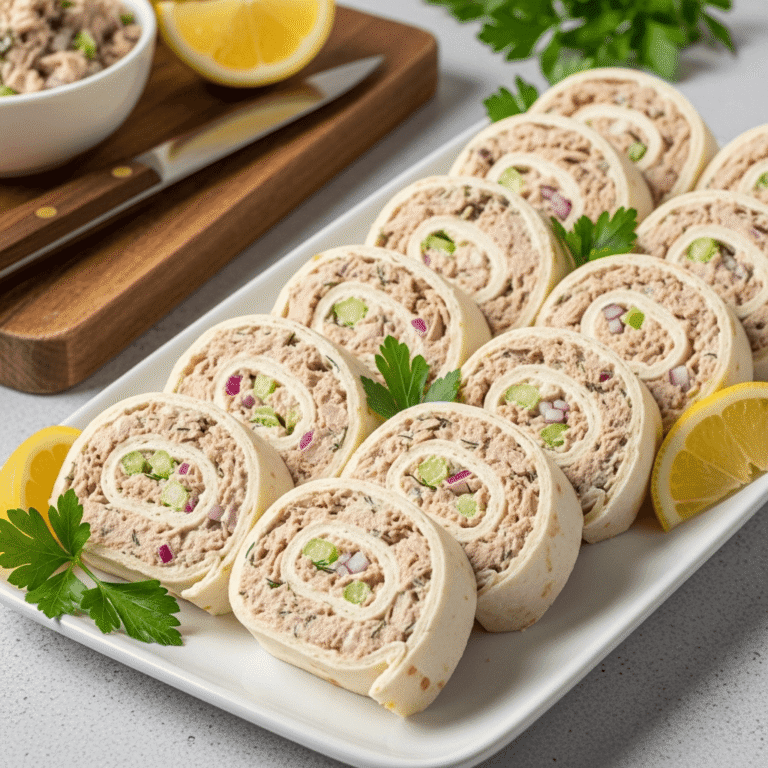
Tuna Salad Pinwheels
These easy tuna salad pinwheels are the perfect make-ahead appetizer or lunch option! Creamy tuna salad is rolled up in soft flour tortillas with fresh vegetables and sliced into beautiful spiral bites. Ready in just 20 minutes with no cooking required, these portable pinwheels are ideal for parties, meal prep, lunchboxes, and busy weeknights.
- Total Time: 20 minutes
- Yield: 20-24 pinwheels (serves 8-10 as appetizers) 1x
Ingredients
- Prepare the tuna salad: Open and thoroughly drain the tuna cans, pressing out as much liquid as possible. Transfer the drained tuna to a medium mixing bowl and use a fork to flake it into small pieces. Add mayonnaise, diced celery, minced red onion, lemon juice, Dijon mustard, garlic powder, dill, salt, and pepper. Mix everything together until well combined and creamy. Taste and adjust seasonings as needed.
- Prep your workspace: Lay out all your tortillas on a clean work surface or large cutting board. Having everything ready makes assembly quick and efficient.
- Spread the cream cheese: Using a butter knife or offset spatula, spread about 1 tablespoon of softened cream cheese evenly over each tortilla, going all the way to the edges. This acts as a “glue” to help seal the pinwheels and adds extra creaminess. Make sure the cream cheese is at room temperature so it spreads easily without tearing the tortilla.
- Add the greens: Layer fresh spinach or lettuce leaves over the cream cheese, covering the entire surface but leaving about ½ inch bare at the top edge. This bare edge will help seal the roll. Pat the greens down gently so they stick to the cream cheese.
- Spread the tuna salad: Spoon about ½ cup of tuna salad onto the bottom third of each tortilla (the edge closest to you). Use the back of your spoon to spread it in an even layer, about ¼-inch thick. Don’t overfill—less is more when it comes to rolling tightly!
- Add optional vegetables: If using shredded carrots or cucumber slices, sprinkle them over the tuna salad layer for extra crunch and color.
- Roll tightly: Starting from the edge with the tuna salad, begin rolling the tortilla away from you, keeping it as tight as possible. Use your fingers to tuck in the sides and maintain even pressure as you roll. The tighter you roll, the prettier your slices will be. Roll all the way to the bare edge, which should seal the roll closed.
- Wrap and chill: Wrap each roll tightly in plastic wrap, twisting the ends to seal. Place the wrapped rolls seam-side down in the refrigerator for at least 30 minutes (up to 24 hours). This chilling time is crucial—it allows the cream cheese to firm up and helps everything stick together, making slicing much easier.
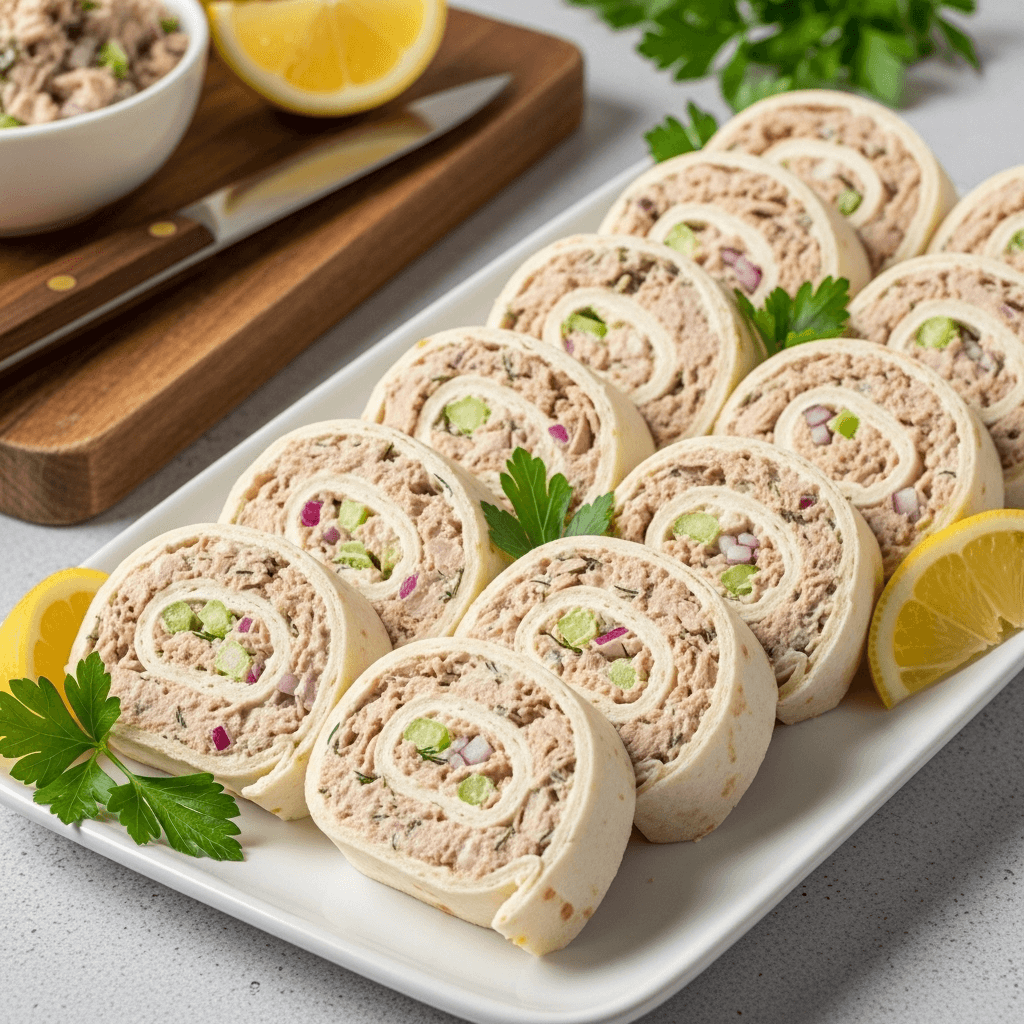
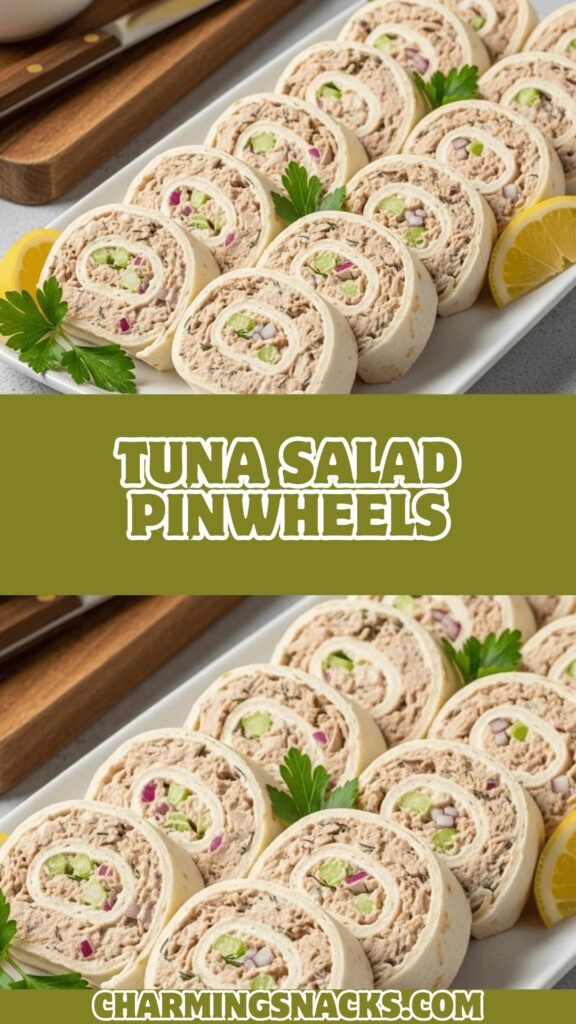
- Slice the pinwheels: When ready to serve, unwrap the rolls and place them seam-side down on a cutting board. Using a sharp, serrated knife, trim off both ends (about ½ inch from each side) for clean edges. Then slice each roll into ¾-inch to 1-inch thick rounds. Wipe your knife clean between cuts for the cleanest slices.
- Arrange and serve: Place the pinwheels cut-side up on a serving platter in a single layer so you can see the beautiful spirals. Serve immediately or cover and refrigerate until party time!
Instructions
- Drainage is key: Make sure to drain the tuna very well. Excess moisture makes the filling runny and can make tortillas soggy.
- Room temperature matters: Softened cream cheese spreads easily; cold cream cheese will tear your tortillas.
- Tight rolling technique: Roll as tightly as possible without squeezing out the filling. Practice makes perfect!
- Chilling is essential: Don’t skip the refrigeration time. Cold rolls slice cleanly; room temperature rolls fall apart.
- Sharp knife required: A serrated knife works best for clean cuts. Wipe the blade between slices.
- Make ahead friendly: These can be rolled and refrigerated up to 24 hours before slicing and serving.
- Prep Time: 20 minutes
- Cook Time: 0 minutes
- Category: Appetizer
- Method: No-Cook
- Cuisine: American
- Diet: Gluten Free
Nutrition
- Serving Size: 2 pinwheels
- Calories: 165
- Sugar: 2g
- Sodium: 385mg
- Fat: 9g
- Saturated Fat: 3g
- Unsaturated Fat: 6g
- Trans Fat: 0g
- Carbohydrates: 13g
- Fiber: 3g
- Protein: 9g
- Cholesterol: 20mg
Tips & Variations
Flavor Variations:
- Dill Pickle Tuna Pinwheels: Add ¼ cup finely chopped dill pickles to the tuna salad and reduce the lemon juice
- Spicy Tuna Rolls: Mix in sriracha, jalapeños, or red pepper flakes for heat
- Italian-Style: Add chopped sun-dried tomatoes, Italian seasoning, and use provolone instead of cream cheese
- Mediterranean: Mix in chopped olives, capers, feta cheese crumbles, and fresh dill
- Ranch Tuna Pinwheels: Use ranch dressing instead of mayo and add shredded cheddar cheese
- Asian-Inspired: Add a splash of soy sauce, sesame oil, and sliced green onions
- Avocado Tuna: Mash in half an avocado for extra creaminess and healthy fats
Ingredient Swaps:
- Tortilla Options: Try spinach tortillas, sun-dried tomato wraps, whole wheat, or even large flatbreads
- Protein Variations: Substitute with canned salmon, canned chicken, chickpeas, or egg salad
- Veggie Boost: Add bell peppers, shredded cabbage, sprouts, or grated zucchini
- Cheese Additions: Sprinkle shredded cheddar, Swiss, or pepper jack before rolling
- Mayo Alternatives: Use all Greek yogurt, half mayo/half yogurt, or mashed avocado
Dietary Modifications:
- Lower Calorie: Use light mayo or all Greek yogurt, light cream cheese, and reduced-fat tortillas
- Gluten-Free: Simply use certified gluten-free tortillas
- Dairy-Free: Skip the cream cheese or use vegan cream cheese; use vegan mayo
- Low-Carb/Keto: Use low-carb tortillas or large lettuce leaves instead of tortillas
- Whole30: Use compliant mayo, skip cream cheese, and use lettuce wraps
Pro Chef Tips
1. The Drainage Secret: After draining your canned tuna, spread it on paper towels and press gently with more paper towels to remove excess moisture. Wet tuna makes for soggy pinwheels and a runny filling. This extra step ensures your pinwheels stay fresh and firm even after a day in the fridge.
2. The Even Spread Technique: When spreading cream cheese, use a thin, even layer that goes all the way to the edges. Think “paint the tortilla” rather than “slather it thick.” Too much cream cheese overwhelms the other flavors and adds unnecessary calories; too little won’t hold the pinwheel together properly.
3. The Tight Roll Method: Here’s a pro trick—before rolling, fold the bottom edge of the tortilla up about ½ inch over the filling. This creates a sealed edge that prevents filling from squeezing out. Then roll firmly but gently, using your fingertips to maintain even pressure. If you feel filling trying to escape, you’ve overfilled—scrape a bit off before continuing.
4. The Clean Slice Secret: For magazine-worthy pinwheel slices, invest in a good serrated knife and use a gentle sawing motion rather than pressing straight down. Wipe your knife blade clean with a damp towel between every 2-3 cuts. This prevents the filling from smearing and ensures each pinwheel looks pristine.
5. Temperature Control: Assemble pinwheels with room-temperature cream cheese but refrigerate before slicing. The cold firms everything up for cleaner cuts. However, let them sit at room temperature for about 10 minutes before serving—slightly cool pinwheels have better texture and flavor than ice-cold ones.
6. The Layering Strategy: Place sturdier ingredients (like lettuce) directly on the cream cheese and save delicate items (like tomatoes, if using) for closer to the center. This prevents the tortilla from getting soggy and helps maintain structural integrity.
7. Batch Assembly: When making large quantities, set up an assembly line: spread all the cream cheese first, then add greens to all, then tuna salad, then roll all at once. This efficient method cuts your prep time nearly in half.
Common Mistakes to Avoid
1. Using Wet or Under-Drained Tuna The Problem: Failing to thoroughly drain the tuna creates a watery filling that makes tortillas soggy and causes pinwheels to fall apart. The moisture also dilutes flavors and creates an unappetizing texture. The Fix: Drain tuna in a fine-mesh strainer, then press it with paper towels to remove ALL excess liquid. The tuna should be quite dry before mixing with other ingredients. This one step makes the biggest difference in pinwheel success!
2. Overfilling the Tortillas The Problem: Getting excited and piling on too much filling seems like a good idea, but it makes rolling nearly impossible. The filling squeezes out the sides, the roll won’t stay closed, and slicing becomes a messy disaster. The Fix: Use about ½ cup of filling per large tortilla and spread it only on the bottom third. Remember: you can always make more pinwheels, but you can’t fix an overstuffed one! Less filling = tighter rolls = prettier pinwheels.
3. Skipping the Chilling Time The Problem: Trying to slice your pinwheels immediately after rolling results in messy, falling-apart spirals that look more like tuna salad accidents than elegant appetizers. The Fix: Always refrigerate rolled pinwheels for at least 30 minutes before slicing. The cream cheese firms up, the ingredients meld together, and everything holds its shape beautifully when cut. Patience pays off here!
4. Using a Dull Knife The Problem: A dull knife crushes the pinwheel rather than cleanly cutting through it, causing the filling to smush out and the tortilla to tear. The Fix: Use a sharp serrated knife and a gentle sawing motion. Clean the blade between cuts. If you notice smashing, sharpen your knife or switch to a better one—this makes all the difference in presentation.
5. Not Sealing the Edge The Problem: Rolling all the way to the edge without proper sealing causes pinwheels to unroll or gaps to form, ruining the spiral effect. The Fix: Spread cream cheese all the way to the edges (it acts as glue), and leave the top ½ inch of tortilla free from other ingredients. This bare edge, when pressed against the completed roll, seals everything shut perfectly.
Storage & Meal Prep
Storing Assembled Pinwheels: Once sliced, arrange pinwheels in a single layer in an airtight container, separating layers with parchment paper if stacking. Cover tightly and refrigerate for up to 3 days. The pinwheels actually taste better after 4-6 hours in the fridge as the flavors meld together! For best results, don’t slice the rolls until the day you plan to serve them.
Storing Unsliced Rolls: This is the best method for maximum freshness! Keep rolls wrapped tightly in plastic wrap, seam-side down, in the refrigerator for up to 24 hours before slicing. They’ll maintain their shape perfectly and stay fresh. Slice just before serving for the best presentation and texture.
Storing Components Separately: For ultimate freshness, store the tuna salad in an airtight container separately from tortillas and other components. The tuna salad keeps for 3-4 days refrigerated. Assemble pinwheels fresh when ready to eat—this method is perfect for meal prep when you want maximum freshness each day.
Preventing Sogginess: To keep your pinwheels from getting soggy:
- Always drain tuna thoroughly
- Use cream cheese as a moisture barrier
- Avoid watery vegetables like tomatoes, or add them sparingly
- Don’t slice until ready to serve
- Store in airtight containers to prevent drying out while keeping moisture at bay
Best Practices for Meal Prep: Make a big batch on Sunday for the week! Prepare 2-3 unsliced rolls, wrap individually, and refrigerate. Each morning, slice what you need for that day’s lunches. This keeps them fresh and prevents the cut edges from drying out.
Make-Ahead & Freezer Notes
Make-Ahead Timeline:
- 24 hours ahead: The sweet spot! Rolls can be assembled, wrapped, and refrigerated up to a full day before your event. Slice 2-4 hours before serving.
- 4-6 hours ahead: Perfect timing for flavor development and easy slicing while maintaining optimal texture.
- 2 hours ahead: Minimum recommended time for chilling; provides adequate setting time for clean slices.
Make-Ahead Components:
The tuna salad filling can be made up to 3 days in advance and stored in an airtight container in the refrigerator. This actually improves the flavor as ingredients meld together. When ready to assemble, give it a quick stir and check seasonings before spreading on tortillas.
Freezing Information:
Here’s the truth about freezing tuna salad pinwheels: it’s not recommended. The mayo-based filling doesn’t freeze well—it separates and becomes watery when thawed, and the lettuce becomes wilted and unappetizing. The tortillas also tend to get tough and chewy after freezing.
However, if you really need a freezer option:
- Freeze unsliced rolls individually wrapped in plastic wrap, then placed in a freezer bag
- Freeze for up to 1 month maximum
- Thaw overnight in the refrigerator, never at room temperature
- Expect some texture changes—the filling may be slightly watery
- Blot any excess moisture with paper towels before slicing
- Best used for personal meal prep rather than entertaining
Better Alternative: Instead of freezing assembled pinwheels, consider freezing just the tuna salad filling (without mayo). Thaw, add fresh mayo and vegetables, then assemble fresh pinwheels. This gives you the convenience of advance prep without the texture issues.
Serving After Storage: Whether make-ahead or fresh, let refrigerated pinwheels sit at room temperature for 10-15 minutes before serving. This takes the chill off and allows flavors to bloom for the best taste experience.
Serving Suggestions
Tuna salad pinwheels are incredibly versatile! Here are my favorite ways to serve these delicious roll-ups:
As Party Appetizers:
- Arrange on a large platter in a spiral pattern or neat rows
- Garnish the platter with fresh parsley, cherry tomatoes, and lemon wedges
- Pair with other finger foods like veggie sticks, crackers, and cheese cubes
- Serve alongside dips like hummus, ranch, or spinach artichoke dip
For Lunch or Light Dinner:
- Serve 4-5 pinwheels per person alongside a cup of soup (tomato, chicken noodle, or broccoli cheddar)
- Pair with a fresh garden salad with vinaigrette
- Add a side of fresh fruit like grapes, melon, or berries
- Include baked chips, pita chips, or pretzel crisps for crunch
Picnic & Outdoor Settings:
- Pack in a portable container with ice packs for beach days or picnics
- Serve with pasta salad, coleslaw, or potato salad
- Include pickles, olives, and cherry tomatoes for a complete spread
- Pair with lemonade, iced tea, or sparkling water with fruit
Kid-Friendly Presentations:
- Cut into smaller “mini pinwheels” for little hands
- Serve with their favorite dipping sauces (ranch is always a hit!)
- Add colorful toothpicks for fun and easy grabbing
- Include sides like apple slices, carrot sticks, and goldfish crackers
Best Side Dishes:
- Creamy tomato soup or chicken noodle soup
- Classic Caesar salad or Greek salad
- Fresh fruit salad or mixed berries
- Kettle-cooked potato chips or veggie chips
- Pickle spears and olives
- Hummus with fresh vegetables
- Deviled eggs
- Pasta salad with Italian dressing
- Coleslaw or broccoli slaw
Beverage Pairings:
- Fresh lemonade or Arnold Palmer
- Unsweetened iced tea with lemon
- Sparkling water with cucumber and mint
- White wine (Sauvignon Blanc or Pinot Grigio) for adult gatherings
- Light beer or hard seltzer for casual parties
- Freshly brewed coffee for brunch service
Brunch or Shower Ideas: Create a beautiful pinwheel platter with variety! Make tuna salad pinwheels alongside chicken salad pinwheels, veggie cream cheese pinwheels, and ham and cheese pinwheels for a stunning display that offers something for everyone.
FAQs Section
Q: Can I make tuna salad pinwheels the night before? A: Absolutely! In fact, they’re perfect for making ahead. Assemble the rolls, wrap them tightly in plastic wrap, and refrigerate overnight. Wait to slice them until 2-4 hours before serving for the freshest presentation. The flavors actually improve overnight as everything melds together. They’ll stay fresh for up to 24 hours when properly wrapped.
Q: How do I keep my pinwheels from getting soggy? A: The key is thoroughly draining your tuna and using cream cheese as a moisture barrier. Press the tuna with paper towels to remove all excess liquid. Spread cream cheese on the entire tortilla before adding any other ingredients—it creates a protective layer. Avoid super wet vegetables like tomatoes, or pat them dry before adding. Store in airtight containers and don’t slice until you’re ready to serve.
Q: Can I use whole wheat or low-carb tortillas? A: Yes! Any type of large flour tortilla works beautifully. Whole wheat tortillas add fiber and nutrition, while low-carb tortillas are great for those watching carbs. Flavored tortillas like spinach, sun-dried tomato, or herb varieties add visual interest and extra flavor. Just make sure they’re fresh and pliable—stiff or cracked tortillas won’t roll properly.
Q: What’s the best way to slice pinwheels without them falling apart? A: Always chill rolled pinwheels for at least 30 minutes before slicing—this is non-negotiable! Use a sharp serrated knife with a gentle sawing motion rather than pressing straight down. Wipe your knife clean between cuts. Make sure your rolls are tight when you initially wrap them. If pinwheels still fall apart, they may be overfilled or not chilled long enough.
Q: Can I make these without mayonnaise? A: Definitely! Greek yogurt is an excellent mayo substitute that adds protein and tanginess while cutting calories. You can use all Greek yogurt or do a 50/50 mix of mayo and yogurt. Mashed avocado also works beautifully for a creamy, healthy fat option. Hummus mixed with the tuna creates a Mediterranean-style filling. Just ensure whatever you use provides enough moisture to bind the salad together.
Q: Are tuna pinwheels healthy? A: Yes, they can be quite nutritious! Tuna provides lean protein and omega-3 fatty acids. Using Greek yogurt instead of mayo, adding plenty of vegetables, and choosing whole wheat tortillas boosts the nutritional value even more. Each pinwheel offers a balanced mix of protein, healthy fats, and carbohydrates. They’re certainly healthier than many traditional appetizers and make an excellent protein-rich snack or light meal.
Q: Can I freeze tuna salad pinwheels? A: While technically possible, I don’t recommend freezing tuna salad pinwheels. Mayo-based fillings don’t freeze well—they separate and become watery when thawed. The lettuce becomes limp and unappetizing. If you must freeze them, wrap unsliced rolls tightly and freeze for up to 1 month, but expect texture changes. A better option is freezing just the tuna salad filling (without mayo), then adding fresh mayo and assembling fresh pinwheels when needed.
Conclusion
And there you have it—everything you need to know to make absolutely perfect tuna salad pinwheels! These easy, no-cook roll-ups truly are one of the most versatile recipes you can master. Whether you’re planning your next party, meal prepping for the week, packing school lunches, or just looking for a quick and satisfying snack, these colorful pinwheels deliver every single time.
The beauty of this recipe lies in its simplicity and adaptability. With just a few basic ingredients and about 20 minutes of your time, you can create an impressive appetizer that looks like it came from a fancy deli or catering company. Plus, the endless flavor variations mean you’ll never get bored—you can customize these tuna tortilla roll ups to match any taste preference or dietary need.
Once you experience how easy these are to make and how beautifully they turn out, you’ll find yourself whipping them up for every occasion. They’re truly the answer to that age-old question: “What should I bring to the party?” Pack them for picnics, serve them at showers, add them to your weekly meal prep rotation, or simply enjoy them as a protein-packed snack any day of the week.
Now it’s your turn to try this recipe! I’d absolutely love to hear how your tuna salad pinwheels turn out. Did you try any fun variations? Do you have a secret ingredient that makes them even better? Drop a comment below and let me know! And if you love this recipe as much as I do, please save it to your Pinterest boards so you can find it again and share it with your friends and family. Everyone needs this easy, crowd-pleasing recipe in their arsenal!