Low-Carb Mini Bell Pepper Nachos – Healthy Game Day Appetizer in 20 Minutes!

Get ready to fall in love with the most genius healthy swap you’ll make all year—Mini Bell Pepper Nachos! These colorful, crunchy, absolutely delicious appetizers replace traditional tortilla chips with sliced mini sweet peppers, creating a naturally low-carb, keto-friendly, and gluten-free nacho experience that’s just as satisfying (if not more!) than the original.
Imagine this: crisp, sweet mini bell peppers loaded with seasoned ground beef or turkey, melted cheese, and all your favorite nacho toppings. Each bite delivers that perfect combination of crunch, creaminess, spice, and freshness—without the guilt or carb overload. Whether you’re hosting game day festivities, planning a healthy appetizer spread, meal prepping snacks for the week, or just looking for a fun way to get more vegetables into your family’s diet, these mini bell pepper nachos are about to become your new obsession.
The beauty of this easy low-carb nacho recipe is its incredible versatility and crowd-pleasing appeal. Even the pickiest eaters and die-hard chip lovers embrace these colorful pepper boats once they take that first bite. They’re perfect for Super Bowl parties, casual weeknight dinners, healthy snacking, or impressive appetizer platters. Plus, these keto bell pepper nachos come together in just 20 minutes from start to finish, making them one of those rare recipes that checks every box: healthy, delicious, quick, beautiful, and fun to eat!
History / Background
While traditional nachos have been an American sports bar staple since their invention in the 1940s, the concept of using bell peppers as edible vessels for nacho toppings is a much more recent innovation born from the low-carb and keto diet movements that gained massive popularity in the 2010s.
The original nachos were created in 1943 by Ignacio “Nacho” Anaya, a maître d’ at a restaurant in Piedras Negras, Mexico, just across the border from Texas. The story goes that a group of U.S. military wives arrived at the restaurant after closing time, and Ignacio quickly whipped up a snack using what was available in the kitchen: tortilla chips, cheese, and jalapeños. The dish was an instant hit and eventually became a Mexican-American food icon that spread throughout the United States.
Fast forward to the 2000s and 2010s, when low-carb eating plans like Atkins, South Beach, and eventually the ketogenic diet surged in popularity across America. Home cooks and food bloggers began experimenting with creative ways to enjoy their favorite comfort foods while reducing carbohydrates and increasing vegetable intake. This period of culinary innovation led to countless “chip swap” recipes—zucchini chips, cheese crisps, cucumber slices, and eventually, the brilliant use of mini bell peppers.
Mini sweet peppers, which are actually a smaller variety of bell peppers bred for sweetness and convenience, became widely available in American grocery stores in the early 2010s. Their perfect bite-sized shape, natural “boat” form when halved, sturdy structure that holds up to heat and toppings, and sweet flavor profile made them ideal candidates for replacing traditional nacho chips.
The mini bell pepper nachos concept gained tremendous momentum on Pinterest, Instagram, and food blogs around 2015-2016, as health-conscious home cooks shared their colorful, photogenic creations. The recipe hit peak popularity during the keto diet boom of 2017-2019, when people were desperately seeking satisfying ways to enjoy comfort foods without the carbs. Today, these healthy bell pepper nachos have transcended diet trends and become a mainstream favorite appreciated for their flavor, nutrition, and fun presentation—proving that healthy eating doesn’t have to be boring or restrictive!
Why You’ll Love This Recipe
These mini bell pepper nachos aren’t just a “healthy alternative”—they’re genuinely delicious in their own right and might even convert you from traditional nachos! The natural sweetness of the peppers pairs beautifully with savory toppings, creating a flavor combination that’s both familiar and excitingly different.
Here’s why this recipe will become your go-to healthy appetizer:
- Naturally Low-Carb & Keto-Friendly – With only about 6-8g net carbs per serving (compared to 30-40g in traditional nachos), these fit perfectly into low-carb lifestyles without sacrificing satisfaction
- Ready in 20 Minutes – From start to finish, including prep and baking time, making them perfect for last-minute entertaining or quick weeknight snacks
- Gluten-Free & Grain-Free – Naturally free from gluten, grains, and processed ingredients, making them suitable for various dietary needs
- Packed with Nutrients – Bell peppers are loaded with vitamin C, vitamin A, and antioxidants—you’re eating a rainbow of nutrition with every bite!
- Portion-Perfect – Each pepper half is a built-in portion, making it easy to control servings and perfect for parties where guests can grab exactly what they want
- Kid-Approved – Children love the fun, colorful presentation and interactive eating experience, making it a sneaky way to increase their veggie intake
- Meal Prep Friendly – Prepare the peppers and toppings in advance for quick assembly throughout the week
- Customizable for Everyone – Easy to make vegetarian, adjust spice levels, or cater to different dietary preferences all on the same baking sheet
- Budget-Conscious – Mini peppers are affordable year-round, and you can use whatever protein and toppings you have on hand
Ingredient Notes
Understanding your ingredients ensures perfect results every time:
Mini Sweet Peppers – These are the stars of the show! Look for bags of multicolored mini bell peppers (usually red, orange, and yellow) in your grocery store’s produce section. They’re smaller than regular bell peppers, about 3-4 inches long, naturally sweet, and have thinner walls that become tender when roasted. Choose peppers that are firm, glossy, and blemish-free. If you can’t find mini peppers, you can substitute 2-3 regular bell peppers cut into quarters or sixths—just adjust baking time slightly as they’ll be thicker.
Ground Meat – Ground beef (80/20 or 85/15) provides classic nacho flavor with good fat content for juiciness. Ground turkey or chicken works beautifully for a leaner option. You can also use ground pork, Italian sausage (remove from casings), or even plant-based ground “meat” for vegetarian versions. About 1 pound serves 4-6 people as an appetizer.
Taco Seasoning – This is what gives your meat that essential nacho flavor! Use store-bought for convenience or make your own blend (recipe in Pro Chef Tips section). If using store-bought, check the label—some brands are high in sodium or contain added sugar and fillers. Homemade seasoning lets you control sodium and customize spice levels.
Cheese – A Mexican cheese blend (combination of cheddar, Monterey Jack, queso quesadilla, and asadero) melts beautifully and provides authentic flavor. Sharp cheddar alone works wonderfully too. For best melting, buy a block and shred it yourself rather than using pre-shredded cheese (which contains anti-caking agents that affect melting). You’ll need about 1-1.5 cups shredded cheese.
Black Beans – Optional but highly recommended! They add fiber, protein, texture, and substance. Use canned black beans (drained and rinsed) for convenience. If you’re keeping this strictly keto/low-carb, you can omit beans to save carbs, or use a smaller amount just for garnish.
Corn – Sweet corn kernels (fresh, frozen, or canned) add pops of sweetness and color. While corn does add some carbs, a small amount distributed across all servings has minimal impact. Omit for stricter keto diets or if you prefer.
Toppings Bar – This is where the fun happens! Traditional options include: diced tomatoes or pico de gallo, sliced jalapeños (fresh or pickled), sour cream or Greek yogurt, guacamole or diced avocado, fresh cilantro, sliced green onions, black olives, salsa, hot sauce, and lime wedges. Choose what your family loves!
Olive Oil – Just a light drizzle helps the peppers roast and prevents sticking. Avocado oil also works well due to its high smoke point.
Equipment Needed
This recipe requires minimal equipment:
- Large baking sheet or sheet pan – A rimmed half-sheet pan (18×13 inches) works perfectly for arranging peppers
- Parchment paper or aluminum foil – For lining the pan, making cleanup effortless
- Large skillet or sauté pan – For cooking the ground meat and mixing in seasonings
- Sharp knife and cutting board – For halving peppers and chopping toppings
- Wooden spoon or spatula – For stirring and crumbling the meat
- Measuring cups and spoons – For portioning cheese and seasonings
- Small prep bowls – For organizing your toppings bar (optional but helpful)
- Cheese grater – If shredding your own cheese (recommended for best melting)
- Oven mitts – For handling the hot baking sheet
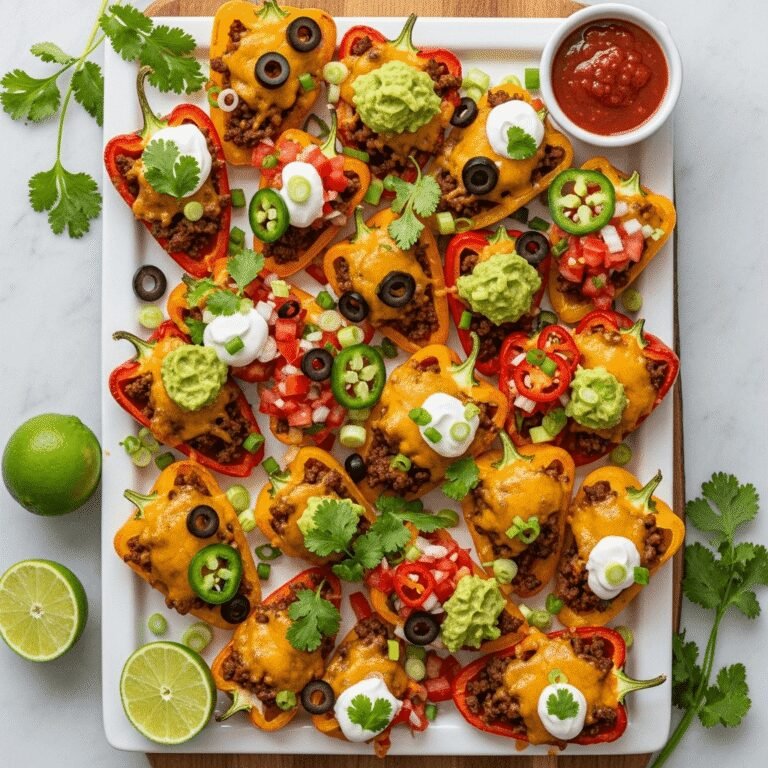
Mini Bell Pepper Nachos
These colorful Mini Bell Pepper Nachos are the ultimate healthy appetizer! Sweet mini peppers are loaded with seasoned meat, melted cheese, and all your favorite nacho toppings for a low-carb, keto-friendly treat that’s ready in just 20 minutes.
- Total Time: 20 minutes
- Yield: 24-30 pepper halves (6-8 servings as appetizer, 4 servings as meal) 1x
Ingredients
For the Pepper Nachos:
- 12-15 mini sweet bell peppers (multicolored), halved lengthwise and seeded
- 1 lb ground beef, ground turkey, or ground chicken
- 2 tablespoons taco seasoning (or homemade blend)
- ¼ cup water
- 1½ cups shredded Mexican cheese blend or sharp cheddar
- ½ cup black beans, drained and rinsed (optional, omit for strict keto)
- ¼ cup corn kernels (optional, omit for strict keto)
- 1 tablespoon olive oil
- Salt and pepper to taste
For Topping (choose your favorites):
- ½ cup sour cream or Greek yogurt
- ½ cup guacamole or 1 diced avocado
- ½ cup pico de gallo or diced fresh tomatoes
- ¼ cup sliced jalapeños (fresh or pickled)
- ¼ cup sliced black olives
- ¼ cup chopped fresh cilantro
- 3 green onions, sliced
- Lime wedges for serving
- Hot sauce or salsa for serving
Instructions
- Preheat Your Oven: Set your oven to 400°F (200°C) and line a large baking sheet with parchment paper or aluminum foil. This prevents sticking and makes cleanup a breeze.
- Prepare the Mini Peppers: Wash and dry your mini peppers thoroughly. Cut each pepper in half lengthwise from stem to tip. Using your fingers or a small spoon, remove the seeds and white membrane from inside each half, creating little “boats” ready for filling. Arrange the pepper halves cut-side up on your prepared baking sheet, fitting them snugly but not overlapping. Drizzle lightly with olive oil and sprinkle with a pinch of salt and pepper.
- Cook the Seasoned Meat: While you’re prepping peppers, heat a large skillet over medium-high heat. Add your ground meat and cook, breaking it up with a wooden spoon, for 5-7 minutes until browned and cooked through with no pink remaining. Drain any excess fat if needed (especially if using higher-fat ground beef). Add the taco seasoning and water, stirring to combine. Reduce heat to medium-low and simmer for 2-3 minutes until the liquid has mostly evaporated and the meat is nicely coated with seasoning. Taste and adjust salt if needed. Remove from heat.
- Fill the Pepper Boats: Using a small spoon, fill each pepper half with about 1-2 tablespoons of the seasoned meat mixture, pressing it gently into the pepper cavity. Don’t overfill—you want the meat to nestle nicely inside without spilling over. If using black beans and corn, sprinkle a few pieces into each pepper on top of the meat.
- Add the Cheese: Generously sprinkle shredded cheese over each filled pepper, covering the meat completely. The cheese will melt down and create that gorgeous bubbly, golden top we all love. Don’t be shy with the cheese—it helps hold everything together!
- Bake to Perfection: Place the baking sheet in your preheated oven and bake for 8-10 minutes, or until the peppers are tender but still have a slight crunch (you don’t want them mushy!), the cheese is completely melted and starting to bubble, and the edges are just beginning to brown. Keep an eye on them—every oven is different, and you want perfectly tender-crisp peppers, not soggy ones.
- Add the Fresh Toppings: Remove the baking sheet from the oven and let cool for 2-3 minutes (they’ll be extremely hot!). While they’re cooling slightly, prepare your toppings. Transfer the pepper nachos to a large serving platter or leave them on the baking sheet for a casual presentation.
- Top and Serve: Now comes the fun part! Add dollops of sour cream or Greek yogurt to various peppers. Spoon on guacamole or scatter diced avocado. Add spoonfuls of pico de gallo or fresh tomatoes. Distribute jalapeño slices, black olives, fresh cilantro, and green onions across the platter. Serve immediately with lime wedges and hot sauce or salsa on the side. Let everyone customize their perfect bite!
Notes
- Pepper Size Consistency: Choose mini peppers that are roughly the same size so they cook evenly. Larger peppers may need an extra 1-2 minutes of baking time.
- Don’t Skip the Draining: If your ground meat releases a lot of fat, drain it before adding seasoning. Excess grease can make your peppers soggy and greasy.
- Cheese Melting Tip: For the best melting and creamiest texture, let your cheese come to room temperature for 15-20 minutes before using, and shred your own from a block rather than using pre-shredded.
- Customize Each Pepper: Make some mild for kids and some spicy for adults by adjusting toppings individually—everyone gets exactly what they want!
- Make It Vegetarian: Replace ground meat with seasoned black beans, refried beans, or plant-based ground “meat.” You can also use sautéed mushrooms and peppers for a veggie-forward version.
- Adjust Spice Levels: Control heat by choosing mild or spicy taco seasoning, and by the amount and type of jalapeños you use.
- Prep Time: 10 minutes
- Cook Time: 10 minutes
- Category: Appetizer
- Method: Baking
- Cuisine: American
- Diet: Gluten Free
Nutrition
- Serving Size: 4-5 pepper halves with toppings
- Calories: 245
- Sugar: 4g
- Sodium: 485mg
- Fat: 16g
- Saturated Fat: 7g
- Unsaturated Fat: 8g
- Trans Fat: 0g
- Carbohydrates: 9g
- Fiber: 2g
- Protein: 18g
- Cholesterol: 65mg
Tips & Variations
Breakfast Bell Pepper Nachos:
Replace the ground meat with scrambled eggs, add crumbled cooked bacon or breakfast sausage, and top with shredded cheese, diced tomatoes, green onions, and a dollop of salsa. Perfect for weekend brunch or meal prep!
Buffalo Chicken Bell Pepper Nachos:
Use shredded rotisserie chicken tossed with buffalo sauce instead of ground meat. Top with blue cheese crumbles, ranch dressing, diced celery, and green onions for a spicy, tangy twist.
Pizza Bell Pepper Nachos:
Fill peppers with marinara sauce, mini pepperoni slices, and Italian cheese blend. Top with fresh basil and a drizzle of balsamic glaze after baking for an Italian-inspired version.
Vegetarian/Vegan Version:
Use seasoned black beans, pinto beans, or plant-based ground “meat.” Replace cheese with vegan shredded cheese or nutritional yeast. Use dairy-free sour cream or cashew cream for topping.
Greek-Inspired Version:
Fill with seasoned ground lamb or turkey, feta cheese, diced cucumbers, tomatoes, red onion, tzatziki sauce, and fresh dill for Mediterranean flair.
Extra-Spicy Nachos:
Add diced jalapeños or serrano peppers directly into the meat mixture, use pepper jack cheese instead of Mexican blend, top with extra hot sauce, and serve with spicy salsa.
Loaded Deluxe Nachos:
Go all out with multiple proteins (seasoned beef plus bacon), three types of cheese, all the toppings, and finish with queso drizzle and pickled red onions.
Pro Chef Tips
The Pre-Roast Method:
For even more tender peppers with concentrated sweetness, roast the empty pepper halves for 3-4 minutes before filling them. This head start ensures perfectly tender peppers without overcooking the cheese or drying out the meat.
Homemade Taco Seasoning:
Make your own superior blend: 1 tablespoon chili powder, 1½ teaspoons cumin, 1 teaspoon paprika, 1 teaspoon garlic powder, 1 teaspoon onion powder, ½ teaspoon oregano, ½ teaspoon salt, ¼ teaspoon black pepper, and ¼ teaspoon cayenne. This makes enough for 1 pound of meat and contains no fillers or preservatives.
The Cheese Layering Technique:
Put a small amount of cheese directly on the meat first, then add your beans/corn, then top with more cheese. This creates a cheese “seal” that holds everything together and ensures every component gets that melted cheese coating.
Prevent Soggy Peppers:
The enemy of crispy pepper nachos is moisture! Always drain your meat well, don’t add wet toppings (like pico de gallo or tomatoes) until after baking, and avoid overloading each pepper. Less is more for structural integrity.
The Flavor Boost Secret:
After draining your cooked ground meat, add a tablespoon of tomato paste along with your taco seasoning. This adds incredible depth, richness, and umami that makes your filling taste restaurant-quality.
Strategic Pepper Selection:
When shopping, choose peppers that naturally lay flat when cut—avoid super rounded ones that will tip over. Give each pepper a gentle press; the flattest, widest ones will be your best bases.
Assembly Line Efficiency:
Set up an assembly line: arrange all pepper halves on the baking sheet first, then go through filling them all with meat, then add beans/corn to all, then finish by topping all with cheese. This method is faster and more consistent than completing each pepper individually.
Common Mistakes to Avoid
Overcooking the Peppers:
The biggest mistake is baking too long, resulting in mushy, collapsing peppers that can’t hold their fillings. Remember, you want tender-crisp peppers, not baby food! Check at 8 minutes—they should be slightly softened but still have structure. Residual heat will continue cooking them slightly after removing from the oven.
Using Pre-Shredded Cheese:
While convenient, pre-shredded cheese contains anti-caking agents (usually cellulose) that prevent smooth melting and create a grainy, oily texture. It also doesn’t brown as beautifully. Spend the extra two minutes shredding your own from a block—the difference is dramatic!
Overloading the Peppers:
It’s tempting to stuff them full, but overloading causes several problems: peppers tip over, fillings spill out, everything cooks unevenly, and the peppers become soggy from too much weight. Aim for 1-2 tablespoons of filling per pepper half—just enough to create a generous mound without overflow.
Adding Wet Toppings Before Baking:
Never add sour cream, guacamole, pico de gallo, fresh tomatoes, or other moisture-heavy toppings before baking! The heat makes them release liquid, creating a watery mess. Always add these fresh toppings after baking for the best texture and flavor.
Not Draining the Meat Properly:
Excess grease from ground meat will pool in the pepper cavities and on the baking sheet, making everything greasy and potentially causing the peppers to steam rather than roast. Always drain well—you want flavorful meat, not a grease bomb!
Inconsistent Pepper Sizes:
Using peppers of wildly different sizes means some will be overcooked while others are undercooked. Sort your peppers and try to use similarly sized ones, or adjust placement on the pan—put larger peppers toward the hotter center and smaller ones near the edges.
Storage & Meal Prep
Refrigerator Storage:
Store leftover mini bell pepper nachos in an airtight container in the refrigerator for up to 3 days. Store the baked pepper-meat-cheese portions separately from fresh toppings for best results. The peppers will soften further as they sit, which is normal.
Reheating Instructions:
Reheat in a 350°F oven for 8-10 minutes until warmed through and cheese is melted again. This method maintains texture better than microwaving. You can also reheat in an air fryer at 350°F for 5-6 minutes for extra crispiness. Microwave reheating (1-2 minutes at 50% power) works in a pinch but will make peppers softer. Add fresh toppings after reheating.
Meal Prep Strategy:
These are fantastic for meal prep! Prepare components separately: cut and seed peppers (store in an airtight container with a damp paper towel), cook and season meat (refrigerate in a container), shred cheese, and prep toppings. When ready to eat, simply assemble and bake for a fresh, quick meal or snack throughout the week.
Prep-Ahead Assembly:
You can assemble the peppers completely (peppers + meat + cheese, but no fresh toppings) up to 24 hours before baking. Cover the baking sheet tightly with plastic wrap and refrigerate. When ready to serve, bake straight from the refrigerator, adding 2-3 extra minutes to the cooking time.
Make-Ahead & Freezer Notes
Advance Preparation:
For stress-free entertaining, you can prep everything up to 24 hours ahead. Cut and seed peppers, cook and season the meat, shred cheese, and prepare all toppings. Store components separately in the refrigerator. When guests arrive, simply assemble and bake—fresh nachos in just 10 minutes!
Freezing Unbaked Pepper Nachos:
Yes, these freeze wonderfully! Assemble the peppers completely (peppers + meat + cheese) on a baking sheet and freeze until solid (about 2 hours). Transfer frozen pepper nachos to a freezer-safe bag or container with parchment paper between layers. They’ll keep for up to 2 months. Bake directly from frozen at 400°F for 12-15 minutes—no thawing required! This makes them perfect for always having a healthy appetizer ready.
Freezing Cooked Components:
You can also freeze just the seasoned cooked meat in freezer bags for up to 3 months. Thaw overnight in the refrigerator, then assemble with fresh peppers and cheese. This is especially handy for quick weeknight meals.
Not Recommended for Freezing:
Don’t freeze already-baked pepper nachos—the peppers become mushy and release too much moisture when thawed. Always freeze before baking for best results.
Batch Cooking:
Consider making a double or triple batch of the seasoned meat filling. Freeze extra portions in meal-sized containers, and you’ll have the hardest part done for multiple future batches of pepper nachos (or use it for tacos, burrito bowls, or salads!).
Serving Suggestions
These versatile mini bell pepper nachos work for virtually any occasion:
As an Appetizer Spread:
- Perfect for game day parties alongside buffalo wings, jalapeño poppers, and spinach artichoke dip
- Include on a Super Bowl or March Madness snack table
- Serve at casual gatherings with other finger foods
- Great for potlucks and bring-a-dish occasions
- Ideal for cocktail parties as substantial, filling appetizers
As a Complete Meal:
- Serve 6-8 pepper halves per person as a light lunch or dinner
- Pair with Mexican rice or cauliflower rice
- Add a side of refried beans or black beans
- Serve with a crisp green salad with lime vinaigrette
- Include tortilla chips and salsa on the side for those who want extra crunch
Taco Tuesday Alternative:
- These make a fun, lighter alternative to traditional tacos
- Set up a “nacho bar” with peppers and various toppings so everyone builds their own
- Serve alongside regular beef or chicken tacos for variety
Kid-Friendly Meals:
- Children love the colorful presentation and hands-on eating
- Mild versions (light on spice) disappear quickly
- Perfect for introducing kids to bell peppers in a fun way
- Great for school lunches when packed with toppings separate
Healthy Game Day Menu:
- Grilled chicken wings
- Veggie sticks with hummus
- These bell pepper nachos
- Fresh fruit platter
- Sparkling water with lime
Beverage Pairings: These pair wonderfully with Mexican beers (Corona, Modelo, Dos Equis), margaritas (frozen or on the rocks), palomas, Mexican sodas like Jarritos, horchata, agua frescas, or simply ice-cold water with lime. For wine lovers, try a crisp Sauvignon Blanc or light Pinot Noir.
FAQs Section
Can I use regular bell peppers instead of mini peppers?
Absolutely! Use 2-3 large regular bell peppers cut into quarters or sixths, depending on size. Each piece should be roughly the size of a mini pepper half. Keep in mind that regular bell peppers have thicker walls, so you may need to increase baking time by 2-3 minutes to achieve tender-crisp texture. Red, orange, and yellow bell peppers are sweetest; green bell peppers have a more bitter, vegetal flavor.
Are these really low-carb and keto-friendly?
Yes! Mini bell peppers are naturally low in carbohydrates—each pepper half contains only 1-2g of carbs. A serving of 4-5 pepper halves with meat and cheese (without beans and corn) has approximately 6-8g net carbs, making them perfectly suitable for keto diets. If you include the optional black beans and corn, carbs increase to about 12-15g net carbs per serving, which is still relatively low compared to traditional chip-based nachos (30-40g+ carbs).
Can I make these ahead for a party?
Yes, and they’re perfect for make-ahead entertaining! You have several options: 1) Prep all components separately up to 24 hours ahead and assemble just before baking, 2) Assemble completely (peppers + meat + cheese) and refrigerate covered for up to 24 hours, then bake when ready, or 3) Freeze assembled pepper nachos unbaked for up to 2 months and bake directly from frozen. Always add fresh toppings after baking for best results.
What’s the best way to prevent the peppers from being too soft or mushy?
The key is not overcooking! Bake at 400°F for only 8-10 minutes—just until the cheese melts and the peppers are tender but still have a slight crunch. Every oven varies, so start checking at 8 minutes. Also, avoid overloading the peppers with too much filling, which can weigh them down and make them steam instead of roast. Finally, don’t add wet toppings like sour cream or pico de gallo until after baking.
Can I make a vegetarian or vegan version?
Definitely! For vegetarian, replace ground meat with seasoned black beans, pinto beans, refried beans, or sautéed mushrooms and onions. For fully vegan, also substitute dairy cheese with vegan shredded cheese (Violife or Daiya melt well) or nutritional yeast, and use vegan sour cream or cashew cream for topping. The flavor is fantastic and you won’t miss the meat!
How do I know when they’re done baking?
Look for three signs: 1) The cheese is completely melted, bubbly, and starting to turn golden brown in spots, 2) The edges of the peppers have just started to soften and possibly wrinkle slightly, and 3) The peppers are tender enough to pierce easily with a fork but still hold their shape. If the cheese is melted but the peppers are still very crunchy, give them another 1-2 minutes.
Can I use ground turkey or chicken instead of beef?
Absolutely! Ground turkey and ground chicken are excellent leaner alternatives to beef and work perfectly in this recipe. Since they’re leaner, they may be slightly drier, so consider adding an extra tablespoon of water when simmering with the taco seasoning, or stir in a tablespoon of salsa or tomato paste for extra moisture and flavor. Season generously since leaner meats can taste blander than beef.
What should I do with leftover filling?
Lucky you! Leftover seasoned meat filling is incredibly versatile. Use it for tacos, burrito bowls, quesadillas, nachos (with chips this time!), stuffed in regular bell peppers, mixed into scrambled eggs for breakfast, topped on salads, or stirred into rice or cauliflower rice. Store refrigerated for up to 4 days or freeze for up to 3 months.
Conclusion
And there you have it—everything you need to make the most delicious, colorful, and healthy Mini Bell Pepper Nachos! These little flavor bombs prove that eating well doesn’t mean sacrificing the foods you love. With naturally low carbs, tons of protein, and all the satisfying flavors of traditional nachos, these beauties deliver guilt-free indulgence in the most fun, Instagram-worthy package.
Whether you’re committed to a low-carb lifestyle, looking for creative ways to eat more vegetables, planning the ultimate game day spread, or simply wanting a quick and delicious appetizer that’ll wow your guests, these keto bell pepper nachos check every box. They’re proof that sometimes the healthiest recipes are also the most delicious, and that a little creativity in the kitchen can transform simple ingredients into something truly special.
I’d absolutely love to hear how your mini bell pepper nachos turn out! Did you make them for game day? Try a fun variation? Serve them to picky eaters who actually loved them? Drop a comment below and share your experience—I read every single one and love connecting with fellow home cooks. And if this recipe earned a spot in your regular rotation, please give it a five-star rating and save it to your Pinterest boards so you (and your friends) can find it easily next time!
Now grab those colorful peppers and get cooking—your taste buds are about to thank you!