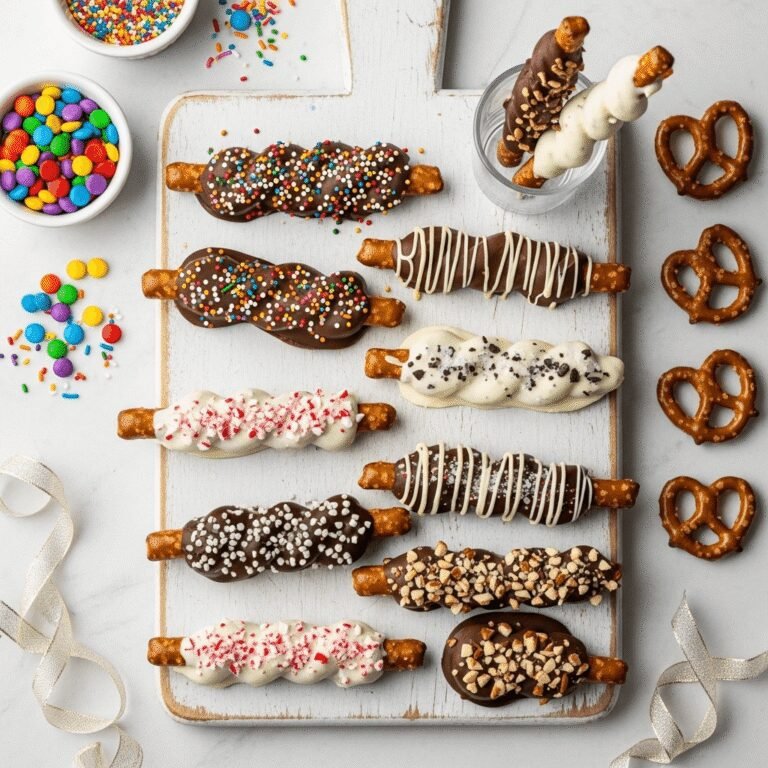
Chocolate Covered Pretzels: Easy, Delicious Homemade Treats

Get ready to fall in love with one of the easiest, most delicious treats you’ll ever make! These Chocolate Covered Pretzels combine the perfect balance of sweet and salty in every bite—crispy, crunchy pretzels enrobed in smooth, glossy chocolate and topped with your favorite sprinkles, drizzles, or toppings. Whether you call them chocolate dipped pretzels, chocolate pretzel rods, or simply the best sweet and salty snack ever, this recipe is guaranteed to become your go-to for gift-giving, parties, and satisfying those irresistible cravings.
Perfect for holiday gift baskets, birthday parties, wedding favors, baby showers, Valentine’s Day treats, Christmas cookie trays, or simply because you deserve something special, these easy chocolate covered pretzels require just two basic ingredients and about 30 minutes of your time. The beauty lies in their simplicity and endless customization options—dip them in dark chocolate, milk chocolate, or white chocolate, then decorate with colorful sprinkles, crushed candy canes, sea salt, or elegant drizzles.
What makes this homemade chocolate covered pretzel recipe so special is how professional they look with minimal effort. Your friends and family will think you spent hours creating these gorgeous treats, but you’ll know the delicious secret: they’re incredibly simple to make! The combination of that satisfying pretzel crunch with smooth, melted chocolate creates an addictive texture contrast that keeps everyone reaching for just one more. Whether you’re making chocolate covered pretzel rods for a elegant presentation or chocolate dipped pretzel twists for snacking, this foolproof recipe delivers bakery-quality results every single time!
History / Background
The marriage of chocolate and pretzels is a relatively modern American innovation, though both components have ancient and fascinating histories. Pretzels themselves date back to around 610 AD, when Italian monks created the twisted bread as rewards for children who learned their prayers—the iconic shape representing arms folded in prayer. These early pretzels were quite different from today’s crunchy snacks, more like soft bread with a distinctive shape.
Hard pretzels as we know them today became popular in Pennsylvania during the 1850s, when German immigrants brought their pretzel-making traditions to America. The Pennsylvania Dutch country became the pretzel capital of the United States, producing millions of pretzels annually. The hard, crunchy pretzel emerged either by accident (some say a baker’s apprentice fell asleep and overbaked them) or by design as a longer-lasting alternative to soft pretzels.
Chocolate coating techniques have been around for centuries, with European chocolatiers perfecting the art of enrobing various centers in chocolate. However, the specific combination of coating pretzels in chocolate appears to be an American innovation that gained popularity in the late 20th century, particularly during the 1980s and 1990s when sweet-and-salty flavor combinations became increasingly trendy.
The genius of chocolate covered pretzels lies in the flavor science: salt enhances sweetness by suppressing bitterness and amplifying the perception of sweet flavors. This creates a more complex, satisfying taste experience than either component alone. The textural contrast—crunchy pretzel against smooth chocolate—adds another dimension of sensory pleasure.
Chocolate covered pretzels exploded in popularity during the early 2000s as homemade food gifts became fashionable and Pinterest culture celebrated DIY treats. Their visual appeal (perfect for photography), ease of customization, and impressive presentation made them ideal for the social media age. Today, they’ve become a staple at celebrations, a popular fundraising item, and a beloved homemade gift that shows both effort and thoughtfulness.
What’s particularly special about chocolate covered pretzels is their democratic appeal—they’re simple enough for children to help make, elegant enough for weddings, customizable for any holiday or theme, and universally loved across age groups. They represent the best of American confectionery innovation: taking traditional elements and combining them in new, delicious ways that create something greater than the sum of their parts.
Why You’ll Love This Recipe
These Chocolate Covered Pretzels aren’t just another dessert—they’re about to become your secret weapon for impressive, easy entertaining and gift-giving. The combination of salty, crunchy pretzels with smooth, sweet chocolate creates an irresistible treat that appeals to virtually everyone, and the best part? They look like they came from an expensive boutique chocolate shop.
Once you discover how simple these homemade chocolate dipped pretzels are to make and how enthusiastically everyone devours them, you’ll wonder why you haven’t been making them all along!
Here’s why these easy chocolate covered pretzels will become your favorite treat to make:
- Ridiculously Simple – Just two basic ingredients (pretzels and chocolate) plus optional toppings create professional-looking results with zero baking required
- Ready in 30 Minutes – From start to finish, including cooling time, you can have beautiful chocolate covered pretzels ready to enjoy or gift
- Endless Customization – Change colors, flavors, and toppings to match any holiday, celebration, or personal preference
- Perfect for Gift-Giving – Package these in cellophane bags or decorative boxes for impressive homemade gifts that everyone loves receiving
- Budget-Friendly – Creates dozens of beautiful treats using inexpensive ingredients you can find at any grocery store
- Kid-Friendly Activity – Children love helping dip and decorate, making this a fun family project that keeps little hands busy
- No Special Skills Required – If you can melt chocolate and dip pretzels, you can make these—no fancy techniques or equipment necessary
- Store Beautifully – These keep for weeks when stored properly, making them ideal for advance preparation
- Crowd-Pleaser Guarantee – The sweet and salty combination appeals to all ages and taste preferences
- Versatile Presentation – Arrange on dessert platters, package individually, or display in decorative jars for any occasion
The satisfying crunch of the pretzel combined with smooth, creamy chocolate and whatever toppings you choose creates an addictive snack that’s equally at home at elegant weddings or casual movie nights. These aren’t just treats—they’re edible happiness that brings smiles to everyone who tries them!
Ingredient Notes
Understanding your ingredients ensures the best possible chocolate covered pretzels:
Pretzels – The foundation of your treats! You have many options: pretzel rods for elegant presentation and easy holding, pretzel twists for classic shape and optimal chocolate-to-pretzel ratio, mini pretzels for bite-sized treats, or pretzel snaps (square grid pretzels) for unique texture. Choose crispy, fresh pretzels without visible salt crystals if you prefer a sweeter treat, or keep the salt for enhanced sweet-salty contrast. Avoid pretzels that taste stale or have a rancid smell—freshness matters! Gluten-free pretzels work perfectly if needed.
Chocolate – This is where quality makes a significant difference. You have several options:
- Chocolate Melting Wafers/Candy Melts – The easiest option for beginners. These contain stabilizers that help them melt smoothly and set with a nice snap. Brands like Ghirardelli, Wilton, and CandiQuik work beautifully. They come in every color imaginable and don’t require tempering.
- High-Quality Chocolate Chips – Semisweet, milk chocolate, or dark chocolate chips work well. Add 1 tablespoon of coconut oil or vegetable shortening per 12 oz of chips to improve flow and achieve a glossy finish. Ghirardelli, Guittard, and Callebaut chips melt beautifully.
- Chocolate Bars – Chopping quality chocolate bars (like Lindt, Ghirardelli, or Dove) creates the richest flavor. Again, add a small amount of coconut oil for easier dipping. This option provides the most luxurious taste but requires a bit more technique.
- White Chocolate – Choose quality white chocolate (not white chips labeled “vanilla flavored”). Real white chocolate contains cocoa butter and melts more smoothly. White chocolate is perfect for coloring with food coloring or pairing with colorful toppings.
Coconut Oil or Vegetable Shortening (Optional) – Adding a small amount (1 tablespoon per 12 oz chocolate) thins the melted chocolate slightly, making it easier to dip and creating a smoother coating. It also adds shine. Don’t use butter—it contains water that can cause chocolate to seize.
Toppings (Optional but Fun) – The decoration possibilities are endless: sprinkles (rainbow, seasonal, or themed), crushed candy canes, sea salt flakes, mini chocolate chips, chopped nuts (almonds, peanuts, pecans), shredded coconut, crushed cookies, edible glitter, or drizzles of contrasting chocolate.
Equipment Needed
You’ll need just a few basic kitchen tools to make perfect chocolate covered pretzels:
- Microwave-Safe Bowls – For melting chocolate; glass or ceramic bowls work best
- Double Boiler (Optional) – Alternative method for melting chocolate if you prefer stovetop
- Fork or Dipping Tool – A regular fork works fine, though specialized dipping tools make the job easier
- Baking Sheets – For placing dipped pretzels to set
- Parchment Paper or Silicone Mats – Essential for preventing sticking
- Small Spoon or Offset Spatula – Helpful for spreading chocolate or applying toppings
- Measuring Cups and Spoons – For accurate chocolate and oil amounts
- Toothpicks – Useful for creating decorative designs or fixing imperfections
- Piping Bag or Zip-Top Bag (Optional) – For creating chocolate drizzles
- Wire Cooling Rack (Optional) – Allows excess chocolate to drip off for cleaner coating
Chocolate Covered Pretzels
These easy Chocolate Covered Pretzels are the perfect sweet and salty treat! Crispy pretzels dipped in smooth, melted chocolate and topped with your favorite decorations create an impressive homemade snack that’s perfect for gifts, parties, or satisfying your cravings. Ready in just 30 minutes with endless customization options!
- Total Time: 30 minutes
- Yield: 24-30 pretzels (depending on size) 1x
Ingredients
- 24-30 pretzel rods, twists, or shape of choice
- 12 oz chocolate (melting wafers, chocolate chips, or chopped chocolate bars)
- 1 tablespoon coconut oil or vegetable shortening (optional, for smoother consistency)
- Optional toppings: sprinkles, crushed candy canes, sea salt, chopped nuts, mini chocolate chips, shredded coconut
- Optional: 4-6 oz contrasting chocolate for drizzling (white chocolate if using dark/milk, or dark if using white)
Instructions
- Prepare Your Workspace – Line two large baking sheets with parchment paper or silicone baking mats. This is crucial to prevent sticking. Arrange all your toppings in small bowls within easy reach, as you’ll need to work somewhat quickly once pretzels are dipped. Make sure your pretzels are at room temperature and completely dry—any moisture will cause chocolate to seize.
- Melt the Chocolate (Microwave Method) – Place chocolate (and coconut oil if using) in a microwave-safe bowl. Microwave on 50% power for 30 seconds, then stir. Continue heating in 15-20 second intervals at 50% power, stirring thoroughly between each interval, until chocolate is smooth and completely melted. Don’t rush this—overheating causes chocolate to become thick and grainy. Total time is usually 1.5-2 minutes.
- Melt the Chocolate (Double Boiler Method) – Alternatively, place chocolate in a heatproof bowl set over a pot of barely simmering water (the bowl shouldn’t touch the water). Stir constantly until melted and smooth, about 5-7 minutes. Remove from heat once melted.
- Test Consistency – The melted chocolate should flow smoothly off a spoon. If it seems too thick, add ½ teaspoon of coconut oil at a time, stirring well, until you achieve a coating consistency that’s fluid but not watery.
- Dip the Pretzels – Hold a pretzel by one end (for pretzel rods) or use a fork to lower it into the melted chocolate (for twists/shapes). Submerge about ⅔ to ¾ of the pretzel, leaving some undipped for easy holding. Tilt the bowl as needed to achieve good coverage. Let excess chocolate drip back into the bowl for a few seconds—you can gently tap the pretzel against the bowl’s edge to encourage dripping.
- Remove Excess Chocolate – Use a fork to gently scrape the bottom of the pretzel against the bowl rim, removing excess chocolate for a cleaner finish. For pretzel rods, a slight twisting motion while lifting helps chocolate coat evenly and drip smoothly.
- Apply Toppings Immediately – Place the dipped pretzel on your prepared baking sheet. While the chocolate is still wet, immediately sprinkle or press on your chosen toppings. Work quickly, as the chocolate begins setting within 1-2 minutes. If adding multiple toppings, apply them all before moving to the next pretzel.
- Repeat Process – Continue dipping and decorating all pretzels, arranging them on baking sheets without touching each other. If your chocolate begins to harden, reheat briefly (10-15 seconds in microwave at 50% power) to restore smooth consistency.
- Optional Drizzle – Once all pretzels are dipped and toppings applied, melt your contrasting chocolate using the same method. Transfer to a piping bag or zip-top bag with a tiny corner snipped off. Drizzle back and forth over the pretzels in decorative patterns for an elegant finish.
- Let Chocolate Set – Allow pretzels to sit at room temperature until chocolate is completely hardened, about 20-30 minutes. For faster setting, refrigerate for 10-15 minutes, though this can sometimes cause condensation. The chocolate should be firm and snap cleanly when fully set.
- Store or Serve – Once completely set, pretzels can be arranged on serving platters, packaged in gift bags, or stored in airtight containers.
Notes
- Don’t let any water come into contact with melting chocolate—even a single drop causes it to seize and become grainy
- If chocolate seizes (becomes thick and grainy), try whisking in coconut oil 1 teaspoon at a time to smooth it out
- Work in a cool, dry environment—humidity and heat make chocolate set slowly
- For cleaner lines on pretzel rods, wipe the very bottom edge before placing on parchment
- Chocolate covered pretzels can be made 2-3 weeks in advance when stored properly
- If chocolate sets too quickly while working, briefly rewarm to restore workable consistency
- Prep Time: 15 minutes
- Cook Time: 15 minutes
- Category: Dessert
- Method: No-Bake
- Cuisine: American
- Diet: Gluten Free
Nutrition
- Serving Size: 1 chocolate covered pretzel rod
- Calories: 95
- Sugar: 8g
- Sodium: 135mg
- Fat: 4g
- Saturated Fat: 2g
- Unsaturated Fat: 1g
- Trans Fat: 0g
- Carbohydrates: 14g
- Fiber: 1g
- Protein: 1g
- Cholesterol: 2mg
Tips & Variations
The beauty of chocolate covered pretzels is their incredible versatility. Here are creative ways to customize them:
Holiday & Seasonal Variations:
- Christmas – Use red and green sprinkles, crushed candy canes, or drizzle with white chocolate and dust with edible snow
- Valentine’s Day – Pink and red sprinkles, heart-shaped decorations, or drizzle with pink-tinted white chocolate
- Easter – Pastel sprinkles, mini chocolate eggs, or spring-themed decorations
- Halloween – Orange and black sprinkles, candy eyes, or drizzle to create spooky designs
- Fourth of July – Red, white, and blue sprinkles or patriotic star decorations
Flavor Combinations:
- Salted Caramel – Drizzle with caramel sauce and sprinkle with sea salt flakes
- Peanut Butter – Use peanut butter chips or drizzle melted peanut butter over chocolate
- Mint Chocolate – Add peppermint extract to chocolate and top with crushed Andes mints
- S’mores Style – Dip in milk chocolate, roll in crushed graham crackers, and add mini marshmallows
- Cookies and Cream – Use white chocolate and crushed Oreos
- Toffee Crunch – Sprinkle with crushed Heath bars or toffee bits
Different Chocolate Options:
- Dark Chocolate – For sophisticated, less-sweet treats with antioxidants
- Ruby Chocolate – The trendy pink chocolate for unique color and fruity flavor
- Colored White Chocolate – Add gel food coloring to white chocolate for custom colors
- Marbled – Swirl dark and white chocolate together before dipping
- Double Dipped – Dip in one chocolate, let set, then partially dip in another color
Dietary Adaptations:
- Gluten-Free – Use certified gluten-free pretzels
- Dairy-Free – Use dairy-free chocolate chips or dark chocolate
- Sugar-Free – Use sugar-free chocolate chips (though texture may differ)
- Vegan – Combine dairy-free chocolate with gluten-free pretzels
Presentation Ideas:
- Gift Bags – Package in clear cellophane bags tied with ribbon
- Mason Jars – Layer different colors in decorative jars
- Gift Boxes – Arrange in bakery boxes with tissue paper
- Dessert Boards – Display on charcuterie-style boards with other treats
Pro Chef Tips
Elevate your chocolate covered pretzels from homemade to professional quality:
Temperature Control is Everything – Chocolate is temperamental about temperature. Work in a cool, dry room (65-70°F is ideal). If your kitchen is warm, the chocolate will take forever to set and may “bloom” (develop white streaks). If too cold, chocolate may crack. Room temperature is your friend.
The Power of Patience – Don’t rush the melting process. Heating chocolate too quickly or at too high a temperature causes it to seize, scorch, or become thick and grainy. Low and slow wins the race—always use 50% power in the microwave and heat in short intervals.
Prevent Water Contamination – Water is chocolate’s enemy. Even a tiny drop causes it to seize and become unusable. Ensure all tools are completely dry, don’t cover chocolate while melting (steam causes condensation), and if using a double boiler, never let boiling water splash.
The Tapping Technique – After dipping, gently tap the pretzel against the bowl’s edge to remove excess chocolate. This creates a thinner, more even coating that sets faster and looks cleaner. Too much chocolate creates thick, uneven puddles.
Work in Small Batches – Melt 12 oz of chocolate at a time. If making large quantities, prepare multiple bowls rather than one huge batch. Smaller amounts stay at optimal consistency longer and are easier to manage.
Strategic Topping Application – Apply toppings immediately after dipping while chocolate is still wet. If you wait even 60 seconds, the chocolate begins to set and toppings won’t adhere properly. Have everything prepped and ready before you start dipping.
The Fork Slide Method – For pretzel twists, place the pretzel on a fork, dip it in chocolate, then lift and let excess drip off. Slide the pretzel off the fork onto parchment using another pretzel or toothpick to nudge it gently—this prevents fork marks on the chocolate.
Save Leftover Chocolate – Don’t waste leftover melted chocolate! Pour it onto parchment paper, sprinkle with toppings, let it harden, then break into chocolate bark. Or drizzle it over popcorn, fresh fruit, or other treats.
The Refrigeration Decision – While refrigerating speeds setting, it can cause condensation when pretzels return to room temperature, creating a dull, streaky finish. Room temperature setting takes longer but produces better shine and appearance. Only refrigerate if absolutely necessary.
Common Mistakes to Avoid
Even this simple recipe has potential pitfalls. Here’s how to avoid them:
Overheating Chocolate – This is the #1 mistake! Overheated chocolate becomes thick, grainy, and difficult to work with. Always use low heat (50% microwave power or barely simmering water for double boiler) and heat in short intervals. If chocolate goes above 115°F, it’s overheated. Chocolate should be just barely melted—there can still be a few small unmelted pieces that will melt from residual heat when stirred.
Using Wet or Humid Conditions – Moisture causes chocolate to seize (become thick and clumpy). This includes wet utensils, steam from a double boiler splashing in, or high humidity in your kitchen. On humid days, turn on air conditioning or work in the coolest room. Always dry your tools thoroughly before use.
Skipping the Parchment Paper – Placing chocolate-covered pretzels directly on a baking sheet creates a mess and ruins the bottom coating. Always use parchment paper or silicone mats. Wax paper works in a pinch but isn’t ideal as chocolate sometimes sticks slightly.
Applying Toppings Too Late – Chocolate sets quickly! If you wait more than 1-2 minutes after dipping to add sprinkles or decorations, they won’t stick properly and will fall off. Work quickly and have all toppings ready before you start dipping.
Not Letting Pretzels Come to Room Temperature – Cold pretzels cause chocolate to set too quickly in uneven layers, creating a thick, uneven coating with poor appearance. Always let pretzels sit at room temperature before dipping.
Rushing the Setting Process – Chocolate needs time to fully harden. If you package or stack pretzels too soon, they’ll stick together or the chocolate will smudge. Wait until chocolate is completely firm to the touch—typically 20-30 minutes at room temperature. Test by gently touching an edge; it should feel solid and cool, not soft or tacky.
Storage & Meal Prep
Proper storage keeps your chocolate covered pretzels fresh and delicious:
Room Temperature Storage – Store completely set pretzels in an airtight container at room temperature (65-70°F) for up to 3 weeks. Layer them with parchment paper between layers to prevent sticking. Keep away from heat, direct sunlight, and humidity. A cool, dark pantry or cupboard is ideal.
Refrigerator Storage – Generally not recommended as refrigeration can cause condensation, creating a dull, streaky appearance and potentially making pretzels soft. However, if your climate is very hot (above 75°F), refrigeration is necessary. Store in airtight containers and let come to room temperature before serving to minimize condensation.
Preventing Chocolate Bloom – White streaks or spots on chocolate (called bloom) occur from temperature fluctuations or moisture exposure. While harmless and still edible, bloom looks unappealing. Prevent it by storing at consistent temperatures and protecting from humidity.
Maintaining Crispness – The pretzel itself can lose crispness if exposed to humidity. Airtight storage with optional silica gel packets (like those found in store-bought snacks) helps maintain crunch in humid environments.
Gift Packaging Timing – If packaging for gifts, wait until pretzels are completely set and have been stored at room temperature for at least 24 hours. This ensures they’re fully hardened and won’t stick to packaging materials.
Make-Ahead & Freezer Notes
These pretzels are make-ahead champions, perfect for stress-free entertaining and gift prep:
Making in Advance – Chocolate covered pretzels are ideal for advance preparation. Make them 2-3 weeks ahead of when needed and store in airtight containers at room temperature. The flavor actually improves slightly after a day or two as the salt from the pretzel subtly seasons the chocolate.
Freezing Instructions – While not necessary, you can freeze chocolate covered pretzels for up to 3 months. Place completely set pretzels in a single layer on a baking sheet and freeze until solid (about 30 minutes), then transfer to freezer bags or airtight containers with parchment paper between layers. This prevents them from sticking together.
Thawing Process – Remove frozen pretzels from freezer and let them come to room temperature in their sealed container for 1-2 hours before opening. This prevents condensation from forming on the chocolate. Never try to speed thawing with heat—it will cause chocolate to soften and look streaky.
Batch Production Strategy – For large quantities (like wedding favors or fundraisers), make pretzels over several days rather than all at once. Make one batch, let set completely and store, then repeat. This prevents burnout and allows you to work at a comfortable pace.
Holiday Prep Timeline – For holiday gifts, begin making chocolate covered pretzels 2-3 weeks before you need them. Store in containers, then package 2-3 days before gifting. This timeline allows for any mistakes or additional batches without last-minute stress.
Serving Suggestions
While chocolate covered pretzels are delicious on their own, here are creative serving ideas:
Dessert Display Ideas:
- Arrange on tiered serving stands for elegant presentation
- Display in glass apothecary jars for vintage charm
- Create a dessert charcuterie board with pretzels, cookies, and candies
- Stand pretzel rods in decorative glasses or vases for easy grabbing
- Arrange by color in rainbow patterns for visual impact
Pairing Suggestions:
- Hot Beverages – Coffee, hot chocolate, chai lattes, or tea for dunking
- Cold Drinks – Cold milk, chocolate milk, or milkshakes
- Wine Pairing – Port, dessert wines, or sweet rieslings complement chocolate
- Ice Cream – Serve alongside or crumbled over ice cream sundaes
- Cheese Boards – Add to cheese boards for sweet-salty contrast
Party & Event Ideas:
- Candy Buffets – Include in wedding or party candy bars
- Movie Night – Serve with popcorn and other theater-style snacks
- Kids’ Parties – Create a decorating station where children make their own
- Dessert Tables – Display alongside cookies, brownies, and other sweets
- After-Dinner Treats – Offer with coffee as a sweet finale to dinner parties
Creative Uses:
- Stir Sticks – Use pretzel rods as stirrers in hot chocolate or coffee
- Cake Toppers – Decorate cakes with chocolate covered pretzel rods
- Ice Cream Toppers – Crush and sprinkle over ice cream
- S’mores Variation – Use instead of graham crackers for unique s’mores
- Trail Mix Addition – Break into pieces and add to homemade trail mix
Gift Presentation:
- Clear cellophane bags tied with coordinating ribbons
- Decorative tins or boxes lined with tissue paper
- Mason jars with fabric-covered lids and gift tags
- Bakery boxes for professional presentation
- Holiday tins for festive seasonal gifts
FAQs Section
Why did my chocolate seize and become thick and grainy?
Chocolate seizes when water comes into contact with it—even a single drop. This can happen from wet utensils, steam, or high humidity. To prevent: ensure all tools are bone dry, don’t cover chocolate while melting (trapped steam condenses), and work in a dry environment. If it seizes, try whisking in coconut oil or vegetable shortening, 1 teaspoon at a time, which sometimes rescues it. Prevention is easier than fixing, so keep water far away!
Can I use chocolate chips instead of melting wafers?
Yes! Chocolate chips work well but contain stabilizers that help them hold their shape, making them slightly thicker when melted. Add 1 tablespoon of coconut oil or shortening per 12 oz of chips to thin the chocolate for easier dipping. Avoid adding butter or milk—these contain water that causes seizing. Higher-quality chips (Ghirardelli, Guittard) melt more smoothly than store brands.
How long do chocolate covered pretzels last?
When stored properly in an airtight container at room temperature (65-70°F), they last 2-3 weeks. The chocolate remains fresh, and pretzels stay crispy if protected from humidity. In hot climates, refrigerate them (though this may cause slight condensation). Frozen, they last up to 3 months. The pretzels themselves don’t go bad quickly—the limiting factor is usually chocolate quality and storage conditions.
Why won’t my toppings stick to the chocolate?
Toppings must be applied while chocolate is still wet and soft—ideally within 30-60 seconds of dipping. Once chocolate begins to set (which happens quickly), toppings won’t adhere. Work quickly and have all decorations ready before you start dipping. If chocolate is setting too fast, work in a slightly warmer room or reheat the chocolate briefly.
Can I make these with white chocolate?
Absolutely! White chocolate creates beautiful, elegant pretzels perfect for coloring with gel food coloring or pairing with colorful toppings. Choose real white chocolate (containing cocoa butter) rather than white chips labeled “vanilla flavored.” White chocolate is more sensitive to heat than milk or dark chocolate, so melt it even more carefully at 50% power in very short intervals.
How do I get a smooth, thin coating without lumps?
The chocolate must be properly melted to the right consistency—fluid enough to coat thinly but not so runny it drips off completely. Add coconut oil or shortening to thin if needed. After dipping, let excess chocolate drip back into the bowl for several seconds while gently tapping the pretzel against the bowl’s rim. This removes excess chocolate for a cleaner, thinner coat.
What’s the white streaking on my chocolate covered pretzels?
This is called “bloom” and occurs when chocolate experiences temperature fluctuations or moisture exposure. While harmless and perfectly edible, it looks unappealing. Prevent bloom by storing at consistent cool temperatures (65-70°F), protecting from humidity, and avoiding refrigeration unless necessary. Once bloom appears, it can’t be removed, though the pretzels still taste fine.
Conclusion
These Chocolate Covered Pretzels prove that some of the best treats are also the simplest to make! With just two basic ingredients and minimal time investment, you can create beautiful, delicious, professional-looking confections that work for any occasion from casual snacking to elegant gift-giving. The magical combination of sweet chocolate and salty pretzel crunch is universally beloved, making these homemade chocolate dipped pretzels one of the most reliable crowd-pleasers you’ll ever make.
What I love most about this easy chocolate covered pretzel recipe is its incredible versatility. Customize them for any holiday with different colors and toppings, make them weeks in advance for stress-free entertaining, involve kids in the decorating process for quality family time, or package them beautifully to create thoughtful homemade gifts that show you care. The possibilities are truly endless, and every variation is absolutely delicious!
I hope these chocolate covered pretzels bring as much joy to your kitchen as they’ve brought to mine! Have you made chocolate dipped pretzels before? What’s your favorite topping combination or creative variation? I’d love to hear about your experiences in the comments below—and please rate this recipe to help other home cooks! If you loved these sweet and salty treats as much as I think you will, please save this recipe to your Pinterest boards so you’ll always have it ready for your next celebration or gift-giving occasion. Happy dipping!