Easy Taco Pinwheels Recipe: Cream Cheese Tortilla Roll-Ups

Taco pinwheels are the ultimate crowd-pleasing appetizer—soft flour tortillas spread with a creamy, seasoned mixture of cream cheese, sour cream, cheese, and Mexican-inspired ingredients, rolled up tight, chilled, and sliced into colorful spiral bites. These easy taco pinwheels (also called Mexican pinwheels or tortilla roll-ups) deliver all the bold flavors of tacos in a convenient, no-cook finger food format that’s perfect for parties, potlucks, game day spreads, or quick snacks. Whether you’re hosting a Cinco de Mayo celebration, Super Bowl party, or casual get-together, these cream cheese taco pinwheels never fail to disappear within minutes.
What makes these taco tortilla pinwheels so irresistible is the perfect combination of creamy texture and bold, zesty flavors. The cream cheese base provides rich tanginess, while shredded cheese adds savory depth. Diced bell peppers, green onions, black olives, and jalapeños contribute colorful crunch and fresh bite, while taco seasoning ties everything together with that familiar Mexican flavor everyone loves. Each slice reveals a beautiful spiral of colors that looks as impressive as it tastes, yet requires no cooking and minimal effort.
This taco pinwheels recipe works beautifully for countless occasions—birthday parties, baby showers, holiday gatherings, potlucks, tailgates, after-school snacks, or meal prep lunches. They’re budget-friendly, kid-approved (without the jalapeños!), can be customized for various dietary needs, and most importantly, they can be made completely ahead of time. Best of all, these Mexican roll-ups take just 15 minutes of hands-on time, then simply chill while you handle other party prep, making entertaining absolutely stress-free.
History / Background
Taco pinwheels represent the fusion of Tex-Mex cuisine with American party food culture, emerging as a popular appetizer in the 1980s and 1990s when entertaining at home became more casual and finger foods gained prominence. While pinwheel sandwiches have existed for decades (with roots in tea sandwiches and canapés from early 20th century entertaining), the Mexican-inspired version is distinctly American in its development.
The concept likely evolved from several sources: classic pinwheel sandwiches that were popular at ladies’ luncheons and tea parties, the rising popularity of Tex-Mex cuisine throughout America in the 1970s-1980s, and the growing trend of cream cheese-based appetizers that dominated party spreads during this era. As Mexican restaurants proliferated across the United States and ingredients like tortillas, taco seasoning, and jalapeños became mainstream grocery items, home cooks began adapting these flavors into easy appetizer formats.
The specific combination of cream cheese with Mexican seasonings and ingredients reflects the American love for “loaded” and “everything” foods. Rather than serving plain tortilla chips with salsa, creative home cooks transformed familiar Mexican flavors into a portable, pre-portioned format that eliminated the need for plates or utensils. This aligned perfectly with the casual entertaining style that became popular in the 1980s-1990s, where grazing and finger foods replaced formal sit-down appetizer courses.
Food magazines, community cookbooks, and eventually food blogs and Pinterest helped spread taco pinwheels throughout American home kitchens. The recipe became particularly associated with potlucks, where its make-ahead convenience, ability to feed many people from simple ingredients, and universal appeal made it a go-to contribution. Different regions developed variations—some adding beans or corn, others including different cheeses or vegetables—but the core concept remained consistent.
Today, taco pinwheels have become a staple of American party food, appearing at everything from children’s birthday parties to adult cocktail hours. They represent how Mexican-inspired flavors have been thoroughly integrated into mainstream American cuisine, and how home cooks continue to find creative ways to serve familiar flavors in new, convenient formats. The recipe’s enduring popularity speaks to its perfect balance of easy preparation, crowd-pleasing flavors, and impressive presentation.
Why You’ll Love This Recipe
These taco pinwheels are about to become your secret weapon for effortless entertaining and quick meals. This easy cream cheese pinwheels recipe delivers bold Tex-Mex flavors and beautiful presentation using simple ingredients and requiring absolutely no cooking. Whether you’re feeding a crowd or meal-prepping lunches, you’ll appreciate how these Mexican tortilla roll-ups create impressive results with minimal effort and maximum flavor.
Here’s why this recipe deserves a permanent spot in your recipe collection:
- No Cooking Required – Completely cold prep, keeping your kitchen cool and saving time
- Lightning Fast – Just 15 minutes of hands-on time, then chill and slice when ready
- Make-Ahead Perfect – Actually tastes better the next day as flavors meld together
- Budget-Friendly – Uses affordable ingredients to feed a crowd without breaking the bank
- Crowd-Pleasing – Universally loved by kids, teens, and adults alike
- Customizable – Endless variations to suit any taste, dietary need, or spice preference
- Impressive Presentation – Colorful spiral design looks gourmet with zero effort
- Perfect for Parties – No utensils needed, easy to grab and eat while mingling
- Great for Meal Prep – Makes excellent grab-and-go lunches for the week
- Versatile Serving – Works as appetizer, snack, lunch, or light dinner
- Kid-Friendly – Children love the fun shape and familiar flavors
- Always Disappears – This is the kind of appetizer that vanishes immediately at parties
Ingredient Notes
Understanding your ingredients helps you make the best taco pinwheels possible. Let’s break down each component:
Flour Tortillas – The foundation that holds everything together. Use large burrito-size flour tortillas (10-12 inches) for easier rolling and more filling capacity. They should be fresh and pliable—old, dried-out tortillas crack when rolled. Room temperature tortillas roll more easily than cold ones. Flavored tortillas (spinach, tomato, jalapeño-cheddar) create colorful variations. For gluten-free, use large gluten-free tortillas, though they’re more delicate and may crack.
Cream Cheese – Creates the creamy, tangy base that binds ingredients and spreads smoothly. Use full-fat cream cheese (8 oz blocks), softened to room temperature for easy mixing and spreading. Low-fat cream cheese can work but won’t be as rich. Never use fat-free, which has poor texture and doesn’t spread well. Softening is crucial—cold cream cheese creates lumps and tears tortillas when spreading.
Sour Cream – Adds tang, thins the cream cheese mixture slightly for easier spreading, and provides moisture. Full-fat sour cream works best, though low-fat is acceptable. Greek yogurt can substitute for a protein boost and tangier flavor, though the taste differs slightly. About ½ cup balances the cream cheese perfectly.
Shredded Cheese – Provides savory, melty goodness and helps bind ingredients. Shredded cheddar is classic, but Mexican blend (cheddar, Monterey Jack, queso quesadilla) adds more complexity. For best results, shred from a block rather than using pre-shredded, which contains anti-caking agents. You’ll need about 1½ cups total.
Taco Seasoning – The flavor powerhouse that gives these Mexican flair. Use store-bought taco seasoning for convenience (about 2-3 tablespoons) or make your own blend. Homemade allows salt control and eliminates additives. The seasoning should be mixed into the cream cheese base for even distribution.
Green Onions – Add fresh, mild onion flavor and beautiful green flecks. Chop both white and light green parts finely—about 3-4 green onions. Regular diced onion can substitute but has stronger flavor. Chives work for milder taste.
Bell Peppers – Contribute sweet crunch and vibrant color. Red bell peppers are prettiest and sweetest. Finely dice about ½ cup. Any color works—use multiple colors for rainbow effect. Orange or yellow peppers are sweeter than green.
Black Olives – Provide salty, briny pops of flavor. Use canned sliced black olives, drained (about ½ cup). Green olives can substitute for different flavor. Omit if you’re not an olive fan—they’re optional but traditional.
Jalapeños – Add heat and authentic Mexican flavor. Use pickled jalapeños from a jar (not fresh), diced finely. Start with 2-3 tablespoons and adjust to heat preference. Remove seeds for less heat. Omit entirely for mild pinwheels that kids will love.
Seasonings – Salt, black pepper, garlic powder, and optional cumin enhance flavors. Don’t rely solely on taco seasoning—additional seasoning makes the difference between bland and delicious.
Equipment Needed
You’ll need these simple tools to make perfect taco pinwheels:
- Medium Mixing Bowl – For combining cream cheese mixture
- Electric Mixer or Spatula – For beating cream cheese until smooth
- Sharp Knife – For dicing vegetables and slicing pinwheels
- Cutting Board – For prep work and slicing rolled pinwheels
- Measuring Cups and Spoons – For accurate ingredient measurements
- Plastic Wrap – Essential for wrapping rolled tortillas tightly
- Large Platter or Cutting Board – For serving finished pinwheels
- Serrated Knife (Optional) – Makes cleaner cuts through rolled tortillas
- Offset Spatula (Optional) – Helps spread cream cheese mixture evenly
The beauty of this recipe is minimal equipment—no oven, stove, or special tools required!
Print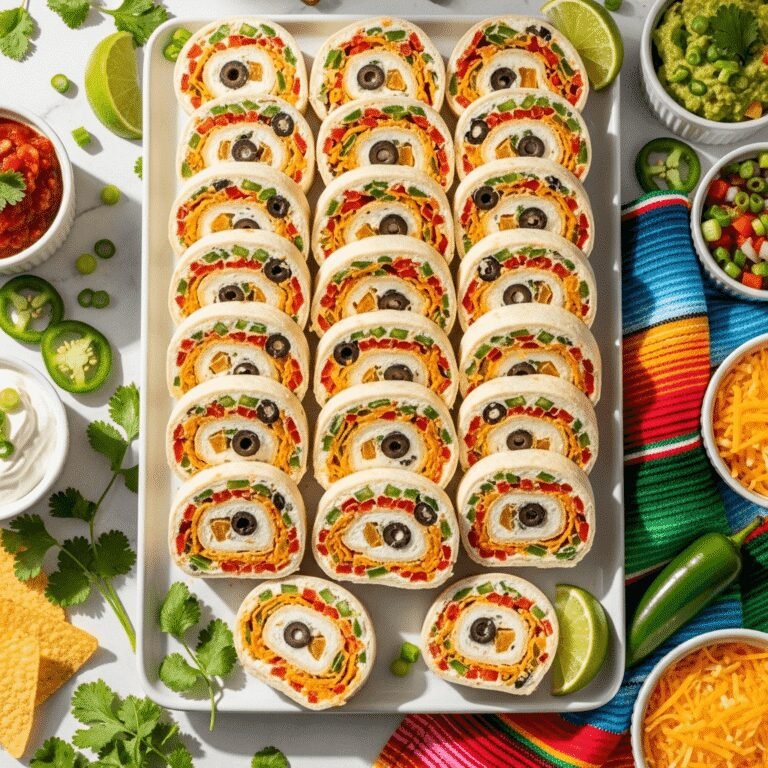
Taco Pinwheels Recipe
Easy taco pinwheels feature flour tortillas spread with seasoned cream cheese, loaded with cheese, vegetables, and Mexican flavors, rolled tight and sliced into colorful spiral bites. Perfect make-ahead party appetizer!
- Total Time: 2 hours 15 minutes
- Yield: 40-50 pinwheels (serves 10-12) 1x
Ingredients
For the Cream Cheese Filling:
- 8 oz cream cheese, softened to room temperature
- ½ cup sour cream
- 2-3 tablespoons taco seasoning
- ½ teaspoon garlic powder
- ¼ teaspoon ground cumin (optional)
- ¼ teaspoon black pepper
- Pinch of salt
For the Fillings:
- 1½ cups shredded cheddar or Mexican blend cheese
- 4 green onions, finely chopped
- ½ cup red bell pepper, finely diced
- ½ cup black olives, drained and chopped
- 2-3 tablespoons pickled jalapeños, finely diced (adjust to heat preference)
- Optional: ¼ cup fresh cilantro, chopped
For Assembly:
- 4-5 large flour tortillas (10-12 inch burrito size)
For Serving:
- Salsa, guacamole, or sour cream for dipping
Instructions
- Soften Cream Cheese: Ensure cream cheese is at room temperature—this is crucial for smooth mixing and easy spreading. If cold, microwave for 15-20 seconds to soften.
- Make Cream Cheese Mixture: In a medium bowl, beat softened cream cheese with electric mixer or sturdy spatula until smooth and fluffy. Add sour cream, taco seasoning, garlic powder, cumin (if using), black pepper, and salt. Mix until completely smooth and well combined. Taste and adjust seasonings if needed.
- Prepare Vegetables: Finely dice bell pepper, chop green onions, chop black olives, and dice jalapeños. Pat vegetables dry with paper towels if they’re wet—excess moisture makes pinwheels soggy.
- Add Mix-ins: Fold shredded cheese, green onions, bell pepper, olives, jalapeños, and cilantro (if using) into the cream cheese mixture. Stir until everything is evenly distributed.
- Spread on Tortillas: Lay one tortilla flat on your work surface. Spread about ¾ to 1 cup of the cream cheese mixture evenly over the entire tortilla, going all the way to the edges. The layer should be about ¼ inch thick. Don’t overfill or it will squeeze out when rolling.
- Roll Tightly: Starting from one edge, roll the tortilla as tightly as possible without tearing. Apply firm, even pressure as you roll to eliminate air pockets and create a compact log. The tighter the roll, the better your slices will hold together.
- Wrap and Chill: Wrap each rolled tortilla tightly in plastic wrap, twisting the ends to seal. Repeat with remaining tortillas and filling. Refrigerate for at least 2 hours or up to 24 hours. This chilling time is essential—it allows the filling to firm up so slices hold together perfectly.
- Slice: When ready to serve, unwrap rolls and place on cutting board. Using a sharp serrated knife, trim off the ends (about ½ inch from each end—the ends are usually messy). Slice into ½ to ¾-inch rounds. You’ll get about 8-10 pinwheels per tortilla.
- Serve: Arrange pinwheels on a platter, spiral side up. Serve with salsa, guacamole, or sour cream for dipping. Enjoy!
Notes
- Room temperature cream cheese is essential—cold cream cheese won’t spread smoothly.
- Pat vegetables dry to prevent soggy pinwheels.
- Spread filling all the way to edges for complete coverage in every slice.
- Roll as tightly as possible without tearing for best results.
- Must chill at least 2 hours—this firms the filling so slices hold together.
- Use a sharp serrated knife for cleanest cuts through chilled rolls.
- Make up to 24 hours ahead for easy entertaining.
- Store wrapped pinwheels in refrigerator up to 3 days before slicing.
- Prep Time: 15 minutes
- Cook Time: 0 minutes (plus 2 hours chilling)
- Category: Appetizer
- Method: No-Cook
- Cuisine: American
- Diet: Vegetarian
Nutrition
- Serving Size: 4 pinwheels
- Calories: 245
- Sugar: 3g
- Sodium: 485mg
- Fat: 16g
- Saturated Fat: 9g
- Unsaturated Fat: 6g
- Trans Fat: 0g
- Carbohydrates: 18g
- Fiber: 2g
- Protein: 8g
- Cholesterol: 42mg
Tips & Variations
Transform your taco pinwheels to match any preference with these creative variations:
Ranch Taco Pinwheels: Add 2 tablespoons ranch seasoning mix along with (or instead of) taco seasoning for a ranch-taco fusion that’s incredibly popular. The ranch adds tangy, herby notes that complement Mexican flavors beautifully.
Buffalo Chicken Taco Pinwheels: Add 1 cup diced cooked chicken mixed with ¼ cup buffalo sauce to the filling. This creates a heartier, protein-packed version that works as a main dish.
Veggie-Loaded Pinwheels: Add diced tomatoes, corn kernels, black beans (drained), and extra bell peppers for a vegetable-packed version. Reduce cream cheese slightly to accommodate extra ingredients.
BLT Taco Pinwheels: Add crumbled cooked bacon, diced tomatoes, and chopped lettuce for a BLT-inspired variation. Add lettuce just before rolling to prevent sogginess.
Pizza Pinwheels: Replace taco seasoning with Italian seasoning, use mozzarella cheese, add pepperoni and diced tomatoes, and serve with marinara for dipping. This creates Italian-inspired pinwheels.
Southwest Pinwheels: Add corn, black beans, diced avocado (or guacamole), and extra jalapeños for bold Southwest flavors. Lime juice brightens everything.
Lighter Version: Use light cream cheese, Greek yogurt instead of sour cream, reduce cheese amount, and load up on vegetables. Still delicious with fewer calories.
Breakfast Pinwheels: Add scrambled eggs, cooked sausage or bacon, and use Mexican cheese blend for breakfast-themed pinwheels perfect for brunch.
Pro Chef Tips
Elevate your taco pinwheels from good to absolutely perfect with these professional techniques:
Room Temperature Everything: Both cream cheese and tortillas should be room temperature. Cold cream cheese tears tortillas and doesn’t spread smoothly. Room temperature tortillas are pliable and less likely to crack when rolled. This single tip prevents most pinwheel failures.
Beat Cream Cheese Until Fluffy: Don’t just stir—beat cream cheese with a mixer until light and fluffy before adding other ingredients. This creates a smoother, creamier filling that spreads like butter and tastes more luxurious.
Dry Your Vegetables Thoroughly: Excess moisture from vegetables (especially tomatoes, jalapeños, or olives) makes pinwheels soggy and causes the filling to weep. Pat everything completely dry with paper towels before adding to cream cheese mixture.
Spread to the Very Edges: Many people leave a border thinking it helps with rolling, but this creates bare spots in your slices. Spread filling edge to edge—the cream cheese acts as glue and the tight roll prevents squeezing out.
Roll Tighter Than You Think: The tighter the roll, the better slices hold together and the more professional they look. Apply firm, even pressure as you roll, eliminating any air pockets. A loose roll creates slices that fall apart.
Chill Properly: The 2-hour minimum chill time isn’t optional—it allows the cream cheese to firm up so slices maintain their shape. Overnight chilling is even better and makes slicing easier. Chilled rolls slice cleanly; warm ones smush.
Use a Sharp Serrated Knife: A serrated knife saws through the rolled tortilla without squishing it. Wipe the knife clean between cuts for the cleanest slices. A dull knife or straight blade compresses the roll and creates messy slices.
Common Mistakes to Avoid
Sidestep these frequent pitfalls for perfect taco pinwheels every time:
Using Cold Cream Cheese: This is the most common mistake and ruins everything. Cold, hard cream cheese tears tortillas when you try to spread it, creates lumps in the filling, and doesn’t mix well with other ingredients. Always soften to room temperature—this is absolutely non-negotiable.
Not Chilling Long Enough: Pinwheels that aren’t chilled properly fall apart when sliced. The filling needs time to firm up. If you try to slice after just 30 minutes, you’ll end up with a mess. Minimum 2 hours, overnight is better. Plan accordingly.
Rolling Too Loosely: Loose rolls have air pockets and fall apart when sliced. Each pinwheel should be compact and tight. Apply firm, even pressure as you roll from edge to edge, keeping the roll consistent in tightness throughout.
Overfilling Tortillas: Too much filling squeezes out when rolling and creates thick, bulky rolls that are hard to slice neatly. The layer should be about ¼ inch thick—substantial but not excessive. Less is more here.
Not Drying Vegetables: Wet ingredients make the filling watery and cause tortillas to get soggy over time. Always pat vegetables dry, drain canned ingredients thoroughly, and avoid adding fresh tomatoes unless you seed them first.
Cutting Too Soon After Refrigeration: If you slice immediately after removing from fridge, the filling is very firm and can crack. Let chilled rolls sit at room temperature for 5-10 minutes before slicing for easier cutting and better texture.
Storage & Meal Prep
Here’s how to handle storage and prep for taco pinwheels:
Rolled (Before Slicing): Store tightly wrapped rolls in refrigerator for up to 3 days before slicing. This is the best storage method—rolls keep longer than pre-sliced pinwheels. Slice just before serving for freshest presentation.
Sliced Pinwheels: Store sliced pinwheels in a single layer in an airtight container, with parchment paper between layers if stacking. Refrigerate for up to 2 days. The edges may dry slightly, but they’re still delicious. Cover with damp paper towel to prevent drying.
Serving Temperature: Pinwheels are best served chilled or at room temperature (not warm). Remove from refrigerator 15-20 minutes before serving so they’re cool but not ice-cold. The flavors are more pronounced at slightly warmer temperature.
Meal Prep: These are excellent for weekly meal prep. Make on Sunday, store wrapped rolls in fridge, and slice portions each morning for lunch. Pack with vegetables and dip for complete meal.
Preventing Drying: Once sliced, pinwheels can dry at the edges. Prevent this by pressing plastic wrap directly against cut surfaces, or covering the container with a damp paper towel before sealing.
Make-Ahead & Freezer Notes
Plan ahead with these time-saving strategies for taco pinwheels:
Ideal Make-Ahead Timeline: Taco pinwheels are perfect for advance preparation:
- 3 days ahead: Maximum recommended time for best quality
- 1-2 days ahead: Ideal window—flavors fully meld without any quality loss
- 4-6 hours ahead: Minimum for firm slicing, works well day-of
- Just before serving: Slice rolls for optimal freshness and appearance
Complete Make-Ahead Strategy: Make entire recipe, wrap rolls tightly in plastic wrap, refrigerate. The filling actually improves as it sits because flavors meld together. Slice just before serving for best presentation.
Freezing: Freezing is possible but not ideal. Cream cheese can become slightly grainy when thawed, and vegetables may release moisture. If you must freeze, freeze the wrapped rolls (before slicing) for up to 1 month. Thaw overnight in refrigerator, then slice. The texture won’t be quite as good as fresh, but still tasty.
Freezing Pre-Made Pinwheels: If you’ve already sliced, you can freeze pinwheels in a single layer on a baking sheet until solid, then transfer to freezer bags. Thaw in refrigerator. They’ll be slightly softer but still enjoyable.
Party Planning Timeline: For stress-free entertaining:
- Day before party: Make rolls completely, wrap, refrigerate
- 3 hours before: Slice pinwheels, arrange on platter, cover
- 30 minutes before: Remove from refrigerator, let warm slightly
This approach maximizes flavor and freshness while minimizing party-day work.
Serving Suggestions
Create memorable spreads and complete the taco pinwheels experience with these serving ideas:
Game Day Spread: Serve taco pinwheels alongside buffalo wings, nachos, seven-layer dip, chips and salsa, and guacamole. The variety ensures something for everyone and the pinwheels provide a handheld option.
Cinco de Mayo Party: Create a complete Mexican-inspired spread with pinwheels, queso dip, street corn salad, Mexican rice, refried beans, and churros for dessert. Serve with margaritas or Mexican beer.
Potluck Contribution: Arrange pinwheels on a beautiful platter with fresh cilantro garnish, lime wedges, and small bowls of salsa and sour cream for dipping. This travels well and always stands out.
Lunch Box: Pack 4-5 pinwheels with carrot sticks, bell pepper strips, tortilla chips, and a small container of salsa for a complete, satisfying lunch that doesn’t need reheating.
Afternoon Snack: Serve with fresh vegetables (celery, carrots, cucumber), tortilla chips, and various dips for an after-school snack that’s filling and nutritious.
Light Dinner: Serve 6-8 pinwheels per person with Mexican rice, black beans, side salad, and fresh fruit for a complete but light dinner that doesn’t require cooking.
Cocktail Party: Present on elegant platters alongside other finger foods like shrimp cocktail, caprese skewers, stuffed mushrooms, and cheese board for sophisticated entertaining.
Dipping Sauces: Offer multiple options:
- Salsa (mild, medium, or hot)
- Guacamole
- Sour cream
- Queso dip
- Ranch dressing
- Chipotle mayo
Beverage Pairings: These pair wonderfully with margaritas, Mexican beer (Corona, Modelo), sangria, limeade, horchata, or iced tea.
FAQs Section
Q: Can I make taco pinwheels without cream cheese?
A: Not really—cream cheese provides the spreadable base that holds everything together. You could try spreadable goat cheese or Boursin for different flavor, but cottage cheese, ricotta, or other alternatives won’t work. The cream cheese is essential to this recipe’s success.
Q: Why do my pinwheels fall apart when I slice them?
A: Most often because they weren’t chilled long enough (minimum 2 hours), rolled too loosely, or you’re using a dull knife. Ensure tight rolling, adequate chilling, and use a sharp serrated knife. Also, let chilled rolls sit at room temperature 5 minutes before slicing.
Q: Can I use whole wheat or low-carb tortillas?
A: Yes! Whole wheat tortillas work perfectly and add nutrition. Low-carb tortillas also work but can be more delicate and prone to cracking—be extra gentle when rolling. Flavored tortillas (spinach, tomato, jalapeño-cheddar) create colorful variations.
Q: How do I prevent soggy pinwheels?
A: Pat all vegetables completely dry before adding to filling. Don’t add fresh tomatoes (or seed them first to remove watery gel). Avoid overfilling. Use firm tortillas, not ones that are old or have tears. Store properly wrapped so moisture doesn’t accumulate.
Q: Can I make these dairy-free?
A: Yes! Use dairy-free cream cheese (Kite Hill or Tofutti), dairy-free sour cream, and omit the cheese or use dairy-free shredded cheese. The texture and flavor differ slightly from traditional but still create delicious pinwheels.
Q: Are these safe for kids?
A: Absolutely! Kids typically love these. For kid-friendly versions, omit jalapeños and use mild ingredients. Let kids help spread filling and roll tortillas—they enjoy the process and are more likely to eat what they help make.
Q: How many pinwheels should I plan per person?
A: For appetizers at a party with other food, plan 3-4 pinwheels per person. For a main lunch or light dinner, plan 6-8 per person. If these are the only appetizer, plan 5-6 per person. Adjust based on your crowd—these tend to disappear quickly!
Q: Can I add meat to taco pinwheels?
A: Yes! Cooked, diced chicken, crumbled cooked bacon, diced ham, or cooked ground beef all work well. Ensure meat is cooked, cooled, and diced small. Add about 1 cup to the filling. This makes them heartier and works well for lunch.
Conclusion
There you have it—everything you need to create perfect, crowd-pleasing taco pinwheels that will make you the star of every party! These easy cream cheese taco pinwheels prove that the best appetizers are often the simplest, requiring no cooking while delivering bold flavors and beautiful presentation that guests always rave about. The combination of creamy, seasoned filling with crunchy vegetables and colorful spirals creates finger food that’s both impressive and incredibly delicious.
Remember the keys to success: soften cream cheese completely, dry vegetables thoroughly, spread filling to the edges, roll as tightly as possible, chill for at least 2 hours, and use a sharp serrated knife for clean slices. Master these fundamentals and you’ll create Mexican pinwheels that look professional and taste amazing every single time.
The beauty of this taco tortilla roll-ups recipe lies in its incredible versatility and make-ahead convenience. Keep it classic or customize with endless variations, make them mild or spicy, prepare completely ahead to eliminate party stress—these pinwheels adapt beautifully to any occasion while remaining budget-friendly and absolutely foolproof.
Ready to add this ultimate party appetizer to your entertaining arsenal? Pin this recipe to your favorite Pinterest board so you’ll always have it ready when guests are coming! Make these taco pinwheels this weekend and let me know in the comments how they turned out. What variations did you try? I absolutely love hearing about your cooking adventures and seeing your delicious creations!
Don’t forget to snap a photo of your gorgeous pinwheel spirals arranged on a platter and share it on social media. Tag me so I can see your masterpiece and celebrate with you! Here’s to easy entertaining, crowd-pleasing recipes, and food that brings people together! 🌮