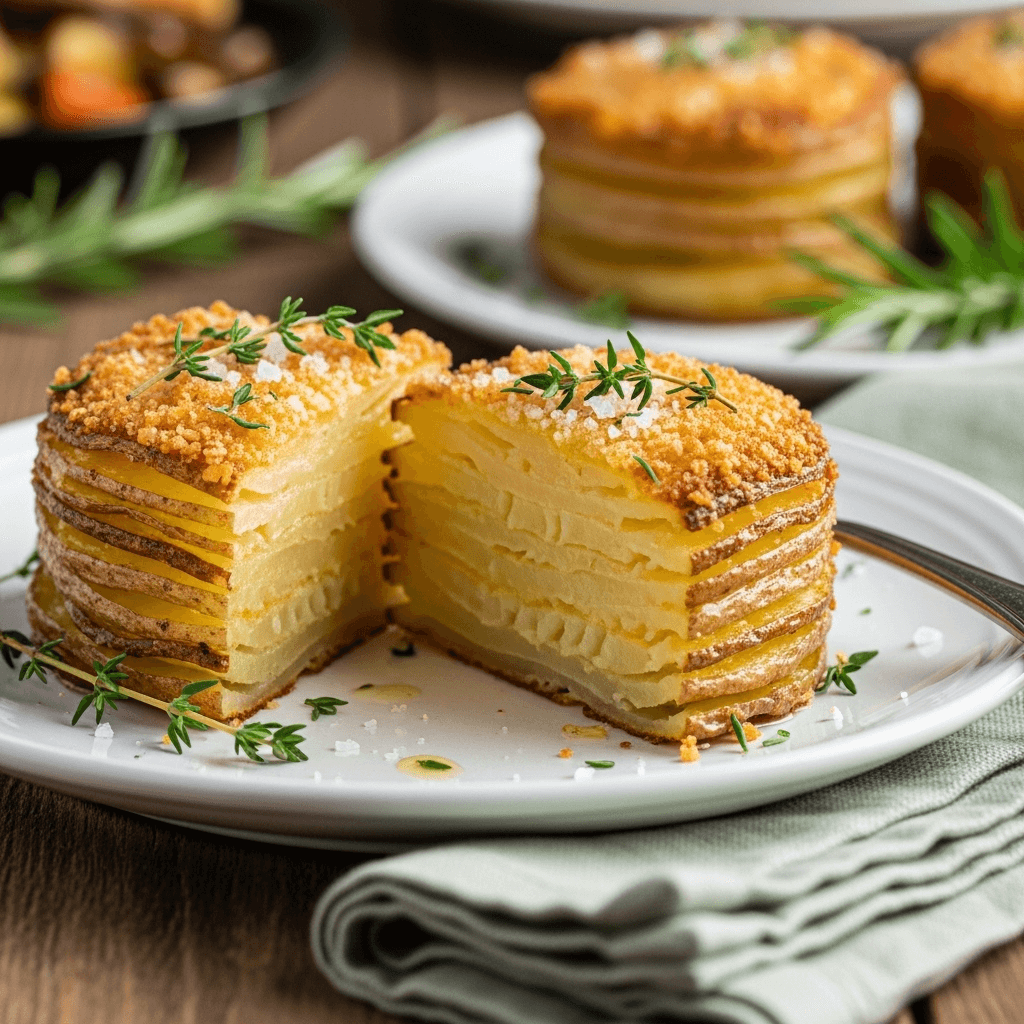
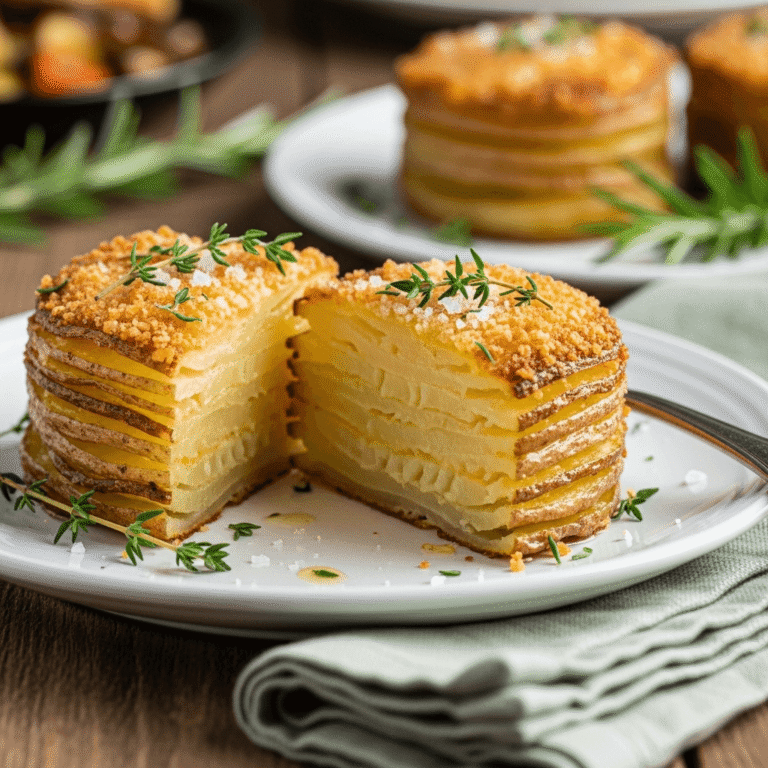
Crispy Potato Stacks Recipe – Elegant Restaurant-Style Side Dish Made Easy

Get ready to elevate your potato game with these stunning crispy potato stacks! Also known as stacked potatoes, potato towers, or pommes Anna stacks, these beautiful layered potato rounds are crispy on the outside, tender on the inside, and impressively elegant despite being surprisingly simple to make. Each individual stack features thinly sliced potatoes arranged in overlapping layers, brushed with butter and herbs, then baked until golden and crispy.
These gorgeous potato stacks are perfect for special occasions like holiday dinners, date nights, dinner parties, or any time you want to impress your guests with restaurant-quality presentation. They look incredibly sophisticated on the plate but require just a few basic ingredients—potatoes, butter, herbs, and seasonings. What makes potato stacks so appealing is that combination of textures: crispy, golden edges with tender, creamy layers in the center. Plus, they’re pre-portioned, which makes serving easy and elegant. Whether you’re planning a fancy dinner or just want to make weeknight potatoes feel special, these crispy baked potato stacks are about to become your new favorite side dish!
History / Background
Potato stacks are a modern take on the classic French dish “Pommes Anna,” which dates back to the 19th century. Pommes Anna was created during the Second French Empire (1852-1870) and named after a famous Parisian courtesan of that era. The original dish featured thinly sliced potatoes layered in a special two-handled pan, generously buttered, and cooked until golden and crispy on both sides. It was considered a sophisticated preparation that showcased the chef’s skill in creating perfectly crispy layers.
The individual potato stack variation we know today is a more recent innovation, likely emerging from the restaurant world in the late 20th and early 21st centuries. As presentation became increasingly important in fine dining, chefs began creating individually portioned versions that were both beautiful and practical. The genius of the modern potato stack lies in its accessibility—home cooks can achieve that same elegant presentation using a simple muffin tin, making restaurant-style plating achievable in any kitchen.
These stacked potatoes gained massive popularity on social media and Pinterest in the 2010s, where their gorgeous presentation and that satisfying cross-section shot made them instantly viral. Food bloggers and home cooks embraced them because they delivered maximum visual impact with minimal ingredients and straightforward techniques. Today, potato stacks represent the perfect marriage of classic French technique and modern home cooking practicality—elegant enough for special occasions but simple enough for anyone to master.
Why You’ll Love This Recipe
These crispy potato stacks are about to transform the way you think about potato side dishes! They’re incredibly impressive to look at, yet surprisingly easy to make—your guests will think you spent hours in the kitchen when really you just sliced some potatoes and stacked them in a muffin tin. The layers of tender potato with crispy, buttery edges create an incredible texture contrast that’s absolutely addictive.
Here’s why this potato stack recipe is absolutely fantastic:
- Restaurant-quality presentation – Looks like something from a fancy steakhouse but made in your own kitchen
- Surprisingly simple – Just slice, stack, season, and bake—no complicated techniques required
- Perfect portion control – Each stack is an individual serving, making plating effortless
- Customizable flavors – Easily adapt with different herbs, cheeses, or seasonings
- Make-ahead friendly – Assemble in advance and bake when ready
- Versatile side dish – Pairs beautifully with everything from steak to chicken to fish
- Kid-approved – The crispy edges and fun presentation make kids excited about eating potatoes
- Budget-friendly – Uses inexpensive potatoes to create an upscale dish
- Gluten-free friendly – Naturally gluten-free and can be made dairy-free too
- Texture perfection – Crispy golden exterior with creamy, tender interior layers
- Freezer-friendly – Make big batches and freeze for future elegant dinners
- Pinterest-worthy – Gorgeous presentation that photographs beautifully
Ingredient Notes
Potatoes: Yukon Gold potatoes are the absolute best choice for potato stacks because they have a creamy texture, buttery flavor, and hold their shape beautifully when baked. Russet potatoes work too but can be slightly drier and more crumbly. Red potatoes are another good option, though they’ll create a slightly different texture. Choose medium-sized potatoes (about 2-3 inches in diameter) that will fit nicely in muffin cups.
Butter: Unsalted butter gives you better control over the salt level and creates those golden, crispy edges we’re after. The butter also helps the seasonings stick to each layer and adds rich flavor throughout. You can substitute with ghee for a slightly nuttier flavor, or use olive oil for a dairy-free version, though butter gives the best flavor and crispiness.
Garlic: Fresh minced garlic adds aromatic, savory depth that makes these potato stacks irresistible. Garlic powder can work in a pinch but fresh is significantly better. The garlic infuses into the butter and permeates every layer of potato.
Fresh Herbs: Thyme and rosemary are classic choices that pair beautifully with potatoes. Fresh herbs are preferred over dried for their bright flavor and aroma. You can also use fresh parsley, sage, or a combination of your favorite herbs.
Parmesan Cheese (Optional): Grated Parmesan adds a salty, umami-rich element and helps create extra crispy tops. It’s optional but highly recommended. Freshly grated Parmesan tastes significantly better than the pre-grated stuff in cans.
Salt and Pepper: Essential for bringing out the natural potato flavor. Use kosher salt or sea salt for best results. Freshly ground black pepper adds a subtle heat and complexity.
Equipment Needed
- Standard 12-cup muffin tin
- Mandoline slicer or sharp knife
- Cutting board
- Small saucepan or microwave-safe bowl (for melting butter)
- Pastry brush or small spoon
- Measuring cups and spoons
- Large bowl (for holding sliced potatoes)
- Parchment paper or cooking spray
- Thin metal spatula or butter knife (for removing stacks)
- Oven mitts
Crispy Potato Stacks Recipe
Elegant crispy potato stacks made with thinly sliced potatoes layered in a muffin tin, brushed with garlic herb butter, and baked until golden and crispy. These beautiful individual servings are perfect for special occasions and feature crispy edges with tender, creamy centers. Restaurant-quality presentation that’s surprisingly easy to make at home!
- Total Time: 60 minutes
- Yield: 12 potato stacks (serves 6-12) 1x
Ingredients
For the Potato Stacks:
- 4-5 medium Yukon Gold potatoes (about 2 lbs)
- 6 tablespoons unsalted butter, melted
- 3 cloves garlic, minced
- 2 teaspoons fresh thyme leaves (or 1 tsp dried)
- 1 teaspoon fresh rosemary, finely chopped (or ½ tsp dried)
- 1 teaspoon salt (or to taste)
- ½ teaspoon black pepper
- ¼ cup freshly grated Parmesan cheese (optional but recommended)
- Fresh herbs for garnish (parsley, thyme, or chives)
- Cooking spray or additional butter for greasing
Instructions
- Preheat and prepare: Preheat your oven to 375°F (190°C). Generously spray a 12-cup muffin tin with cooking spray or brush each cup with melted butter. This step is crucial for preventing sticking and ensuring you can remove the potato stacks intact later.
- Prepare the garlic herb butter: In a small saucepan over low heat (or in a microwave-safe bowl), melt the butter. Add the minced garlic, thyme, rosemary, salt, and pepper. Stir well and let it sit for a few minutes to allow the flavors to infuse. The butter should smell incredibly aromatic.
- Slice the potatoes: Wash and scrub the potatoes thoroughly but don’t peel them—the skin adds flavor, texture, and helps hold the stacks together. Using a mandoline slicer set to about ⅛-inch thickness (or a very sharp knife), slice the potatoes into thin, uniform rounds. Try to keep the slices as consistent as possible for even cooking. Place sliced potatoes in a large bowl.
- Season the potato slices: Pour about half of the garlic herb butter over the potato slices and gently toss with your hands to coat each slice. Be gentle to avoid breaking the delicate slices. This pre-coating ensures every layer is flavorful.
- Stack the potatoes: Begin layering the potato slices vertically in each muffin cup, standing them on their edges and overlapping them slightly like shingles on a roof. Pack them in fairly tightly—they’ll shrink as they cook. Each cup should be filled to just slightly above the rim. As you stack, occasionally brush layers with more of the garlic herb butter.
- Brush with remaining butter: Once all cups are filled, brush the tops generously with any remaining garlic herb butter, making sure to get the garlic and herbs on top of the stacks. If using Parmesan, sprinkle it evenly over the tops of all the stacks now.
- Cover and bake: Cover the muffin tin tightly with aluminum foil. Place in the preheated oven and bake for 30 minutes. This covered baking time allows the potatoes to steam and become tender.
- Uncover and crisp: After 30 minutes, carefully remove the foil (watch out for hot steam!). Continue baking uncovered for an additional 15-20 minutes, until the tops are golden brown and crispy, and the edges are beautifully caramelized. The potatoes should be tender when pierced with a knife.
- Cool and remove: Let the potato stacks cool in the pan for about 5 minutes. This brief cooling period allows them to set up and makes removal much easier. Run a thin knife or offset spatula around the edges of each stack, then gently lift them out using the spatula or a fork. They should release fairly easily if the pan was well-greased.
- Serve immediately: Transfer potato stacks to a serving platter or individual plates. Garnish with fresh herbs and serve hot. These are best enjoyed immediately while the edges are still crispy!
Notes
- Mandoline safety: If using a mandoline slicer, always use the hand guard to protect your fingers. Mandolines are incredibly sharp!
- Uniform slices are key: Consistent thickness ensures even cooking. Too thick and the centers will be undercooked; too thin and they’ll fall apart.
- Don’t skip the greasing: Generously greasing the muffin tin is essential for releasing the stacks intact.
- Pack them tight: The potatoes will shrink as they cook, so pack the muffin cups fairly full.
- Customization: Add layers of thinly sliced onions, different cheeses, or bacon bits between potato layers for variation.
- Make them crispier: For extra crispy tops, broil for 1-2 minutes at the very end, watching carefully.
- Prep Time: 20 minutes
- Cook Time: 40 minutes
- Category: Side Dish
- Method: Baking
- Cuisine: French-American
- Diet: Gluten Free
Nutrition
- Serving Size: 2 potato stacks
- Calories: 195
- Sugar: 1g
- Sodium: 425mg
- Fat: 12g
- Saturated Fat: 7g
- Unsaturated Fat: 4g
- Trans Fat: 0g
- Carbohydrates: 20g
- Fiber: 2g
- Protein: 3g
- Cholesterol: 30mg
Tips & Variations
Cheesy Potato Stacks:
Layer thin slices of cheddar, Gruyère, or fontina cheese between the potato layers for an extra indulgent version. The cheese melts into the potatoes, creating pockets of gooey deliciousness. Finish with extra Parmesan on top for a golden, crispy crust.
Loaded Potato Stacks:
Add crumbled bacon, shredded cheese, and green onions between layers for a “loaded baked potato” version. Top with sour cream and chives when serving for the ultimate comfort food side dish.
Mediterranean Style:
Use olive oil instead of butter and add fresh oregano, lemon zest, and crumbled feta cheese for a Greek-inspired variation. Finish with a squeeze of fresh lemon juice before serving.
Spicy Potato Stacks:
Add ½ teaspoon of smoked paprika, ¼ teaspoon cayenne pepper, or red pepper flakes to the butter mixture for a spicy kick. Top with pepper jack cheese for extra heat.
Sweet Potato Stacks:
Substitute sweet potatoes for regular potatoes for a naturally sweeter, more colorful version. Reduce baking time slightly as sweet potatoes cook faster. These pair beautifully with sage and brown butter.
Vegan Potato Stacks:
Replace butter with olive oil or vegan butter and omit the Parmesan (or use vegan Parmesan). They’re just as delicious!
Truffle Potato Stacks:
Add 1-2 teaspoons of truffle oil to the butter mixture for an ultra-luxurious version. This makes them perfect for special celebration dinners.
Hasselback-Style:
For an easier variation that still looks impressive, make hasselback potatoes by slicing potatoes almost all the way through (leaving the bottom intact) and baking them on a sheet pan with the same seasonings.
Pro Chef Tips
The Mandoline is Your Friend: Investing in an inexpensive mandoline slicer makes this recipe exponentially easier and ensures uniform slices that cook evenly. Hand-slicing works but requires patience and a very sharp knife.
Soak for Extra Crispiness: After slicing, soak potato rounds in cold water for 15-20 minutes to remove excess starch. Pat them completely dry before seasoning. This technique creates extra crispy edges.
Room Temperature Matters: Let potatoes come to room temperature before slicing and assembling. Cold potatoes are harder to slice uniformly and may cook unevenly.
The Vertical Stack Method: Standing potato slices vertically (on their edges) rather than laying them flat creates those beautiful layers and allows butter and seasonings to penetrate between each slice.
Butter Distribution: Use a pastry brush to get butter and herbs into every crevice. Don’t be shy with the butter—it’s what creates those crispy, golden edges.
The Cover-Uncover Technique: Covering for the first portion of baking steams the potatoes until tender, while uncovering for the final baking crisps the tops beautifully. This two-stage method is key to texture perfection.
Test for Doneness: Pierce a center stack with a thin knife—it should slide through easily with no resistance when potatoes are fully cooked.
Cooling is Crucial: Don’t try to remove hot stacks immediately. The 5-minute cooling period allows them to set up and hold together when you remove them from the tin.
Gentle Removal: Use a thin offset spatula or butter knife to gently loosen around the edges before lifting out. If one sticks, don’t force it—run the spatula around again and try lifting from a different angle.
Common Mistakes to Avoid
Slicing potatoes too thick: Thick slices won’t cook through properly in the center and won’t create those beautiful layered sections. Aim for ⅛-inch thickness or thinner for best results.
Not greasing the muffin tin enough: Insufficient greasing is the number one reason potato stacks stick and break apart when you try to remove them. Be generous with the cooking spray or butter in each cup.
Skipping the covered baking time: Baking uncovered the entire time will dry out the potatoes before they cook through. The covered period is essential for creating tender interiors.
Removing them too soon: Trying to take potato stacks out of the tin while they’re still piping hot will result in broken, falling-apart messes. Let them cool for 5 minutes to set up properly.
Inconsistent slice thickness: If slices vary wildly in thickness, some layers will be overcooked and burnt while others remain undercooked and hard. Uniform slicing is worth the extra effort.
Overfilling the cups: While you want to pack them fairly full, don’t mound potatoes way above the rim. They need room to shrink and settle as they cook without spilling over and making a mess.
Using the wrong potatoes: Waxy potatoes like red potatoes hold their shape better than starchy russets. Yukon Golds are the perfect middle ground with great flavor and texture.
Storage & Meal Prep
Refrigerator Storage:
Store leftover potato stacks in an airtight container in the refrigerator for up to 4 days. Place parchment paper between layers to prevent them from sticking together. The potato stacks will lose some crispiness when stored but can be re-crisped when reheating.
Reheating for Best Results:
The oven is the best reheating method to restore crispiness. Preheat your oven to 350°F, place potato stacks on a baking sheet, and heat for 10-15 minutes until warmed through and the edges crisp up again. You can also use an air fryer at 350°F for 5-7 minutes for super crispy results.
Microwave Reheating:
While not ideal for maintaining crispiness, you can microwave individual stacks for 30-60 seconds if you’re in a hurry. They’ll be warm and tasty, just not as crispy.
Meal Prep Strategy:
Potato stacks are excellent for meal prep! Make a full batch on Sunday and portion them out with your proteins and vegetables for easy weeknight dinners. They reheat beautifully and add an elegant touch to meal-prepped containers.
Make-Ahead & Freezer Notes
Assembling in Advance:
You can assemble the potato stacks completely in the muffin tin up to 8 hours ahead. After stacking and brushing with butter, cover tightly with plastic wrap and refrigerate. When ready to bake, let them sit at room temperature for 15 minutes, then proceed with the covered baking as directed. You may need to add 5 minutes to the baking time if they’re still cold.
Par-Baking Method:
For the best make-ahead strategy, bake the potato stacks covered for the full 30 minutes, then let them cool completely. Refrigerate for up to 2 days. When ready to serve, place in a 375°F oven uncovered for 15-20 minutes to finish cooking and crisp up.
Freezing Instructions:
These freeze surprisingly well! Bake the potato stacks completely, let them cool entirely, then freeze individually on a baking sheet until solid (about 2 hours). Transfer frozen stacks to freezer bags or airtight containers, separating layers with parchment paper. They’ll keep for up to 2 months.
Reheating from Frozen:
Place frozen potato stacks on a baking sheet and reheat in a 350°F oven for 20-25 minutes until heated through and crispy. No need to thaw first! This makes them perfect for having elegant side dishes ready to go for unexpected dinner guests.
Holiday Prep Strategy:
For holiday dinners, assemble potato stacks the day before and refrigerate. On the day of your meal, bake them while your main dish is resting. This timing works perfectly and ensures hot, fresh potato stacks with minimal last-minute effort.
Serving Suggestions
Crispy potato stacks are incredibly versatile and pair beautifully with a wide variety of main dishes:
With Beef:
These elegant potato stacks are perfect alongside steaks, beef tenderloin, prime rib, pot roast, or beef Wellington. The crispy, buttery potatoes complement rich beef dishes beautifully.
With Poultry:
Serve with roasted chicken, herb-crusted turkey breast, duck, chicken piccata, or any poultry dish. They’re especially popular for holiday dinners alongside roasted turkey or chicken.
With Seafood:
Potato stacks pair wonderfully with salmon, halibut, sea bass, lobster tail, or pan-seared scallops. The mild potato flavor doesn’t compete with delicate fish.
With Pork:
Excellent alongside pork chops, pork tenderloin, ham, or roasted pork loin. The herbs in the potato stacks complement pork’s natural sweetness.
Complete the Plate:
- Roasted or grilled vegetables (asparagus, Brussels sprouts, green beans)
- Fresh green salad with vinaigrette
- Creamed spinach or sautéed greens
- Dinner rolls or crusty bread
- Compound butter or herb butter on the side
Special Occasion Menus:
Perfect for Thanksgiving, Christmas dinner, Easter brunch, Valentine’s Day dinner, anniversary celebrations, or any time you want to make a meal feel special.
Wine Pairings:
The buttery, herb-flavored potato stacks pair nicely with Chardonnay, Pinot Noir, Sauvignon Blanc, or Champagne for celebrations.
Brunch Application:
Serve these for an elegant brunch alongside eggs Benedict, quiche, or smoked salmon. Top with sour cream and chives for a breakfast-appropriate presentation.
FAQs Section
Do I have to peel the potatoes?
No! Leaving the skin on adds flavor, nutrition, and helps the stacks hold together better. Just scrub the potatoes well to remove any dirt. The skin also adds a nice rustic look and extra texture. However, if you prefer, you can peel them—just know they may be slightly more delicate.
Can I use a different type of pan?
While a muffin tin is ideal for individual portions, you can make one large potato stack in a cake pan or cast iron skillet (similar to traditional Pommes Anna). Adjust cooking time to about 50-60 minutes covered, then 20-30 minutes uncovered. You can also use a mini muffin tin for bite-sized appetizer versions.
Why are my potato stacks falling apart?
This usually happens because: the slices were too thick or uneven, the pan wasn’t greased enough, you tried to remove them while too hot, or they weren’t cooked long enough to soften and bind together. Make sure to let them cool for 5 minutes and use a thin spatula to carefully loosen all around the edges.
Can I make these ahead for a dinner party?
Absolutely! The best method is to assemble them completely in the muffin tin up to 8 hours ahead and refrigerate covered. Bake them while your main course is resting or during appetizers. You can also par-bake them and finish just before serving (see make-ahead notes above).
What’s the best way to slice potatoes without a mandoline?
Use the sharpest knife you have and take your time. Slice the potato in half lengthwise to create a flat, stable surface, then slice as thinly and uniformly as possible. A serrated knife can actually work better than a straight-edge for some people. It takes practice, but it’s definitely doable!
Can I add other vegetables to the stacks?
Yes! Thinly sliced onions, beets, or sweet potatoes can be layered between the regular potato slices for variation. Just keep in mind that different vegetables cook at different rates, so you may need to adjust cooking time.
How do I make them extra crispy?
For maximum crispiness: soak sliced potatoes in cold water for 15 minutes to remove starch, pat completely dry, use plenty of butter, bake uncovered a bit longer, and/or finish under the broiler for 1-2 minutes while watching carefully. An air fryer also creates exceptionally crispy results.
Are these suitable for meal prep?
Yes! These potato stacks are excellent for meal prep. Make a big batch, store in the refrigerator for up to 4 days, and reheat in the oven or air fryer. They add an elegant touch to weekday meal prep containers and reheat much better than most potato dishes.
Conclusion
These crispy potato stacks are proof that simple ingredients can create something truly spectacular! With just potatoes, butter, herbs, and seasonings, you can make a side dish that looks like it came from a fine dining restaurant. The combination of crispy, golden edges and tender, creamy layers makes every bite absolutely delicious, and the individual portions make serving effortless and elegant.
Whether you’re making these baked potato stacks for a holiday feast, special dinner, or just to make a weeknight meal feel more special, they’re guaranteed to impress. They’re surprisingly simple to make once you get the hang of slicing and stacking, and the wow factor is off the charts. Plus, they’re endlessly customizable—change up the herbs, add cheese, try different potato varieties, or create your own signature variation!
Now it’s your turn to make these gorgeous crispy potato stacks! Give this easy potato stack recipe a try and watch everyone’s eyes light up when you bring them to the table. Don’t forget to pin this recipe to your Pinterest boards so you can easily find it when you’re planning your next special dinner or holiday menu. Share your photos and tag me—I especially love seeing how beautifully these turn out in everyone’s kitchens! Happy cooking!