Crispy Air Fryer Coconut Shrimp (Ready in 15 Minutes!)
There’s something magical about biting into a perfectly crispy coconut shrimp – that satisfying crunch followed by tender, sweet shrimp wrapped in toasted coconut flakes. And guess what? You don’t need a deep fryer or gallons of oil to achieve restaurant-quality results at home. This air fryer coconut shrimp recipe delivers all the crispy, golden goodness you crave with a fraction of the oil and calories, making it perfect for weeknight dinners, party appetizers, or even a special date night at home.
If you’ve been scrolling through Pinterest looking for the perfect air fryer seafood recipe, you’ve just found it! These golden beauties cook up in just 8-10 minutes, creating that irresistible crispy coconut coating while keeping the shrimp juicy and tender inside. Whether you’re serving them as a crowd-pleasing appetizer with sweet chili sauce or making them the star of your dinner alongside tropical rice and a fresh salad, this easy coconut shrimp recipe is about to become your new obsession.
History / Background
Coconut shrimp has an interesting culinary journey that spans multiple continents and decades. While the exact origin is debated among food historians, the dish as we know it today gained massive popularity in American restaurants during the 1980s and 1990s, particularly in coastal regions and tropical-themed eateries. The combination likely draws inspiration from Southeast Asian and Caribbean cooking traditions, where coconut and seafood have been paired together for centuries.
In Thailand, Malaysia, and Indonesia, cooks have long been coating seafood in coconut before frying, creating dishes that celebrate the natural sweetness of both ingredients. When this technique made its way to American shores, particularly in Florida and Hawaii, it evolved into the panko-crusted, sweetened coconut version that became a restaurant staple. The dish perfectly embodied the “tropical vacation” vibe that American diners craved, becoming a signature item at chains like Red Lobster and countless beachside restaurants.
The traditional preparation method involved deep-frying the breaded shrimp in several inches of oil – delicious, yes, but not exactly something you’d want to make at home on a Tuesday night. Enter the air fryer revolution of the 2010s! This kitchen appliance transformed coconut shrimp from an occasional restaurant treat into an accessible weeknight dinner option. The air fryer’s circulating hot air creates that same crispy, golden exterior we love while using just a light spray of oil, making healthy coconut shrimp a reality rather than an oxymoron.
Today, air fryer coconut shrimp represents the perfect marriage of nostalgic comfort food and modern cooking convenience, bringing restaurant-quality results to your home kitchen without the mess, expense, or guilt of deep frying.
Why You’ll Love This Recipe
This air fryer coconut shrimp recipe checks every box for busy home cooks who refuse to compromise on flavor. It’s become one of the most popular recipes on Pinterest for good reason – it delivers impressive results with minimal effort.
Here’s why this recipe will become your new go-to:
- Lightning fast – From start to finish, you’ll have crispy shrimp on the table in just 15 minutes total
- Healthier indulgence – Uses 75% less oil than traditional deep-fried coconut shrimp while maintaining that addictive crunch
- Foolproof technique – The three-step breading station is simple enough for beginners yet produces professional results
- Crowd-pleaser guaranteed – Kids and adults alike can’t resist the sweet coconut coating paired with tender shrimp
- Versatile serving options – Works perfectly as an appetizer, main course, salad topper, or taco filling
- Budget-friendly – Frozen shrimp and pantry staples mean no expensive ingredients required
- Meal prep champion – Bread the shrimp ahead of time and air fry when ready to eat
- Clean-up is a breeze – No splattered oil on your stovetop or lingering fried food smell in your kitchen
- Naturally gluten-free option – Easy to adapt with gluten-free panko breadcrumbs
Whether you’re cooking for picky eaters, hosting a game day party, or just treating yourself to something special, this recipe delivers every single time.
Ingredient Notes
Let’s talk about what makes this crispy air fryer shrimp so incredibly delicious. Each ingredient plays a crucial role in creating that perfect texture and flavor.
Large Shrimp (16-20 count) – This size is ideal because they’re substantial enough to stay juicy during cooking but not so large that the coating burns before they’re cooked through. Fresh or frozen work equally well – just ensure frozen shrimp are completely thawed and patted dry. Substitute with jumbo shrimp if you prefer, but adjust cooking time by 1-2 minutes.
Sweetened Shredded Coconut – The sweetened variety creates that classic restaurant-style flavor profile we’re aiming for. The sugar in the coconut helps achieve deeper browning and adds a subtle caramelized note. If you only have unsweetened coconut on hand, you can add 1 teaspoon of sugar to the coating mixture.
Panko Breadcrumbs – These Japanese-style breadcrumbs are absolutely essential for achieving maximum crispiness. Their larger, flakier texture creates more surface area and crunch compared to regular breadcrumbs. Don’t substitute with regular breadcrumbs – the results won’t be the same. Look for gluten-free panko if needed.
All-Purpose Flour – Creates the initial dry layer that helps the egg mixture adhere properly. You can substitute with rice flour or gluten-free flour blend without any issues.
Eggs – Acts as the “glue” that binds the coconut-panko mixture to the shrimp. For an even richer coating, some cooks add a splash of coconut milk to the egg mixture.
Seasonings (Salt, Garlic Powder, Paprika) – These simple additions prevent the shrimp from tasting bland. The paprika adds a subtle color and mild sweetness that complements the coconut beautifully.
Cooking Spray – A light mist of oil is crucial for browning in the air fryer. Avocado oil or coconut oil spray works wonderfully and adds an extra layer of flavor.
Equipment Needed
You don’t need a fancy kitchen setup to make perfect air fryer coconut shrimp. Here’s everything you’ll need:
- Air fryer (any size works; 3.5 quart or larger is ideal for cooking in batches)
- Three shallow bowls or pie plates (for your breading station)
- Kitchen tongs or a fork (for coating the shrimp without getting your hands messy)
- Paper towels (for drying the shrimp)
- Cooking spray or oil mister (avocado oil, coconut oil, or olive oil)
- Large plate or baking sheet (for holding breaded shrimp before air frying)
- Meat thermometer (optional but helpful for beginners)
- Colander (if using frozen shrimp that need thawing)
- Small serving bowls (for dipping sauces)

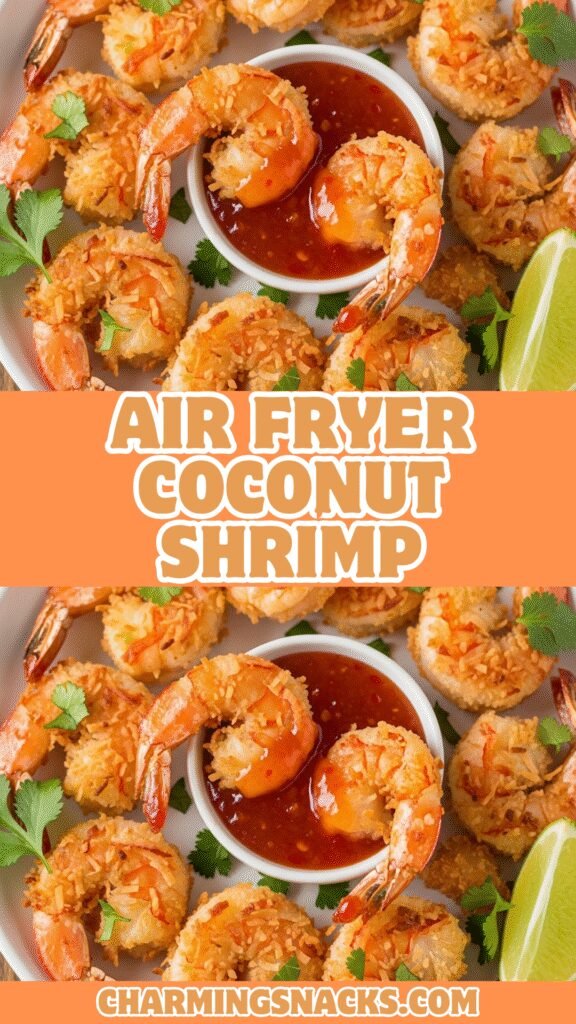
Air Fryer Coconut Shrimp
Golden, crispy air fryer coconut shrimp with a crunchy panko-coconut coating and tender, juicy interior. This healthier version of the restaurant classic uses minimal oil and cooks in under 10 minutes. Perfect as an appetizer or main dish served with sweet chili sauce!
- Total Time: 18 minutes
- Yield: 4 servings (approximately 20-24 shrimp) 1x
Ingredients
- 1 pound large shrimp (16-20 count), peeled and deveined, tails on or off
- ½ cup all-purpose flour (or gluten-free flour)
- 2 large eggs
- 1 cup sweetened shredded coconut
- 1 cup panko breadcrumbs (or gluten-free panko)
- 1 teaspoon garlic powder
- ½ teaspoon paprika
- ¾ teaspoon salt, divided
- ¼ teaspoon black pepper
- Cooking spray (avocado oil or coconut oil preferred)
For Serving:
- Sweet chili sauce
- Spicy mayo or sriracha mayo
- Fresh lime wedges
- Chopped cilantro (optional)
Instructions
Step 1: Prepare the Shrimp
Pat the shrimp completely dry using paper towels. This step is crucial – any excess moisture will prevent the coating from adhering properly. If using frozen shrimp, ensure they’re fully thawed, rinsed, and thoroughly dried. Season the shrimp lightly with ¼ teaspoon of salt.
Step 2: Set Up Your Breading Station
Arrange three shallow bowls in a row. In the first bowl, add the flour mixed with ¼ teaspoon salt and black pepper. In the second bowl, whisk the eggs until well combined. In the third bowl, combine the shredded coconut, panko breadcrumbs, garlic powder, paprika, and remaining ¼ teaspoon salt. Mix the coconut mixture thoroughly to distribute seasonings evenly.
Step 3: Bread the Shrimp
Working with one shrimp at a time, dredge it in the flour mixture, shaking off any excess. Next, dip it into the beaten egg, allowing excess to drip off. Finally, press the shrimp into the coconut-panko mixture, coating both sides generously and pressing gently so the coating adheres. Place breaded shrimp on a plate and repeat with remaining shrimp.
Step 4: Preheat the Air Fryer
Preheat your air fryer to 400°F (200°C) for 3-5 minutes. This ensures even cooking from the moment the shrimp go in.
Step 5: Arrange in Air Fryer
Lightly spray the air fryer basket with cooking spray. Arrange the breaded shrimp in a single layer, making sure they don’t touch or overlap (this ensures maximum crispiness). Depending on your air fryer size, you may need to cook in 2 batches. Lightly spray the tops of the shrimp with cooking spray.
Step 6: Air Fry
Cook at 400°F for 8-10 minutes, flipping halfway through the cooking time (at the 4-5 minute mark). The shrimp are done when they’re golden brown, the coating is crispy, and the internal temperature reaches 145°F. The shrimp should be opaque and pink.
Step 7: Serve Immediately
Transfer the cooked shrimp to a serving platter. Serve hot with your favorite dipping sauces, lime wedges, and fresh herbs if desired.
Notes
- Don’t skip the spray: Misting the shrimp with oil before air frying is essential for achieving golden, crispy results. Without it, the coating may remain pale and less crunchy.
- Work in batches: Overcrowding prevents proper air circulation and results in soggy, unevenly cooked shrimp. Single layer is non-negotiable!
- Flip carefully: Use tongs to gently flip the shrimp at the halfway point to ensure even browning on both sides.
- Size matters: If using smaller shrimp (21-25 count), reduce cooking time by 1-2 minutes. Larger shrimp (13-15 count) may need an extra minute.
- Make ahead tip: Bread the shrimp up to 4 hours ahead, arrange on a baking sheet, cover with plastic wrap, and refrigerate until ready to cook.
- Prep Time: 10 minutes
- Cook Time: 8 minutes
- Category: Appetizer
- Method: Air Fryer
- Cuisine: American
- Diet: Vegetarian
Nutrition
- Serving Size: 5-6 shrimp (about ¼ of recipe)
- Calories: 285
- Sugar: 6g
- Sodium: 625mg
- Fat: 11g
- Saturated Fat: 7g
- Unsaturated Fat: 3g
- Trans Fat: 0g
- Carbohydrates: 26g
- Fiber: 2g
- Protein: 21g
- Cholesterol: 195mg
Tips & Variations
This recipe is incredibly versatile! Here are some delicious ways to customize your air fryer coconut shrimp:
Spicy Coconut Shrimp: Add ½ teaspoon cayenne pepper or red pepper flakes to the coconut-panko mixture. Serve with a spicy-sweet mango habanero sauce for an extra kick.
Extra Crispy Version: Double-dip the shrimp by going through the egg and coconut coating process twice. This creates an even thicker, crunchier crust that’s absolutely addictive.
Thai-Inspired: Add 1 teaspoon of curry powder to the coconut mixture and serve with a peanut sauce or Thai sweet chili sauce for an Asian fusion twist.
Healthier Alternative: Use unsweetened coconut flakes and reduce added salt. You can also use egg whites only instead of whole eggs to reduce cholesterol.
Tropical Twist: Add ½ teaspoon of lime zest to the coconut coating for a bright, citrusy flavor that pairs beautifully with the sweetness.
Gluten-Free Adaptation: Simply swap regular panko for certified gluten-free panko breadcrumbs and use gluten-free flour or cornstarch in the first dredging step.
Taco Tuesday: Break up the shrimp and use them as a filling for fish tacos with mango salsa, shredded cabbage, and cilantro-lime crema.
Kid-Friendly Mild Version: Omit the paprika and garlic powder, keeping the seasoning simple with just salt. Kids love the sweet coconut coating without any spice.
Pro Chef Tips
Want to take your coconut shrimp from good to absolutely restaurant-worthy? Here are professional techniques that make all the difference:
Butterfly your shrimp for extra surface area. Make a deeper cut along the back when deveining, which allows the shrimp to open up slightly during cooking. This creates more area for the delicious coating and makes each shrimp look larger and more impressive.
Toast your coconut first for deeper flavor. Before mixing with the panko, spread the coconut on a baking sheet and toast in a 325°F oven for 3-4 minutes until lightly golden. This intensifies the coconut flavor and adds an extra dimension of nuttiness.
Use the “dry hand, wet hand” method when breading to keep your fingers from getting coated. Use your left hand for dry ingredients (flour and coconut mixture) and your right hand for the wet egg mixture. This prevents clumping and makes the process much cleaner.
Let breaded shrimp rest for 5 minutes before air frying. This allows the coating to set and adhere better, reducing the chance of it falling off during cooking. The flour absorbs moisture from the shrimp, creating a better bond.
Don’t overcook – shrimp continue cooking after removed from heat. Pull them from the air fryer when they’re just barely done. The residual heat will finish the cooking process, preventing rubbery, overcooked shrimp.
Create steam holes by not overlapping shrimp. Proper spacing isn’t just about browning – it allows moisture to escape, which is crucial for crispiness. Think of each shrimp as needing its own personal space bubble.
Refresh leftover shrimp in the air fryer, never the microwave. 2-3 minutes at 350°F will restore the crispiness, while microwaving will make them soggy and rubbery.
Common Mistakes to Avoid
Even experienced cooks sometimes stumble with air fryer recipes. Here are the pitfalls to watch out for:
Using wet shrimp: This is the #1 reason for coating failure. Any moisture on the shrimp’s surface will create a barrier that prevents the flour from sticking, which means your beautiful coconut coating slides right off. Always pat completely dry – take an extra minute here, it’s worth it.
Skipping the oil spray: The air fryer needs a little fat to promote browning and crisping. Without it, you’ll end up with pale, somewhat crispy shrimp instead of golden, ultra-crispy perfection. A light mist is all it takes.
Overcrowding the basket: This is a recipe for disappointment. When shrimp touch, they steam rather than crisp. The hot air needs to circulate around each piece. Yes, cooking in batches takes a few extra minutes, but soggy shrimp are never worth the time saved.
Not preheating the air fryer: Starting with a cold basket means uneven cooking and extended cooking times, which can lead to overcooked shrimp with underbrowned coating. Those 3 minutes of preheating make a real difference.
Using regular breadcrumbs instead of panko: Regular breadcrumbs create a denser, less crispy coating. Panko’s irregular shape and larger size are specifically designed to create maximum crunch. It’s not worth substituting.
Flipping too vigorously: The coating is delicate before it fully sets. Handle the shrimp gently when flipping at the halfway point, using tongs rather than a spatula to avoid knocking off the breading.
Cooking past the pink point: Shrimp go from perfectly tender to rubbery in a matter of 30-60 seconds. Once they’re pink and opaque all the way through, they’re done. Continuing to cook “just to be safe” will ruin their texture.
Storage & Meal Prep
Good news – coconut shrimp store reasonably well if you know the proper techniques!
Refrigerator Storage: Store leftover cooked coconut shrimp in an airtight container in the refrigerator for up to 2 days. Place parchment paper between layers to prevent them from sticking together. Keep in mind that the coating will soften somewhat in the fridge, but you can revive the crispiness during reheating.
Reheating Instructions: Never use the microwave – it will make them soggy and unappetizing. Instead, reheat in the air fryer at 350°F for 3-4 minutes until warmed through and crispy again. You can also use a conventional oven at 400°F for about 5 minutes, placing them on a wire rack over a baking sheet for best results.
Make-Ahead Breading: The absolute best meal prep strategy is to bread the shrimp up to 4 hours ahead of time. Arrange them on a parchment-lined baking sheet without touching, cover tightly with plastic wrap, and refrigerate. When ready to eat, proceed directly to air frying – no need to bring to room temperature first. This method maintains the best texture.
Storing Uncooked Breaded Shrimp: If you want to bread them further in advance, they’ll keep for up to 24 hours in the refrigerator, though the coating may become slightly softer. The texture is best when fried within 4-6 hours of breading.
Make-Ahead & Freezer Notes
Planning for a party or want to prep ahead? Here’s how to do it successfully:
Freezing Breaded Uncooked Shrimp: This is the ideal make-ahead method! After breading, arrange shrimp in a single layer on a parchment-lined baking sheet and freeze until solid (about 2 hours). Once frozen, transfer to a freezer-safe bag or container, separating layers with parchment paper. They’ll keep for up to 1 month.
Cooking from Frozen: You can air fry directly from frozen without thawing! Add 2-3 minutes to the cooking time (total of 11-13 minutes at 400°F) and flip halfway through. They may not get quite as golden as fresh, but they’re still delicious and incredibly convenient for last-minute meals.
Freezing Cooked Shrimp: While you can freeze cooked coconut shrimp for up to 1 month, the texture won’t be quite as crispy when reheated. If you do freeze them, reheat from frozen in the air fryer at 375°F for 6-8 minutes, which will restore much of the crispiness.
Best Reheating Method for Frozen Cooked Shrimp: Place frozen cooked shrimp in the air fryer at 350°F for 5-7 minutes, flipping halfway through. This works better than thawing first, as it helps maintain the coating’s integrity.
Party Planning Tip: For entertaining, bread all your shrimp the morning of your event, freeze them on a baking sheet, then transfer to the freezer. Cook them in batches as your guests arrive – they’ll be hot, fresh, and crispy!
Serving Suggestions
Coconut shrimp are incredibly versatile! Here are delicious ways to serve them:
Classic Appetizer Style: Arrange on a platter with small bowls of sweet chili sauce, spicy mayo (mix mayo with sriracha), and a tangy pineapple dipping sauce. Garnish with lime wedges and fresh cilantro for a beautiful presentation.
As a Main Course: Serve over coconut jasmine rice with roasted asparagus or steamed broccoli on the side. Add a fresh tropical fruit salsa made with mango, pineapple, red onion, and cilantro for a complete island-inspired meal.
Tropical Salad Topper: Place warm coconut shrimp over mixed greens, mandarin oranges, sliced avocado, and toasted almonds. Drizzle with a citrus vinaigrette for a satisfying lunch.
Taco Night: Stuff into flour or corn tortillas with shredded purple cabbage, mango salsa, pickled red onions, and cilantro-lime crema. Game changer!
Rice Bowl Creation: Build a bowl with coconut rice, edamame, cucumber, shredded carrots, and your crispy shrimp. Drizzle with teriyaki sauce or peanut sauce.
Perfect Side Dishes:
- Coconut rice or pineapple fried rice
- Sweet potato fries (also made in the air fryer!)
- Asian cucumber salad
- Mango coleslaw
- Garlic butter green beans
- Watermelon and feta salad
Beverage Pairings: These pair beautifully with crisp white wines like Sauvignon Blanc or Pinot Grigio, tropical cocktails like piña coladas or mai tais, or even a cold lager beer.
FAQs Section
Can I use pre-cooked shrimp for this recipe?
It’s not recommended. Pre-cooked shrimp will become rubbery and overcooked during the air frying process. Raw shrimp are essential for achieving the proper texture – they cook perfectly in the same time it takes to crisp the coating.
Do I need to devein the shrimp myself?
Most shrimp sold in stores come already deveined, especially if purchased peeled. Check the back – you’ll see a dark vein if it’s still there. While it’s safe to eat, it can be gritty and unappetizing, so it’s worth removing. You can buy already cleaned, deveined shrimp to save time.
Can I make this recipe without an air fryer?
Yes! Bake in a preheated 425°F oven on a wire rack set over a baking sheet for 12-15 minutes, flipping halfway through. You can also shallow fry in about ½ inch of oil in a skillet, though this defeats the healthier purpose of the air fryer method.
Why is my coconut coating falling off?
This usually happens when shrimp aren’t dried properly, the breading station is done in the wrong order, or you’re not pressing the coating firmly enough. Make sure to pat shrimp completely dry, follow the flour-egg-coconut sequence, and press the coating to adhere before air frying.
What’s the best dipping sauce for coconut shrimp?
Sweet chili sauce is the classic choice and can be found in the Asian section of most grocery stores. Other popular options include orange marmalade mixed with horseradish, honey mustard, spicy mayo, or a simple mix of apricot preserves and Dijon mustard.
Can I use fresh coconut instead of shredded?
Fresh coconut won’t work well in this application because it contains too much moisture and won’t crisp properly. Stick with dried, shredded coconut (sweetened or unsweetened) for best results.
How do I know when the shrimp are done?
Shrimp are fully cooked when they’re firm, opaque, and pink throughout. The internal temperature should reach 145°F. They’ll curl into a loose “C” shape when done – if they curl into a tight “O” shape, they’re overcooked.
Conclusion
There you have it – the ultimate guide to making crispy air fryer coconut shrimp that rivals any restaurant version! This recipe proves that you don’t need a deep fryer or professional kitchen to create impressive, delicious meals. With just a handful of simple ingredients and your trusty air fryer, you can enjoy this tropical treat any night of the week without the guilt, mess, or hassle of traditional frying.
The beauty of this recipe lies in its simplicity and versatility. Whether you’re serving these golden beauties as a fun appetizer for game day, making them the star of Taco Tuesday, or impressing dinner guests with a restaurant-worthy main course, they never disappoint. That perfect combination of crunchy, sweet coconut coating and tender, juicy shrimp is simply irresistible.
I’d love to hear how your air fryer coconut shrimp turn out! Did you try any of the variations? What’s your favorite dipping sauce combination? Drop a comment below and let me know. And if you loved this recipe as much as my family does, please share it on Pinterest so other home cooks can discover how easy it is to make this restaurant favorite at home. Don’t forget to snap a photo of your beautiful golden shrimp and tag me – I love seeing your creations!
Happy air frying, friends!