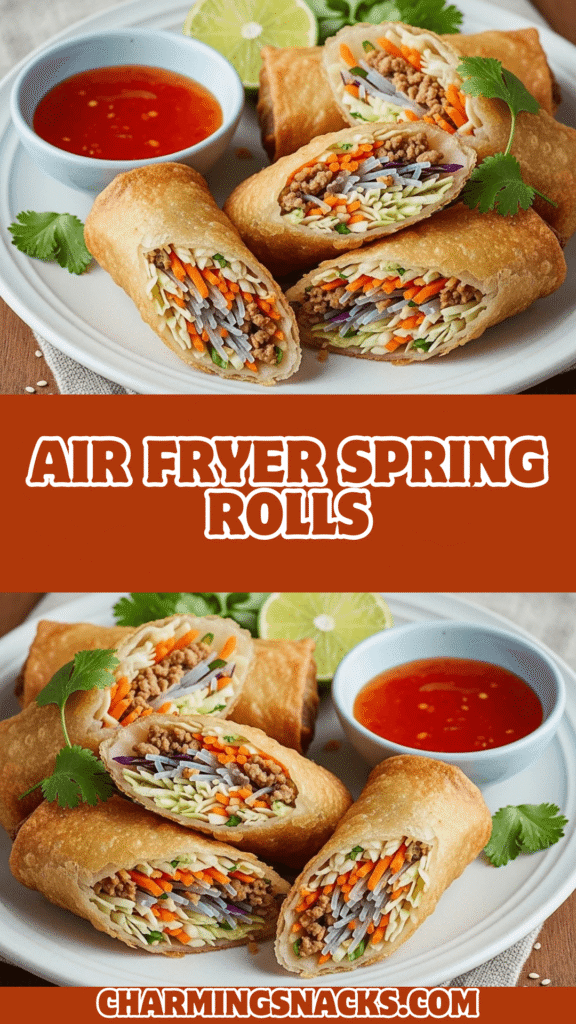
Crispy Air Fryer Spring Rolls (Easy Homemade Recipe!)
There’s something truly magical about biting into a perfectly crispy spring roll – that satisfying crunch giving way to a savory, vegetable-packed filling that’s bursting with flavor. If you’ve been ordering spring rolls from your favorite Asian restaurant, it’s time to bring that experience home with these incredible air fryer spring rolls!
This easy homemade spring rolls recipe transforms fresh vegetables, aromatic seasonings, and delicate spring roll wrappers into restaurant-quality appetizers right in your kitchen. Unlike traditional deep-fried versions that require cups of oil and leave your kitchen smelling like a fast-food joint, these healthy air fryer spring rolls achieve that coveted golden-brown crispiness with just a light spray of oil. They’re perfect for game day parties, holiday gatherings, weeknight dinners, or whenever you’re craving something deliciously crunchy and satisfying.
Whether you’re hosting a party and need an impressive appetizer, looking for a fun family cooking project, or simply want a lighter alternative to takeout, these air fryer spring rolls deliver on all fronts. They’re customizable, freezer-friendly, and honestly taste even better than what you’d get from most restaurants. Plus, watching your family and friends devour these crispy golden bundles is incredibly rewarding!
History / Background
Spring rolls have a rich and fascinating history that spans centuries across various Asian cultures. Originally from China, spring rolls (春卷, chūnjuǎn) were traditionally eaten during the Spring Festival (Chinese New Year) to celebrate the arrival of spring and the fresh vegetables it brought. The thin, delicate wrapper symbolized gold bars, making them a symbol of prosperity and good fortune for the coming year.
The concept of spring rolls spread throughout Asia, with each region developing its own unique interpretation. In Vietnam, fresh spring rolls (gỏi cuốn) are served unfried with rice paper wrappers and packed with herbs, while fried spring rolls (chả giò) are smaller and crispier. In Thailand, they’re called popia, and in the Philippines, they’re known as lumpia – each with distinct fillings and wrapper styles that reflect local ingredients and culinary traditions.
The modern spring roll we know and love in Western countries is primarily based on Chinese and Vietnamese influences, typically featuring a savory vegetable filling wrapped in wheat-based spring roll wrappers. When Chinese immigrants brought their culinary traditions to America in the mid-20th century, spring rolls became a staple on Chinese-American restaurant menus, quickly winning hearts with their crispy exterior and flavorful filling.
The air fryer revolution of the 2010s brought new life to this classic dish. Home cooks discovered they could achieve that same restaurant-quality crispiness without the mess, smell, and calories associated with deep frying. This game-changing cooking method has made homemade spring rolls more accessible than ever, allowing anyone to recreate this beloved appetizer in their own kitchen with minimal fuss and maximum deliciousness.
Why You’ll Love This Recipe
These air fryer spring rolls are about to become your new favorite appetizer, and here’s why: they deliver all the crispy, crunchy satisfaction of deep-fried restaurant spring rolls but with a fraction of the oil and none of the greasy aftermath. This recipe is a total game-changer for anyone who loves Asian-inspired food but wants a healthier, more convenient way to enjoy it at home.
Here’s what makes this recipe absolutely irresistible:
- Incredibly crispy texture – The air fryer creates an even, golden-brown crispiness that rivals traditional deep-frying, with that perfect crackle when you bite in
- So much healthier – Uses 90% less oil than deep-frying while still achieving amazing results, making these guilt-free enough to enjoy regularly
- Budget-friendly – Costs a fraction of takeout spring rolls and feeds a crowd for just a few dollars worth of vegetables and wrappers
- Customizable filling – Easily adapt to whatever vegetables you have on hand, add protein, or make them vegetarian, vegan, or even keto-friendly
- Perfect for meal prep – Make a big batch and freeze them for quick appetizers, snacks, or light meals anytime you need them
- Family-friendly activity – Kids love helping wrap spring rolls, making this a fun cooking project that gets everyone involved in the kitchen
- No lingering oil smell – Your house won’t smell like a deep fryer for days afterward, and cleanup is infinitely easier
- Foolproof results – The air fryer’s consistent heat means perfectly cooked spring rolls every single time, with no risk of burning or undercooking
- Restaurant-quality at home – Impress your guests with appetizers that look and taste like they came from your favorite Asian restaurant
- Ready in under 30 minutes – From prep to plate faster than ordering delivery, making weeknight cooking actually achievable
Whether you’re new to air frying or a seasoned pro, these spring rolls will quickly earn a permanent spot in your recipe rotation!
Ingredient Notes
Let’s break down what makes these air fryer spring rolls so delicious. Understanding your ingredients helps you make smart substitutions and adjustments based on what you have available.
Spring Roll Wrappers: These thin, square wheat-based wrappers are found in the freezer or refrigerated section of most grocery stores (look near the tofu or in the Asian foods aisle). They’re different from rice paper wrappers, which are used for fresh rolls. Make sure they’re fully thawed before using, or they’ll crack when you try to fold them. If you can’t find spring roll wrappers, egg roll wrappers work but are thicker and will give you a heartier, less delicate result.
Cabbage: The foundation of your filling, green cabbage provides bulk, crunch, and that classic spring roll texture. Shredded coleslaw mix is a great time-saving shortcut! You can substitute napa cabbage for a more authentic, slightly sweeter flavor, or use a mix of green and purple cabbage for visual appeal.
Carrots: Adds natural sweetness, color, and nutrients. Pre-shredded carrots save time, or you can julienne fresh carrots for the best texture. Don’t skip these – they’re essential for that classic spring roll flavor profile.
Garlic and Ginger: This aromatic duo brings authentic Asian flavor to your filling. Fresh is always best, but in a pinch, you can use ¼ teaspoon garlic powder and ¼ teaspoon ground ginger per clove and inch respectively. The fresh versions contribute so much more complexity and aroma, though!
Soy Sauce: Provides that essential umami depth and saltiness. Use regular soy sauce, low-sodium (adjust salt accordingly), or tamari for a gluten-free version. Coconut aminos work for a soy-free alternative, though the flavor will be slightly sweeter.
Sesame Oil: Just a small amount brings incredible nutty, toasted flavor that makes your filling taste distinctly Asian. This isn’t optional – it’s what makes these taste like restaurant spring rolls! Regular sesame oil works, but toasted sesame oil has a deeper, more complex flavor.
Green Onions: Adds fresh, mild onion flavor and beautiful green flecks throughout your filling. Scallions are the same thing! Regular onions are too strong and will overpower the other flavors, so stick with green onions if possible.
Bean Sprouts (Optional): Traditional in many spring roll recipes, they add a wonderful crisp texture. They’re not essential, so feel free to skip or substitute with finely chopped celery for crunch.
Mushrooms (Optional): Shiitake mushrooms are traditional and add an earthy, meaty quality, making these more substantial. Regular button mushrooms, cremini, or even wood ear mushrooms work beautifully.
Cooking Spray or Oil: You need just a light coating to help the wrappers crisp up. Avocado oil spray works best because of its high smoke point, but olive oil, canola, or vegetable oil all work fine.
Cornstarch Slurry: This simple mixture of cornstarch and water acts as an edible glue to seal your spring rolls shut. It works much better than just water and ensures your rolls stay tightly closed during cooking.
Equipment Needed
You don’t need a fancy kitchen to make spectacular air fryer spring rolls! Here’s everything you’ll need:
Air Fryer: The star of the show! Any size works, though a larger capacity (5+ quarts) lets you cook more spring rolls at once. Basket-style and oven-style air fryers both work perfectly for this recipe.
Large Mixing Bowl: For combining all your filling ingredients. A bowl that’s roomy enough to toss everything together easily makes the process much smoother.
Chef’s Knife and Cutting Board: Essential for prepping your vegetables. A sharp knife makes quick work of shredding cabbage and julienning carrots.
Large Skillet or Wok: For pre-cooking your filling. A wok is traditional and works beautifully, but any large skillet with high sides will do the job.
Box Grater or Food Processor: Makes shredding cabbage and carrots much faster. A food processor with a shredding blade is the ultimate time-saver if you’re making a large batch.
Small Bowl: For mixing your cornstarch slurry seal. You’ll be dipping your finger in this repeatedly, so keep it handy.
Clean Kitchen Towel or Paper Towels: For keeping your wrappers covered while you work – this prevents them from drying out and cracking.
Pastry Brush or Oil Sprayer: For applying oil to your spring rolls before air frying. An oil sprayer (like a Misto) gives the most even, light coating.
Measuring Cups and Spoons: For accurate ingredient measurements, ensuring consistent results every time you make these.
Spatula or Tongs: For flipping your spring rolls halfway through cooking. Tongs give you the best control without piercing the wrappers.
Cooling Rack (Optional): Lets air circulate around your finished spring rolls so they stay crispy while you cook subsequent batches.
Print
Crispy Air Fryer Spring Rolls
Crispy, golden-brown air fryer spring rolls packed with fresh vegetables and aromatic seasonings. These healthier homemade spring rolls deliver all the crunch and flavor of restaurant versions with 90% less oil. Perfect as an appetizer, snack, or light meal served with your favorite dipping sauce!
- Total Time: 37 minutes
- Yield: 16-18 spring rolls (6-8 servings) 1x
Ingredients
For the Filling:
- 4 cups green cabbage, finely shredded
- 1 cup carrots, julienned or shredded
- 3 cloves garlic, minced
- 1 tablespoon fresh ginger, minced
- 3 green onions, thinly sliced
- 1 cup bean sprouts (optional)
- 1 cup shiitake mushrooms, finely chopped (optional)
- 2 tablespoons soy sauce
- 1 tablespoon sesame oil
- 1 teaspoon sugar
- ½ teaspoon black pepper
- 2 tablespoons vegetable oil (for cooking filling)
For Assembly:
- 16-18 spring roll wrappers (thawed if frozen)
- 2 tablespoons cornstarch mixed with 3 tablespoons water (for sealing)
- Cooking spray or oil for brushing
For Serving:
- Sweet chili sauce
- Soy sauce
- Duck sauce
- Sriracha mayo
Instructions
- Prepare the filling: Heat 2 tablespoons vegetable oil in a large skillet or wok over medium-high heat. Add minced garlic and ginger, stirring constantly for 30 seconds until fragrant but not browned. Add the shredded cabbage, carrots, and mushrooms (if using). Stir-fry for 4-5 minutes until vegetables are softened but still have a slight crunch.
- Season and cool: Add soy sauce, sesame oil, sugar, black pepper, green onions, and bean sprouts to the pan. Stir-fry for another 2 minutes until everything is well combined and coated. Transfer the mixture to a large bowl and let it cool completely for 15-20 minutes. This cooling step is crucial – warm filling will make your wrappers soggy and difficult to work with.
- Set up your wrapping station: Place a spring roll wrapper on a clean, dry surface in a diamond orientation (corner pointing toward you). Keep remaining wrappers covered with a damp towel to prevent drying. Have your cornstarch slurry and a small brush or your finger ready for sealing.
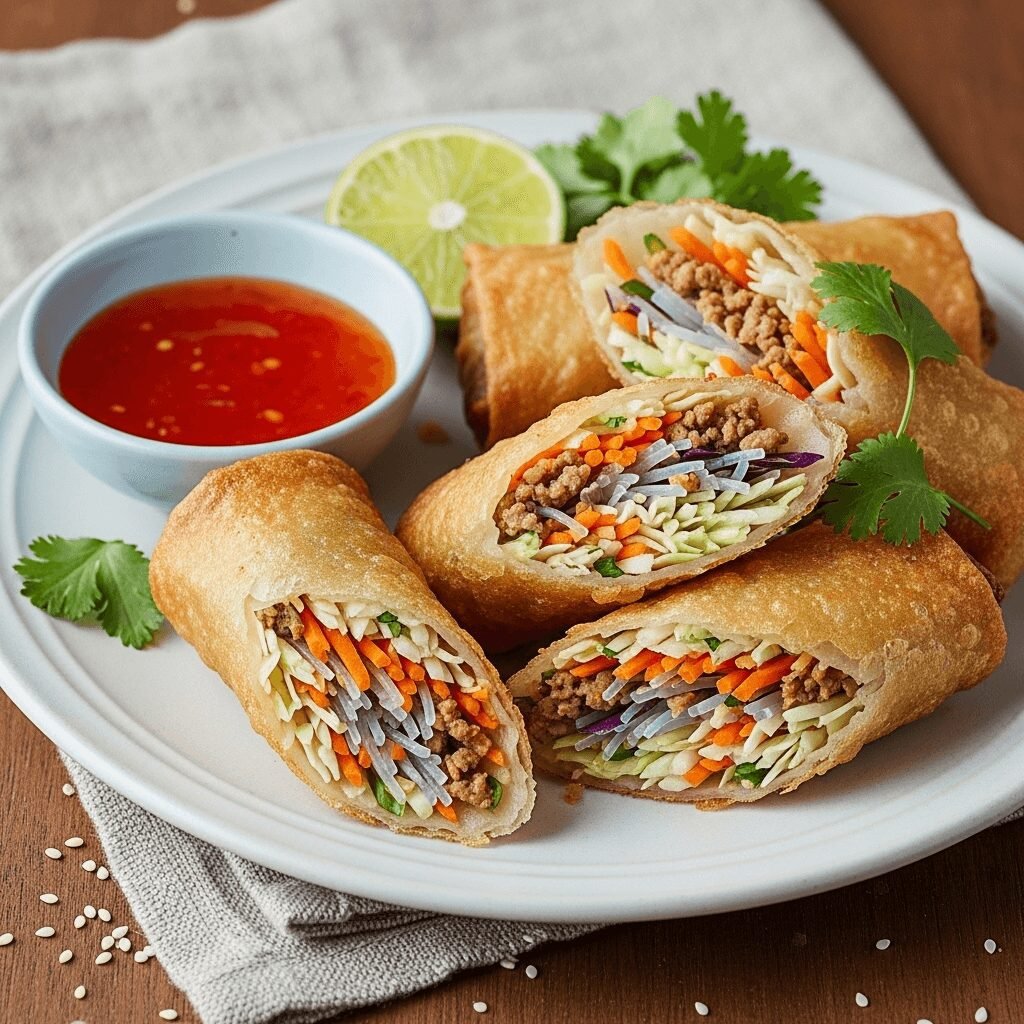
- Fill the wrapper: Place 2-3 tablespoons of cooled filling in the center-bottom third of the wrapper, forming a horizontal log shape about 4 inches long. Don’t overfill – less is more when it comes to achieving tight, crispy rolls!
- Roll it up: Fold the bottom corner up and over the filling, tucking it tightly underneath. Fold in the left and right corners toward the center, creating an envelope shape. Continue rolling away from you tightly until you reach the top corner. Brush the top corner with cornstarch slurry and press to seal completely.
- Repeat: Continue wrapping until all filling is used, placing completed spring rolls seam-side down on a plate. Keep them covered until ready to cook to prevent wrappers from drying out.
- Preheat the air fryer: Set your air fryer to 375°F (190°C) and let it preheat for 3 minutes. Preheating ensures even cooking and maximum crispiness.
- Prepare for cooking: Lightly spray or brush each spring roll with oil on all sides. Don’t skip this step – it’s essential for achieving that golden, crispy exterior!
- Air fry: Place spring rolls in a single layer in the air fryer basket, leaving space between each one (don’t overcrowd). Cook at 375°F for 10-12 minutes, flipping halfway through, until deep golden brown and crispy all over.
- Serve immediately: Transfer cooked spring rolls to a serving platter. Serve hot with your choice of dipping sauces and watch them disappear! If making multiple batches, keep finished rolls warm in a 200°F oven while cooking the rest.
Notes
- Make sure filling is completely cool before wrapping to prevent soggy wrappers and tearing.
- Don’t overfill – 2-3 tablespoons of filling is plenty. Overstuffed rolls will burst during cooking.
- Work with one wrapper at a time and keep the rest covered to prevent drying and cracking.
- Cook in batches – overcrowding prevents proper air circulation and results in less crispy spring rolls.
- Flip halfway through for even browning on all sides.
- For crispiest results, serve immediately after cooking. They soften slightly as they cool but are still delicious!
- Freezing instructions: Freeze uncooked spring rolls in a single layer on a baking sheet, then transfer to a freezer bag once frozen solid. Cook from frozen, adding 2-3 extra minutes to the cooking time.
- Prep Time: 25 minutes
- Cook Time: 12 minutes
- Category: Appetizer
- Method: Air Frying
- Cuisine: Asian-Inspired
- Diet: Vegan
Nutrition
- Serving Size: 2 spring rolls
- Calories: 142
- Sugar: 2g
- Sodium: 285mg
- Fat: 4.5g
- Saturated Fat: 0g
- Unsaturated Fat: 3g
- Trans Fat: 0g
- Carbohydrates: 21g
- Fiber: 2g
- Protein: 4g
- Cholesterol: 0mg
Tips & Variations
One of the best things about homemade spring rolls is how incredibly versatile they are! Here are some fantastic ways to customize this recipe to suit your preferences, dietary needs, or whatever ingredients you have on hand.
Protein Additions: Add cooked, cooled protein to make these more substantial. Shredded rotisserie chicken, cooked shrimp, ground pork, or crumbled tofu all work beautifully. Cook and season your protein separately, then add about ½ cup per batch of filling. Just remember to let everything cool completely before wrapping!
Vegetable Swaps: The vegetable combinations are endless! Try adding julienned bell peppers for sweetness and color, thinly sliced bok choy for authentic flavor, shredded Brussels sprouts for a unique twist, water chestnuts for extra crunch, or bamboo shoots for traditional texture. Just maintain the same total volume of vegetables for consistent results.
Make Them Spicy: Love heat? Add 1-2 teaspoons of sriracha or sambal oelek to your filling, include finely minced Thai chilies or jalapeños, toss in red pepper flakes to taste, or serve with spicy mayo or chili crisp for dipping. The mild filling is the perfect canvas for heat!
Different Wrappers: Can’t find spring roll wrappers? Use egg roll wrappers (they’re thicker and heartier), lumpia wrappers for thinner, crispier results, or even wonton wrappers for tiny bite-sized versions. Each gives a slightly different texture but all work deliciously!
Noodle Spring Rolls: Add some cooked, cooled glass noodles or rice vermicelli to your filling for a more substantial, authentic texture. Use about 2 ounces of dried noodles, cooked according to package directions, cooled, and roughly chopped.
Low-Carb Version: For a keto-friendly option, ditch the wrappers entirely and form the filling into patties. Air fry them directly for delicious veggie fritters, or wrap the filling in large lettuce leaves for fresh, crispy “spring rolls” without the carbs.
Breakfast Spring Rolls: Get creative! Fill wrappers with scrambled eggs, cheese, cooked breakfast sausage, and peppers for a fun breakfast twist. Cook the same way and serve with salsa or hot sauce.
Pro Chef Tips
Want to take your spring rolls from good to absolutely incredible? These professional techniques will elevate your results to restaurant quality!
Dry Your Filling Thoroughly: After cooking your vegetables, spread them on a baking sheet lined with paper towels and press another layer of paper towels on top to absorb excess moisture. Wet filling is the number one cause of soggy, burst spring rolls. Some chefs even salt their cabbage beforehand, let it sit for 10 minutes, then squeeze out the excess water before cooking.
Master the Tight Roll: The key to crispy spring rolls is rolling them as tightly as possible without tearing the wrapper. Think of it like rolling a sleeping bag – constant firm pressure as you roll creates a compact cylinder with no air pockets. Air pockets mean uneven cooking and potential bursting. Practice makes perfect here!
Double-Seal Method: For extra insurance against bursting, brush the entire top triangle of your wrapper with cornstarch slurry before making your final roll, then press firmly for 10 seconds. This creates a stronger seal that can withstand the pressure of air frying. Some professional cooks even use a tiny dab of flour paste for an even stronger hold.
Score for Extra Crispiness: Using a sharp knife, make 2-3 shallow diagonal cuts across the top of each spring roll before air frying. This creates more surface area and additional crispy edges while also helping steam escape during cooking. Just don’t cut too deep or you’ll expose the filling!
The Rest Period: After wrapping, let your spring rolls rest seam-side down for 5-10 minutes before cooking. This allows the wrapper to slightly absorb moisture from the filling at the seam, creating a stronger bond that’s less likely to come apart during cooking.
Temperature Matters: Start at a slightly lower temperature (350°F) for the first 6 minutes, then increase to 400°F for the final 4-6 minutes. This gentle start allows the interior to heat through without burning the exterior, while the high finish creates that incredible golden crispiness.
Spray Mid-Cook: For maximum crispiness, give your spring rolls another light spray of oil when you flip them halfway through cooking. This ensures both sides get that gorgeous, even golden-brown color and creates an extra-crispy texture.
The Resting Trick: Let cooked spring rolls rest on a wire rack for 2-3 minutes before serving. This allows steam to escape from the bottom, preventing sogginess, and the wrappers actually crisp up even more during this brief rest period!
Common Mistakes to Avoid
Even experienced cooks can run into issues with spring rolls. Here are the most common problems and how to prevent them:
Soggy or Torn Wrappers: This happens when your filling is too warm or wet when wrapping. Always let your filling cool completely to room temperature, and if it seems watery, drain it or press out excess moisture with paper towels. Wet filling = soggy disaster!
Spring Rolls Bursting Open: Usually caused by overfilling, not sealing properly, or cooking at too high a temperature initially. Use just 2-3 tablespoons of filling per roll, seal thoroughly with cornstarch slurry, and make sure there are no air pockets when rolling. Start at a moderate temperature so the interior doesn’t expand too quickly.
Uneven Browning: This happens when spring rolls are overcrowded in the air fryer basket, blocking airflow. Always leave at least ½ inch of space between rolls, cook in batches if necessary, and flip them halfway through cooking. If one side is consistently darker, your air fryer may have a hot spot – rotate positions next time.
Wrappers Drying and Cracking: Spring roll wrappers dry out incredibly fast when exposed to air. Keep your wrapper package covered with a damp towel while working, only remove one wrapper at a time, and work relatively quickly. If wrappers do start cracking, lightly mist them with water from a spray bottle.
Bland Filling: If your spring rolls taste flat, you probably under-seasoned or didn’t let the aromatics cook enough to release their flavors. Always taste your filling before wrapping and adjust seasoning – it should taste slightly over-seasoned since the wrapper is unseasoned and dilutes the flavor. Don’t skip the sesame oil, as it provides crucial authentic flavor!
Greasy Exterior: Using too much oil before air frying creates a greasy rather than crispy texture. A light mist or thin brush coating is all you need – the air fryer doesn’t require much oil to crisp things up. Better to go light and add a bit more halfway through than to start with too much.
Sticking to Air Fryer Basket: Sometimes spring rolls stick and tear when you try to flip them. Prevent this by making sure your air fryer basket is clean, using enough (but not too much) oil spray, and preheating the air fryer before adding your rolls. A quick shake of the basket after 3-4 minutes helps too!
Storage & Meal Prep
These air fryer spring rolls are fantastic for meal prep and planning ahead! Here’s everything you need to know about storing and reheating them.
Refrigerating Cooked Spring Rolls: Store completely cooled, cooked spring rolls in an airtight container in the refrigerator for up to 3 days. Place parchment paper between layers to prevent sticking. They’ll lose some crispiness during storage, but you can revive them!
Reheating Cooked Spring Rolls: The air fryer is your best friend for reheating. Place refrigerated spring rolls in the air fryer at 350°F for 4-6 minutes, flipping halfway through, until heated through and crispy again. You can also use a regular oven at 375°F for 8-10 minutes, placing rolls on a wire rack over a baking sheet for air circulation. Avoid the microwave – it makes them soggy and chewy!
Storing Uncooked Spring Rolls: This is where meal prep really shines! You can wrap spring rolls up to 24 hours in advance. Place them seam-side down on a parchment-lined baking sheet, cover tightly with plastic wrap (making sure it touches the rolls to prevent air exposure), and refrigerate. Cook directly from the fridge, adding 1-2 extra minutes to the cooking time.
Storing the Filling: Cooked, cooled filling can be stored in an airtight container in the refrigerator for up to 4 days. This is perfect for making spring rolls throughout the week! Just wrap and cook whenever you want fresh, hot spring rolls without all the prep work.
Freezing the Filling: The cooked filling freezes beautifully for up to 3 months. Thaw overnight in the refrigerator before using. Make sure to drain any excess liquid that may have accumulated during thawing before wrapping your spring rolls.
Shelf Life: Wrappers themselves can be stored in the freezer for months according to package directions. Once thawed, use them within 3-5 days and keep them well-sealed to prevent drying out. Never refreeze thawed wrappers as they become brittle and unusable.
Make-Ahead & Freezer Notes
Spring rolls are one of the best freezer-friendly appetizers you can make! Here’s your complete guide to preparing them in advance.
Freezing Uncooked Spring Rolls (Recommended Method): This is absolutely the best approach! Arrange wrapped, uncooked spring rolls in a single layer on a parchment-lined baking sheet, making sure they don’t touch. Freeze until solid (about 2-3 hours), then transfer to a freezer-safe zip-top bag or airtight container, separating layers with parchment paper. They’ll keep for up to 3 months.
Cooking from Frozen: No thawing necessary! Cook frozen spring rolls directly from the freezer at 375°F for 14-16 minutes, flipping halfway through. They might need 1-2 extra minutes compared to fresh rolls. The wrapper may look slightly lighter when you first put them in – this is normal and they’ll crisp up beautifully as they cook.
Freezing Cooked Spring Rolls: While you can freeze cooked spring rolls, they won’t be quite as crispy when reheated. If you go this route, cool them completely, then freeze using the same single-layer method described above. Reheat from frozen at 375°F for 8-10 minutes until heated through and crispy.
Best Reheating Method: For the crispiest results, always reheat in the air fryer or oven – never the microwave. Air fryer reheating at 350-375°F for 5-8 minutes gives you results that are nearly as good as freshly cooked. Give them a light spray of oil before reheating for extra crispiness.
Make-Ahead Timeline: You can prep different components at different times for maximum convenience. Make the filling up to 4 days ahead and store refrigerated. Wrap spring rolls up to 24 hours ahead and refrigerate, or freeze for up to 3 months. On the day you want to serve them, just pop them in the air fryer and you’re done! This makes them perfect for entertaining – do all the work ahead of time and just cook when guests arrive.
Party Planning Tip: For large gatherings, wrap and freeze spring rolls several weeks in advance. Cook them in batches, keeping finished batches warm in a 200°F oven while you cook the rest. This way, you can serve a large crowd without spending hours in the kitchen during your party!
Serving Suggestions
These crispy air fryer spring rolls are incredibly versatile! Here are some delicious ways to serve them.
Classic Dipping Sauces: Sweet chili sauce is the traditional favorite with its perfect balance of sweet and spicy. Soy sauce with a splash of rice vinegar and a pinch of sugar is simple and delicious. Duck sauce provides tangy-sweet contrast. Peanut sauce (even though it’s more of a Vietnamese fresh roll pairing) is rich and creamy. And don’t sleep on plum sauce – its fruity complexity is amazing with spring rolls!
Modern Fusion Sauces: Get creative with sriracha mayo (mix mayo with sriracha to taste), sweet and sour sauce for that American-Chinese takeout vibe, spicy honey (honey mixed with chili flakes), or yum yum sauce for a Japanese steakhouse twist. Bang bang sauce (mayo, sweet chili, sriracha, and honey) is incredibly popular right now!
Complete Meal Ideas: Serve your spring rolls as an appetizer before a main course of fried rice, lo mein, or pad thai. Make them the star of the meal alongside egg drop soup or hot and sour soup, steamed edamame, and white or brown rice. They’re also perfect for a party spread with potstickers, crab rangoon, and other Asian-inspired appetizers.
Side Dishes: Pair them with Asian cucumber salad for cool, refreshing contrast. Sesame noodles make a satisfying carb companion. Stir-fried vegetables add more nutrition. A simple mixed green salad with sesame-ginger dressing balances the richness. And don’t forget sticky rice or coconut rice for something a little special!
Beverage Pairings: Traditional iced green tea is refreshing and palate-cleansing. Thai iced tea provides sweet, creamy contrast. For alcoholic options, try light lagers, wheat beers, Riesling, or Gewürztraminer. Sake or plum wine also pair beautifully! For a fun party twist, serve with ginger beer mojitos or lychee martinis.
Presentation Ideas: Arrange spring rolls standing upright in a shallow bowl or basket lined with lettuce leaves for height and drama. Serve small individual portions on bamboo plates or in paper takeout boxes for a fun party presentation. Garnish the platter with fresh cilantro, lime wedges, and chili peppers for color and authenticity.
FAQs Section
Can I make spring rolls without an air fryer? Absolutely! You can bake them in a conventional oven at 400°F for 15-20 minutes, flipping halfway through, until golden and crispy. Place them on a wire rack over a baking sheet for best results. You can also shallow fry them in a couple inches of oil in a skillet, or deep fry traditionally at 350°F for 3-4 minutes. The air fryer is the healthiest option, but the others work great too!
What’s the difference between spring rolls and egg rolls? Spring rolls use thin, delicate wheat-based wrappers and typically have a lighter, vegetable-focused filling. Egg rolls have much thicker wrappers that contain egg, are usually larger, and often include meat in the filling. Spring rolls are crispy and delicate, while egg rolls are heartier and chewier. Both are delicious but distinctly different!
Can I make these gluten-free? Traditional spring roll wrappers contain wheat and aren’t gluten-free. However, you can use rice paper wrappers instead – just know they’ll give you a different texture that’s more delicate and less crispy. Make sure to use tamari or coconut aminos instead of soy sauce, and check that all other ingredients are certified gluten-free.
Why do my spring rolls keep bursting in the air fryer? The most common causes are overfilling (use less filling!), not sealing properly with the cornstarch slurry, starting at too high a temperature (which causes rapid expansion), or trapped air pockets when rolling. Make sure to roll tightly, seal thoroughly, and start at a moderate temperature. Also ensure your filling is completely cool and not too wet.
Can I use other vegetables in the filling? Yes! Spring rolls are incredibly versatile. Bell peppers, snow peas, broccoli slaw, zucchini, water chestnuts, bamboo shoots, bok choy, and celery all work wonderfully. Just keep the total volume of vegetables about the same and make sure everything is cut into thin, uniform pieces that cook evenly.
Do I have to cook the filling before wrapping? Yes, you should always pre-cook the filling. Raw vegetables contain too much moisture and won’t cook properly in the short air frying time. Pre-cooking also allows you to season properly and ensure the filling is flavorful. Plus, cooked and cooled filling is much easier to work with and less likely to make wrappers soggy.
How do I keep spring rolls crispy after cooking? Serve them immediately for maximum crispiness! If you need to hold them, place cooked spring rolls on a wire rack (not a plate) in a 200°F oven for up to 30 minutes. The circulating air keeps them crispy while staying warm. Never cover hot spring rolls as trapped steam makes them soggy. For leftovers, reheat in the air fryer to restore crispiness rather than microwaving.
Conclusion
There you have it – everything you need to make absolutely incredible crispy air fryer spring rolls right in your own kitchen! These golden, crunchy bundles of veggie-packed goodness prove that you don’t need a deep fryer or expensive takeout to enjoy restaurant-quality Asian appetizers. With just a handful of fresh ingredients, some simple wrappers, and your trusty air fryer, you can create these addictive treats that’ll have everyone asking for the recipe.
Whether you’re making them for a party, meal prepping for the week, or just craving something deliciously crispy and satisfying, these easy homemade spring rolls deliver every single time. The best part? You can customize them endlessly, freeze them for later, and feel good about serving a much healthier version than traditional deep-fried rolls. Once you master the technique, you’ll be wrapping spring rolls like a pro and wondering why you ever bothered with takeout!
I’d absolutely love to hear how your air fryer spring rolls recipe turns out! Did you add any creative twists to the filling? What’s your favorite dipping sauce combination? Leave a comment below sharing your experience, rate this recipe, and don’t forget.