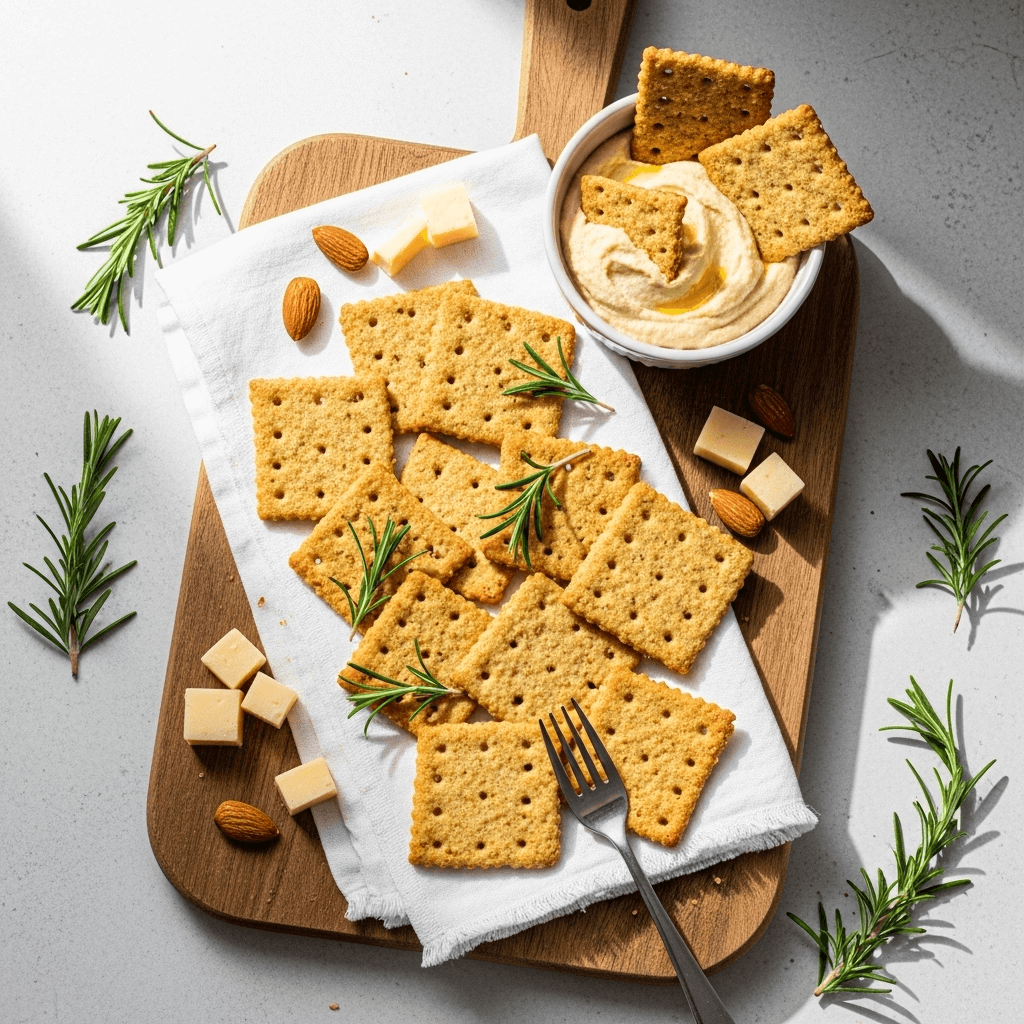
Crispy Homemade Almond Flour Crackers (Gluten-Free & Keto-Friendly!)

There’s something incredibly satisfying about making your own crackers from scratch—especially when they’re as delicious and versatile as these almond flour crackers! These crispy, golden-brown beauties are the perfect gluten-free alternative to store-bought crackers, and they’re surprisingly easy to make at home.
Whether you’re following a keto diet, avoiding gluten, or simply looking for a healthier snack option, these almond flour crackers are about to become your new obsession. They’re wonderfully crunchy, subtly nutty, and endlessly customizable with your favorite herbs and seasonings. Serve them with cheese, dips, spreads, or enjoy them plain as a satisfying low-carb snack. They’re perfect for party platters, lunchboxes, or those afternoon moments when you need something crispy and delicious to munch on.
What makes these crackers truly special is their simplicity. With just a handful of wholesome ingredients and about 30 minutes from start to finish, you can create a batch of artisan-quality crackers that rival anything you’d find at a gourmet grocery store—but for a fraction of the price!
History / Background
While crackers themselves have been around since ancient times (the earliest versions date back to sailors’ “hardtack” in the 18th century), almond flour crackers are a relatively modern innovation born from the intersection of several dietary movements. The rise of gluten-free, paleo, and ketogenic diets in the early 2000s created a demand for alternatives to traditional wheat-based crackers.
Almond flour became a superstar ingredient in the low-carb and gluten-free baking world around 2010-2012, particularly as the paleo diet gained mainstream popularity. Home bakers and food bloggers began experimenting with nut flours as substitutes for conventional wheat flour, discovering that finely ground almonds created surprisingly crispy, flavorful crackers with a fraction of the carbohydrates.
The beauty of almond flour crackers lies in their European-inspired simplicity—reminiscent of the artisanal seed crackers you might find at a French market or Italian cafe, but adapted for modern dietary needs. While they don’t have centuries of tradition behind them like sourdough bread or pasta, these crackers have quickly earned their place in contemporary home kitchens as a healthier, nutrient-dense alternative to processed snacks.
Today, homemade almond flour crackers have become a staple in grain-free households across America, with countless variations featuring everything from rosemary and sea salt to everything bagel seasoning. They represent the perfect marriage of health-conscious eating and gourmet flavor.
Why You’ll Love This Recipe
These almond flour crackers are about to transform your snacking game! Imagine biting into a perfectly crispy cracker that’s not only delicious but actually nutritious—no guilt required. These crackers deliver on flavor, texture, and health benefits, making them ideal for anyone who wants to snack smarter without sacrificing taste.
Here’s why these crackers will become your go-to recipe:
- Incredibly simple – Just 5 basic ingredients and one bowl required
- Naturally gluten-free – Perfect for those with celiac disease or gluten sensitivity
- Keto-friendly & low-carb – Only 2g net carbs per serving
- High in protein and healthy fats – Thanks to nutrient-dense almond flour
- Budget-friendly – Much cheaper than store-bought specialty crackers
- Customizable – Endless flavor variations to suit your taste preferences
- No special equipment needed – Just a rolling pin and a baking sheet
- Kid-approved – Even picky eaters love these crunchy snacks
- Meal prep friendly – Stays fresh for up to two weeks when stored properly
- Impressive presentation – Looks artisan and gourmet when served to guests
- Whole30 compatible – When made without cheese (optional ingredient)
- Egg-free option available – Can be modified for egg allergies
Ingredient Notes
Let’s talk about what makes these crackers so wonderfully crispy and delicious! Understanding your ingredients helps you make smart substitutions and troubleshoot if needed.
Almond Flour (Blanched): This is the star of the show! Blanched almond flour (made from almonds with skins removed) creates the best texture—fine, smooth, and perfectly crispy. It’s naturally gluten-free and packed with protein, healthy fats, and vitamin E. Avoid almond meal, which is coarser and will give you grainier crackers. Bob’s Red Mill and Kirkland (Costco) brands work beautifully. Substitution: You can use hazelnut flour or sunflower seed flour for nut-free crackers, though the flavor will differ.
Egg: Acts as the binder that holds everything together. One large egg is typically sufficient for a standard batch. The egg helps create structural integrity and contributes to that satisfying crunch. Substitution: For egg-free crackers, try 1 tablespoon ground flaxseed mixed with 3 tablespoons water, or use a commercial egg replacer.
Salt: Essential for flavor! I recommend fine sea salt or kosher salt. Salt enhances the nutty flavor of the almonds and balances any toppings you add. Don’t skip it!
Seasonings (Optional): This is where you get creative! Garlic powder, onion powder, dried rosemary, Italian seasoning, everything bagel seasoning, or smoked paprika all work wonderfully. Start with 1-2 teaspoons total and adjust to taste.
Olive Oil or Melted Butter (Optional): While not always necessary, a tablespoon of fat makes the crackers extra tender and flavorful. Extra virgin olive oil adds a fruity note, while butter gives richness. Coconut oil works too for a dairy-free option.
Equipment Needed
You don’t need fancy equipment to make these crackers! Here’s what you’ll use:
- Large mixing bowl – For combining ingredients
- Fork or whisk – To beat the egg and mix the dough
- Parchment paper – Essential for preventing sticking and easy cleanup
- Rolling pin – For rolling out the dough thin and even (a wine bottle works in a pinch!)
- Sharp knife or pizza cutter – For cutting crackers into shapes
- Baking sheet (or two) – Standard half-sheet pans work perfectly
- Measuring cups and spoons – For accurate measurements
- Spatula – For transferring crackers if needed
- Cooling rack – Allows air circulation for maximum crispiness

Crispy Homemade Almond Flour Crackers
These crispy homemade almond flour crackers are the perfect gluten-free and keto-friendly snack! Made with just 5 simple ingredients, they’re wonderfully crunchy, subtly nutty, and endlessly customizable. Serve them with cheese, dips, or enjoy them plain—they’re perfect for parties, meal prep, or healthy snacking.
- Total Time: 25 minutes
- Yield: 4 servings (about 40-50 crackers, depending on size) 1x
Ingredients
- 2 cups blanched almond flour (not almond meal)
- 1 large egg, beaten
- 1/2 teaspoon fine sea salt
- 1 tablespoon olive oil or melted butter (optional, for tenderness)
- 1-2 teaspoons dried herbs or seasonings of choice (optional: garlic powder, rosemary, everything bagel seasoning, Italian herbs)
- Flaky sea salt for topping (optional)
Instructions
- Preheat your oven to 350°F (175°C). Line a large baking sheet with parchment paper and set aside.
- Mix the dough: In a large bowl, combine the almond flour, salt, and any dried herbs or seasonings you’re using. Stir with a fork to distribute evenly.
- Add wet ingredients: Make a well in the center of the flour mixture. Add the beaten egg and olive oil (if using). Mix with a fork until the mixture comes together into a soft, slightly sticky dough. It should form a cohesive ball.
- Roll out the dough: Place the dough ball between two sheets of parchment paper. Using a rolling pin, roll the dough out as thin as possible—ideally 1/16 to 1/8 inch thick. The thinner you roll it, the crispier your crackers will be! Don’t worry about perfect edges; rustic is beautiful.
- Cut into crackers: Remove the top sheet of parchment paper. Using a sharp knife, pizza cutter, or pastry wheel, cut the dough into squares, rectangles, or any shape you like. I typically make 1.5-inch squares, but you can customize the size. For a decorative touch, use a fork to prick small holes in each cracker (this prevents puffing and looks pretty).
- Transfer to baking sheet: Carefully transfer the bottom parchment paper with the cut crackers directly onto your prepared baking sheet. You can separate the crackers slightly if you prefer, or leave them touching and break them apart after baking.
- Season the tops: If desired, lightly brush the crackers with a tiny bit of olive oil and sprinkle with flaky sea salt or additional seasonings.
- Bake: Place in the preheated oven and bake for 15-18 minutes, or until the edges are golden brown and the crackers are crisp. Keep a close eye after 12 minutes as they can brown quickly. The crackers will continue to crisp up as they cool.
- Cool completely: Remove from the oven and let the crackers cool on the baking sheet for 5 minutes, then transfer to a wire cooling rack. They’ll become crunchier as they cool. Once completely cooled, break apart any crackers that are still connected.
- Serve and enjoy: Serve your homemade almond flour crackers with your favorite cheeses, dips, or spreads, or enjoy them plain as a satisfying snack!
Notes
Thickness matters: The thinner you roll the dough, the crispier your crackers will be. Aim for less than 1/8 inch if possible.
Watch closely: Almond flour browns faster than regular flour. Check your crackers at 12 minutes and adjust baking time as needed.
Storage is key: These crackers stay crispy when stored in an airtight container at room temperature. Any moisture will make them soft.
Flavor variations: Try adding 1/2 teaspoon garlic powder + 1 teaspoon dried rosemary, or 2 teaspoons everything bagel seasoning for incredible flavor!
Egg-free option: Replace the egg with 1 tablespoon ground flaxseed mixed with 3 tablespoons water. Let sit 5 minutes before using.
- Prep Time: 10 minutes
- Cook Time: 15 minutes
- Category: Snack
- Method: Baking
- Cuisine: American
- Diet: Gluten Free
Nutrition
- Serving Size: 10-12 crackers (1/4 of recipe)
- Calories: 220
- Sugar: 2g
- Sodium: 240mg
- Fat: 18g
- Saturated Fat: 2g
- Unsaturated Fat: 15g
- Trans Fat: 0g
- Carbohydrates: 8g
- Fiber: 4g
- Protein: 8g
- Cholesterol: 45mg
Tips & Variations
These almond flour crackers are like a blank canvas—ready for your creative touch! Here are some delicious ways to customize them:
Flavor Variations:
- Italian Herb: Add 1 teaspoon dried Italian seasoning and 1/2 teaspoon garlic powder
- Everything Bagel: Top with 2 tablespoons everything bagel seasoning before baking
- Rosemary Parmesan: Mix in 2 tablespoons grated Parmesan and 1 teaspoon dried rosemary
- Spicy Jalapeño: Add 1/2 teaspoon cayenne pepper and 1 teaspoon dried jalapeño flakes
- Sweet Cinnamon: Omit salt, add 2 tablespoons coconut sugar and 1 teaspoon cinnamon
- Za’atar: Sprinkle with 1 tablespoon za’atar spice blend before baking
- Ranch Style: Mix in 1 tablespoon ranch seasoning powder
Texture Modifications:
- For extra-crispy crackers, roll even thinner and bake a few minutes longer
- For chewier crackers, roll slightly thicker (about 1/4 inch) and reduce baking time
- Add seeds for crunch: sprinkle with sesame seeds, poppy seeds, or flax seeds before baking
Dietary Adaptations:
- Nut-free: Use sunflower seed flour instead of almond flour (note: these may turn greenish due to chlorophyll—totally safe!)
- Vegan: Replace egg with flax egg (1 tablespoon ground flaxseed + 3 tablespoons water)
- Paleo: Use these exact ingredients—they’re already paleo-compliant!
- Dairy-free: Skip the butter option and use olive oil
Pro Chef Tips
Want bakery-quality crackers? These professional techniques will take your crackers from good to extraordinary:
Roll between parchment: Always roll your dough between two sheets of parchment paper. This prevents sticking without adding extra flour (which can make crackers tough) and makes transferring to the baking sheet effortless.
Achieve uniform thickness: Use rolling pin rings or rubber bands as guides to ensure even thickness across the entire sheet. Uneven rolling means some crackers burn while others stay undercooked.
The “dock” technique: Pricking holes in your crackers (called “docking” in the baking world) isn’t just decorative—it prevents air pockets from forming and keeps crackers flat and crispy. Use a fork in a decorative pattern.
Score before baking, break after: Cutting all the way through before baking can cause irregular shapes. Instead, score deeply (cut about 80% through) and the crackers will break cleanly apart after cooling.
Rotate the pan: For perfectly even browning, rotate your baking sheet 180 degrees halfway through baking time.
Low and slow option: For the absolute crispiest crackers, try baking at 300°F for 25-30 minutes. This slower bake dehydrates the crackers more thoroughly, resulting in maximum crunch without burning.
Cool completely before storing: This is crucial! Even slightly warm crackers will create condensation in your storage container, turning your crispy crackers soggy within hours.
Use the “tap test”: Your crackers are done when they sound hollow when you tap them gently with your fingernail.
Common Mistakes to Avoid
Learn from these common pitfalls so your first batch turns out perfectly!
Rolling too thick: This is the #1 mistake! Thick crackers end up more like cookies—soft and cakey rather than crisp. Roll your dough paper-thin (1/16 inch if possible) for maximum crunchiness.
Not watching closely during baking: Almond flour browns much faster than wheat flour because of its high fat content. What looks pale at 12 minutes can be burnt at 16 minutes. Set a timer and check early!
Using almond meal instead of almond flour: Almond meal (with skins) is coarser and will give you grainy, less crispy crackers. Always use blanched almond flour for the smoothest texture.
Storing while still warm: If you seal warm crackers in a container, the trapped steam will soften them immediately. Always cool completely—this is non-negotiable!
Overcrowding the baking sheet: If you’re doubling the recipe, use two baking sheets. Overcrowding prevents proper air circulation and leads to uneven baking.
Not seasoning enough: Almond flour has a mild flavor that can taste bland without adequate seasoning. Don’t be shy with the salt and herbs—crackers need more seasoning than you think!
Opening the oven door repeatedly: Every time you open the oven, you release heat and create temperature fluctuations. Check your crackers through the oven window until the very end.
Storage & Meal Prep
One of the best things about these almond flour crackers is how well they store—perfect for making ahead!
Room Temperature Storage: Store completely cooled crackers in an airtight container at room temperature for up to 2 weeks. I like to use a glass jar with a tight-fitting lid or a BPA-free plastic container. For extra insurance against humidity, add a food-safe silica gel packet to your container.
Refrigerator Storage: While not necessary, refrigerating can extend shelf life to 3 weeks, especially in humid climates. Just know they may lose a tiny bit of crispness, but they’ll still be delicious.
Signs of Freshness: Fresh crackers should snap cleanly when broken and sound hollow when tapped. If they bend or feel soft, they’ve absorbed moisture and need to be re-crisped.
Re-crisping Method: If your crackers lose their crunch, spread them on a baking sheet and bake at 300°F for 5-7 minutes. Let them cool completely before storing again.
Preventing Sogginess: Never store crackers with cheese, dips, or moist foods. Always keep them separate until serving time.
Portion Control Tip: Package crackers in individual snack-size bags with 10-12 crackers each—perfect for lunchboxes, work snacks, or portion-controlled munching!
Make-Ahead & Freezer Notes
These crackers are meal-prep champions! Here’s how to plan ahead:
Freezing Baked Crackers: Yes, you can freeze them! Place cooled crackers in a freezer-safe container or zip-top bag with layers separated by parchment paper. Freeze for up to 3 months. Thaw at room temperature for 30 minutes, then re-crisp in a 300°F oven for 5 minutes if desired.
Freezing Unbaked Dough: Roll out your dough, cut into crackers, and freeze on a parchment-lined baking sheet until solid (about 2 hours). Transfer frozen crackers to a freezer bag for up to 2 months. Bake directly from frozen, adding 2-3 minutes to the baking time.
Pre-Cut and Refrigerate: You can prepare the dough, roll it out, cut it into crackers, and refrigerate on the baking sheet (covered with plastic wrap) for up to 24 hours before baking. This is perfect for party prep!
Dough Ball Method: Mix the dough, form it into a disk, wrap tightly in plastic wrap, and refrigerate for up to 3 days or freeze for up to 1 month. Thaw frozen dough in the refrigerator overnight before rolling.
Best Reheating Method: For crackers that have been refrigerated or frozen, spread them on a baking sheet and warm in a 300°F oven for 5-7 minutes to restore maximum crispiness.
Serving Suggestions
These versatile crackers pair beautifully with so many foods! Here are some delicious ways to serve them:
Cheese Board Perfection: Create a stunning charcuterie board with aged cheddar, creamy brie, tangy goat cheese, and a selection of cured meats. Your homemade crackers will be the star!
Dip Companions:
- Creamy spinach artichoke dip
- Classic hummus (roasted red pepper or garlic varieties)
- Warm buffalo chicken dip
- Fresh guacamole or chunky salsa
- Whipped feta dip with honey
- Caramelized onion dip
Elegant Appetizers: Top each cracker with a thin slice of smoked salmon, a dollop of crème fraîche, and fresh dill for a sophisticated canapé.
Soup Sidekick: Serve alongside tomato soup, butternut squash soup, or French onion soup for added crunch and substance.
Salad Crunch: Crumble over Caesar salad or mixed greens instead of croutons for a gluten-free option.
Snack Combos:
- Spread with almond butter and a drizzle of honey
- Top with cream cheese and everything bagel seasoning
- Pair with tuna or chicken salad
- Serve with sliced apples and sharp cheddar
Wine Pairing: These crackers pair beautifully with crisp white wines like Sauvignon Blanc or Pinot Grigio, or light reds like Pinot Noir.
Kids’ Lunches: Pack with string cheese, apple slices, and their favorite sandwich for a balanced lunchbox.
FAQs Section
Q: Can I make these crackers without eggs?
A: Absolutely! Replace the egg with a flax egg (1 tablespoon ground flaxseed mixed with 3 tablespoons water—let sit for 5 minutes until gelatinous). The texture will be slightly more crumbly but still delicious. Some readers have also had success with chia eggs or commercial egg replacers.
Q: Why are my crackers soft instead of crispy?
A: This usually happens for one of three reasons: (1) the dough was rolled too thick, (2) they weren’t baked long enough, or (3) they were stored before cooling completely. The solution: roll thinner, bake until edges are golden, and always cool completely on a wire rack before storing. You can also re-crisp soft crackers by baking at 300°F for 5-7 minutes.
Q: Can I use almond meal instead of almond flour?
A: It’s not recommended. Almond meal is coarser (often includes the almond skins) and will result in grainier, less crispy crackers. Blanched almond flour is finely ground and creates the best texture. If you only have almond meal, pulse it in a food processor until very fine before using.
Q: How many crackers does this recipe make?
A: It depends on how large you cut them! Typically, you’ll get 40-50 crackers if you cut them into 1.5-inch squares. Smaller cocktail-size crackers will yield 60-70 pieces, while larger 2-inch crackers will give you about 30-35.
Q: Are these crackers Keto and Whole30 compliant?
A: Yes! These crackers are keto-friendly with only 2g net carbs per serving (total carbs minus fiber). They’re also Whole30 compliant when you omit the cheese and use olive oil instead of butter. They fit perfectly into paleo, grain-free, and gluten-free diets as well.
Q: Can I add cheese directly to the dough?
A: You can! Grated Parmesan or aged cheddar (about 1/4 cup) can be mixed into the dough for extra flavor. Just note that cheese adds moisture, so you may need to bake a minute or two longer, and the crackers won’t store quite as long (about 7-10 days instead of 2 weeks).
Q: My dough is too dry and crumbly. What should I do?
A: Almond flour can vary in moisture content by brand. If your dough won’t come together, add water one teaspoon at a time (up to 1 tablespoon total) until the dough forms a cohesive ball. If it’s too wet and sticky, add almond flour one tablespoon at a time.
Q: Can I double this recipe?
A: Definitely! This recipe doubles and triples beautifully. Just make sure to use two baking sheets if you’re making a large batch, and rotate them halfway through baking for even browning. You may need to work in batches depending on your oven size.
Conclusion
Congratulations—you’re now equipped with everything you need to make the most amazing homemade almond flour crackers! These crispy, golden, gluten-free beauties prove that healthy snacking doesn’t have to be boring or complicated. With just a handful of wholesome ingredients and less than 30 minutes, you can create a batch of crackers that rival anything you’d find in a gourmet store.
The best part? Once you master this basic recipe, you can customize it endlessly to suit your taste preferences and dietary needs. Whether you’re serving them at your next gathering, packing them in lunchboxes, or simply enjoying them as an afternoon snack, these crackers are sure to become a staple in your kitchen.
I’d love to hear how your almond flour crackers turn out! Did you try a creative seasoning combination? Do you have a favorite dip pairing? Drop a comment below and let me know. And if you loved this recipe, please share it on Pinterest—your fellow home cooks will thank you! Don’t forget to pin this recipe to your favorite boards so you can make it again and again.
Happy baking, friends! Here’s to healthier snacking without sacrificing any of that satisfying crunch. 🥰
Pin this recipe now and tag me in your cracker creations—I can’t wait to see your beautiful batches!