Easy Apple Nachos Recipe – Fun Healthy Snack in 10 Minutes!

Get ready to fall in love with the most fun, creative, and delicious way to enjoy apples! These Apple Nachos are exactly what they sound like – crisp, fresh apple slices arranged like nachos and loaded with an incredible array of sweet and indulgent toppings. Think warm peanut butter drizzle, melted chocolate, crunchy granola, mini chocolate chips, shredded coconut, and a sprinkle of cinnamon that brings everything together beautifully.
What makes this healthy apple nachos recipe so special is that it strikes the perfect balance between indulgent treat and nutritious snack. Unlike traditional nachos loaded with cheese and sour cream, these fruit nachos use naturally sweet apples as the base, making them a guilt-free option that still feels like a total treat. They’re perfect for after-school snacks, game day gatherings, birthday parties, movie nights, or even as a fun and interactive dessert that kids and adults alike will devour.
The best part? This easy apple nachos recipe comes together in just 10 minutes with no cooking required! It’s completely customizable based on what you have in your pantry, and it’s a fantastic way to get kids excited about eating fruit. Whether you’re looking for a quick snack for hungry kids, a crowd-pleasing party appetizer, or a fun dessert that won’t derail your healthy eating goals, these apple slice nachos are about to become your new go-to recipe. The combination of crisp, juicy apples with creamy, crunchy, and sweet toppings creates a texture and flavor experience that’s absolutely irresistible!
History / Background
The concept of Apple Nachos is a relatively modern creation, born from the creative food trend movement that emerged in the early 2010s. While traditional nachos have been a beloved Mexican-American dish since the 1940s (invented by Ignacio “Nacho” Anaya in Piedras Negras, Mexico), the idea of transforming this savory concept into a sweet, fruit-based snack represents the innovative spirit of contemporary home cooking and food blogging culture.
Apple Nachos first gained significant traction on social media platforms, particularly Pinterest and Instagram, around 2012-2014. Food bloggers and creative home cooks began experimenting with “deconstructed” and “healthified” versions of popular dishes, and the nacho format proved perfect for this transformation. The appeal was immediate: take the fun, shareable, customizable nature of nachos and apply it to healthy ingredients, creating something that looked indulgent but was actually nutritious.
This recipe emerged during a broader cultural shift toward making healthy eating more appealing and accessible, especially for families with children. Parents were seeking creative ways to make fruits and vegetables exciting, and the “nachos” presentation did exactly that. By arranging apple slices in the familiar nacho formation and allowing kids to add their own toppings, what could have been a boring snack became an interactive, fun experience.
The concept also ties into the long American tradition of creative apple preparations. Apples have been a staple in American cuisine since colonial times, with the first apple trees planted by European settlers in the 1600s. Over centuries, Americans have celebrated apples in countless forms – from apple pie to caramel apples, apple cider to Waldorf salad. Apple Nachos represent the latest evolution in this tradition, reflecting our modern desire for foods that are simultaneously healthy, convenient, beautiful, and fun to eat.
Today, Apple Nachos have become a staple in schools, after-school programs, and family kitchens across America. They’re particularly popular during fall when apples are at their peak, but their year-round availability of apples means this snack can be enjoyed anytime. The recipe has evolved to include countless variations, from simple peanut butter drizzles to elaborate dessert versions with caramel sauce and candy toppings, proving that healthy snacking doesn’t have to be boring!
Why You’ll Love This Recipe
This Apple Nachos recipe is genuinely one of those magical recipes that checks every single box for what makes a recipe worth keeping in your regular rotation. It’s the kind of snack that you’ll find yourself making multiple times a week because it’s just that easy, that delicious, and that universally loved!
Let me tell you why this recipe is absolutely brilliant. First, it completely transforms the way you think about healthy snacking. These aren’t boring apple slices with nothing on them – they’re a full-on flavor and texture experience that happens to be based on fruit. The combination of crisp, slightly tart apples with sweet, creamy, and crunchy toppings creates something that feels indulgent while still being packed with nutrients, fiber, and natural goodness. It’s the perfect answer when you’re craving something sweet but don’t want to completely blow your healthy eating goals.
Here’s why you’ll absolutely love making these Apple Nachos:
- Incredibly quick and easy – Literally 10 minutes from start to finish with zero cooking required, making it perfect for busy families
- Kid-approved and fun – Children love the interactive nature of “building” their own nachos and choosing their toppings
- Customizable for everyone – Easily adapted for different dietary needs, allergies, and taste preferences
- Budget-friendly – Uses affordable, accessible ingredients you probably already have at home
- No special equipment needed – Just a cutting board, knife, and serving plate
- Naturally gluten-free – Perfect for those with gluten sensitivities or celiac disease
- Great for parties and gatherings – Makes an impressive, shareable snack that’s Instagram-worthy
- Portion-controlled – Easy to make just one serving or scale up for a crowd
- Encourages fruit consumption – Gets kids excited about eating fresh fruit
- Versatile for any time of day – Works as breakfast, snack, dessert, or even lunch
- Allergen-friendly options – Can be made nut-free, dairy-free, or vegan with simple swaps
- No mess, no fuss – Minimal cleanup compared to traditional baking or cooking
- Educational for kids – Great for teaching children about healthy food choices and kitchen skills
- Satisfies sweet cravings – Curbs sugar cravings in a healthier way than traditional desserts
Ingredient Notes
The beauty of this Apple Nachos recipe is its simplicity and flexibility. Each ingredient plays an important role in creating that perfect balance of flavors and textures, but there’s plenty of room for customization based on what you have available or your dietary preferences.
Apples: The foundation of our nachos! Choose crisp, slightly tart varieties like Honeycrisp, Granny Smith, Pink Lady, or Gala for the best texture and flavor. The apples should be firm and fresh – avoid mealy or soft apples as they won’t provide that satisfying crunch. I recommend using 2-3 medium apples for 2-4 servings. You want thick enough slices (about ¼-inch) that they’re sturdy enough to hold toppings but thin enough to bite through easily. To prevent browning, toss sliced apples with a little lemon juice or use a product like Fruit-Fresh.
Peanut Butter (or alternative nut butter): This creates the creamy, protein-rich drizzle that brings everything together. Natural peanut butter works beautifully, though you may need to thin it slightly with a tiny bit of water or honey to make it drizzle-able. For nut-free versions, use sunflower seed butter, tahini, or even cream cheese thinned with a bit of milk. Almond butter, cashew butter, or cookie butter are also fantastic alternatives that each bring their own unique flavor.
Chocolate Chips: Mini chocolate chips are ideal because they distribute more evenly across the apples, but regular-sized chips work too. Use semi-sweet, dark chocolate, or even white chocolate chips depending on your preference. For a healthier option, look for stevia-sweetened chocolate chips or cacao nibs. Dairy-free chocolate chips work perfectly for vegan versions.
Chocolate Sauce or Melted Chocolate: This adds an extra layer of chocolate indulgence. You can use store-bought chocolate syrup, make a simple ganache by melting chocolate with a bit of cream, or use Magic Shell-type chocolate sauce. For a healthier option, melt dark chocolate with a tiny bit of coconut oil.
Granola: Provides that essential crunchy texture contrast. Choose your favorite variety – plain, honey-oat, chocolate, or even peanut butter granola all work wonderfully. For a nut-free option, use seed-based granola or crushed graham crackers. You can also substitute with crushed pretzels for a sweet-salty combination.
Shredded Coconut: Adds a tropical sweetness and interesting texture. Sweetened or unsweetened both work – unsweetened is less sweet overall. Toast the coconut in a dry pan for 2-3 minutes for extra flavor and crunch. Skip if you’re not a coconut fan, or substitute with chopped dried fruit.
Honey or Maple Syrup: A light drizzle adds extra sweetness and helps other toppings stick to the apples. Maple syrup is a great vegan option, or you can use agave nectar. For a lower-sugar option, skip this or use it very sparingly.
Cinnamon: A sprinkle of ground cinnamon is absolutely essential! It enhances the apple flavor and adds that warm, cozy spice note that makes everything taste more complex and delicious. You can also add a pinch of nutmeg or pumpkin pie spice.
Optional Toppings: The sky’s the limit here! Consider mini marshmallows, chopped nuts (walnuts, pecans, almonds), dried cranberries or raisins, crushed cookies, caramel sauce, sliced bananas, fresh berries, chia seeds, hemp hearts, or even a dollop of Greek yogurt.
Equipment Needed
One of the best things about this recipe is that you need almost no special equipment – just basic kitchen tools you definitely already have:
- Sharp knife – For slicing apples cleanly and evenly
- Cutting board – Preferably one designated for produce
- Apple corer or slicer (optional) – Makes uniform slices quickly and easily, though a knife works perfectly fine
- Large serving plate or platter – For arranging your apple nachos; a pizza pan or baking sheet also works great
- Small bowls – For holding various toppings (2-4 depending on how many toppings you’re using)
- Spoon or small spatula – For drizzling nut butter and chocolate
- Microwave-safe bowl – For warming/thinning peanut butter or melting chocolate
- Measuring cups and spoons – For portioning ingredients, though this recipe is very forgiving
- Small whisk or fork – For stirring and thinning peanut butter
- Squeeze bottles (optional) – Make drizzling sauces neater and more controlled
- Pastry brush (optional) – For applying lemon juice to prevent browning

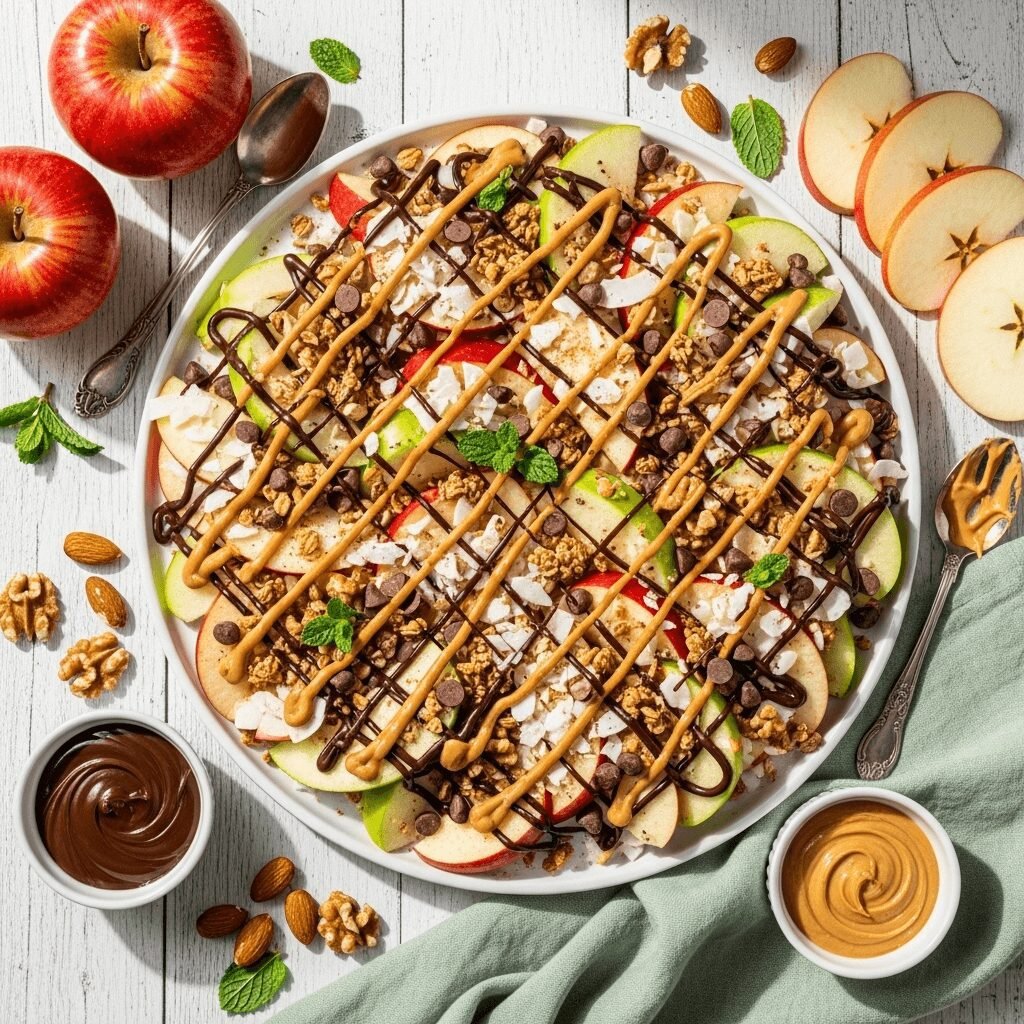
Apple Nachos Recipe
These fun and healthy Apple Nachos feature crisp apple slices arranged like nachos and topped with drizzled peanut butter, chocolate, granola, coconut, and a sprinkle of cinnamon. Ready in just 10 minutes, they’re the perfect after-school snack, party treat, or guilt-free dessert that everyone will love!
- Total Time: 10 minutes
- Yield: 2-4 servings 1x
Ingredients
- 2-3 large apples (Honeycrisp, Granny Smith, or Gala), cored and sliced into ¼-inch rounds or wedges
- 1 tablespoon fresh lemon juice (optional, to prevent browning)
- ¼ cup natural peanut butter (or alternative nut/seed butter)
- 1-2 teaspoons honey or water (to thin peanut butter for drizzling)
- ¼ cup mini chocolate chips (semi-sweet, dark, or white chocolate)
- 2-3 tablespoons chocolate sauce or melted chocolate
- ⅓ cup granola (your favorite variety)
- 3 tablespoons shredded coconut (sweetened or unsweetened)
- 2 tablespoons honey or maple syrup (for drizzling)
- ½ teaspoon ground cinnamon
- Optional toppings: chopped nuts (walnuts, pecans, almonds), mini marshmallows, dried cranberries, caramel sauce, fresh berries, chia seeds
Instructions
- Prepare the apples: Wash and dry your apples thoroughly. Using a sharp knife or apple corer, remove the core from each apple. Slice the apples into ¼-inch thick rounds or wedges, depending on your preference. If you’re not serving immediately, toss the apple slices gently with 1 tablespoon of fresh lemon juice to prevent them from browning.
- Arrange the apple base: On a large serving plate, platter, or baking sheet, arrange the apple slices in an overlapping pattern, similar to how you’d arrange tortilla chips for traditional nachos. You can do a single layer in a circular pattern or pile them slightly for a more dramatic “nacho” presentation. Make sure the apples cover most of the serving area.
- Prepare the peanut butter drizzle: Place the peanut butter in a microwave-safe bowl. If your peanut butter is thick and hard to drizzle, add 1-2 teaspoons of honey or warm water. Microwave for 15-20 seconds, then stir until smooth and drizzle-able. If it’s still too thick, add a bit more liquid and stir well.
- Add the first drizzle: Using a spoon or transfer the peanut butter to a squeeze bottle, drizzle the warmed peanut butter back and forth over the arranged apple slices in a zig-zag pattern. Don’t worry about being perfectly neat – rustic is beautiful here! Make sure to get some on most of the apple slices.
- Add chocolate: Drizzle your chocolate sauce or melted chocolate over the apples in a similar zig-zag pattern, alternating with the peanut butter drizzle for a pretty striped effect. Then sprinkle the mini chocolate chips evenly over the entire plate of apples, distributing them so each piece gets some chocolate.
- Add crunchy toppings: Sprinkle the granola evenly over the apple nachos, making sure it’s distributed across the plate. Follow with the shredded coconut, sprinkling it over everything. If using additional toppings like nuts or dried fruit, add them now.
- Final touches: Drizzle the honey or maple syrup lightly over the entire creation for extra sweetness and to help everything stick together. Finish with a generous dusting of ground cinnamon over the top, using a small fine-mesh strainer for even distribution if you have one.
- Serve immediately: These Apple Nachos are best enjoyed fresh! Serve on the platter with small plates and forks, or let everyone dig in and grab pieces by hand. If serving at a party, provide small appetizer plates and napkins.
Notes
- Prevent browning: Toss apple slices with lemon juice immediately after cutting to keep them looking fresh and bright, especially if preparing slightly ahead.
- Adjust toppings: Feel free to use more or less of any topping based on your preferences. This recipe is extremely flexible!
- Nut-free version: Replace peanut butter with sunflower seed butter, tahini, or cream cheese thinned with milk.
- Vegan option: Use maple syrup instead of honey and ensure chocolate chips are dairy-free.
- Lower sugar: Skip the honey drizzle and use dark chocolate chips and unsweetened coconut for a less sweet version.
- Serving size: This recipe easily scales up or down. For a party, use 5-6 apples and double the toppings.
- Best apples: Tart, crisp varieties work best as they provide nice contrast to sweet toppings and won’t get mushy.
- Prep Time: 10 minutes
- Cook Time: 0 minutes
- Category: Snack
- Method: No-Bake
- Cuisine: American
- Diet: Gluten Free
Nutrition
- Serving Size: About 1 cup (¼ of recipe)
- Calories: 285
- Sugar: 32g
- Sodium: 55mg
- Fat: 12g
- Saturated Fat: 4g
- Unsaturated Fat: 7g
- Trans Fat: 0g
- Carbohydrates: 43g
- Fiber: 6g
- Protein: 6g
- Cholesterol: 0mg
Tips & Variations
The wonderful thing about Apple Nachos is how endlessly customizable they are! Here are some creative ways to make this recipe your own:
Dessert-Focused Apple Nachos: Transform these into a full-on dessert by adding caramel sauce drizzle, crushed Oreos or graham crackers, mini marshmallows, chopped candy bars (Snickers, Reese’s, or Heath bars), and a scoop of vanilla ice cream or whipped cream on top.
Protein-Packed Version: Add Greek yogurt drizzle (mix yogurt with a touch of honey), extra nut butter, hemp hearts, chia seeds, and protein granola for a more filling snack that works great post-workout.
Tropical Twist: Use toasted coconut, macadamia nut butter, pineapple chunks, dried mango pieces, and white chocolate drizzle for a vacation-inspired treat.
Fall-Spiced Apple Nachos: Embrace autumn flavors with pumpkin spice seasoning instead of cinnamon, pecans, dried cranberries, caramel sauce, and a sprinkle of pumpkin seeds.
Chocolate Lover’s Version: Go all-out with chocolate by using chocolate hazelnut spread (Nutella) instead of peanut butter, dark chocolate chips, chocolate granola, chocolate sauce, and cocoa powder dusting.
Savory-Sweet Combo: Try a unique sweet-salty version with almond butter, pretzel pieces, sea salt flakes, dark chocolate chips, and a tiny drizzle of olive oil.
Kid-Friendly Fun: Let children build their own Apple Nachos bar! Set out the sliced apples and various toppings in small bowls and let them create their own combinations. Include fun options like rainbow sprinkles, gummy bears, M&Ms, and marshmallows.
Healthy Clean-Eating Version: Keep it simple and nutritious with just almond butter drizzle, fresh berries, unsweetened coconut, nuts, seeds, and a touch of raw honey.
Cookie Butter Apple Nachos: Replace peanut butter with speculoos cookie butter, add crushed biscoff cookies, white chocolate chips, and a sprinkle of sea salt.
S’mores Style: Use chocolate sauce, crushed graham crackers, mini marshmallows (toast them with a kitchen torch if you have one!), and chocolate chips.
Pro Chef Tips
Want to take your Apple Nachos from good to absolutely phenomenal? Here are some professional techniques and insider secrets:
Choose the right apple varieties: Mix two different apple varieties for more complex flavor – try pairing a sweet apple (like Honeycrisp or Gala) with a tart one (like Granny Smith). The contrast makes each bite more interesting. Different apples also provide varying textures and colors, making your nachos more visually appealing.
Perfect your slice thickness: Aim for ¼-inch thick slices – thick enough to be sturdy and provide good crunch, but thin enough to bite through easily. Use an apple slicer gadget for perfectly uniform pieces every time, or take your time with a sharp knife. Uneven slices lead to some pieces being too thick and hard to eat while others are flimsy.
Master the drizzle technique: Warm your nut butter to the perfect consistency – it should flow smoothly but not be so thin that it runs off the apples and pools on the plate. The ideal temperature is just warm to the touch. Use squeeze bottles or plastic bags with the corner snipped off for the most controlled, beautiful drizzles. Practice your zig-zag motion over the sink first if you want Instagram-perfect results!
Layer strategically: Think of building Apple Nachos like building lasagna – you want toppings distributed throughout, not just on top. For larger servings, create two or three layers of apples with toppings between each layer so every bite has a good mix of flavors and textures.
Toast your toppings: Take an extra minute to toast your coconut, nuts, and even granola in a dry skillet for 2-3 minutes before using. This intensifies their flavor and adds an extra dimension of crunch. Toasted coconut especially becomes fragrant and more flavorful.
Use chocolate strategically: For the best chocolate coverage, melt chocolate chips with a teaspoon of coconut oil for a thinner, shinier sauce that sets with a nice snap. Let the drizzled chocolate cool for a minute before adding other toppings so they stick to it.
Work quickly after cutting: Apples oxidize fast! Have all your toppings prepped and ready to go before you slice the apples. Once you cut them, work quickly to assemble and serve. If you must wait, keep the lemon-juice-coated apple slices in a bowl of cold water with lemon until ready to use, then pat very dry.
Consider apple shape: Slice apples horizontally (across the core) for pretty circular rounds with a star pattern in the center, or vertically for traditional wedges. Horizontal slices are prettier for presentation but vertical wedges are easier to eat with your hands.
Balance your flavors: Don’t go overboard with every topping! Too many sweet elements can be cloying. Balance sweet toppings with something slightly tart (like the apple itself), something salty (nuts, pretzels), and something neutral (granola). The contrast makes each component shine.
Common Mistakes to Avoid
Even with a simple recipe like this, there are a few common pitfalls that can affect your results. Here’s what to watch out for:
Using the wrong apple varieties: Soft, mealy apples like Red Delicious create a disappointing texture. These apples lack the crispness that makes Apple Nachos so satisfying to eat. They also brown faster and don’t hold up well under toppings. Stick with crisp varieties like Honeycrisp, Granny Smith, Pink Lady, or Gala. If you accidentally buy soft apples, cut them into smaller pieces so the texture issue is less noticeable.
Cutting apples too far in advance: While you can slice apples ahead with lemon juice, the best texture and flavor come from freshly cut apples. Even with lemon juice, apples will start to brown and lose their crispness after sitting for more than 30 minutes. The edges can also start to dry out. If making for a party, slice the apples no more than 15-20 minutes before serving, or right before guests arrive.
Overloading with toppings: More isn’t always better! Too many toppings make the nachos overwhelming, overly sweet, and difficult to eat. The apple should still be the star, with toppings as supporting players. A heavy hand with chocolate and nut butter can also make everything slide off and create a mess. Use a light touch with drizzles and sprinkle toppings evenly rather than dumping them in one spot.
Not thinning the nut butter enough: Thick, cold peanut butter is impossible to drizzle prettily and will sit in globs rather than distributing evenly. This creates an uneven eating experience where some bites have too much and others have none. Always warm your nut butter and thin it slightly until it drizzles smoothly. Test the consistency on a plate before drizzling over your apples.
Forgetting about lemon juice: If you’re not serving immediately or if your apples are particularly prone to browning, skipping the lemon juice results in unappetizing brown apples that look unappetizing even though they taste fine. The visual appeal of food matters! Just a tablespoon of lemon juice tossed with your apple slices will keep them looking fresh and bright without making them taste lemony.
Incorrect apple-to-topping ratio: Using too few apples with too many toppings creates an overly sweet, heavy snack that defeats the “healthy” purpose. Conversely, too many apples with too few toppings leaves people underwhelmed. Aim for a balanced ratio where apples are well-covered but not swimming in toppings.
Storage & Meal Prep
Let’s be honest – Apple Nachos are absolutely best enjoyed fresh and don’t store particularly well due to the nature of cut apples. However, here’s what you need to know about keeping them and prepping ahead:
Immediate Consumption is Best: Ideally, you should make and eat Apple Nachos right away. The combination of crisp apples with the various toppings is at its peak within the first 30 minutes after assembly. The apples stay crispest, the chocolate and nut butter remain at perfect consistency, and nothing gets soggy or slides off.
Short-Term Storage: If you absolutely must store assembled Apple Nachos (though I don’t recommend it), cover the plate tightly with plastic wrap and refrigerate for no more than 2-3 hours. The apples will brown despite the lemon juice, the granola will get soggy from the moisture in the apples, and the nut butter and chocolate will harden considerably in the cold. Before serving, let them sit at room temperature for 10-15 minutes.
Storing Components Separately: This is your best bet for any kind of “advance prep.” Cut and prepare your apples, toss with lemon juice, and store in an airtight container submerged in cold water with a bit of extra lemon juice for up to 4-6 hours. Keep all toppings in separate containers. Drain and thoroughly pat dry the apples before assembling. This method works great if you’re bringing Apple Nachos to a party – transport everything separately and assemble on-site.
Leftover Apple Slices: If you have leftover untopped apple slices, store them in an airtight container in the fridge and use within 24 hours. They’re perfect for snacking, adding to oatmeal, or blending into smoothies. If they’ve been tossed with lemon juice, rinse and pat dry before eating plain as they may taste too tart.
Don’t Store Assembled Leftovers: If you’ve made Apple Nachos and have leftovers, it’s better to discard them or eat the apples plain. The combination of soggy granola, hardened chocolate, and brown apples isn’t appetizing after refrigeration. This is one recipe where leftovers just don’t work well.
Make-Ahead & Freezer Notes
While this isn’t a make-ahead friendly dish in the traditional sense, here are some strategies for planning ahead:
Component Prep: The best make-ahead strategy is preparing your toppings in advance. Melt and portion your chocolate, measure out your granola, toast your coconut, and store everything in separate containers up to 3 days ahead. This way, when snack time comes, you only need to slice apples and assemble, which takes just 5 minutes.
Preparing Apples Ahead: For the apples themselves, you can slice them up to 2-3 hours ahead if necessary. Toss them immediately with lemon juice (or a solution of water with a dissolved Vitamin C tablet, which works even better than lemon juice), and store in an airtight container in the refrigerator. Just before assembling, drain the apples well and pat completely dry with paper towels. The lemon juice will slow browning significantly but won’t prevent it entirely beyond a few hours.
Freezing Apple Nachos: I don’t recommend freezing assembled Apple Nachos – the texture of the apples becomes mealy and unpleasant when thawed, and all the toppings will become a soggy mess. This is definitely a fresh-only recipe.
Party Planning Strategy: If making these for a party or gathering, set up an Apple Nachos Bar instead! Prep and arrange all your toppings in pretty bowls, slice your apples right before guests arrive (or let them watch you slice them), and let everyone build their own. This keeps everything fresh, accommodates different preferences and dietary needs, and adds an interactive, fun element to your gathering.
School Lunch Hack: For kids’ lunch boxes, pack apple slices (tossed with lemon juice) in one compartment, and individual portions of toppings in separate small containers or silicone cups. Include a small plate or the main lunch container as the “nacho plate,” and your child can assemble their Apple Nachos at lunchtime for a fun, fresh snack.
Serving Suggestions
Apple Nachos are wonderfully versatile and can fit into various occasions and meals. Here’s how to serve them:
After-School Snack: This is the perfect time for Apple Nachos! Serve them as soon as kids get home for a satisfying snack that curbs hunger until dinner without spoiling their appetite. Pair with a glass of cold milk or a protein smoothie for a more substantial snack.
Party Appetizer or Dessert: Apple Nachos make a stunning centerpiece for gatherings! Arrange them on a large platter or serving board and place in the center of your appetizer table. They work especially well at fall gatherings, baby showers, birthday parties, game day celebrations, or any casual get-together. They’re conversation starters because they’re so visually interesting and unexpected!
Fun Family Dessert Night: Make Apple Nachos the main event for a casual family dessert night. Set up a topping bar and let everyone build their own. Pair with hot apple cider, hot chocolate, or chai tea for a cozy autumn evening.
Healthy Breakfast Option: Yes, Apple Nachos work for breakfast! They provide fruit, protein from nut butter, and energy from the other toppings. Serve alongside scrambled eggs or a yogurt parfait for a more substantial morning meal. Use less chocolate and more nuts and seeds for a breakfast-appropriate version.
Brunch Showstopper: For a weekend brunch or brunch party, Apple Nachos add a fresh, light option among heavier breakfast dishes. They’re especially good as a palate cleanser between savory courses.
Movie Night Snack: Instead of popcorn or candy, make Apple Nachos for movie night! They satisfy sweet cravings while being substantially healthier than traditional movie snacks.
Lunch Box Treat: As mentioned earlier, pack components separately for kids to assemble at lunchtime. It makes lunch exciting and ensures they get fresh fruit.
Beverage Pairings: Apple Nachos pair wonderfully with:
- Hot apple cider or spiced cider
- Cold milk (regular or non-dairy)
- Hot chocolate or mocha
- Caramel latte or cappuccino
- Chai tea or spiced tea
- Sparkling apple juice
- Protein smoothies
Complementary Snacks: If serving as part of a larger snack spread, pair with:
- Veggie nachos with hummus (for savory contrast)
- Cheese and crackers
- Trail mix or nuts
- Popcorn (lightly salted or kettle corn)
- Fresh fruit salad
FAQs Section
Q: How do I keep my apples from turning brown?
A: The best method is to toss your sliced apples with 1 tablespoon of fresh lemon juice immediately after cutting. The citric acid slows the oxidation process that causes browning. For even better results, you can dissolve a Vitamin C (ascorbic acid) tablet in water and soak your apple slices in that solution for 3-5 minutes, then pat dry. Some people swear by soaking apples in a mixture of water and a bit of honey or in Sprite/7-Up, which also works due to the citric acid content. However, lemon juice is the most reliable and doesn’t add unwanted sweetness. Even with these methods, apples will eventually brown, so serve within 30 minutes to an hour for the best appearance.
Q: Can I make Apple Nachos nut-free for school or allergies?
A: Absolutely! Apple Nachos are easily adapted for nut allergies. Replace peanut butter with sunflower seed butter (like SunButter), tahini (sesame seed paste), or even cream cheese thinned with a bit of milk for drizzling. WowButter is another great peanut butter alternative that’s school-safe. Make sure your granola is nut-free (many brands make nut-free versions), and skip any nut toppings, replacing them with seeds (pumpkin seeds, sunflower seeds), dried fruit, or extra chocolate chips. Always check labels on all products to ensure they’re processed in nut-free facilities if dealing with severe allergies.
Q: What are the best apples to use for this recipe?
A: The best apples are crisp, firm varieties that hold up well and don’t brown too quickly. Top choices include Honeycrisp (sweet, juicy, extremely crisp), Granny Smith (tart, very firm, slower to brown), Pink Lady/Cripps Pink (sweet-tart balance, crisp), Gala (mild and sweet, kid-friendly), Fuji (very sweet and crunchy), and Jazz (crisp with complex flavor). Avoid softer apples like Red Delicious, McIntosh, or any apple that feels soft or mealy when you press it. For the best flavor and texture experience, use a combination of two varieties – one sweet and one tart.
Q: Can I make these ahead for a party?
A: Apple Nachos really are best assembled fresh, but you can do significant prep work ahead. Prep all your toppings, warm your nut butter, melt your chocolate, and have everything ready in serving bowls up to a day ahead. For the apples, slice them no more than 2-3 hours before serving, toss with lemon juice, and keep in an airtight container in the fridge. Pat them completely dry before assembling. For parties, I highly recommend setting up an Apple Nachos Bar instead – arrange all the toppings in bowls, slice the apples fresh when guests arrive, and let everyone build their own. This keeps everything fresh and makes it interactive and fun!
Q: How do I get the peanut butter to drizzle nicely instead of clumping?
A: The key is warming and thinning your peanut butter to the right consistency. Place your peanut butter in a microwave-safe bowl and heat for 15-20 seconds. Stir well, then add 1-2 teaspoons of honey, maple syrup, or warm water and stir until smooth. If it’s still too thick, microwave another 10 seconds and add a bit more liquid. You want a consistency similar to honey – it should flow smoothly off a spoon but not be so thin it’s watery. Natural peanut butter (the kind where oil separates on top) actually drizzles more easily than regular peanut butter. For the prettiest drizzles, transfer the thinned peanut butter to a squeeze bottle or a plastic zip-top bag with a corner snipped off, which gives you much better control than a spoon.
Q: Are Apple Nachos actually healthy?
A: Yes and no – it depends on how you build them! The base of fresh apples provides fiber, vitamins, and natural sweetness, which is definitely healthy. Adding nut butter contributes protein and healthy fats. Where it can become less healthy is with excessive chocolate, sugary granola, honey drizzles, and lots of sweetened coconut. That said, Apple Nachos are still significantly healthier than traditional desserts or snacks like cookies, candy, or ice cream. They offer real nutrition (fiber, vitamins, minerals, protein) alongside the treat elements. For the healthiest version, use unsweetened coconut, dark chocolate chips (which have antioxidants), low-sugar granola, skip the honey drizzle, and add nuts and seeds for extra nutrition. Even the “indulgent” version is healthier than most alternatives because you’re still getting the benefits of whole fruit.
Q: Can I use other fruits instead of just apples?
A: Definitely! While apples are the classic choice and hold up best, you can absolutely create fruit nachos with other options. Pears work wonderfully and are similar to apples in texture. Strawberries, sliced bananas, and pineapple chunks are all excellent choices. You can even do a mixed fruit version with a combination of berries, melon pieces, and apple slices. Watermelon “nachos” have become trendy too – use triangle-shaped watermelon slices as the base. Keep in mind that softer fruits like bananas and strawberries brown or get mushy more quickly than apples, so they need to be served immediately. Citrus fruits like orange or grapefruit segments can work but pair better with yogurt drizzles than chocolate.
Q: How many apples do I need per person?
A: For a snack serving, plan on about ½ to ¾ of a large apple per person (roughly 4-6 apple slices). If serving as a dessert or more substantial snack, use 1 full apple per person. For a party where Apple Nachos are just one of many options, ½ apple per person is usually sufficient. Remember that the toppings add volume and substance, so you need less apple than you might think. The beauty of Apple Nachos is that they’re easy to scale – just add more apples and proportionally increase your toppings. For a family of four as an after-school snack, 2-3 large apples with ¼ cup peanut butter and modest toppings works perfectly.
Conclusion
And there you have it – everything you need to create the most delicious, fun, and healthy Apple Nachos that will have everyone asking for seconds! This recipe proves that healthy snacking doesn’t have to be boring or feel like a compromise. With crisp, fresh apples as your canvas and an array of delicious toppings to choose from, you can create a snack that’s as nutritious as it is indulgent, as beautiful as it is delicious.
What makes this easy apple nachos recipe so special is its incredible versatility and universal appeal. Whether you’re a busy parent looking for an after-school snack that kids will actually get excited about, a health-conscious adult wanting to satisfy sweet cravings without derailing your goals, or a host planning a party that needs a showstopping yet simple dish, these apple slice nachos deliver every single time. They’re proof that the best recipes don’t have to be complicated – sometimes the simplest ideas are the most brilliant!
I absolutely love how this recipe brings people together, gets kids involved in the kitchen, and makes healthy eating genuinely exciting. There’s something magical about transforming ordinary apples into something that looks and feels like a special treat. The interactive nature of building Apple Nachos – whether you’re assembling them yourself or setting up a topping bar for others – makes eating more mindful and fun.
So what are you waiting for? Grab some crisp apples, raid your pantry for toppings, and whip up a batch of these healthy apple nachos right now! Get creative with your toppings, make them your own, and don’t forget to snap a photo of your beautiful creation. I’d absolutely love to see how your Apple Nachos turn out!
Have you tried this recipe? Please leave a comment below and let me know how it went! Tell me about your favorite topping combinations, any creative variations you tried, or how your family loved them. Give this recipe a star rating to help other readers, and don’t forget to PIN THIS RECIPE to your favorite Pinterest boards so you can find it again easily. Share your Apple Nachos photos on Instagram and tag me – I feature reader creations in my stories!
If you loved these Apple Nachos, you’ll definitely want to check out my other healthy snack recipes on the blog. Happy snacking, friends! 🍎