Crispy Baked Apple Chips Recipe: Healthy Homemade Apple Snack
Baked apple chips are thin, crispy slices of fresh apples baked low and slow in the oven until they transform into perfectly crunchy, naturally sweet chips that taste like concentrated apple flavor in every bite, creating a healthy snack that’s perfect for lunchboxes, after-school munching, or anytime you want something sweet without guilt. This easy baked apple chips recipe uses just one or two ingredients (apples and optional cinnamon), requiring no special equipment beyond your oven and a sharp knife or mandoline, making homemade apple chips achievable for anyone who wants a healthier alternative to store-bought chips or candy. Whether you’re meal prepping snacks for the week, looking for kid-friendly treats, or simply trying to eat more fruit, these crispy apple chips deliver satisfying crunch and natural sweetness that makes healthy snacking actually enjoyable.
What makes this homemade apple chips recipe so irresistible is how baking concentrates the apple’s natural sugars, creating intense apple flavor that’s both sweet and slightly tart, with a satisfying crunch that rivals any potato chip. Unlike store-bought dried apple chips that often contain added sugar, preservatives, and sulfites, these healthy apple chips are pure fruit—nothing added, nothing artificial. The best part? They’re incredibly budget-friendly since apples are affordable year-round, and making them at home costs a fraction of what you’d pay for packaged versions.
This cinnamon apple chips recipe works beautifully for countless occasions—school lunches and lunchbox fillers, healthy after-school snacks for kids, portable hiking and camping food, party appetizers on cheese boards, topping for yogurt or oatmeal, or guilt-free late-night munchies when you want something crunchy. They’re naturally gluten-free, vegan, paleo-friendly, contain no added sugar, and are so simple that kids can help make them. Best of all, these baked apple chips prove that healthy snacking can be absolutely delicious and satisfying!
History / Background
Baked apple chips represent a modern, health-conscious take on the ancient practice of drying fruit for preservation, a technique humans have used for thousands of years to extend the shelf life of seasonal produce. To understand these popular snacks, we need to explore both the history of fruit preservation and how home ovens transformed dried fruit from necessity into a wellness trend.
Drying fruit is one of humanity’s oldest food preservation methods, dating back to ancient Mesopotamia and Egypt around 12,000 BCE when people discovered that removing moisture prevented spoilage. Apples specifically have been dried for centuries across cultures—from medieval Europe where dried apple rings were stored for winter, to American colonial times when apple slices were strung and hung near fireplaces to dry. This wasn’t about creating snacks; it was about survival, ensuring fruit nutrition was available during months when fresh fruit didn’t grow.
Traditional methods involved sun-drying or air-drying, which took days and depended on warm, dry weather. The invention of food dehydrators in the early 20th century made the process more reliable and faster, but dehydrators remained specialized equipment that most home cooks didn’t own. Store-bought dried fruits became common in the mid-1900s, though they often contained added sugars, preservatives, and sulfites to maintain color and extend shelf life.
The innovation of making apple chips in a conventional home oven emerged in the 2000s-2010s as part of the broader wellness and whole foods movement. Food bloggers and health-conscious home cooks discovered that low-temperature baking (around 200°F) could replicate dehydrator results using equipment everyone already had in their kitchen. This democratized homemade dried fruit, making it accessible to anyone.
The specific trend of “apple chips” (as opposed to traditional chewy dried apples) gained massive popularity on Pinterest, Instagram, and food blogs in the 2010s as people sought healthier alternatives to potato chips and packaged snacks. The key innovation was slicing apples paper-thin and baking them until completely crispy rather than chewy, creating a chip-like texture that satisfied the craving for crunchy snacks without the guilt of fried foods.
The recipe exploded in popularity particularly among parents looking for healthy lunchbox options, clean eating enthusiasts, and anyone following paleo, Whole30, or other whole-foods-based diets. The visual appeal of the thin, translucent slices also made them Instagram-worthy, further driving their popularity on social media.
Today, baked apple chips represent how traditional preservation techniques have been adapted for modern wellness culture—turning a practical necessity into a trendy, healthy snack that tastes indulgent while being pure fruit.
Why You’ll Love This Recipe
These baked apple chips are about to become your new favorite healthy snack obsession. This easy baked apple chips recipe delivers incredible crunch and concentrated apple sweetness using nothing but fresh apples and time. Whether you’re trying to eat healthier, looking for kid-approved snacks, or want to make your own portable munchies for a fraction of store-bought prices, you’ll appreciate how these homemade apple chips create guilt-free satisfaction with minimal effort.
Here’s why this recipe deserves a permanent spot in your snacking routine:
- Only 1-2 Ingredients – Apples and optional cinnamon, that’s it!
- No Added Sugar – Naturally sweet from the apples themselves
- Incredibly Budget-Friendly – Costs pennies per batch
- Healthy Snacking – Low calorie, high fiber, pure fruit
- Kid-Approved – Even picky eaters love these
- Naturally Gluten-Free – Safe for celiac and gluten sensitivity
- Vegan and Paleo-Friendly – Fits multiple dietary lifestyles
- Perfect for Meal Prep – Make batches for the whole week
- No Special Equipment – Just your regular oven
- Customizable Flavors – Add spices to suit your taste
- Long Shelf Life – Stays crispy for weeks when stored properly
- Great for Kids to Help Make – Simple, safe, educational
Ingredient Notes
Understanding your ingredients helps you make the best baked apple chips possible. Let’s break down each component:
Apples – The star and only essential ingredient. Use 3-4 large apples for one batch. The variety matters! Best choices include:
- Honeycrisp – Sweet, crisp, holds shape well
- Fuji – Very sweet, creates candy-like chips
- Gala – Mildly sweet, reliable results
- Granny Smith – Tart, great if you prefer less sweetness
- Pink Lady – Balanced sweet-tart, excellent flavor
Choose firm, crisp apples without bruises. Softer varieties like Red Delicious or McIntosh don’t crisp as well. You can mix varieties for complex flavor. Organic is nice to avoid pesticides since you’re eating the skin, but not required—just wash well.
Cinnamon (Optional) – Enhances natural apple sweetness and adds warmth. Use 1-2 teaspoons ground cinnamon for 3-4 apples. This is completely optional—plain apple chips are equally delicious! Other spice options include nutmeg, pumpkin pie spice, or even a tiny pinch of cayenne for heat.
Lemon Juice (Optional) – Some recipes call for a light spritz of lemon juice to prevent browning and add tartness. Use juice of ½ lemon diluted with ½ cup water if desired. This isn’t necessary for flavor, just appearance—the chips will brown during baking anyway.
No Sugar Needed! – Unlike many recipes, these truly don’t need added sugar. The low, slow baking concentrates the apple’s natural sugars, creating intensely sweet chips without any additions.
Equipment Needed
You’ll need these simple tools to make perfect baked apple chips:
- Sharp Knife or Mandoline Slicer – For slicing apples paper-thin (⅛ inch or thinner)
- Baking Sheets – 2-3 large baking sheets (you’ll need space!)
- Parchment Paper or Silicone Baking Mats – Essential to prevent sticking
- Cutting Board – For slicing apples
- Apple Corer (Optional) – Makes removing cores easier
- Small Bowl – For cinnamon mixture if using
- Cooling Rack – For cooling chips after baking
- Airtight Container – For storing finished chips
Note: A mandoline slicer is highly recommended for uniform, paper-thin slices. Hand-slicing works but requires patience and a very sharp knife.
Print
Crispy Baked Apple Chips Recipe
These crispy baked apple chips are the perfect healthy snack! Made with just apples and optional cinnamon, they’re naturally sweet, satisfyingly crunchy, and contain no added sugar or oil. Easy to make and impossible to stop eating!
- Total Time: 2 hours 15 minutes
- Yield: About 3-4 cups chips (serves 4-6) 1x
Ingredients
- 3-4 medium apples (any variety – Honeycrisp, Fuji, or Gala recommended)
- 1-2 teaspoons ground cinnamon (optional)
- 1 tablespoon fresh lemon juice (optional, prevents browning)
Instructions
- Preheat oven: Preheat your oven to 200°F (93°C). Line 2-3 large baking sheets with parchment paper or silicone baking mats. Using low temperature is key to drying out the apples without burning them.
- Prep apples: Wash and dry apples thoroughly. Using a sharp knife or mandoline slicer, cut apples crosswise into very thin slices, about ⅛ inch thick (or as thin as you can manage – thinner is better!). You want them thin enough to see through slightly. Remove any seeds as you go, but keep the peel on for fiber and structure.
- Optional lemon treatment: If you want to prevent browning, toss apple slices gently in a bowl with lemon juice. This step is optional – some browning during baking is natural and doesn’t affect taste.
- Arrange on baking sheets: Lay apple slices in a single layer on prepared baking sheets, making sure they don’t overlap. Overlapping will cause uneven drying and soggy spots. It’s okay if they’re close together, but they shouldn’t touch.
- Season (optional): If using cinnamon, lightly sprinkle it over the apple slices. Use a fine-mesh sieve or shaker for even distribution. A little goes a long way!
- Bake: Place baking sheets in the preheated oven. Bake for 1 hour, then flip each apple slice over using tongs or a spatula. Return to oven and continue baking for 1-1.5 more hours, checking every 20 minutes.
- Check for doneness: Chips are done when they feel dry to the touch and are starting to curl at the edges. They may still feel slightly soft when hot but will crisp up as they cool. Thicker slices will take longer than thin ones.
- Cool completely: Remove baking sheets from oven and let chips cool completely on the baking sheets or transfer to wire cooling racks. They will continue to crisp as they cool. This step is important – don’t skip it!
- Store: Once completely cool and crispy, store apple chips in an airtight container at room temperature. They’ll stay crispy for up to 1 week (if they last that long!).
Notes
- Slice thickness matters: The thinner you slice apples, the crispier the chips. Aim for ⅛ inch or thinner. A mandoline makes this easier and more uniform.
- Don’t overlap: Apple slices must be in a single layer for even drying. Use multiple baking sheets if needed.
- Low and slow: The low temperature (200°F) is crucial. Higher heat will burn the edges before the centers dry out.
- Flip halfway: Flipping ensures even drying on both sides and prevents sticking.
- They crisp as they cool: Chips will seem slightly soft when hot but firm up dramatically during cooling.
- Apple variety: Different apples create different flavor profiles. Try multiple varieties!
- Humidity affects results: On humid days, chips may take longer to dry and may not get as crispy.
- Prep Time: 15 minutes
- Cook Time: 2 hours
- Category: Dessert
- Method: Baking
- Cuisine: American
- Diet: Gluten Free
Nutrition
- Serving Size: About 1 cup (1 apple's worth of chips)
- Calories: 95
- Sugar: 19g (natural fruit sugars)
- Sodium: 2mg
- Fat: 0.3g
- Saturated Fat: 0g
- Unsaturated Fat: 0g
- Trans Fat: 0g
- Carbohydrates: 25g
- Fiber: 0g
- Protein: 15g
- Cholesterol: 70mg
Tips & Variations
Spice Level Adjustments:
- Mild: Reduce buffalo sauce to ⅓ cup, add more ranch
- Medium: Recipe as written with ½ cup buffalo sauce
- Hot: Increase to ¾ cup buffalo sauce, add diced jalapeños
- Extra hot: Use ¾ cup sauce plus ¼ teaspoon cayenne pepper
Cheese Variations:
- Blue cheese lovers: Add ½ cup crumbled blue cheese to the mix
- Extra cheesy: Increase cheddar to 2 cups total
- Pepper jack: Use for spicy, smoky flavor
- Mexican blend: For a Tex-Mex twist
- Mozzarella: For extra stretchy, gooey texture
Protein Options:
- Turkey: Use leftover turkey (perfect for post-Thanksgiving!)
- Rotisserie chicken: The easiest and most flavorful
- Canned chicken: Most budget-friendly option
- Pulled chicken: Slow cooker chicken works great
- Vegetarian: Use shredded cauliflower or jackfruit
Add-In Ideas:
- Crispy bacon crumbles (everything’s better with bacon!)
- Diced celery for crunch
- Green onions for color and flavor
- Jalapeños for extra heat
- Corn kernels for sweetness
- Black beans for heartiness
- Diced bell peppers for color
Healthier Swaps:
- Use light cream cheese and sour cream
- Substitute Greek yogurt for sour cream
- Use reduced-fat cheese
- Add extra vegetables like spinach or bell peppers
- Serve with veggies instead of chips
Cooking Method Variations:
- Slow cooker: Mix everything and cook on low 2-3 hours
- Stovetop: Heat in a skillet over medium-low, stirring until melted
- Microwave: Heat in microwave-safe dish in 2-minute intervals, stirring
- Air fryer: Bake in air fryer-safe dish at 350°F for 12-15 minutes
Pro Chef Tips
Tip #1: Room Temperature Cream Cheese is Essential
Professional chefs never use cold cream cheese in dips because it creates lumps that resist mixing. Let cream cheese sit at room temperature for 30-60 minutes before making the dip, or microwave it for 15-20 seconds to soften (don’t melt it!). Softened cream cheese blends smoothly, creating that silky texture you want.
Tip #2: Shred Your Own Cheese
Pre-shredded cheese contains anti-caking agents (usually cellulose) that prevent smooth melting and can make your dip grainy. If you have time, buy a block of cheese and shred it yourself. The difference in meltability and texture is noticeable. Freshly shredded cheese also has better flavor.
Tip #3: Don’t Overbake
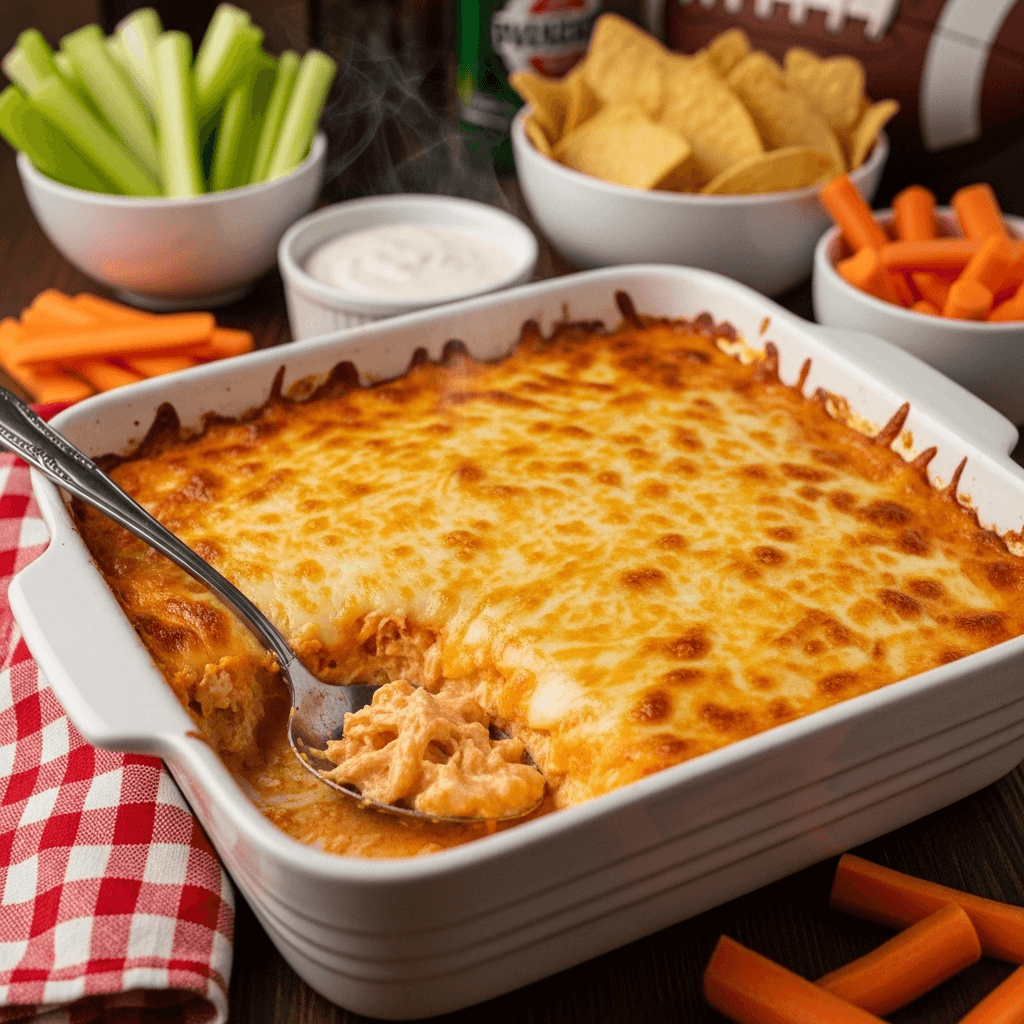
The dip is done when it’s hot throughout and bubbling at the edges – usually 20-25 minutes. Overbaking can cause the cheese to separate and become oily or grainy. You want it hot and bubbly, but not splitting. The dip will continue to cook slightly from residual heat after removing from the oven.
Tip #4: Let It Rest Before Serving
Resist the urge to serve immediately! Let the dip rest for 5 minutes after baking. This brief cooling period allows it to thicken slightly, making it easier to scoop and less likely to burn eager mouths. The flavors also have a moment to settle and meld together.
Tip #5: Keep It Warm in a Slow Cooker
For parties lasting several hours, transfer your baked dip to a slow cooker set on “warm” or “low.” This keeps it at the perfect temperature throughout your event without drying out or continuing to cook. Stir occasionally to maintain even consistency. This is a game-changer for entertaining!
Tip #6: Taste and Adjust Before Baking
Before spreading the dip into your baking dish, taste it! This is your chance to adjust seasoning, add more buffalo sauce for heat, or more ranch for creaminess. Once baked, you can’t easily fix the flavor balance. Trust your palate and make it perfect for your crowd’s preferences.
Common Mistakes to Avoid
Mistake #1: Using Cold Cream Cheese
Cold cream cheese won’t mix smoothly, creating lumps throughout your dip no matter how much you stir. Those lumps won’t disappear during baking and create an unpleasant texture. Always let cream cheese soften to room temperature first. If you forgot, microwave it briefly (15-20 seconds) to soften, but don’t let it melt or get hot.
Mistake #2: Adding Too Much Buffalo Sauce
More isn’t always better! Too much buffalo sauce makes the dip watery, overly spicy, and can cause it to separate during baking. Start with the recommended ½ cup, then add more if needed after tasting. You can always add more buffalo sauce or serve it on the side for heat lovers.
Mistake #3: Not Draining Chicken Properly
Whether using canned chicken or cooking your own, excess moisture ruins the dip’s consistency. Canned chicken should be thoroughly drained and even pressed to remove extra liquid. Rotisserie chicken should be shredded and any excess moisture patted away with paper towels. Watery chicken creates watery dip.
Mistake #4: Forgetting to Grease the Baking Dish
Without greasing, the dip sticks to the dish edges and becomes difficult to serve cleanly. A light coating of cooking spray or butter prevents sticking and makes cleanup easier. This simple step saves frustration when serving.
Mistake #5: Serving Immediately After Baking
The dip is molten-hot right out of the oven and the consistency is too thin. Let it rest for 5 minutes – it will thicken as it cools slightly, making it easier to scoop, and you won’t burn anyone’s mouth. This waiting period also allows flavors to settle and improves overall texture.
Storage & Meal Prep
Refrigerator Storage:
Store leftover buffalo chicken dip in an airtight container in the refrigerator for up to 4 days. The dip will firm up considerably when cold but remains delicious. Some liquid may separate out – this is normal and can be stirred back in when reheating.
Reheating Instructions:
Reheat in a 350°F oven for 15-20 minutes until hot throughout, stirring halfway through. You can also microwave individual portions in 30-second intervals, stirring between each, until heated. For best texture, reheat in the oven rather than microwave. Add a splash of milk or ranch if the dip seems too thick after storing.
Texture After Storage:
The dip thickens significantly after refrigeration as fats solidify and ingredients meld together. This is normal! When reheating, you may want to stir in 1-2 tablespoons of milk, chicken broth, or extra ranch dressing to restore the original creamy consistency. Mix well while heating.
Portioning for Meal Prep:
If making ahead for multiple events, portion the dip into smaller containers (2-cup portions work well). This way you can reheat only what you need without constantly reheating the entire batch, which can degrade quality over multiple heatings.
Make-Ahead & Freezer Notes
Assembling Ahead:
Chicken wing dip is perfect for make-ahead! Prepare the complete dip mixture, spread it in your baking dish, top with cheese, cover tightly with plastic wrap, and refrigerate for up to 24 hours. When ready to serve, remove from refrigerator, let sit at room temperature for 15 minutes, then bake as directed (may need 5 extra minutes since starting cold).
Day-Before Strategy:
For stress-free entertaining, prepare the dip completely the day before your party. Store covered in the refrigerator overnight. About 45 minutes before guests arrive, remove from fridge, let warm slightly, and bake. This timing gives you hot, fresh dip right when you need it without last-minute stress.
Freezing Instructions:
Buffalo chicken dip freezes reasonably well for up to 2 months, though texture may be slightly different after thawing. Freeze in the baking dish (wrapped very well) or in a freezer-safe container. Thaw overnight in refrigerator before baking. The cheese may separate slightly but usually comes back together when stirred during reheating.
Freezing Baked vs. Unbaked:
You can freeze either unbaked (assemble completely, then freeze) or baked (cook, cool completely, then freeze) dip. Unbaked gives you “fresh-baked” quality when reheated. Baked is more convenient for quick reheating. Both methods work – choose based on your needs.
Best Freezing Approach:
For optimal quality, freeze the dip in smaller portions rather than one large batch. This allows you to thaw only what you need and reduces the number of freeze-thaw cycles. Wrap portions tightly in plastic wrap, then place in freezer bags with date labeled. Thaw in refrigerator overnight before reheating.
Serving Suggestions
Buffalo chicken wing dip deserves an equally delicious supporting cast. Here’s how to create the ultimate game day spread:
Dipping Options:
- Tortilla chips – Sturdy scoops work best
- Celery sticks – Classic buffalo wing pairing
- Carrot sticks – Sweet crunch balances heat
- Crackers – Choose thick, sturdy varieties
- Pita chips – Hold up well to thick dip
- Toasted baguette slices – For something more substantial
- Pretzels – Salty and sturdy
- Bell pepper strips – For a healthier option
- Cucumber slices – Fresh and cooling
Complete Game Day Spread: Create the ultimate party table:
- Buffalo chicken wing dip as the centerpiece
- Actual buffalo wings for wing lovers
- Veggie platter with ranch for freshness
- Chips and guacamole or salsa
- Cheese and crackers
- Mozzarella sticks or jalapeño poppers
- Fruit platter for balance
- Dessert like brownies or cookies
Beverage Pairings:
- Beer – Light lagers or IPAs work great
- Soda – Cola or lemon-lime
- Iced tea – Sweet or unsweetened
- Lemonade – Balances the heat
- Water – Always have plenty available
- Wine – Crisp whites like Pinot Grigio
- Cocktails – Margaritas or mojitos
Serving Vessels:
- Bake and serve in a pretty baking dish
- Transfer to a decorative serving bowl
- Keep warm in a small slow cooker
- Use a bread bowl for fun presentation
- Individual ramekins for personal servings
Making it a Meal: While typically an appetizer, you can make buffalo chicken dip more substantial:
- Serve over baked potatoes
- Use as a topping for nachos
- Stuff into quesadillas or tacos
- Spoon over rice or pasta
- Make buffalo chicken dip sandwiches
FAQs Section
Q: Can I use canned chicken?
A: Absolutely! Canned chicken is budget-friendly and convenient. Use 2 cans (12.5 ounces each) and drain them very thoroughly. Press the chicken in a strainer to remove excess moisture, then shred or chop before adding to the dip. While rotisserie chicken has more flavor, canned chicken works great in a pinch.
Q: How do I make this dip less spicy?
A: Reduce buffalo sauce to ⅓ cup and increase ranch dressing to make up the difference. You can also use mild buffalo sauce instead of medium or hot. Adding extra cheese and sour cream also helps mellow the heat. Serve with cooling sides like celery and ranch dressing. Remember, you can always add heat but can’t take it away!
Q: Can I make this in a slow cooker?
A: Yes! Mix all ingredients together, transfer to a greased slow cooker, and cook on LOW for 2-3 hours or HIGH for 1-1.5 hours, stirring occasionally. Once hot and bubbly, switch to WARM setting for serving. This method is perfect for parties because it keeps the dip at ideal temperature throughout the event.
Q: Why is my dip watery?
A: Watery dip usually results from excess moisture in the chicken (drain canned chicken thoroughly), too much buffalo sauce, or not draining vegetables like celery if adding them. To fix watery dip, simmer it on the stovetop while stirring to evaporate excess moisture, or add more cream cheese and cheese to thicken.
Q: Can I make this ahead and freeze it?
A: Yes! Assemble the dip completely, cover tightly, and freeze for up to 2 months. Thaw overnight in the refrigerator, then bake as directed (add 5-10 extra minutes). The texture may be slightly different after freezing, and you may need to stir in a splash of milk when reheating, but it’s still delicious.
Q: What’s the difference between buffalo sauce and hot sauce?
A: Buffalo sauce is a specific blend made with hot sauce (usually cayenne pepper-based), butter, vinegar, and other seasonings. It’s milder and more complex than straight hot sauce. Frank’s RedHot is the original and most popular brand. Don’t substitute plain hot sauce – it’s much spicier and doesn’t have the buttery richness that makes buffalo flavor distinctive.
Q: Can I make this dairy-free?
A: While it won’t be exactly the same, you can use dairy-free cream cheese, sour cream, and cheese alternatives. The texture and flavor will differ, but it can work. Coconut cream and cashew-based products work best for mimicking the creaminess. Make sure your buffalo sauce doesn’t contain butter (some do).
Conclusion
And there you have it – everything you need to make the most addictive, crowd-pleasing buffalo chicken wing dip that will have everyone asking for the recipe! This easy game day appetizer proves that the best party foods don’t require complicated techniques or hours of work. Just a handful of ingredients, one bowl, and 30 minutes creates something that tastes like you spent all day in the kitchen.
The beauty of this hot chicken wing dip is its versatility and guaranteed success. Whether you’re feeding a crowd for the Super Bowl, bringing an appetizer to a potluck, or just craving something cheesy and delicious, this recipe delivers every single time. It’s become a modern classic for good reason – it simply works, and everyone loves it!
Ready to make the ultimate party dip? I’d absolutely love to hear how yours turns out! Drop a comment below and let me know what you think, any variations you tried, or how fast it disappeared at your party. And if this becomes your new go-to appetizer (and I think it will!), please save this recipe to your Pinterest boards so you can find it easily next time – and help other home cooks discover this amazing dip too! Your pins and shares truly keep this blog going and inspire me to create more delicious recipes for you. Now grab that cream cheese and get ready to make the dip everyone will be talking about!