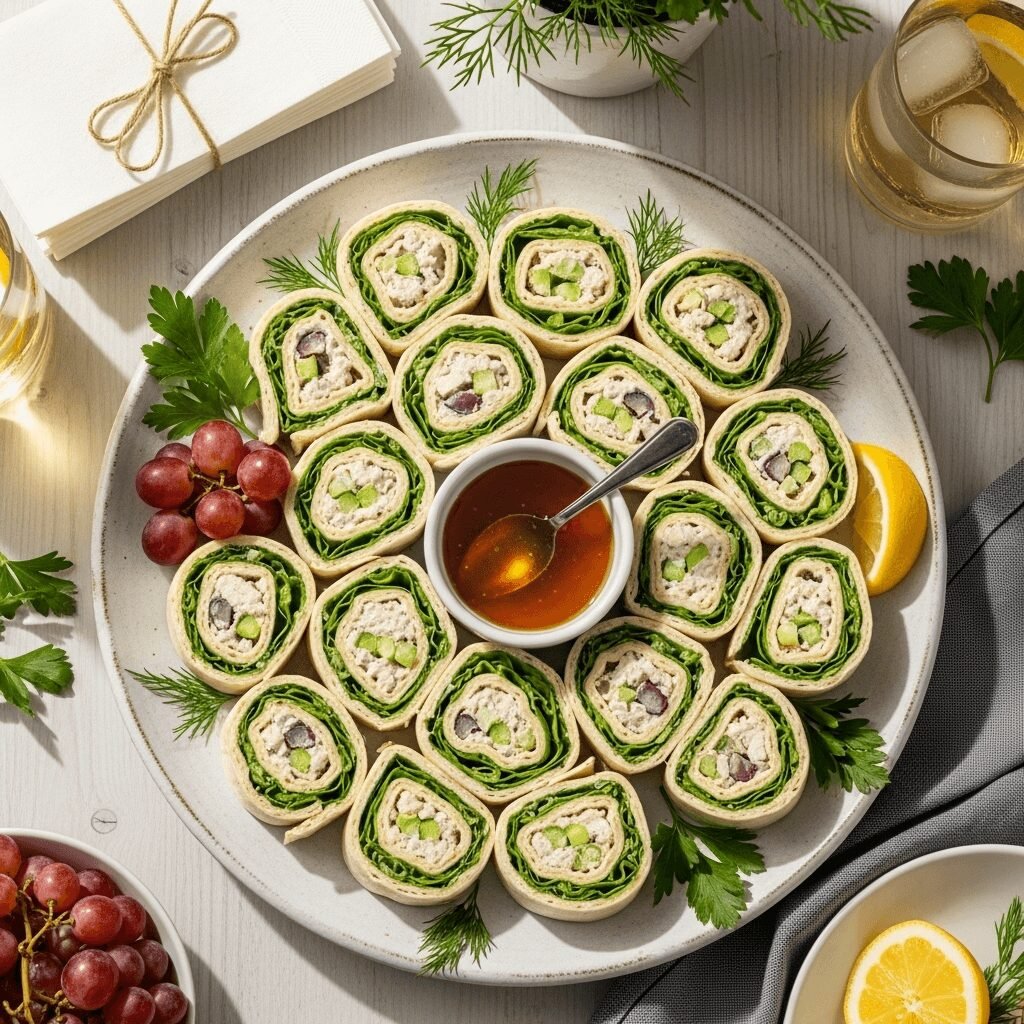
Easy Chicken Salad Pinwheels (Perfect Party Appetizer!)

If you’re looking for the ultimate crowd-pleasing appetizer that looks impressive but comes together in minutes, these chicken salad pinwheels are about to become your new go-to recipe! These beautiful spiral sandwiches feature creamy, flavorful chicken salad wrapped in soft flour tortillas and sliced into perfectly portioned rounds that are as pretty as they are delicious.
These easy chicken salad roll-ups are the definition of versatile – they’re perfect for game day parties, baby showers, bridal luncheons, holiday gatherings, picnics, or even as a quick and satisfying lunch. Unlike traditional finger sandwiches that can be fussy and time-consuming, these tortilla pinwheel appetizers come together in about 15 minutes and can be made hours (or even a day!) ahead of time, making them ideal for busy hosts who want to prep in advance.
What makes these pinwheels so irresistible is the combination of creamy, savory chicken salad studded with crunchy celery and a hint of sweetness, all wrapped up in a soft tortilla with fresh lettuce for added crunch. Each bite delivers that perfect balance of textures and flavors that keeps people coming back for more. Whether you’re feeding a crowd or just want an easy lunch option for the week, these make-ahead pinwheel sandwiches are about to earn a permanent spot in your recipe rotation!
History / Background
While pinwheel sandwiches might seem like a modern party food invention, their roots actually trace back to the elegant tea sandwiches of Victorian England in the late 1800s. British high society would serve dainty rolled sandwiches filled with cucumber, watercress, or egg salad during afternoon tea service. These delicate rolls were a way to showcase refinement and hospitality, with their spiral presentation considered quite sophisticated.
The concept of rolled sandwiches made its way to America in the early 20th century, where they became popular at ladies’ luncheons and garden parties. American cooks put their own spin on the tradition, using larger tortillas instead of thin bread slices and filling them with heartier ingredients like chicken salad, ham and cheese, or cream cheese spreads. By the 1950s and 60s, these “rollups” or “pinwheels” had become a staple of American party food, appearing in countless community cookbooks and women’s magazines.
The specific combination of chicken salad in a tortilla pinwheel likely emerged in the 1980s and 90s when tortillas became more mainstream in American kitchens beyond Mexican cuisine. Home cooks discovered that flour tortillas were the perfect vehicle for creating neat, easy-to-slice pinwheels that didn’t fall apart like traditional bread rolls sometimes did. The tortilla’s flexibility and neutral flavor made it ideal for holding creamy fillings without getting soggy.
Today, pinwheel sandwiches have evolved into countless variations, but the classic chicken salad version remains one of the most beloved. They’ve become synonymous with potluck dinners, bridal and baby showers, office parties, and any gathering where you need finger food that’s both impressive and easy to eat. The beauty of this recipe is that it takes a timeless classic – chicken salad – and presents it in a fun, modern format that appeals to all ages and occasions.
Why You’ll Love This Recipe
These chicken salad pinwheels are about to become your secret weapon for effortless entertaining! They deliver impressive presentation with minimal effort, making you look like a culinary genius without spending hours in the kitchen.
Here’s why this recipe is absolutely amazing:
- Incredibly easy – If you can spread and roll, you can make these! No cooking required, just assembly, making them perfect even for beginner cooks
- Lightning-fast prep – From start to finish, these take about 15 minutes of hands-on time, faster than ordering delivery
- Make-ahead friendly – Prep them hours or even a day in advance, then just slice and serve when guests arrive – zero last-minute stress!
- Perfect portion control – Each pinwheel is perfectly sized for one or two bites, making them ideal finger food with no messy plates or utensils needed
- Crowd-pleaser guaranteed – The creamy, savory filling appeals to everyone from kids to grandparents, with familiar flavors that everyone loves
- Budget-friendly – Uses simple, affordable ingredients you probably already have, and one batch feeds a crowd for just a few dollars
- Endlessly customizable – Swap the chicken for turkey, add different veggies, or try different tortilla flavors to keep things interesting
- Great for meal prep – Make a batch for easy grab-and-go lunches throughout the week, perfect for busy weekdays
- No-cook convenience – Ideal for hot summer days when you don’t want to turn on the oven or stove
- Kid-approved – Children love the fun spiral shape and mild, creamy filling, making these perfect for school lunches or after-school snacks
- Looks impressive – The beautiful spiral presentation makes these look fancy and restaurant-quality, even though they’re incredibly simple
- Transportable – These travel beautifully to potlucks, picnics, or office parties without falling apart or making a mess
Whether you’re an experienced entertainer or hosting your first party, these foolproof pinwheels will make you feel like a hosting superstar!
Ingredient Notes
Let’s break down what goes into these delicious chicken salad pinwheels and why each ingredient matters. Understanding your ingredients helps you make smart substitutions based on what you have available!
Cooked Chicken: The star of the show! Rotisserie chicken is the ultimate shortcut – it’s already seasoned, juicy, and ready to shred. You can also use leftover grilled chicken, poached chicken breasts, or even canned chicken in a pinch (though fresh tastes much better). You’ll need about 2 cups of shredded or diced chicken, which is roughly one rotisserie chicken breast or 2-3 chicken breasts. Dark meat adds more flavor, while white meat is leaner.
Mayonnaise: This is what makes the chicken salad creamy and binds everything together. Full-fat mayo gives the best flavor and texture, but you can use light mayo if you prefer. Greek yogurt can replace half the mayo for a tangier, protein-packed version, or use all Greek yogurt for a healthier twist (though the texture will be slightly different).
Celery: Provides that essential crunch and fresh flavor that defines classic chicken salad. Dice it finely so you get a bit in every bite without large chunks that make rolling difficult. If you don’t have celery, finely diced cucumber, bell peppers, or water chestnuts work as crunchy substitutes.
Red Grapes or Apples: This is the secret ingredient that takes chicken salad from good to amazing! The sweetness and juicy pop of grapes (or the crisp sweetness of diced apples) creates incredible flavor contrast. Dried cranberries are another delicious option that adds chewy texture.
Green Onions: Adds mild onion flavor without the harsh bite of regular onions. The green parts are milder and add pretty color flecks. Regular onions are too strong and will overpower the other flavors, so stick with green onions (scallions) or use very finely minced shallots.
Dijon Mustard: Just a teaspoon adds tangy depth and complexity that elevates the whole dish. Regular yellow mustard works but lacks the sophisticated flavor. Don’t skip this – it’s what makes the filling taste restaurant-quality!
Lemon Juice: Brightens all the flavors and adds a subtle tang that keeps the chicken salad from tasting too heavy. Fresh is always best, but bottled works in a pinch. Apple cider vinegar can substitute if you don’t have lemon.
Salt and Pepper: Essential for bringing out all the other flavors. Always taste and adjust seasoning before assembling – the filling should taste slightly over-seasoned since the tortilla and lettuce are bland.
Large Flour Tortillas: The wrapper that holds everything together! Use burrito-size tortillas (10-12 inches) for the best results. Whole wheat tortillas add fiber and nuttiness, spinach or tomato tortillas add color, and low-carb tortillas work for keto diets. Make sure they’re fresh and pliable – stale tortillas crack when you roll them.
Lettuce: Adds fresh crunch and a barrier that prevents the tortilla from getting soggy. Romaine, green leaf, or butter lettuce work best because they’re sturdy but not tough. Avoid iceberg (too watery) and avoid thick stems that make rolling difficult.
Cream Cheese (Optional): Many cooks spread a thin layer of softened cream cheese on the tortilla before adding the chicken salad. This acts as a “glue” that helps everything stick together and adds extra creaminess. It’s not essential but definitely makes rolling easier!
Equipment Needed
The beauty of this recipe is how minimal your equipment needs are! Here’s everything you’ll need:
Large Mixing Bowl: For combining all your chicken salad ingredients. A medium bowl works too, but a larger one makes mixing easier without spilling.
Sharp Knife: Essential for dicing your chicken, celery, and other ingredients, plus slicing your finished pinwheels. A serrated knife works best for slicing the rolls cleanly without squishing them.
Cutting Board: For all your chopping needs and for slicing the finished rolls.
Measuring Cups and Spoons: For accurate ingredient measurements, ensuring consistent results every time.
Mixing Spoon or Spatula: For stirring together your chicken salad filling until everything is evenly combined and coated.
Offset Spatula or Butter Knife: Makes spreading the chicken salad evenly on the tortillas much easier, though a regular knife or spoon works fine.
Plastic Wrap: For wrapping your rolled pinwheels tightly before refrigerating. This is crucial for helping them hold their shape and keeping them fresh.
Serving Platter: For displaying your beautiful pinwheels. A round platter works great for arranging them in a circle pattern, or use a rectangular serving tray.
Paper Towels: For patting your lettuce dry – wet lettuce makes soggy pinwheels!
Optional Tools:
- Food Processor: Makes quick work of dicing chicken if you prefer a finer texture
- Pastry Brush: For spreading cream cheese if you’re using that option
- Toothpicks: Can help hold stubborn rolls together before slicing
That’s it! No fancy equipment needed, which is part of what makes this recipe so accessible and easy.
Print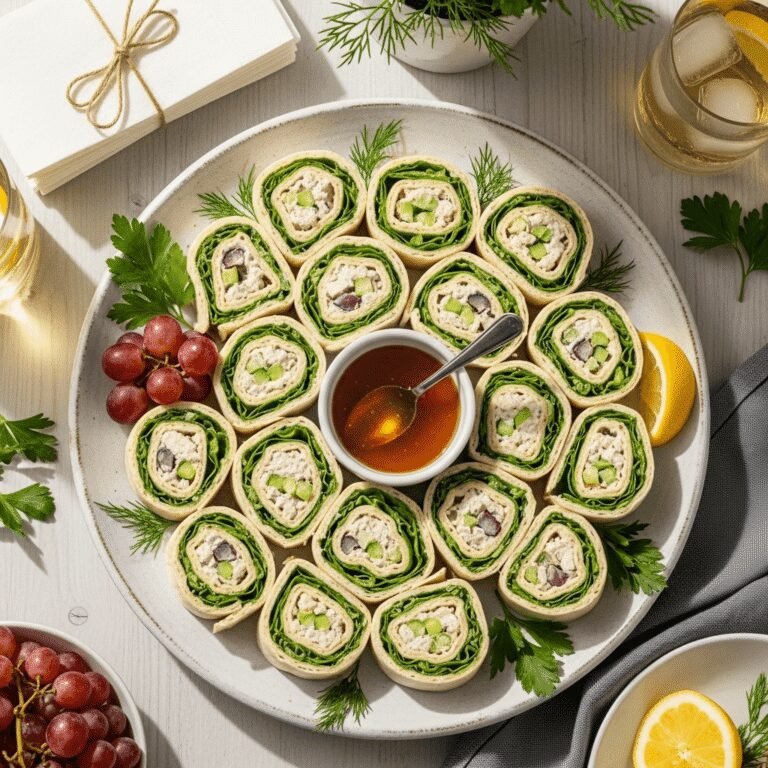
Chicken Salad Pinwheels
Creamy chicken salad pinwheels made with tender chicken, crunchy celery, sweet grapes, and fresh lettuce rolled in soft flour tortillas. These easy, make-ahead appetizers are perfect for parties, potlucks, and game day gatherings. No cooking required – just mix, roll, chill, and slice!
- Total Time: 1 hour 15 minutes
- Yield: 32-40 pinwheels (8-10 servings) 1x
Ingredients
For the Chicken Salad:
- 2 cups cooked chicken, shredded or diced (about 1 rotisserie chicken breast)
- ½ cup mayonnaise
- ½ cup celery, finely diced
- ½ cup red grapes, quartered (or ½ cup diced apple)
- ¼ cup green onions, thinly sliced
- 1 tablespoon Dijon mustard
- 1 tablespoon fresh lemon juice
- ½ teaspoon garlic powder
- ½ teaspoon salt (adjust to taste)
- ¼ teaspoon black pepper
- ¼ cup sliced almonds or chopped pecans (optional, for crunch)
For Assembly:
- 4 large flour tortillas (10-12 inch burrito size)
- 4 ounces cream cheese, softened (optional, but recommended)
- 8-12 large lettuce leaves (romaine or green leaf)
- Fresh herbs for garnish (optional – parsley or dill)
Instructions
- Make the chicken salad: In a large mixing bowl, combine the shredded chicken, mayonnaise, diced celery, quartered grapes, green onions, Dijon mustard, lemon juice, garlic powder, salt, and pepper. Stir everything together until the chicken is evenly coated with the creamy dressing. If using nuts, fold them in gently. Taste and adjust seasoning as needed – it should taste well-seasoned and flavorful.
- Prepare your tortillas: Lay one flour tortilla flat on a clean work surface or large cutting board. If using cream cheese, spread a thin, even layer (about 1 ounce per tortilla) across the entire surface of the tortilla, leaving a ½-inch border around the edges. This acts as a “glue” to help everything stick together and prevents the tortilla from getting soggy.
- Add the lettuce layer: Place 2-3 lettuce leaves across the tortilla, covering as much surface area as possible while keeping them flat. Pat the lettuce dry with paper towels first to remove excess moisture. Tear large leaves to fit if necessary, avoiding thick stems that make rolling difficult.
- Spread the chicken salad: Spoon about ½ cup of chicken salad onto the tortilla and spread it evenly over the lettuce layer, leaving about 1 inch clear at the edges (especially the far edge). Don’t overfill – less is more when it comes to successful rolling! The filling should be in a thin, even layer rather than a thick mound.
- Roll it up tightly: Starting from the edge closest to you, begin rolling the tortilla away from you as tightly as possible without tearing it. Keep constant firm pressure as you roll, tucking in the sides if needed. The tighter you roll, the prettier your pinwheels will be and the less likely they are to fall apart when sliced.
- Seal the edge: When you reach the end, the cream cheese should help seal the edge. If you didn’t use cream cheese, dab a little mayo or water on the edge to help it stick. Press firmly for a few seconds to seal.
- Wrap and chill: Wrap each rolled tortilla tightly in plastic wrap, twisting the ends like a candy wrapper. This is crucial! The wrapping helps the rolls hold their shape and allows the flavors to meld. Refrigerate for at least 1 hour (or up to 24 hours). The chilling time firms everything up and makes slicing much easier.
- Slice and serve: When ready to serve, unwrap the rolls and use a sharp serrated knife to trim off the uneven ends (cook’s snack!). Slice each roll into 8-10 pinwheel rounds, about 1 inch thick. Wipe your knife clean between cuts for the neatest slices. Arrange on a serving platter with the spiral side up and serve immediately, garnished with fresh herbs if desired.
Notes
- Use rotisserie chicken for the easiest prep – it’s already seasoned and saves tons of time!
- Don’t overfill – this is the #1 cause of messy, falling-apart pinwheels. Less filling = tighter rolls.
- The cream cheese layer is optional but highly recommended as it helps everything stick together and adds creaminess.
- Chill time is important – don’t skip it! Chilled pinwheels slice cleanly, while room-temperature ones fall apart.
- For crispier tortillas, you can lightly toast them in a dry skillet for 10-15 seconds per side before assembling, then let them cool completely.
- Make flavor variations by adding dried cranberries, diced apple instead of grapes, curry powder, fresh dill, or buffalo sauce.
- Store assembled but unsliced rolls for best freshness – slice just before serving.
- Prep Time: 15 minutes
- Cook Time: 1 hour (recommended)
- Category: Appetizer
- Method: No-Cook Assembly
- Cuisine: American
- Diet: Low Lactose
Nutrition
- Serving Size: 4 pinwheels
- Calories: 245
- Sugar: 3g
- Sodium: 425mg
- Fat: 14g
- Saturated Fat: 3g
- Unsaturated Fat: 10g
- Trans Fat: 0g
- Carbohydrates: 18g
- Fiber: 1g
- Protein: 12g
- Cholesterol: 35mg
Tips & Variations
The beauty of chicken salad pinwheels is how easily you can customize them to suit your taste preferences, dietary needs, or whatever ingredients you have on hand!
Lighter Version: Replace half or all of the mayonnaise with plain Greek yogurt for a protein boost and tangy flavor. Use light mayo and reduced-fat cream cheese to cut calories significantly. Choose whole wheat or low-carb tortillas for added fiber. Skip the cream cheese layer entirely and rely on the mayo in the filling to hold things together.
Buffalo Chicken Pinwheels: Add 2-3 tablespoons of buffalo wing sauce to your chicken salad and include some crumbled blue cheese or ranch seasoning. Use shredded buffalo chicken from the store for even more flavor. These are perfect for game day parties!
Cranberry Pecan Chicken Salad Pinwheels: Swap the grapes for dried cranberries and add chopped pecans or walnuts for a fall-inspired version. Add a pinch of curry powder for complexity. This variation is beautiful for Thanksgiving or holiday gatherings.
Mediterranean Style: Replace the grapes with diced cucumber, sun-dried tomatoes, and kalamata olives. Add crumbled feta cheese and fresh dill to the chicken salad. Use spinach instead of regular lettuce and consider adding a thin layer of hummus instead of cream cheese.
Asian-Inspired: Add shredded carrots, sliced water chestnuts, and mandarin oranges to your filling. Mix in a teaspoon of sesame oil and use cashews instead of almonds. Replace half the mayo with sweet chili sauce for a sweet-heat kick.
Bacon Ranch Pinwheels: Add crumbled crispy bacon and shredded cheddar cheese to your chicken salad. Replace the Dijon with ranch seasoning mix and add diced tomatoes. These taste like a loaded chicken club sandwich!
Curry Chicken Salad Pinwheels: Add 1-2 teaspoons of curry powder to your chicken salad along with golden raisins and cashews. This exotic twist is surprisingly delicious and perfect for sophisticated gatherings.
Kid-Friendly Plain Jane: Keep it simple with just chicken, mayo, a tiny bit of celery, and mild cheddar cheese. Skip anything too “different” and serve with ranch dressing for dipping.
Pro Chef Tips
Want to elevate your pinwheels from good to absolutely spectacular? These professional techniques will help you achieve perfect results every time!
The Overnight Method: For the absolute best flavor and texture, make your chicken salad a full day ahead and refrigerate it overnight. This resting period allows the flavors to meld beautifully, and the chilled filling is much easier to spread without tearing your tortillas. The vegetables also release their flavors more fully into the creamy base.
Season in Layers: Don’t just season the chicken salad – season each component! If you’re cooking your own chicken, season it well before cooking. Taste your celery and lettuce – if they taste bland, season them lightly. This builds complex, restaurant-quality flavor throughout the dish rather than having all the seasoning in just one component.
The Double-Wrap Technique: After rolling, wrap your pinwheels first in plastic wrap, then in aluminum foil. This double layer creates a tighter roll, prevents them from unraveling, and keeps them fresher longer. The foil also makes them easier to transport if you’re bringing them to a party.
Knife Wisdom: Use a very sharp serrated knife and a gentle sawing motion when slicing. Clean your knife with a damp cloth between each cut to prevent dragging filling from one pinwheel to the next. For the cleanest cuts, chill your knife in the freezer for 10 minutes before slicing – the cold blade cuts through the cream cheese layer more cleanly.
The Compression Roll: After spreading your filling, use a piece of plastic wrap to help you roll tightly. Lay the plastic wrap over the filled tortilla, then use it to apply even pressure as you roll. This professional technique (borrowed from sushi making) ensures consistently tight rolls without getting filling all over your hands.
Strategic Filling Placement: Spread your chicken salad slightly thicker at the starting edge and thinner as you go toward the far edge. This compensates for the fact that you’ll have multiple layers at the center of your roll, preventing bulging in the middle and gaps at the ends.
Temperature Matters: All your ingredients should be cold when assembling. Cold chicken salad spreads more easily and holds its shape better. Room temperature ingredients make for loose, messy rolls that fall apart. Some chefs even chill their tortillas for 15 minutes before rolling for maximum firmness.
The Visual Test: Before slicing, examine your wrapped roll. It should be uniformly cylindrical with no lumps or flat spots. If you see irregularities, gently massage the roll through the plastic wrap to redistribute the filling and create a more uniform shape. This ensures every slice looks identical and professional.
Common Mistakes to Avoid
Even experienced cooks can run into issues with pinwheels. Here are the most common problems and how to prevent them:
Soggy, Falling-Apart Pinwheels: This is usually caused by too much moisture in your filling or wet lettuce. Always pat your lettuce completely dry with paper towels before using it. If your chicken salad seems watery, drain any excess liquid before spreading. The cream cheese barrier also helps prevent sogginess by creating a waterproof layer between the tortilla and filling.
Pinwheels Unrolling After Slicing: This happens when you don’t roll tightly enough or skip the chilling step. Make sure to roll with constant firm pressure and definitely chill for at least an hour before slicing. The cold firms up the cream cheese and mayo, acting like glue to hold everything together. Wrapping tightly in plastic wrap during chilling is also crucial.
Torn or Cracked Tortillas: Old, stale tortillas crack when you try to roll them. Always use fresh, pliable tortillas and let them come to room temperature if they were refrigerated. You can also warm them very briefly (5-10 seconds) in the microwave wrapped in a damp paper towel to make them more flexible. However, they must cool completely before adding cold filling!
Messy, Uneven Slices: Using a dull knife or cutting with a straight up-and-down motion causes squishing and tearing. Always use a sharp serrated knife and a gentle sawing motion. Cleaning your knife between cuts is essential for neat presentation. If your pinwheels are still warm or haven’t chilled long enough, they’ll be too soft to slice cleanly.
Bland, Boring Flavor: Underseasoning is the culprit here. Remember that the tortilla and lettuce add no flavor, so your chicken salad needs to be well-seasoned to compensate. Always taste and adjust seasoning before assembling. Don’t be shy with salt, pepper, lemon juice, and Dijon – these ingredients brighten and enhance all the other flavors.
Overstuffed Rolls That Burst: More is not better when it comes to filling! Overfilling makes rolling impossible and creates messy pinwheels that fall apart when sliced. Use just ½ cup of filling per tortilla and spread it thin. You should be able to see some tortilla through the filling layer – that’s perfect!
Dry Chicken Salad: If your chicken salad tastes dry or doesn’t hold together well, you need more mayo or moisture. Remember that the filling should seem almost too creamy when you first make it – as it sits, the chicken and vegetables absorb moisture, and the tortilla also absorbs some. Don’t be afraid to be generous with the mayo!
Storage & Meal Prep
These chicken salad pinwheels are meal-prep champions! Here’s everything you need to know about storing them properly.
Refrigerating Assembled Pinwheels: Store wrapped, unsliced rolls in the refrigerator for up to 24 hours before serving. This is actually the ideal timeframe – the flavors meld beautifully overnight! Keep them tightly wrapped in plastic wrap with the ends twisted closed to prevent air exposure and drying out.
Storing Sliced Pinwheels: Once sliced, pinwheels should be stored in a single layer in an airtight container lined with paper towels. Place a second layer of paper towels on top before sealing to absorb any excess moisture. They’ll keep for 2-3 days refrigerated, though they’re definitely best within the first 24 hours. The texture degrades slightly as the tortillas absorb moisture from the filling.
Storing Chicken Salad Separately: The chicken salad itself keeps beautifully for 3-4 days in an airtight container in the refrigerator. This is perfect for making pinwheels throughout the week! Just assemble fresh rolls as needed. You can even pre-prep all your components separately and do final assembly quickly whenever you want fresh pinwheels.
Best Serving Practices: For parties, slice your pinwheels no more than 2-3 hours before serving for optimal freshness and appearance. Keep them refrigerated until the last possible moment, then arrange on your serving platter. If your party is longer than 2 hours, consider slicing in batches and keeping extras refrigerated, refreshing the platter as needed.
Transporting Tips: If bringing pinwheels to a potluck or party, transport the unsliced wrapped rolls in a cooler with ice packs, then slice on-site for the freshest presentation. Alternatively, place sliced pinwheels in a single layer in a shallow container with a lid, keeping them cold until serving.
Signs of Spoilage: Discard pinwheels if the chicken salad smells sour or “off,” the lettuce is slimy or brown, or the tortillas are excessively soggy. Properly stored pinwheels should look fresh and vibrant with no discoloration.
Make-Ahead & Freezer Notes
These pinwheels are one of the best make-ahead appetizers you can prepare! Here’s your complete guide to prepping in advance.
Best Make-Ahead Strategy: Prepare your chicken salad up to 3 days ahead and store it refrigerated in an airtight container. Assemble the pinwheels up to 24 hours before serving – this is actually the sweet spot where they taste best! The overnight rest allows flavors to meld while the texture remains perfect. Slice 2-3 hours before serving for optimal freshness.
Same-Day Timeline: If making the same day, assemble at least 1-2 hours before serving to allow adequate chilling time. This firms everything up and makes slicing so much easier. Pinwheels sliced immediately after rolling tend to fall apart and look messy.
Freezing Considerations: Here’s the truth: chicken salad pinwheels don’t freeze particularly well. The mayonnaise-based filling separates and becomes watery when thawed, and the lettuce turns completely soggy and brown. The texture of the tortilla also suffers, becoming gummy and unpleasant.
If You Must Freeze: If you absolutely need to freeze them, your best bet is to freeze the chicken salad separately (without the grapes or lettuce, which don’t freeze well). Use it within 1 month. Thaw overnight in the refrigerator, stir well, add fresh grapes and adjust seasoning, then assemble fresh pinwheels with new tortillas and lettuce. This gives you much better results than freezing assembled rolls.
Alternative Freezer Option: Freeze leftover cooked, unseasoned chicken in shredded form. When ready to make pinwheels, thaw the chicken and prepare fresh chicken salad. This essentially gives you a head start on the recipe without compromising quality.
Meal Prep Strategy: For weekly meal prep, make a full batch of chicken salad on Sunday and store it in the fridge. Each morning, quickly assemble one roll for lunch, wrap it tightly, and pack it with an ice pack. Roll it right before eating if possible, but even pre-rolled and refrigerated overnight works reasonably well for lunch-box purposes.
Party Planning Timeline: For a party, here’s the ideal schedule: 2-3 days before: Cook chicken if making your own, shred and refrigerate. 1 day before: Make chicken salad and refrigerate overnight. Morning of party: Assemble rolls, wrap tightly, and refrigerate. 2-3 hours before guests arrive: Slice pinwheels and arrange on platter, keep refrigerated until serving time.
Serving Suggestions
These versatile pinwheels work beautifully in so many different contexts! Here are some delicious ways to serve them.
Party Presentation Ideas: Arrange pinwheels in a circular pattern on a round platter, spirals facing up, for a stunning visual display. Garnish the center with fresh herbs like parsley, dill, or cilantro for a pop of color. Add some cherry tomatoes, grapes, or strawberries around the edges for additional color and freshness. For a tiered effect, use a cake stand or stacked platters to create height and drama.
Complete Party Spread: Pair chicken salad pinwheels with other finger foods for a complete appetizer table: deviled eggs for classic Southern charm, fresh vegetable crudités with ranch dip for healthy balance, cheese and crackers for variety, tortilla chips with salsa or guacamole, caprese skewers for brightness, and stuffed mushrooms or mini quiches for heartier options.
Dipping Sauces: While not traditional, some people love dipping their pinwheels! Offer small bowls of ranch dressing for classic appeal, honey mustard for sweet-tangy contrast, buffalo sauce for heat lovers, or garlic aioli for sophistication. Place toothpicks nearby for easy, mess-free dipping.
Beverage Pairings: For casual gatherings, serve with iced tea (sweetened or unsweetened), lemonade for summer events, sparkling water with fruit, or light beers and white wine. For bridal or baby showers, consider mimosas, bellinis, or champagne punch. Coffee and tea work beautifully for afternoon gatherings or brunches.
Complete Lunch or Light Dinner: Turn pinwheels into a full meal by serving with fresh fruit salad for sweetness and vitamins, garden salad with vinaigrette to lighten the rich pinwheels, soup (tomato, broccoli cheddar, or chicken noodle) for a satisfying combo, potato salad or coleslaw for classic picnic vibes, or tortilla chips with queso or guacamole for Tex-Mex flair.
Platter Styling Tips: Use fresh lettuce leaves or kale as a decorative base on your serving platter – it adds color and keeps pinwheels from sliding around. Add edible flowers for elegant events, garnish with lemon wedges and fresh herbs, or use decorative toothpicks to add personality. Consider color coordination with your party theme using colored napkins or serving dishes.
Portion Planning: For appetizers before dinner, plan on 3-4 pinwheels per person. For cocktail parties where pinwheels are the main food, plan on 6-8 pinwheels per person. For lunch, 8-10 pinwheels (one full tortilla roll) per person is satisfying. Always make a few extra – these disappear fast!
FAQs Section
Can I make chicken salad pinwheels without mayonnaise? Yes! While traditional chicken salad uses mayo, you can substitute plain Greek yogurt for a healthier, tangier version. Use the same amount as you would mayo – the texture will be slightly thinner but still delicious. Mashed avocado is another option, though it will brown quickly so make these the same day you plan to serve them. Some people also use a combination of sour cream and cream cheese for a different flavor profile.
How far in advance can I make these pinwheels? You can make the chicken salad up to 3 days ahead and assemble the rolls up to 24 hours before serving. However, for best results, slice them only 2-3 hours before your event. The longer sliced pinwheels sit, the more the tortilla absorbs moisture from the filling, making them slightly soggy. Unsliced wrapped rolls hold up much better, so slice as close to serving time as possible.
Why do my pinwheels fall apart when I slice them? The most common reasons are: not rolling tightly enough, not chilling long enough (you need at least 1 hour), using a dull knife, or overfilling the tortillas. Make sure to wrap your rolls tightly in plastic wrap and refrigerate until very cold. Use a sharp serrated knife with a gentle sawing motion rather than pressing straight down, and clean your knife between cuts.
Can I use a different protein instead of chicken? Absolutely! Turkey is the most obvious substitution and works exactly the same way. Shredded pork or ham create a different but delicious flavor profile. Tuna or canned salmon work wonderfully for seafood versions. For vegetarian options, try chickpea salad (mashed chickpeas seasoned similarly to chicken salad) or hard-boiled egg salad. Each protein brings its own character while the basic format remains the same!
What’s the best type of tortilla to use? Large burrito-size flour tortillas (10-12 inches) work best because they’re soft, pliable, and neutral-flavored. Whole wheat tortillas add fiber and a slightly nutty flavor. Spinach, tomato, or sun-dried tomato tortillas add color and make for stunning presentation. Low-carb or keto tortillas work well if you’re watching carbs. Avoid corn tortillas as they’re too small, break easily, and have a strong flavor that clashes with chicken salad. The key is using fresh, pliable tortillas – stale ones will crack when you try to roll them.
Can I use store-bought rotisserie chicken? Absolutely – this is actually the recommended method! Rotisserie chicken is a huge time-saver, it’s already seasoned and flavorful, and it’s incredibly moist. One rotisserie chicken breast yields about 2 cups of shredded chicken, which is perfect for this recipe. The slightly savory, herb-seasoned flavor of rotisserie chicken actually enhances the overall taste. Just make sure the chicken is completely cooled before mixing into your salad.
Do I have to use lettuce in the pinwheels? While lettuce adds nice crunch and freshness, it’s not absolutely mandatory. Some people skip it entirely and just use the cream cheese layer as a barrier. However, lettuce does serve an important purpose: it prevents the tortilla from getting soggy by creating a barrier between the wet filling and the bread. It also adds textural contrast and a fresh element. If you dislike lettuce, try fresh spinach leaves or very thinly sliced cucumber instead.
How do I keep pinwheels from getting soggy? Several strategies help: First, use the cream cheese barrier method – spread softened cream cheese on the tortilla before adding other ingredients. Second, make sure your lettuce is completely dry by patting it with paper towels. Third, don’t make the chicken salad too wet – if it seems runny, drain excess liquid. Fourth, don’t slice until shortly before serving, as sliced pinwheels get soggy faster than whole rolls. Finally, store with paper towels in the container to absorb any excess moisture.
Conclusion
There you have it – everything you need to make absolutely perfect chicken salad pinwheels that will have everyone asking for the recipe! These beautiful, spiral sandwiches prove that impressive party food doesn’t have to be complicated or time-consuming. With just a handful of simple ingredients and about 15 minutes of hands-on time, you can create an appetizer that looks like it came from a fancy catered event.
The best part about these easy tortilla pinwheel appetizers is how incredibly versatile they are. Whether you’re hosting a sophisticated bridal shower, a casual game day party, need grab-and-go lunches for the week, or just want a light dinner option, these make-ahead chicken roll-ups deliver every single time. The creamy, savory filling studded with crunchy celery and sweet grapes is universally loved, and the pretty spiral presentation never fails to impress.
Once you master the basic technique, you’ll find yourself making these pinwheels again and again, experimenting with different flavor combinations and serving them for every occasion imaginable. They’re the kind of reliable, crowd-pleasing recipe that earns a permanent spot in your entertaining repertoire – and trust me, you’ll be so glad to have this trick up your sleeve when you need to bring something to your next potluck!
I can’t wait to hear how your chicken salad pinwheels turn out! Did you try any of the fun variations? What’s your favorite dipping sauce? Drop a comment below sharing your experience, and don’t forget to rate this recipe so other home cooks know how amazing these are.
Pin this recipe to your favorite Pinterest board so you can find it easily the next time you need a quick, impressive appetizer! Snap a photo of your beautiful pinwheel platter and tag me – I absolutely love seeing how this recipe comes to life in your kitchen. Your friends and family are going to be so impressed, and only you need to know how incredibly easy these actually are to make!
Happy rolling, and enjoy every delicious, crispy bite of these absolutely addictive pinwheels! 🌯