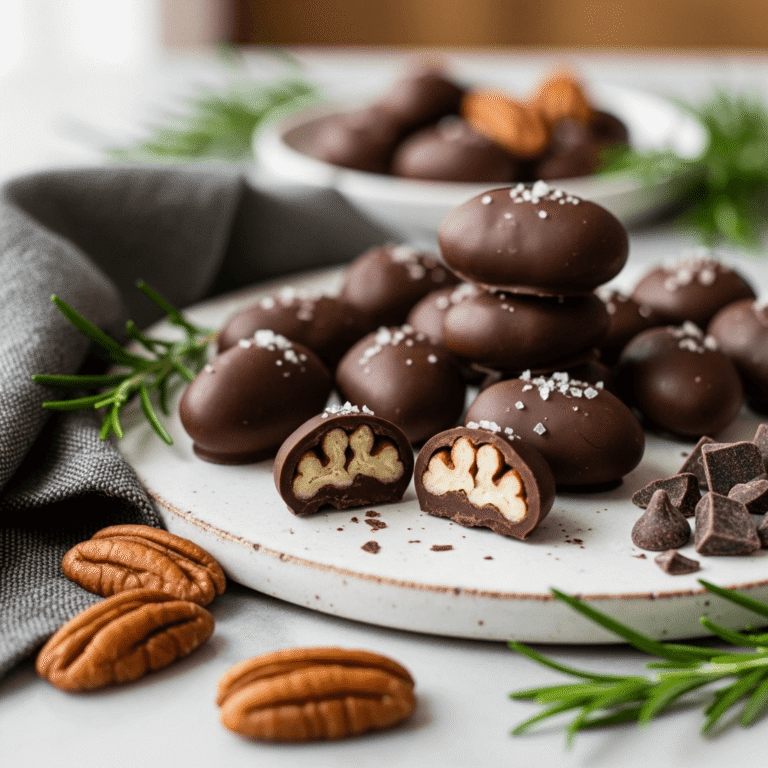
Chocolate Covered Pecans – Easy Homemade Candy That’s Irresistibly Delicious
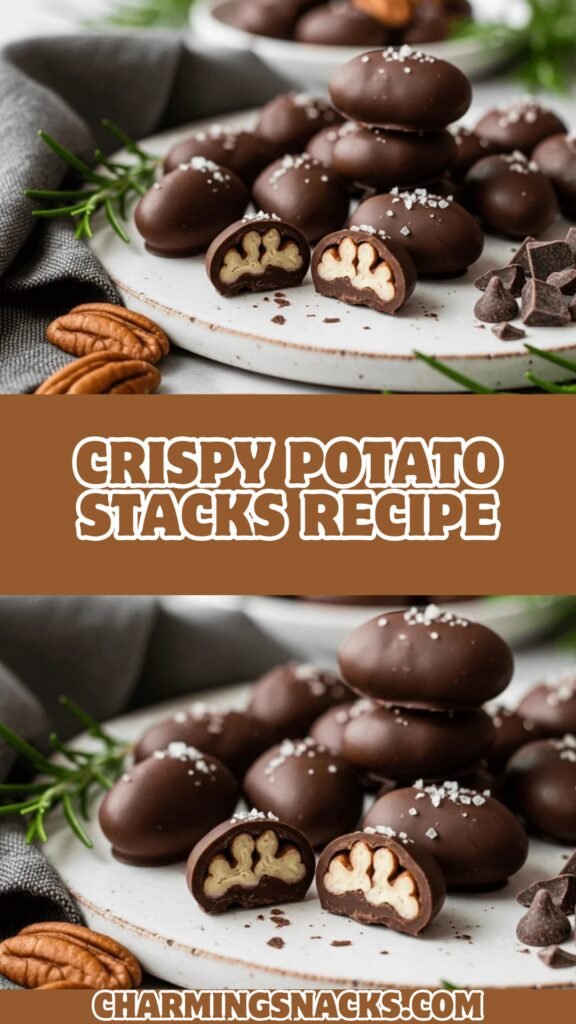
There’s something undeniably magical about the combination of buttery, toasted pecans enrobed in rich, glossy chocolate. These Chocolate Covered Pecans are the ultimate homemade treat that looks impressive but couldn’t be easier to make. With just a handful of ingredients and about 30 minutes of your time, you can create a confection that rivals anything from a gourmet chocolate shop – at a fraction of the cost.
Chocolate pecan candies are the perfect balance of crunchy and smooth, nutty and sweet, with that satisfying snap when you bite through the chocolate shell to reach the tender pecan inside. They’re elegant enough for gift-giving during the holidays, yet simple enough to whip up on a weeknight when you’re craving something sweet. These homemade chocolate pecans make stunning additions to dessert platters, work beautifully as edible gifts, and disappear quickly at parties.
What makes this easy chocolate pecan recipe so appealing is its versatility. Serve them as an after-dinner treat, package them in decorative jars for teacher gifts or hostess presents, add them to holiday cookie trays, or simply keep a stash in your pantry for when chocolate cravings strike. They’re also naturally gluten-free and can be made with dark, milk, or white chocolate depending on your preference.
These chocolate dipped pecans are especially popular during fall and winter when pecans are freshly harvested and holiday entertaining is in full swing. They embody that cozy, indulgent feeling we all crave during colder months while requiring minimal effort and zero fancy equipment. If you’ve never made homemade chocolate candies before, this is the perfect recipe to start with – foolproof, forgiving, and absolutely delicious.
History / Background
The tradition of coating nuts in chocolate has European roots, with chocolate-covered almonds and hazelnuts being popular confections in countries like Belgium, Switzerland, and Italy for centuries. However, chocolate covered pecans have a distinctly American story, as pecans are native to North America and have been cultivated primarily in the southern United States since the 1800s.
Pecans have special significance in Southern culture and cuisine. Native American tribes were harvesting and trading pecans long before European settlers arrived, and the nut quickly became an important food source and trade commodity. The word “pecan” itself comes from an Algonquian word meaning “nut requiring a stone to crack.” By the late 19th and early 20th centuries, pecan cultivation had become a major agricultural industry in states like Texas, Georgia, Louisiana, and Oklahoma.
The marriage of pecans and chocolate likely emerged in the early-to-mid 20th century as chocolate became more accessible to home cooks and candy-making became a popular domestic activity. Southern confectioners and home cooks began dipping their abundant pecan harvests in chocolate, creating what would become a regional specialty. Pralines – a New Orleans candy made with pecans, cream, and sugar – showed that pecans and sweets were a match made in heaven.
The trend of chocolate covered pecans gained particular momentum in the 1950s and 1960s when candy-making at home became fashionable, partly thanks to the rise of women’s magazines featuring holiday recipes and gift ideas. These treats became synonymous with Christmas and holiday gift-giving, often packaged in decorative tins and given to neighbors, teachers, and coworkers.
Today, chocolate covered pecans represent both a nostalgic homemade treat and a gourmet confection. You’ll find them in high-end chocolate shops, farmer’s markets, and gift stores throughout the South and beyond. The recipe has evolved to include variations like sea salt chocolate pecans, toffee chocolate pecans, and spiced versions, but the classic simple combination remains the most beloved.
Why You’ll Love This Recipe
These Chocolate Covered Pecans aren’t just another candy recipe – they’re a game-changer for anyone who loves homemade treats but doesn’t have hours to spend in the kitchen. The combination of simplicity, elegance, and incredible taste makes this recipe one you’ll return to again and again, especially during gift-giving seasons.
Here’s why these homemade chocolate pecans will become your go-to candy recipe:
- Ridiculously easy – Just three main ingredients and no candy thermometer or special skills required
- Quick to make – From start to finish, including cooling time, you’re done in 30-40 minutes
- Customizable – Use any chocolate you love and add different toppings or flavorings
- Perfect for gifting – Package them in mason jars, cellophane bags, or decorative tins for beautiful homemade presents
- Naturally gluten-free – A safe treat for those with gluten sensitivities (when using pure chocolate)
- Budget-friendly – Much cheaper than store-bought gourmet chocolate nuts
- Impressive presentation – They look like they came from a fancy chocolate shop
- Make-ahead friendly – Stay fresh for weeks when stored properly, perfect for holiday prep
- No baking required – No need to heat up your oven
- Kid-friendly activity – Simple enough for children to help make (with supervision)
- Crowd-pleaser – Appeals to almost everyone; even picky eaters love them
- Versatile for occasions – Works for holidays, parties, teacher gifts, wedding favors, or everyday snacking
- Portion-controlled treats – Each pecan is individually coated, making it easy to enjoy just one or two
Ingredient Notes
Pecans: The star of the show! You’ll need about 3 cups of pecan halves (approximately 12 ounces or ¾ pound). Choose fresh, plump pecans without any rancid smell – pecans have high oil content and can go bad if stored improperly. Raw pecans work perfectly, though you can toast them first for deeper, nuttier flavor (more on this in Pro Chef Tips). Pecan halves are traditional and look most elegant, but pecan pieces work too if that’s what you have.
Chocolate: This is where you can customize! You’ll need about 12-16 ounces of chocolate depending on how thickly you coat. Options include:
- Dark chocolate – Rich, slightly bitter, pairs beautifully with the sweet pecans (60-70% cacao works best)
- Milk chocolate – Sweeter and creamier, appeals to those who prefer milder chocolate
- Semi-sweet chocolate chips – The most common choice, easy to find and melt
- White chocolate – Creates a beautiful contrast and sweeter profile
- Chocolate melting wafers or candy melts – Easiest to work with as they’re formulated for smooth melting and setting
For best results, use quality chocolate that you enjoy eating on its own. Avoid chocolate chips if possible (they contain stabilizers that prevent smooth melting), but they work in a pinch.
Coconut Oil or Shortening (Optional): Adding 1-2 teaspoons of coconut oil or vegetable shortening to your melted chocolate creates a thinner, smoother coating that’s easier to work with and gives a glossier finish. This is completely optional but helps achieve that professional candy-shop look.
Sea Salt (Optional): A tiny sprinkle of flaky sea salt on top of the chocolate while it’s still wet creates a sophisticated sweet-salty combination that’s absolutely addictive.
Additional Flavor Options: Vanilla extract (¼ teaspoon), cinnamon, cayenne pepper for spicy chocolate pecans, or espresso powder can all be added to melted chocolate for flavor variations.
Equipment Needed
- Large baking sheet (for spreading coated pecans to cool)
- Parchment paper or silicone baking mat (essential for preventing sticking)
- Microwave-safe bowl (for melting chocolate) OR double boiler/heat-proof bowl over simmering water
- Spoon or fork (for dipping and coating pecans)
- Small offset spatula (optional but helpful for spreading chocolate)
- Measuring cups
- Cooling rack (optional, for faster setting)
- Airtight container or jars (for storage)
- Optional: Candy dipping tools or fork (makes coating easier but regular fork works fine)
- Optional: Small skillet (if toasting pecans first)
Chocolate Covered Pecans
Simple and elegant chocolate covered pecans made with just three ingredients. These easy homemade chocolate pecans feature buttery pecan halves coated in rich, glossy chocolate for a delicious treat perfect for gifting, snacking, or adding to dessert spreads. Naturally gluten-free and endlessly customizable.
- Total Time: 30 minutes
- Yield: About 3 cups (24-30 servings) 1x
Ingredients
Basic Recipe:
- 3 cups pecan halves (about 12 ounces)
- 12-16 ounces chocolate (dark, milk, semi-sweet chips, or melting wafers)
- 1-2 teaspoons coconut oil or vegetable shortening (optional, for smoother coating)
- Pinch of flaky sea salt (optional, for topping)
Optional Additions:
- ¼ teaspoon vanilla extract (stirred into melted chocolate)
- ½ teaspoon cinnamon (for spiced version)
- Pinch of cayenne pepper (for spicy chocolate pecans)
- 1 teaspoon instant espresso powder (for mocha flavor)
Instructions
Step 1: Prepare Your Workspace
Line a large baking sheet with parchment paper or a silicone baking mat. Set aside. This is where you’ll place your chocolate-covered pecans to set. Make sure you have plenty of space – coated pecans should be placed in a single layer without touching.
Step 2: Optional – Toast the Pecans
For deeper, nuttier flavor (highly recommended!), toast the pecans first. Spread pecans in a single layer on a baking sheet and toast in a 350°F oven for 5-7 minutes, stirring once halfway through, until fragrant and slightly darkened. Watch carefully to prevent burning. Let cool completely before coating. Alternatively, toast in a dry skillet over medium heat for 4-5 minutes, stirring frequently.
Step 3: Melt the Chocolate
Microwave method: Place chocolate (broken into pieces or chips) in a microwave-safe bowl. Add coconut oil or shortening if using. Microwave in 30-second intervals at 50% power, stirring between each interval, until chocolate is completely melted and smooth. This usually takes 2-3 minutes total. Don’t rush – low power prevents burning.
Double boiler method: Fill a saucepan with 1-2 inches of water and bring to a simmer. Place chocolate in a heat-proof bowl that fits over the pan without touching the water. Stir frequently until completely melted and smooth. Remove from heat.
Step 4: Add Pecans to Chocolate
Add all the pecans to the melted chocolate and stir gently but thoroughly with a spoon or spatula until every pecan is completely coated in chocolate. Take your time to ensure even coverage.
Step 5: Transfer to Prepared Sheet
Working quickly before the chocolate begins to set, use a fork or spoon to lift individual pecans or small clusters from the chocolate, allowing excess to drip off, then place them on the prepared baking sheet. Space them slightly apart so they don’t stick together. You can do single pecans for individual treats or create small clusters of 2-3 pecans.
Step 6: Add Optional Toppings
If using sea salt or other toppings, sprinkle them on immediately while the chocolate is still wet. Work quickly as chocolate begins setting within a few minutes.
Step 7: Allow to Set
Let the chocolate-covered pecans sit at room temperature for 20-30 minutes until the chocolate is completely hardened and set. For faster setting, place the baking sheet in the refrigerator for 10-15 minutes. The chocolate should be firm to the touch and not sticky.
Step 8: Store and Enjoy
Once completely set, transfer the chocolate pecans to an airtight container, layering them between sheets of parchment paper if stacking. Store at room temperature or in the refrigerator depending on your climate and chocolate type.
Notes
- Chocolate selection: Dark and semi-sweet chocolate set firmer at room temperature than milk chocolate. White chocolate can be temperamental – add a bit more coconut oil for easier working.
- Working temperature: If your kitchen is very warm (above 75°F), the chocolate may not set properly at room temperature. Refrigerate to set, then store in a cool place.
- Preventing bloom: White spots on chocolate (called bloom) happen when chocolate gets too warm then cools. Store in consistent temperature to prevent this cosmetic (but harmless) issue.
- Clusters vs. singles: For gift-giving, individual coated pecans look most elegant. For snacking, clusters are fun and easier/faster to make.
- Gluten-free note: Ensure your chocolate doesn’t contain malt flavoring or other gluten-containing additives if serving to those with celiac disease.
- Prep Time: 10 minutes
- Cook Time: 20 minutes
- Category: Dessert
- Method: Stovetop
- Cuisine: American
- Diet: Gluten Free
Nutrition
- Serving Size: Approximately ¼ cup or 4-5 chocolate-covered pecans
- Calories: 180
- Sugar: 12g
- Sodium: 2mg
- Fat: 14g
- Saturated Fat: 4g
- Unsaturated Fat: 9g
- Trans Fat: 0g
- Carbohydrates: 15g
- Fiber: 2g
- Protein: 2g
- Cholesterol: 2mg
Tips & Variations
Sea Salt Dark Chocolate Pecans: Use high-quality dark chocolate (60-70% cacao), coat the pecans, and immediately sprinkle with flaky Maldon or Himalayan pink salt. The sweet-salty combination is absolutely addictive and sophisticated.
Spicy Mexican Chocolate Pecans: Add ½ teaspoon cinnamon and a pinch of cayenne pepper to melted chocolate for a warming, complex flavor profile inspired by Mexican hot chocolate.
Toffee Chocolate Pecans: After coating in chocolate and while still wet, sprinkle with crushed English toffee bits or Heath bar pieces for extra crunch and buttery sweetness.
White Chocolate Cranberry Pecans: Use white chocolate for coating and add dried cranberries to create festive holiday clusters. These look beautiful in gift jars.
Mocha Espresso Pecans: Stir 1-2 teaspoons of instant espresso powder into melted dark chocolate for a coffee-enhanced version perfect for coffee lovers.
Coconut Chocolate Pecans: Sprinkle toasted shredded coconut over freshly coated pecans for a tropical twist reminiscent of Almond Joy bars.
Peppermint Bark Pecans: Add ¼ teaspoon peppermint extract to melted chocolate and top with crushed candy canes for a festive holiday version.
Mixed Nut Chocolate Clusters: Combine pecans with almonds, cashews, or walnuts in the chocolate for variety and added texture.
Caramel Pecan Turtles: Drizzle melted caramel over chocolate-covered pecans for a homemade turtle candy experience.
Sugar-Free Version: Use sugar-free chocolate chips or melting wafers for a diabetic-friendly or low-sugar option.
Pro Chef Tips
Toast Your Pecans First: This single step transforms the flavor dramatically. Toasting brings out the natural oils and creates deeper, more complex nutty flavors that complement the chocolate beautifully. Just watch carefully – pecans can go from perfectly toasted to burnt in seconds.
Temper for Professional Results: While not necessary for home use, properly tempering chocolate creates a glossy shine, crisp snap, and prevents bloom (white streaks). To temper: melt chocolate to 115-120°F, cool to 80-82°F while stirring, then gently reheat to 88-90°F for dark chocolate (slightly lower for milk/white). Use a candy thermometer for accuracy.
The Fork Method: For the neatest individual pecans, place a pecan on a fork, dip into chocolate, tap the fork gently on the bowl edge to remove excess chocolate, then slide onto parchment using another fork or toothpick. This creates a professional look with minimal chocolate pooling.
Room Temperature Matters: Ensure pecans are completely at room temperature before coating. Cold pecans cause chocolate to seize or harden too quickly before you can spread it evenly.
Thin Your Chocolate Strategically: Adding 1 teaspoon of coconut oil per 12 ounces of chocolate creates a thinner, more workable consistency without affecting flavor. Too much makes the chocolate too soft to set properly; too little makes it thick and difficult to work with.
Layer Flavors: For more complex taste, brush toasted pecans lightly with bourbon, rum, or vanilla extract before coating in chocolate. Let dry completely first. The subtle flavor comes through beautifully.
Work in Batches: Don’t try to coat all pecans at once if you’re new to candy-making. Chocolate in the bowl will start to thicken as it cools. Work in smaller batches, reheating chocolate gently as needed between batches.
The Paper Towel Trick: Before dipping, ensure pecans are completely dry. Pat with paper towels if needed. Any moisture causes chocolate to seize (become grainy and unusable).
Storage Temperature Strategy: Dark chocolate-covered pecans can stay at room temperature (65-70°F). Milk chocolate versions should be refrigerated if your home is warm, but bring to room temperature before serving for best flavor and texture.
Common Mistakes to Avoid
Mistake #1: Overheating the Chocolate – Heating chocolate too quickly or at too high a temperature causes it to seize, become grainy, or burn. Chocolate burns easily and there’s no fixing it once it happens. Always use low heat and short intervals, stirring frequently. Be patient – rushing this step ruins the entire batch.
Mistake #2: Getting Water in the Chocolate – Even a single drop of water causes chocolate to seize into a thick, grainy, unusable paste. Ensure all bowls, spoons, and pecans are completely dry. Be careful when using a double boiler that no steam or condensation drips into the chocolate. If chocolate seizes, sometimes adding 1 tablespoon of vegetable oil can save it, but prevention is better.
Mistake #3: Using Old or Rancid Pecans – Pecans have high oil content and go rancid relatively quickly, especially if stored improperly. Rancid pecans have a bitter, unpleasant taste and smell like old oil. Always taste a pecan before coating – it should be sweet, buttery, and pleasant. Store pecans in the freezer if keeping for more than a month.
Mistake #4: Not Allowing Chocolate to Set Completely – Stacking or storing chocolate pecans before they’re fully hardened causes them to stick together and lose their pretty coating. Be patient! Let them set completely at room temperature (or refrigerate briefly) until firm to the touch and no longer tacky before storing.
Mistake #5: Coating Warm Pecans – If you’ve toasted your pecans (which you should!), let them cool COMPLETELY before dipping in chocolate. Warm pecans melt the chocolate too quickly, creating a thin coating that slides off. Cool pecans to room temperature for at least 15-20 minutes after toasting.
Mistake #6: Using Low-Quality Chocolate – The chocolate is half the recipe, so quality matters significantly. Cheap chocolate chips contain stabilizers that prevent smooth melting and don’t taste as good. Invest in decent chocolate – it doesn’t have to be expensive, but choose brands you’d enjoy eating plain. The difference in final product is dramatic.
Storage & Meal Prep
Room Temperature Storage: Store chocolate covered pecans in an airtight container at room temperature (65-70°F) for up to 2-3 weeks. Layer them between sheets of parchment paper if stacking to prevent sticking. This works best for dark and semi-sweet chocolate versions. Keep away from heat, humidity, and direct sunlight.
Refrigerator Storage: Milk chocolate and white chocolate versions should be refrigerated, especially during warm months or in hot climates. Store in airtight containers for up to 4-6 weeks. Let them come to room temperature (about 10-15 minutes) before serving for best flavor and texture. Cold chocolate is less flavorful and can have a dull appearance.
Preventing Moisture: Moisture is chocolate’s enemy. Always ensure containers are completely dry before storing, and avoid opening the container repeatedly in humid environments. If you live in a humid climate, consider adding a food-safe silica gel packet to the container.
Layering for Storage: If stacking chocolate pecans in a container, place parchment or wax paper between layers to prevent them from sticking together or the chocolate from getting scratched.
Gift Packaging Storage: If packaging as gifts, store in cellophane bags tied with ribbons, mason jars with tight lids, or decorative tins. Include a “best by” date (2-3 weeks from making) on the package. Store gift packages in cool, dry places until giving.
Make-Ahead & Freezer Notes
Perfect Make-Ahead Treat: Chocolate covered pecans are ideal for advance preparation, making them perfect for holiday baking seasons when you’re juggling multiple recipes. Make them up to 3-4 weeks ahead and store properly – they actually stay fresh remarkably well.
Freezing Instructions: Yes, you can freeze chocolate covered pecans! Place them in a single layer on a baking sheet and freeze until solid (about 1 hour), then transfer to freezer-safe containers or bags, removing as much air as possible. Freeze for up to 3-4 months. This is particularly useful if you’ve made a huge batch for holiday gifting.
Thawing Method: Remove from freezer and let thaw at room temperature for 20-30 minutes before serving or packaging. Never thaw in the microwave or rush the process – this causes condensation which creates moisture on the chocolate surface, leading to a dull, streaky appearance (bloom) and potentially sticky texture.
Bulk Holiday Prep: Many people make multiple batches in November and early December for holiday gifts. Make one batch per week starting in early November, freeze in labeled containers, then thaw and package during the week before gift-giving. This spreads the work across several weeks instead of one exhausting marathon baking session.
Make-Ahead for Parties: Prepare these 1-2 weeks before your party and store at room temperature in airtight containers. They’ll taste just as fresh as the day you made them, freeing you up to focus on other party preparations.
Freezing Raw Pecans: If you buy pecans in bulk, freeze the raw pecans in airtight bags for up to 6-12 months. This prevents them from going rancid and ensures you always have fresh pecans ready when you want to make a batch of chocolate covered pecans.
Serving Suggestions
Chocolate covered pecans are incredibly versatile and fit beautifully into many serving occasions:
Dessert Presentations:
- Arranged on a dessert platter alongside cookies, brownies, and other candies
- Sprinkled over ice cream sundaes or cheesecake
- Nestled beside slices of pie or cake as an elegant garnish
- Added to charcuterie or dessert boards with fruits and cheeses
- Served in small bowls at dinner parties as an after-dinner treat
Holiday and Party Ideas:
- Displayed in glass apothecary jars on buffet tables
- Placed in small paper cups at each place setting
- Added to hot chocolate or coffee bar stations for stirring into drinks
- Arranged in decorative tins or boxes as party favors
- Set out during cocktail hour as an upscale nibble
Gift Packaging Ideas:
- Mason jars with fabric-topped lids and ribbon
- Clear cellophane bags tied with raffia or festive ribbons
- Small decorative boxes lined with tissue paper
- Vintage tins from thrift stores cleaned and filled
- Glass containers with handwritten recipe tags attached
Pairing Suggestions:
- Beverages: Coffee, espresso, hot chocolate, port wine, bourbon, dessert wines
- Cheese boards: Pair with sharp cheddar, aged Gouda, or creamy Brie
- Fresh fruit: Strawberries, orange slices, or dried apricots complement the rich chocolate
- Other nuts: Create a mixed nut display with candied walnuts and roasted almonds
Creative Uses:
- Chopped and sprinkled over yogurt parfaits
- Mixed into trail mix with dried fruit and seeds
- Crushed as a topping for cupcakes or brownies
- Added to holiday gift baskets alongside jams and baked goods
FAQs Section
Q: Can I use chocolate chips instead of melting chocolate?
A: Yes, but with a caveat. Regular chocolate chips contain stabilizers that help them hold their shape during baking, which makes them slightly more difficult to melt smoothly. They can work, but they may not create as smooth or glossy a coating as real chocolate bars or melting wafers. If using chips, add 1-2 teaspoons of coconut oil or shortening to help with consistency.
Q: Why did my chocolate turn white and streaky?
A: This is called chocolate bloom, and it happens when chocolate is exposed to temperature fluctuations – usually getting too warm and then cooling again. There are two types: fat bloom (whitish streaks) and sugar bloom (grainy white coating). While it looks unappealing, bloom doesn’t affect safety or taste significantly. Prevent it by storing chocolate pecans at a consistent cool temperature (65-70°F) and avoiding humidity. Once bloom happens, you can’t reverse it, but the candies are still perfectly safe to eat.
Q: How do I prevent the chocolate from being too thick?
A: Chocolate that’s too thick is usually either not melted completely or has gotten too cool. Reheat it gently (microwave in 15-second bursts or over the double boiler), stirring until smooth. Adding 1 teaspoon of coconut oil per 12 ounces of chocolate also helps thin it to a more workable consistency without affecting taste or setting properties.
Q: Can I make these nut-free for allergies?
A: While pecans are the star of this recipe, you can use the same technique to coat other items like pretzels, graham crackers, dried fruit, or even crispy rice cereal treats if you need a nut-free version for allergies. The method remains exactly the same.
Q: Do I have to toast the pecans first?
A: No, it’s not required, but it’s highly recommended. Toasting intensifies the pecan flavor dramatically, bringing out natural oils and creating a deeper, more complex nutty taste that pairs beautifully with chocolate. Raw pecans work fine if you’re short on time, but toasted pecans take this recipe from good to absolutely incredible with just 5 extra minutes of effort.
Q: How can I tell if my pecans have gone bad?
A: Fresh pecans should smell pleasantly nutty and sweet, taste buttery and rich, and look plump with no shriveling. Rancid pecans smell like old oil or paint, taste bitter or sour, and may look darker or shriveled. Always taste a pecan before coating to ensure freshness – one bad pecan can ruin an entire batch of candy.
Q: Can I use almond bark or candy melts instead of real chocolate?
A: Absolutely! Almond bark and candy melts (like Wilton Candy Melts or CandiQuik) are actually easier to work with than real chocolate because they’re formulated specifically for candy-making. They melt smoothly, set quickly, and don’t require tempering. They’re less expensive than quality chocolate and come in multiple colors. The trade-off is that they don’t taste quite as rich as real chocolate, but they’re perfect for gift-giving and create beautiful results.
Q: Why are my chocolate-covered pecans sticky instead of having a nice snap?
A: This usually happens when chocolate hasn’t set completely or if your storage environment is too warm. Ensure chocolate has hardened fully before storing (test by touching – it should be completely firm). If your kitchen is warmer than 75°F, refrigerate to set and store. Also, make sure you’re not using expired chocolate, which can have compromised cocoa butter that doesn’t set properly.
Conclusion
These Chocolate Covered Pecans prove that the most impressive treats are often the simplest to make. With just three main ingredients and minimal time investment, you can create a confection that looks and tastes like it came from an upscale chocolate shop. The combination of buttery, crunchy pecans and smooth, rich chocolate is timeless – it’s a flavor pairing that has delighted people for generations and will continue to do so for many more.
What makes this recipe truly special is its incredible versatility. Make them as quick after-dinner treats, thoughtful homemade gifts, elegant party favors, or additions to holiday cookie trays. Customize them with different chocolates, add sea salt for sophistication, or create spicy versions with cayenne for adventurous palates. However you make them, you’ll have a treat that disappears quickly and earns you constant compliments.
The beauty of homemade chocolate pecans lies not just in their delicious taste, but in the care and thoughtfulness they represent. When you package these in a pretty jar and give them to someone, you’re giving more than candy – you’re sharing something you made with your own hands, and that makes them priceless.
Ready to create the most delicious chocolate covered pecans you’ve ever tasted? Grab your pecans and favorite chocolate, and let’s make some magic happen in your kitchen. These addictive little treats are about to become your signature homemade gift!
Don’t forget to pin this recipe to your Pinterest boards so you can find it easily when holiday baking season rolls around (or whenever chocolate cravings strike!). After you’ve made these chocolate pecans, I’d love to hear all about them! Drop a comment below telling me which chocolate you used, who you gifted them to, and how long they lasted before being completely devoured. Share your beautiful photos on social media and tag me – I can’t wait to see your gorgeous creations! Happy candy-making, and enjoy every crunchy, chocolatey bite! 🍫🌰