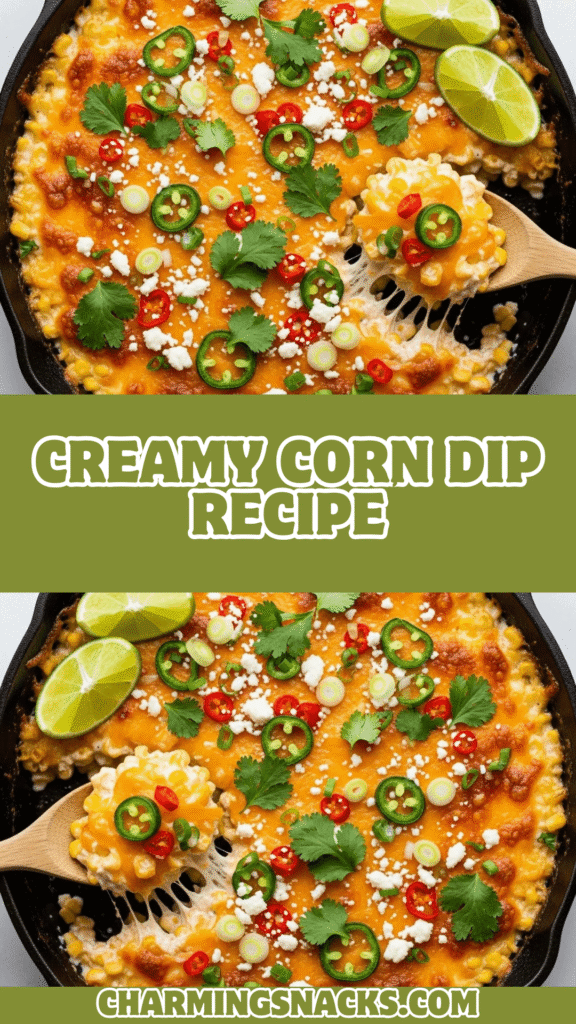
The Best Creamy Corn Dip Recipe – Easy, Cheesy & Always a Crowd-Pleaser!
Get ready for the most addictive appetizer you’ll ever make! This creamy corn dip is the ultimate party starter that combines sweet corn, tangy cream cheese, melty shredded cheese, and a kick of spices into one irresistible bowl of deliciousness. If you’ve ever been to a potluck, game day party, or summer barbecue and found yourself hovering near the snack table, chances are there was a corn dip calling your name!
This easy corn dip recipe has become an absolute staple at gatherings across America, and it’s easy to understand why. It takes just 10 minutes to prep, requires minimal cooking skills, and disappears faster than any other appetizer on the table. Whether you’re serving it hot and bubbly straight from the oven, warm from the slow cooker, or at room temperature with a mountain of tortilla chips, this creamy, cheesy corn dip delivers every single time.
Perfect for tailgating parties, holiday gatherings, casual weeknight snacking, or as part of your Taco Tuesday spread, this versatile dip works for absolutely any occasion. It’s the kind of recipe you’ll make once and then get asked to bring to every single party for the rest of your life. Trust me—once people taste this addictive combination of sweet corn and creamy, spicy, cheesy goodness, they’ll be begging you for the recipe!
History / Background
While corn dip might feel like a timeless American classic, it’s actually a relatively modern creation that emerged from the fusion of several beloved culinary traditions. To understand corn dip, we need to look at its cultural roots in Mexican street food, specifically elote—Mexican street corn.
Elote has been enjoyed in Mexico for centuries, featuring grilled corn on the cob slathered with mayonnaise, Mexican crema, cotija cheese, chili powder, and fresh lime juice. This flavor combination—creamy, tangy, spicy, and sweet—captured the hearts (and taste buds) of food lovers across North America. As Mexican cuisine continued to influence American cooking throughout the latter half of the 20th century, creative home cooks began adapting these bold flavors into more party-friendly formats.
Enter the corn dip revolution! Somewhere in the American Midwest and Southwest during the 1990s and early 2000s, ingenious home cooks started transforming elote’s signature flavors into a dippable, shareable appetizer. By combining canned or frozen corn with cream cheese, sour cream, mayonnaise, and shredded cheese, then adding jalapeños and spices, they created something entirely new—a Tex-Mex fusion appetizer that honored traditional Mexican flavors while embracing American party food culture.
The rise of food blogs, Pinterest, and social media in the 2010s catapulted corn dip to viral fame. Recipes with names like “Mexican Street Corn Dip,” “Elote Dip,” or simply “Creamy Corn Dip” began circulating rapidly, each cook adding their own twist. Some versions were baked until golden and bubbly, others were served cold, and many adapted the recipe for slow cookers, making it even more convenient for entertaining.
Today, corn dip represents the beautiful evolution of fusion cuisine—it takes the soul of traditional Mexican elote and transforms it into an accessible, crowd-pleasing American appetizer. It’s become as essential to game day spreads as buffalo chicken dip, as beloved at summer cookouts as potato salad, and as requested at potlucks as seven-layer dip. This humble dip has earned its place in the modern American recipe canon, proving that the best dishes often come from creative cultural fusion and a willingness to make delicious food even more shareable!
Why You’ll Love This Recipe
This hot corn dip recipe is about to become your secret weapon for effortless entertaining! I’ve made this countless times for parties, family gatherings, and even just weeknight snacking (no judgment here!), and it never fails to impress. The combination of sweet corn kernels, tangy cream cheese, and melty Mexican cheese blend creates an absolutely addictive flavor that keeps everyone coming back for more.
Here’s why this easy corn dip will be your new go-to appetizer:
- Lightning-fast prep – Ready in just 10 minutes of hands-on time, perfect for last-minute party planning
- Always a crowd-pleaser – I’ve never served this without getting recipe requests
- Incredibly budget-friendly – Uses affordable pantry staples and feeds a crowd for just a few dollars
- Minimal cooking skills required – If you can stir ingredients together, you can make this!
- Versatile serving options – Serve hot, warm, or cold—all equally delicious
- Make-ahead friendly – Prep in advance and bake when guests arrive
- Customizable heat level – Easily adjust spice to suit any preference
- Potluck perfect – Travels well and stays delicious at room temperature
- Kid-approved – Even picky eaters love this creamy, cheesy dip
- Works for any occasion – From elegant parties to casual game days
- Addictively delicious – Seriously, you’ve been warned—it’s impossible to stop eating!
Ingredient Notes
The magic of this cheesy corn dip lies in the perfect balance of creamy, tangy, sweet, and spicy. Let’s break down what makes each ingredient essential:
Corn – The star of the show! You have three excellent options: canned corn (most convenient, drain well), frozen corn (great texture, thaw and drain), or fresh corn (best flavor, about 3 cups from 4-5 ears). Each works beautifully, so use whatever you have on hand. For extra flavor, consider roasting or charring the corn first.
Cream Cheese – Creates the rich, creamy base that holds everything together. Always use full-fat cream cheese (not whipped or low-fat) for the best texture. Let it soften to room temperature for 30 minutes before mixing—this makes stirring much easier and creates a smoother dip. In a pinch, microwave for 10-15 seconds.
Sour Cream – Adds tanginess and helps thin the cream cheese for a perfectly dippable consistency. Full-fat sour cream provides the best flavor, but reduced-fat works if you prefer. Greek yogurt can substitute, though it’s slightly less tangy and more tart.
Mayonnaise – Contributes richness and helps create that signature creamy texture. Use regular mayo (not Miracle Whip) for authentic flavor. If you’re not a mayo fan, you can substitute with additional sour cream, though the texture will be slightly different.
Shredded Cheese – A blend of Mexican cheeses (cheddar, Monterey Jack, queso quesadilla) provides the best melting and flavor. Sharp cheddar adds bold taste, while Monterey Jack ensures smooth melting. Freshly shredded cheese melts better than pre-shredded, but pre-shredded works fine in a pinch.
Jalapeños – Fresh or pickled jalapeños add that signature kick. Pickled jalapeños (from a jar) provide tangy heat and are super convenient. Fresh jalapeños offer cleaner heat—remove seeds and membranes for less spice. For mild versions, use diced green chiles instead.
Seasonings – Garlic powder, cumin, chili powder, and lime juice create authentic Mexican-inspired flavor. Don’t skip the lime juice—it brightens everything and balances the richness! Fresh garlic can replace garlic powder (use 2-3 cloves, minced).
Green Onions and Cilantro – Fresh garnishes that add color, freshness, and authentic flavor. Both are optional but highly recommended for that restaurant-quality finish.
Equipment Needed
You don’t need fancy equipment to make restaurant-quality corn dip! Here’s what you’ll use:
- Large mixing bowl – For combining all ingredients smoothly
- Wooden spoon or rubber spatula – For stirring and mixing
- Can opener – If using canned corn
- Colander or strainer – For draining corn thoroughly
- Measuring cups and spoons – For accurate ingredient proportions
- Baking dish – 8×8-inch or 9×9-inch square dish, or 2-quart casserole dish for hot baked version
- Slow cooker (optional) – 3-4 quart size for keeping dip warm at parties
- Cutting board and knife – For chopping jalapeños, onions, and cilantro
- Cheese grater (if shredding cheese yourself) – Box grater works perfectly
- Serving bowl – For cold or room temperature serving
- Aluminum foil or plastic wrap – For covering and storing

Creamy Corn Dip Recipe
This irresistible creamy corn dip combines sweet corn, cream cheese, sour cream, Mexican cheese blend, and jalapeños for the ultimate party appetizer. Serve it hot and bubbly from the oven, warm from the slow cooker, or cold for easy entertaining. Perfect with tortilla chips, crackers, or fresh vegetables!
- Total Time: 30 minutes
- Yield: 12 servings (about 4 cups) 1x
Ingredients
- 3 cups corn kernels (about 15 oz can, drained, or 16 oz frozen and thawed)
- 8 oz cream cheese, softened to room temperature
- ½ cup sour cream
- ⅓ cup mayonnaise
- 2 cups shredded Mexican cheese blend, divided
- ⅓ cup diced jalapeños (fresh or pickled, adjust to taste)
- 2 cloves garlic, minced (or ½ teaspoon garlic powder)
- 1 teaspoon ground cumin
- ½ teaspoon chili powder
- ½ teaspoon salt
- ¼ teaspoon black pepper
- 2 tablespoons fresh lime juice (about 1 lime)
- ¼ cup chopped green onions (about 3-4 onions)
- ¼ cup fresh cilantro, chopped (optional)
- ¼ cup crumbled cotija cheese or queso fresco (optional, for topping)
- Paprika or extra chili powder for garnish
For Serving:
- Tortilla chips
- Crackers
- Pita chips
- Fresh vegetable sticks
Instructions
For Baked Hot Corn Dip:
- Preheat and prep: Preheat your oven to 350°F (175°C). Lightly grease an 8×8-inch baking dish or 2-quart casserole dish with cooking spray or butter. If using canned or frozen corn, make sure it’s thoroughly drained—excess moisture will make your dip watery.
- Mix the base: In a large mixing bowl, combine softened cream cheese, sour cream, and mayonnaise. Use a wooden spoon or rubber spatula to stir vigorously until smooth and well blended with no lumps of cream cheese remaining. This creates your creamy base.
- Add flavorings: Stir in 1½ cups of the shredded cheese (reserving ½ cup for topping), diced jalapeños, minced garlic, cumin, chili powder, salt, black pepper, and lime juice. Mix until everything is evenly incorporated throughout the creamy mixture.
- Fold in corn and fresh ingredients: Gently fold in the corn kernels, chopped green onions, and cilantro (if using). Make sure the corn is evenly distributed throughout the dip. The mixture will be thick and creamy.
- Transfer and top: Spread the corn dip mixture evenly into your prepared baking dish. Smooth the top with a spatula. Sprinkle the remaining ½ cup of shredded cheese over the top, covering the entire surface. Dust lightly with paprika or chili powder for color and extra flavor.
- Bake: Place the baking dish in the preheated oven and bake for 20-25 minutes, until the dip is hot and bubbly around the edges and the cheese on top is melted and lightly golden. You should see bubbles breaking through around the sides.
- Garnish and serve: Remove from oven and let cool for 3-5 minutes (it will be extremely hot!). Garnish with additional chopped cilantro, green onions, and crumbled cotija cheese if desired. Serve immediately with tortilla chips, crackers, or fresh vegetables.
For Cold/Room Temperature Corn Dip:
Follow steps 2-4 above, then transfer to a serving bowl, cover, and refrigerate for at least 1 hour before serving. Top with cotija cheese, cilantro, and green onions just before serving.
For Slow Cooker Corn Dip:
Combine all ingredients (reserving some cheese for topping) in a 3-4 quart slow cooker. Cook on LOW for 2 hours or HIGH for 1 hour, stirring occasionally. Top with reserved cheese, cover for 5 minutes to melt, then serve directly from slow cooker on WARM setting.
Notes
- Draining is crucial: Make absolutely sure your corn is well-drained. Pat frozen corn with paper towels to remove excess moisture.
- Softened cream cheese is key: Room temperature cream cheese mixes smoothly without lumps. Cold cream cheese will create a chunky texture.
- Adjust heat level: For mild dip, use 2-3 tablespoons jalapeños; for spicy, use ½ cup and include seeds. Pickled jalapeños are milder than fresh.
- Roasted corn upgrade: For extra flavor, roast your corn in a skillet with a little butter until lightly charred before adding to the dip.
- Cheese options: Mexican blend, cheddar-jack blend, or straight Monterey Jack all work beautifully.
- Make it lighter: Use low-fat cream cheese, Greek yogurt instead of sour cream, and reduced-fat mayo. The texture will be slightly different but still delicious.
- Prep Time: 10 minutes
- Cook Time: 20 minutes
- Category: Appetizer
- Method: Baking
- Cuisine: Tex-Mex
- Diet: Gluten Free
Nutrition
- Serving Size: ⅓ cup (about 1/12 of recipe)
- Calories: 215
- Sugar: 2g
- Sodium: 340mg
- Fat: 17g
- Saturated Fat: 8g
- Unsaturated Fat: 7g
- Trans Fat: 0g
- Carbohydrates: 10g
- Fiber: 1g
- Protein: 7g
- Cholesterol: 40mg
Tips & Variations
The beauty of this Mexican corn dip is how easily you can customize it to suit your taste! Here are countless ways to make it your own:
Flavor Variations:
- Bacon Lover’s: Add 6 strips cooked, crumbled bacon for smoky richness
- Southwest Style: Mix in black beans, diced tomatoes, and extra cumin
- Buffalo Corn Dip: Add ¼ cup buffalo sauce and extra blue cheese crumbles
- Elote-Style: Top with extra cotija cheese, chili-lime seasoning, and lime wedges
- Creamy Poblano: Substitute roasted poblano peppers for jalapeños for smoky, mild heat
- Fiesta Corn Dip: Add a can of drained Rotel tomatoes and green chiles
- Ranch Corn Dip: Stir in 2 tablespoons dry ranch seasoning mix
- Chipotle Version: Add 2 tablespoons chopped chipotle peppers in adobo for smoky heat
Cheese Swaps:
- Pepper jack for extra spice
- Gruyère for sophisticated, nutty flavor
- Queso fresco or cotija throughout for authentic Mexican taste
- Smoked gouda for depth and smokiness
- Goat cheese for tangy, creamy twist
Heat Level Adjustments:
- Mild: Omit jalapeños entirely, use 1 can diced green chiles instead
- Medium: Recipe as written with seeds removed from jalapeños
- Spicy: Keep jalapeño seeds, add diced serrano peppers or cayenne pepper
- Extra Hot: Mix in diced habaneros or add hot sauce to taste
Add-Ins and Mix-Ins:
- Roasted red bell peppers for sweetness and color
- Fresh or canned diced tomatoes (drain well!)
- Black olives for briny flavor
- Cooked, crumbled chorizo for meaty richness
- Diced avocado folded in just before serving
- Fresh corn kernels sautéed with garlic and butter
Dietary Modifications:
- Dairy-Free/Vegan: Use dairy-free cream cheese, vegan sour cream and mayo, and dairy-free cheese shreds
- Lighter Version: Greek yogurt replaces sour cream, light cream cheese, reduced-fat mayo
- Keto-Friendly: Serve with celery sticks, cucumber slices, or pork rinds instead of chips
Pro Chef Tips
Want to take your corn dip from good to absolutely restaurant-worthy? These professional techniques make all the difference:
1. Char your corn for maximum flavor. Professional chefs know that charred corn adds incredible depth and smokiness. Before adding to your dip, spread corn kernels in a dry cast-iron skillet over high heat and let them sit undisturbed for 2-3 minutes until deeply browned. Stir and repeat. This caramelizes the natural sugars and adds complexity you can’t get from plain corn.
2. Room temperature dairy is non-negotiable. Cold cream cheese will never fully incorporate and will leave lumps throughout your dip. Set all dairy ingredients on the counter 30-45 minutes before mixing. If you forgot, microwave cream cheese for 10 seconds at 50% power, but room temperature is always better.
3. Layer your cheeses strategically. Reserve the best melting cheese (like Monterey Jack) for the top layer. Use sharper, more flavorful cheeses (like aged cheddar) mixed throughout. This creates visual appeal with a gorgeous melted top layer while maintaining bold flavor throughout.
4. Fresh lime juice is essential. Bottled lime juice tastes flat and artificial. Fresh lime juice provides brightness that cuts through the richness and makes all the flavors pop. Roll the lime firmly on the counter before juicing to release more juice.
5. Don’t skip the resting time. After baking, let your hot corn dip rest for 5 minutes before serving. This allows the temperature to stabilize slightly (preventing burned tongues!) and lets the dip thicken to the perfect consistency. It will be lava-hot straight from the oven.
6. Season in layers. Add half your seasonings with the dairy base, fold in the rest with the corn. Taste before baking and adjust. Remember that baking will mellow flavors slightly, so it should taste well-seasoned when raw.
7. Drain, then drain again. Watery corn is the enemy of creamy dip. After draining canned or frozen corn, spread it on paper towels and pat completely dry. This extra step prevents watery, separated dip.
8. Finish with fresh elements. Always reserve some fresh cilantro, green onions, cotija cheese, and lime wedges for garnishing just before serving. This adds visual appeal, fresh flavor, and makes your dip look professionally prepared.
Common Mistakes to Avoid
Even simple recipes can go wrong! Here’s what to watch out for:
1. Using cold cream cheese straight from the fridge. This is the most common mistake and leads to lumpy, chunky dip that never fully comes together. Cold cream cheese won’t blend smoothly with other ingredients no matter how much you stir. Always bring cream cheese to room temperature—it should be soft enough to easily press your finger into it.
2. Not draining corn properly. Excess moisture from canned or frozen corn will make your dip watery and separated. The dairy base can only absorb so much liquid. Drain corn thoroughly in a colander, then spread on paper towels and pat dry before adding to your mixture.
3. Overbaking until the dip dries out. Corn dip should be hot and bubbly, not dried out and crusty. Start checking at 20 minutes—you want bubbles around the edges and melted cheese on top, but the center should still look creamy. Overbaked dip becomes grainy and breaks, losing that luxurious texture.
4. Skipping the lime juice. It might seem like a small ingredient, but lime juice is crucial for balancing the richness. Without it, corn dip tastes flat, heavy, and one-dimensional. The acidity brightens every other flavor and makes the dip more craveable.
5. Adding wet ingredients without draining. If using canned jalapeños, pickled jalapeños, or adding tomatoes or roasted peppers, drain them thoroughly. Every wet ingredient you add increases the risk of watery dip. When in doubt, pat ingredients dry with paper towels before mixing in.
Storage & Meal Prep
Corn dip is fantastic for making ahead and storing, making entertaining so much easier!
Refrigerator Storage: Store cooled corn dip in an airtight container in the refrigerator for up to 4-5 days. Press plastic wrap directly onto the surface of the dip before sealing the container to prevent drying out and oxidation.
Reheating Methods:
- Oven (best for maintaining texture): Transfer to an oven-safe dish, cover with foil, and reheat at 350°F for 15-20 minutes until hot and bubbly. Remove foil for the last 5 minutes to re-crisp the top.
- Microwave (quickest): Heat in 30-second intervals, stirring between each, until warmed through. Be careful—it gets very hot!
- Slow cooker (best for parties): Transfer to slow cooker, heat on LOW for 1-2 hours, stirring occasionally. Keep on WARM setting for serving.
- Stovetop: Heat in a saucepan over medium-low heat, stirring frequently to prevent sticking and scorching.
Serving Temperature Options: This versatile dip is delicious at multiple temperatures:
- Hot: Straight from the oven or slow cooker—cheese is melty and stretchy
- Warm: Room temperature after cooling slightly—easy for casual gatherings
- Cold: Chilled from the fridge—refreshing for summer parties and requires no reheating
Meal Prep Tips:
- Mix all ingredients except cheese topping up to 2 days ahead
- Store covered in the refrigerator
- When ready to serve, top with cheese and bake fresh, or serve cold
- Pre-chop garnishes and store separately
Make-Ahead & Freezer Notes
Corn dip is incredibly make-ahead friendly, perfect for stress-free entertaining!
Make-Ahead Unbaked (Best Option):
- Prepare the entire recipe through step 4 (mixing all ingredients)
- Transfer to your baking dish but don’t add the cheese topping yet
- Cover tightly with plastic wrap and refrigerate for up to 2 days
- When ready to serve, top with reserved cheese and bake as directed (add 5 extra minutes since it’s cold)
Make-Ahead Baked:
- Bake the corn dip completely according to recipe instructions
- Cool to room temperature, cover tightly with foil or plastic wrap
- Refrigerate for up to 3 days
- Reheat covered at 350°F for 15-20 minutes before serving
Freezing Instructions: Corn dip freezes reasonably well, though the texture may be slightly different after thawing:
- Prepare dip completely but don’t bake
- Transfer to a freezer-safe, airtight container or heavy-duty freezer bag
- Press plastic wrap directly onto surface to prevent freezer burn
- Label with date and freeze for up to 2 months
- To use: Thaw overnight in refrigerator, transfer to baking dish, top with cheese, and bake as directed (may need 5-10 extra minutes)
Note on Freezing: The cream cheese and sour cream may separate slightly when frozen and thawed. Stir well before baking and the texture will improve as it heats. For best results, freeze before baking rather than after.
Day-of-Party Timeline:
- 2 days before: Mix all ingredients, cover and refrigerate
- Morning of party: Add cheese topping, keep refrigerated
- 30 minutes before guests arrive: Preheat oven
- 20 minutes before serving: Bake until hot and bubbly
- Just before serving: Add fresh garnishes
Serving Suggestions
Corn dip is wonderfully versatile! Here’s how to serve it for maximum enjoyment:
Classic Dippers:
- Tortilla chips – Classic choice, sturdy enough for scooping (Tostitos Scoops work great!)
- Fritos corn chips – Their corn flavor complements the dip perfectly
- Pita chips – Provide sturdy, crunchy contrast
- Crackers – Wheat Thins, Triscuits, or Club crackers
- Bagel chips – Extra crunchy and substantial
- Crostini or toasted baguette slices – Elegant option for upscale parties
Healthier Dippers:
- Fresh vegetables: bell pepper strips, cucumber rounds, carrot sticks, celery
- Jicama sticks – Sweet and crunchy
- Endive leaves – Natural “scoops”
- Cauliflower florets
- Cherry tomatoes (slice in half)
Creative Serving Ideas:
- As a topping: Spread on grilled chicken, fish tacos, or burgers
- Quesadilla filling: Use as filling for quesadillas alongside extra cheese
- Stuffed peppers: Fill mini sweet peppers with corn dip and bake
- Loaded nachos: Use as one of the layers in epic nacho plates
- Taco bar addition: Serve alongside other taco toppings
- Baked potato topper: Dollop on baked potatoes instead of sour cream
Party Presentation:
- Serve in a cast-iron skillet for rustic appeal
- Use a slow cooker to keep warm throughout parties
- Garnish heavily with fresh cilantro, lime wedges, and cotija for Instagram-worthy presentation
- Surround with colorful chips and veggies on a large platter
Complete Party Spread: Pair corn dip with other crowd-pleasers:
- Guacamole and salsa
- Queso blanco or queso fundido
- Seven-layer dip
- Buffalo chicken dip
- Fresh margaritas or Mexican beer
- Lime wedges and hot sauce on the side
FAQs Section
Q: Can I use fresh corn instead of canned or frozen? A: Absolutely! Fresh corn is delicious in this recipe. You’ll need about 3 cups of kernels, which comes from approximately 4-5 ears of corn. Cut the kernels off the cob, then either use them raw or (even better) sauté them in a skillet with a little butter until lightly charred for maximum flavor. Fresh corn has the best texture and sweetest taste, especially in summer when corn is in season.
Q: Why is my corn dip watery? A: Watery corn dip almost always results from excess moisture in your ingredients. Make sure to thoroughly drain your corn—spread it on paper towels and pat completely dry. If using pickled jalapeños, drain them well. Also, be careful not to overdo wet add-ins like tomatoes. Finally, make sure you’re using regular sour cream (not watery versions) and full-fat cream cheese that’s been properly softened, not microwaved to liquid.
Q: Can I make this corn dip in a slow cooker? A: Yes! Slow cooker corn dip is perfect for parties. Combine all ingredients (except garnishes) in a 3-4 quart slow cooker. Cook on LOW for 2 hours or HIGH for 1 hour, stirring every 30 minutes. Once hot and creamy, reduce to WARM setting for serving. The dip will stay perfectly heated for hours, and guests can serve themselves. Top with cheese during the last 10 minutes of cooking.
Q: Do I have to bake corn dip or can I serve it cold? A: You can absolutely serve corn dip cold! Simply mix all ingredients together, transfer to a serving bowl, cover, and refrigerate for at least 1 hour (overnight is even better for flavors to meld). Cold corn dip is refreshing, especially in summer, and requires zero cooking. It won’t have that melty, stretchy cheese experience, but it’s equally delicious and incredibly convenient.
Q: What’s the best cheese for corn dip? A: A Mexican cheese blend (combination of cheddar, Monterey Jack, queso quesadilla, and asadero) provides the best flavor and melting. These cheeses melt smoothly and taste authentic. Sharp cheddar adds bold flavor, Monterey Jack melts beautifully, and pepper jack adds heat. For the most authentic version, include cotija or queso fresco crumbled on top—these traditional Mexican cheeses add salty, tangy flavor.
Q: How do I make corn dip less spicy for kids? A: To make kid-friendly mild corn dip, omit the jalapeños entirely and substitute with one 4-ounce can of mild diced green chiles (drained). Reduce or eliminate the chili powder, and use mild cheddar instead of pepper jack. The result will be creamy, cheesy, and kid-approved without any heat. You can always provide hot sauce on the side for adults who want to add spice.
Q: Can I make this corn dip dairy-free? A: Yes! Use dairy-free cream cheese (Kite Hill or Miyoko’s work well), vegan sour cream (like Tofutti), and vegan mayo. Substitute dairy-free shredded cheese (Violife or Daiya melt reasonably well). The texture will be slightly different but still delicious. Make sure all your dairy-free products are at room temperature for the best mixing consistency.
Q: How long does leftover corn dip last? A: Properly stored in an airtight container in the refrigerator, corn dip will last 4-5 days. Make sure it cools completely before refrigerating, and press plastic wrap directly onto the surface before sealing to prevent drying and oxidation. Reheat gently before serving, or enjoy cold. If the dip looks or smells off, discard it. The dip can also be frozen for up to 2 months.
Conclusion
There you have it—the ultimate guide to making irresistibly creamy, cheesy, absolutely addictive corn dip! Whether you’re serving it hot and bubbly from the oven, keeping it warm in a slow cooker for hours of party grazing, or enjoying it cold on a summer afternoon, this easy corn dip recipe delivers incredible flavor with minimal effort. It’s the kind of crowd-pleasing appetizer that makes you look like a kitchen rock star while requiring almost no cooking skills!
The beauty of this recipe is its incredible flexibility. Make it mild for kids, spicy for heat lovers, load it with bacon for meat eaters, or keep it vegetarian for plant-based friends. Serve it at fancy gatherings or casual game days—it fits every occasion perfectly. And knowing you can make it ahead, freeze it for later, or throw it together in 10 minutes? That’s the kind of recipe we all need in our lives!
I’d love to hear about your corn dip adventures! What variation did you try? Did you serve it hot or cold? Was it devoured within minutes at your party? Drop a comment below and let me know—I read and respond to every comment and love hearing your experiences!
If this recipe made your life easier or your party more delicious, please pin it to your favorite Pinterest board so you can find it again and again. Share it with friends who are always asking what to bring to potlucks—they’ll thank you after their first bite of this creamy, cheesy perfection!
Happy dipping, and here’s to many parties filled with empty bowls and recipe requests! 🌽🧀