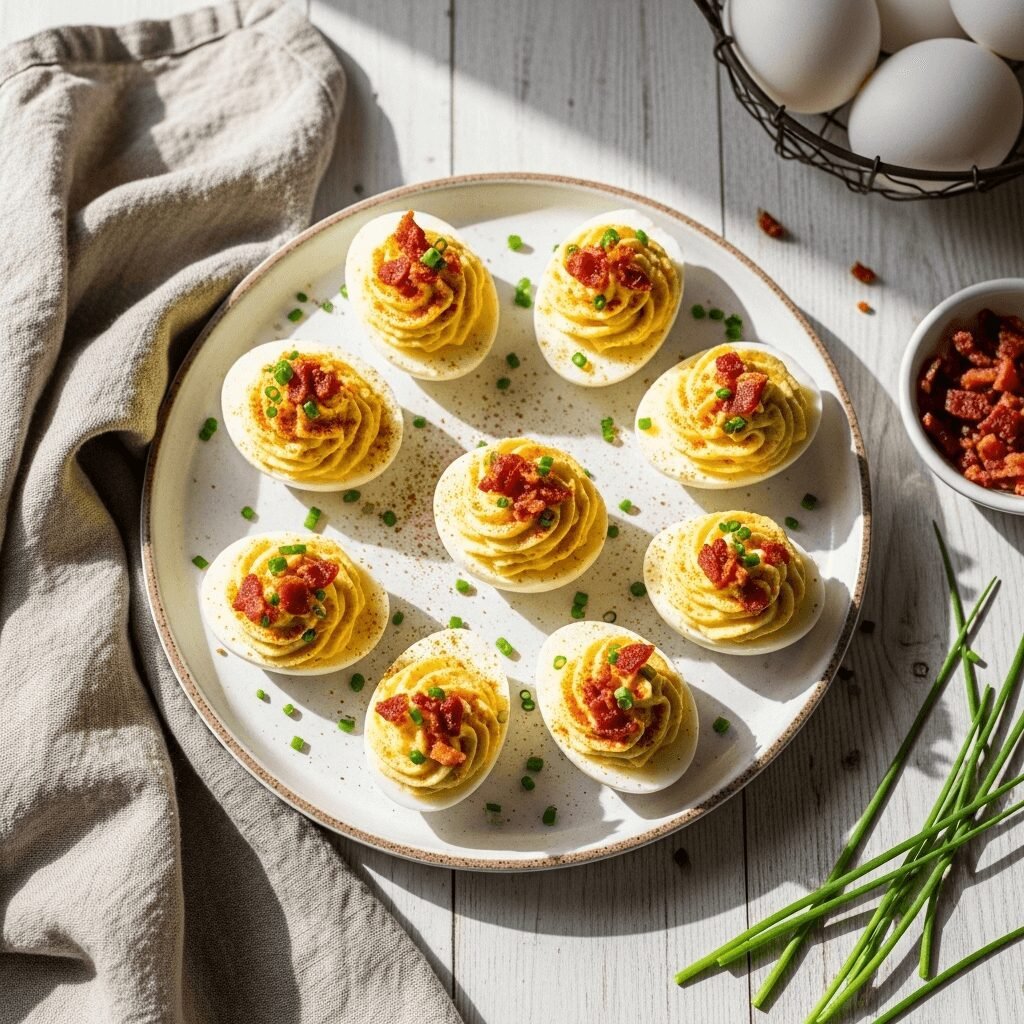
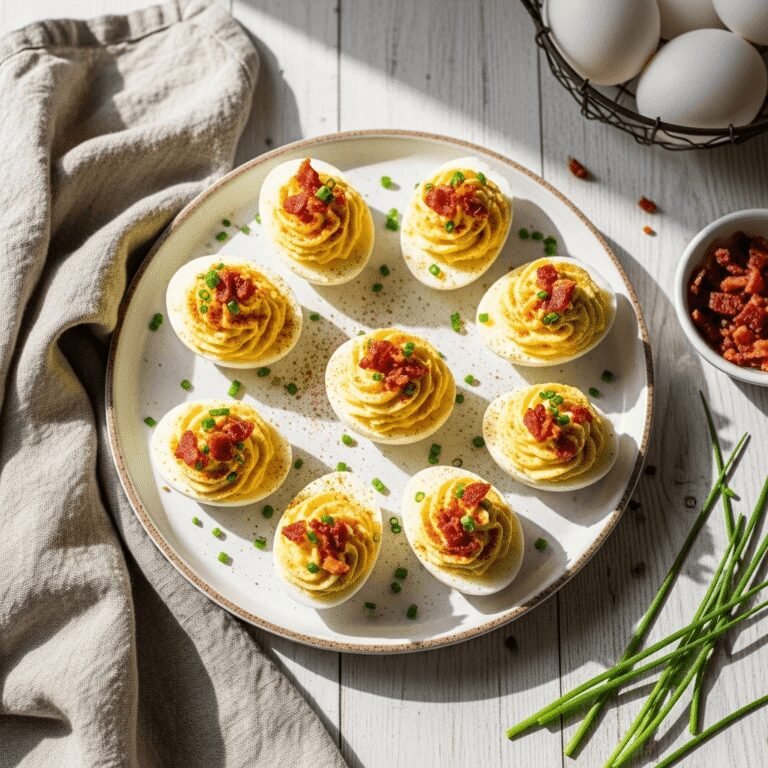
Deviled Eggs with Bacon: The Ultimate Crowd-Pleasing Appetizer

There’s something undeniably special about deviled eggs with bacon. This classic Southern appetizer takes the traditional deviled egg recipe and elevates it with crispy, smoky bacon pieces that add an irresistible crunch and savory depth. Whether you’re hosting a holiday gathering, attending a potluck, preparing game day snacks, or simply looking for an elegant yet easy appetizer, these bacon deviled eggs deliver every single time.
What makes this recipe truly shine is its perfect balance of creamy, tangy filling with the salty, smoky flavor of bacon. The combination creates a harmonious bite that keeps guests coming back for more. These aren’t your grandmother’s plain deviled eggs—though we love those too—these are the upgraded, modern version that appeals to bacon lovers everywhere. Serve them at Easter brunch, Thanksgiving dinner, summer barbecues, baby showers, or any occasion where you want to impress without spending hours in the kitchen.
The beauty of deviled eggs with bacon lies in their versatility and make-ahead convenience. You can prepare most components in advance, making them perfect for busy hosts who want to minimize last-minute stress. Plus, they’re naturally gluten-free and low-carb, fitting seamlessly into various dietary preferences without sacrificing flavor or satisfaction.
History / Background
Deviled eggs have been gracing American tables since the mid-19th century, though the concept of stuffed eggs dates back to ancient Rome. The term “deviled” began appearing in culinary contexts in the 18th century, referring to foods that were spicy, zesty, or highly seasoned—often with mustard, pepper, or hot sauce. The idea was that these bold seasonings were “devilishly” hot or spicy, giving the dish its memorable name.
In the United States, deviled eggs became a staple at church picnics, family reunions, and social gatherings throughout the South during the early 20th century. Their popularity surged during the 1940s and 1950s when they became a sophisticated cocktail party hors d’oeuvre. The basic formula—hard-boiled egg halves filled with a seasoned yolk mixture—proved endlessly adaptable, leading to countless regional variations.
The addition of bacon to deviled eggs is a more contemporary innovation, reflecting America’s enduring love affair with bacon that intensified in the late 1990s and early 2000s. As bacon became a trendy ingredient appearing in everything from cocktails to desserts, home cooks naturally began incorporating it into their beloved deviled egg recipes. The combination was an instant hit, perfectly complementing the creamy filling with textural contrast and smoky flavor.
Today, deviled eggs with bacon represent the evolution of classic American comfort food—honoring tradition while embracing modern tastes. They’ve become particularly popular in Southern cuisine, where both deviled eggs and bacon hold special places in the culinary canon. This recipe bridges generations, appealing to both traditionalists who grew up with deviled eggs and younger food enthusiasts who appreciate creative, flavor-packed appetizers.
Why You’ll Love This Recipe
This bacon deviled eggs recipe is about to become your go-to appetizer for every occasion. The combination of creamy, tangy filling with crispy bacon creates an addictive flavor profile that appeals to almost everyone. Whether you’re an experienced cook or just starting your culinary journey, this recipe offers the perfect balance of simplicity and impressive presentation.
Here’s why this recipe deserves a permanent spot in your recipe collection:
- Incredibly Easy to Make – With straightforward steps and common ingredients, even beginners can master this recipe on the first try
- Make-Ahead Friendly – Prepare components up to 2 days in advance, making party planning stress-free
- Budget-Friendly – Uses affordable, accessible ingredients that won’t break the bank
- Crowd-Pleasing Appeal – The bacon addition makes these deviled eggs irresistible to guests of all ages
- Naturally Low-Carb & Gluten-Free – Fits perfectly into keto, paleo, and gluten-free diets without modifications
- Portable & Party-Perfect – Transport easily to potlucks, picnics, and gatherings without worry
- Customizable – Easily adapt the recipe to suit different taste preferences and dietary needs
- Restaurant-Quality Presentation – Simple garnishing techniques create impressive, Pinterest-worthy results
- Quick Preparation – Active cooking time is minimal, with most time spent on passive tasks
- Protein-Packed – Each serving delivers substantial protein, making them satisfying and filling
Ingredient Notes
Understanding your ingredients is the first step to creating perfect deviled eggs with bacon. Let’s break down each component and why it matters:
Large Eggs – The foundation of this recipe. Use fresh, large eggs for consistent results. Older eggs (about 7-10 days old) actually peel more easily than ultra-fresh eggs, so plan accordingly if you’re buying specifically for this recipe.
Bacon – Regular-cut bacon works beautifully, providing the ideal balance of fat and meat. Thick-cut bacon is acceptable but takes longer to crisp. For best results, choose quality bacon without excessive added sugar. Turkey bacon can substitute for a leaner option, though the flavor will be milder.
Mayonnaise – Creates the creamy base of the filling. Full-fat mayonnaise delivers the best texture and flavor. Duke’s, Hellmann’s, or homemade mayo all work wonderfully. Greek yogurt or sour cream can replace half the mayo for a lighter version.
Dijon Mustard – Adds tangy depth and slight heat that balances the richness. Yellow mustard works in a pinch but produces a milder, more traditional flavor. Whole-grain mustard creates interesting texture if you prefer it.
Apple Cider Vinegar – Brightens the filling with acidity that cuts through the richness. White vinegar or pickle juice are suitable substitutions that add similar tang.
Salt & Black Pepper – Essential seasonings that enhance all other flavors. Always taste and adjust seasoning before filling the eggs, as different mayonnaise brands contain varying salt levels.
Paprika – Used primarily for garnish, adding color and subtle smokiness. Sweet paprika is traditional, but smoked paprika creates deeper flavor dimension. Cayenne pepper provides heat if desired.
Fresh Chives – Optional but highly recommended for fresh, mild onion flavor and beautiful color contrast. Green onions or fresh parsley make excellent alternatives.
Equipment Needed
Having the right tools makes preparing deviled eggs with bacon significantly easier. Here’s what you’ll need:
- Medium Saucepan – For boiling eggs with enough room for them to move freely
- Large Skillet – To cook bacon until perfectly crispy
- Large Bowl with Ice Water – Essential for stopping the cooking process and making eggs easier to peel
- Sharp Knife – For cleanly slicing eggs in half without tearing the whites
- Small Mixing Bowl – For combining the yolk mixture
- Fork or Potato Masher – To break down egg yolks into smooth consistency
- Spoon or Piping Bag – For filling egg white halves (piping bag creates prettier presentation)
- Paper Towels – For draining bacon and patting eggs dry
- Deviled Egg Platter (Optional) – Keeps filled eggs stable and makes an elegant presentation
- Measuring Spoons – For accurate seasoning and ingredient measurements
Deviled Eggs with Bacon
These bacon deviled eggs combine the classic creamy, tangy deviled egg filling with crispy, smoky bacon pieces for an irresistible appetizer that disappears quickly at any gathering. Perfect for holidays, potlucks, and parties!
- Total Time: 40 minutes
- Yield: 24 deviled egg halves (12 servings) 1x
Ingredients
- 12 large eggs
- 6 slices bacon
- ⅓ cup mayonnaise
- 1½ tablespoons Dijon mustard
- 1 teaspoon apple cider vinegar
- ¼ teaspoon salt (adjust to taste)
- ⅛ teaspoon black pepper
- Paprika for garnish
- 2 tablespoons fresh chives, finely chopped (optional)
Instructions
- Boil the Eggs: Place eggs in a single layer in a medium saucepan. Cover with cold water by 1 inch. Bring to a rolling boil over high heat. Once boiling, immediately remove from heat, cover with a lid, and let stand for 12 minutes.
- Ice Bath: While eggs cook, prepare a large bowl with ice water. After 12 minutes, transfer eggs to the ice bath using a slotted spoon. Let cool for 10 minutes to stop the cooking process completely.
- Cook the Bacon: While eggs cool, cook bacon in a large skillet over medium heat until crispy, about 8-10 minutes, flipping occasionally. Transfer to paper towels to drain. Once cooled, finely chop or crumble the bacon. Set aside 2 tablespoons for garnish.
- Peel and Halve Eggs: Gently tap each egg on the counter to crack the shell, then peel under cool running water. Pat dry with paper towels. Slice each egg in half lengthwise. Carefully remove yolks and place them in a small mixing bowl.
- Make the Filling: Add mayonnaise, Dijon mustard, apple cider vinegar, salt, and pepper to the bowl with yolks. Mash with a fork until completely smooth and creamy. Fold in most of the crumbled bacon (reserving 2 tablespoons for garnish). Taste and adjust seasonings as needed.
- Fill the Eggs: Spoon or pipe the yolk mixture evenly into each egg white half, slightly mounding the filling.
- Garnish and Serve: Sprinkle with reserved bacon, paprika, and fresh chives if using. Arrange on a serving platter. Refrigerate until ready to serve.
Notes
- For easier peeling, use eggs that are 7-10 days old rather than very fresh eggs.
- To pipe the filling for a prettier presentation, use a piping bag fitted with a large star tip.
- Make the filling up to 2 days ahead and store separately from the egg whites.
- Don’t skip the ice bath—it prevents gray-green rings around the yolks.
- If your filling seems too thick, thin it with a teaspoon of water or milk.
- Leftover deviled eggs keep in an airtight container for 2-3 days refrigerated.
- Prep Time: 20 minutes
- Cook Time: 20 minutes
- Category: Appetizer
- Method: Boiling, Stovetop
- Cuisine: American
- Diet: Gluten Free
Nutrition
- Serving Size: 2 deviled egg halves
- Calories: 162
- Sugar: 0.5g
- Sodium: 285mg
- Fat: 13g
- Saturated Fat: 3g
- Unsaturated Fat: 8g
- Trans Fat: 0g
- Carbohydrates: 1g
- Fiber: 0g
- Protein: 10g
- Cholesterol: 201mg
Tips & Variations
Transform these bacon deviled eggs to suit your preferences or dietary needs with these creative variations:
Spicy Bacon Deviled Eggs: Add ½ teaspoon hot sauce, a pinch of cayenne pepper, or finely minced jalapeño to the filling. Top with a tiny dollop of sriracha for extra heat.
Ranch Bacon Deviled Eggs: Mix in 1 tablespoon of ranch seasoning powder or replace half the mayo with ranch dressing for a familiar, beloved flavor combination.
Loaded Baked Potato Style: Add finely shredded cheddar cheese to the filling and top with bacon, chives, and a tiny dollop of sour cream for a loaded baked potato-inspired version.
Avocado Bacon Deviled Eggs: Mash half an avocado into the yolk mixture for extra creaminess and healthy fats. The avocado creates beautiful green-tinted filling.
Smoked Salmon Twist: Replace bacon with crumbled smoked salmon or lox for an elegant, brunch-worthy variation. Garnish with fresh dill instead of chives.
Lighter Version: Use half Greek yogurt and half mayo instead of all mayo. Turkey bacon can replace regular bacon to reduce fat content while maintaining great flavor.
Southern-Style: Add a teaspoon of sweet pickle relish to the filling and garnish with a thin pickle slice alongside the bacon.
Pro Chef Tips
Elevate your deviled eggs from good to extraordinary with these professional techniques:
Perfect Hard-Boiled Eggs Every Time: The key is timing and temperature control. Start with eggs at room temperature if possible, as this prevents cracking. The 12-minute covered rest after boiling creates perfectly cooked yolks that are creamy yellow without any gray-green ring.
Silky-Smooth Filling: Press the yolk mixture through a fine-mesh sieve for ultra-smooth, luxurious texture that rivals any restaurant. This removes any lumps and creates professional results.
Piping Bag Mastery: For bakery-worthy presentation, use a piping bag with a large star tip. Hold the bag perpendicular to the egg white and pipe in a circular motion from outside to center, creating a beautiful spiral pattern.
Flavor Layering: Let your bacon cool completely before crumbling and mixing into the filling. Warm bacon can make the mayonnaise separate. Also, crisp your bacon slightly beyond what you’d normally eat—it softens slightly when mixed into the filling.
Balance the Seasoning: Always taste your filling before stuffing the eggs. The salt level needs to be slightly higher than you think because the egg whites are unsalted and will balance the overall flavor.
Strategic Garnishing: Apply garnishes like paprika, bacon, and chives just before serving. Pre-garnishing causes colors to bleed and bacon to soften. For maximum crunch and visual appeal, garnish at the last moment.
Temperature Matters: Serve deviled eggs slightly chilled but not ice-cold. Remove them from the refrigerator 15 minutes before serving for optimal flavor and texture. Cold dulls taste, so this short rest brings the flavors forward.
Common Mistakes to Avoid
Sidestep these frequent pitfalls to ensure perfect deviled eggs every time:
Overcooking the Eggs: Boiling eggs too long creates rubbery whites and dry, crumbly yolks with that unappetizing gray-green ring. Follow the timing precisely: bring to boil, remove from heat, cover, and let sit for exactly 12 minutes.
Skipping the Ice Bath: Without shocking the eggs in ice water immediately after cooking, they continue cooking internally from residual heat. This results in overcooked yolks and difficult peeling. Always prepare your ice bath before you start cooking.
Peeling Eggs Too Soon: Attempting to peel hot or warm eggs leads to frustration and torn egg whites. Let them cool completely in the ice bath for at least 10 minutes before peeling for easiest removal.
Underseasoning the Filling: One of the most common mistakes is not tasting and adjusting the filling before stuffing the eggs. The egg whites are bland, so the filling needs enough salt, mustard, and vinegar to create balanced flavor.
Making Filling Too Thick or Too Thin: The filling should be creamy and spreadable but hold its shape. Too much mayo makes it runny; too little makes it dry and crumbly. Add liquid cautiously, one teaspoon at a time, until you reach the perfect consistency.
Soggy Bacon: Mix bacon into filling while it’s still warm, and you’ll end up with limp, soggy pieces. Always let bacon cool completely and pat away excess grease before incorporating it into your filling.
Poor Presentation: Overfilling the eggs or unevenly distributing the filling makes them look messy. Use a measuring spoon or piping bag to ensure uniform portions, and don’t overstuff—a neat mound is more appealing than overflowing filling.
Storage & Meal Prep
Proper storage ensures your deviled eggs stay fresh, safe, and delicious:
Refrigerator Storage: Store assembled deviled eggs in an airtight container in the refrigerator for up to 2-3 days. Place them in a single layer if possible, or separate layers with parchment paper to prevent sticking. Keep them toward the back of the fridge where temperature is most consistent, not in the door where temperature fluctuates.
Preventing Drying: Deviled eggs can dry out in the refrigerator. To prevent this, cover the container with plastic wrap pressed directly against the surface before sealing the lid, or place a damp paper towel over the eggs (not touching them) inside the container.
Separate Component Storage: For maximum freshness, store egg white halves and yolk filling separately in airtight containers. This keeps the whites from becoming watery and the filling from drying out. Assemble and garnish within a few hours of serving.
Food Safety Considerations: Because deviled eggs contain mayonnaise and eggs, both potentially hazardous foods, never leave them at room temperature for more than 2 hours total (1 hour if outdoor temperature exceeds 90°F). When transporting to events, use a cooler with ice packs.
Reheating Notes: Deviled eggs are meant to be served cold or at cool room temperature. Do not reheat. Simply remove from the refrigerator 15-20 minutes before serving to take the chill off for best flavor.
Batch Cooking Bacon: Cook extra bacon when making this recipe. It stores well in the refrigerator for up to 5 days or can be frozen for up to 3 months, making future batches even quicker to prepare.
Make-Ahead & Freezer Notes
Plan ahead with these time-saving preparation strategies:
Two-Day Advance Prep: Hard-boil eggs up to 2 days ahead. Keep them unpeeled in the refrigerator until ready to use—the shells protect the eggs and keep them fresher. Peel and assemble within several hours of serving for best quality.
Filling Preparation: Make the yolk filling mixture up to 24 hours in advance and store in an airtight container or piping bag in the refrigerator. Wait to add bacon until closer to serving time to maintain its texture, or store it separately and mix in just before filling the eggs.
Bacon Make-Ahead: Cook bacon up to 3 days in advance. Store cooled, crispy bacon in an airtight container between layers of paper towels in the refrigerator. Crumble it just before using to maintain maximum crunch.
Freezing Considerations: Unfortunately, deviled eggs don’t freeze well. The egg whites become rubbery and watery when thawed, and the mayonnaise-based filling separates and becomes grainy. This is one recipe best enjoyed fresh or within a few days of preparation.
Assembly Timeline: For optimal freshness and presentation, fill the egg whites within 6 hours of serving. Garnish with reserved bacon, paprika, and chives within 1 hour of serving to prevent color bleeding and maintain crispy bacon texture.
Event Planning Strategy: If hosting a party, hard-boil eggs the day before, make filling the morning of your event, and assemble 2-3 hours before guests arrive. Cover and refrigerate, then garnish just before serving. This timeline ensures maximum freshness with minimal last-minute stress.
Serving Suggestions
Create a complete spread by pairing your bacon deviled eggs with these complementary dishes:
Holiday Gatherings: Serve alongside honey-glazed ham, green bean casserole, sweet potato casserole, and dinner rolls for Thanksgiving, Easter, or Christmas celebrations. The rich, savory eggs balance perfectly with sweeter side dishes.
Game Day Spread: Pair with buffalo chicken dip, loaded nachos, chicken wings, vegetable crudités with ranch, and cheese and crackers for the ultimate sports-watching party. The protein-packed eggs help balance heavier, indulgent snacks.
Summer Barbecues: Include on your picnic table with pulled pork sandwiches, coleslaw, baked beans, potato salad, and watermelon. The cool, creamy eggs provide refreshing contrast to hot, smoky grilled foods.
Brunch Buffet: Arrange alongside quiche, fresh fruit salad, breakfast casserole, pastries, and mimosas for an elegant brunch spread. Deviled eggs add protein and sophistication to morning gatherings.
Cocktail Party: Serve with cheese board, shrimp cocktail, stuffed mushrooms, spinach artichoke dip, and crostini for upscale entertaining. The bite-sized eggs are perfect finger food that doesn’t require utensils.
Beverage Pairings: These savory eggs pair beautifully with crisp white wines like Sauvignon Blanc or Pinot Grigio, light beers, sweet tea, lemonade, or sparkling water with lemon. The acidity in these drinks cuts through the richness of the eggs.
Garnish Station: For interactive entertaining, set up a deviled egg garnish bar where guests can customize their eggs with options like extra bacon, hot sauce, pickle slices, capers, or different herbs.
FAQs Section
Q: Why are my deviled eggs watery?
A: Watery deviled eggs typically result from eggs that weren’t properly drained after cooking or egg whites that released moisture after being cut. Always pat your peeled eggs completely dry with paper towels before halving them. If your filling becomes watery after mixing, the egg yolks may have contained excess moisture or you added too much liquid. To fix watery filling, add a tablespoon more mayonnaise or a teaspoon of cream cheese to thicken the mixture.
Q: How do I get my deviled eggs to not smell?
A: The sulfur smell in eggs intensifies when they’re overcooked or stored improperly. Follow the exact cooking time (12 minutes covered after boiling), use the ice bath immediately, and store eggs in an airtight container. Adding acid like vinegar or mustard to the filling also helps neutralize odors. Keep deviled eggs well-sealed in the refrigerator, and they shouldn’t have an offensive smell if they’re fresh.
Q: Can I make deviled eggs without mayonnaise?
A: Yes! Replace mayonnaise with Greek yogurt, sour cream, or mashed avocado for a different but delicious variation. You can also use a combination—try half Greek yogurt and half mayo for a lighter version that maintains creaminess. Just be aware that the flavor profile will change slightly, becoming tangier with yogurt or richer with sour cream.
Q: What’s the best way to transport deviled eggs?
A: Invest in a deviled egg carrier with individual egg-shaped indentations that keep each egg secure and prevent sliding. If you don’t have one, place eggs in a shallow container lined with paper towels, arrange in a single layer, and don’t stack them. Cover with plastic wrap and transport in a cooler with ice packs to maintain food safety. Alternatively, transport components separately and assemble on-site.
Q: Why do my egg yolks have a green ring around them?
A: The gray-green ring forms when eggs are overcooked or not cooled quickly enough. The sulfur in the egg white reacts with iron in the yolk, creating ferrous sulfide. This is harmless but unattractive. Prevent it by following precise cooking times, removing eggs from heat after boiling, and immediately plunging them into an ice bath.
Q: How far in advance can I make deviled eggs?
A: For best quality, assemble deviled eggs within 6 hours of serving, though they’ll stay safe in the refrigerator for 2-3 days. The egg whites can become slightly watery and the filling may dry out over time. For events, prepare components up to 2 days ahead and assemble the day of. Always garnish right before serving.
Q: Can I use turkey bacon instead of regular bacon?
A: Absolutely! Turkey bacon is a leaner alternative that works well in this recipe. Cook it until very crispy since it tends to be chewier than pork bacon. The flavor will be slightly milder, so you might want to add an extra ½ teaspoon of Dijon mustard or a dash of smoked paprika to boost the smoky notes.
Conclusion
There you have it—everything you need to create show-stopping bacon deviled eggs that will have everyone asking for your recipe! This classic Southern appetizer combines creamy, tangy filling with crispy, smoky bacon to create an irresistible bite that disappears quickly at every gathering. Whether you’re preparing them for a holiday celebration, potluck, game day party, or elegant brunch, these deviled eggs deliver impressive results with surprisingly simple preparation.
The beauty of this recipe lies in its versatility and make-ahead convenience. You can customize the flavors to suit your preferences, prepare components in advance to minimize stress, and feel confident that you’re serving an appetizer that appeals to virtually everyone. The combination of protein-packed eggs and savory bacon makes these not just delicious but also satisfying and naturally low-carb.
Remember the key tips: don’t overcook your eggs, use the ice bath without fail, taste and adjust your filling before stuffing, and garnish just before serving for maximum impact. With these techniques mastered, you’ll be creating restaurant-quality deviled eggs that rival any professional caterer.
Ready to become the deviled egg champion of your next gathering? Pin this recipe to your favorite Pinterest board so you’ll always have it handy! Try making these bacon deviled eggs this weekend and let me know in the comments how they turned out. Did you try any of the variations? What’s your favorite way to customize deviled eggs? I’d love to hear about your creations!
Don’t forget to share photos of your beautiful bacon deviled eggs on social media and tag me—I absolutely love seeing your kitchen successes! Happy cooking, and here’s to creating delicious memories around the table with family and friends! 🥚🥓