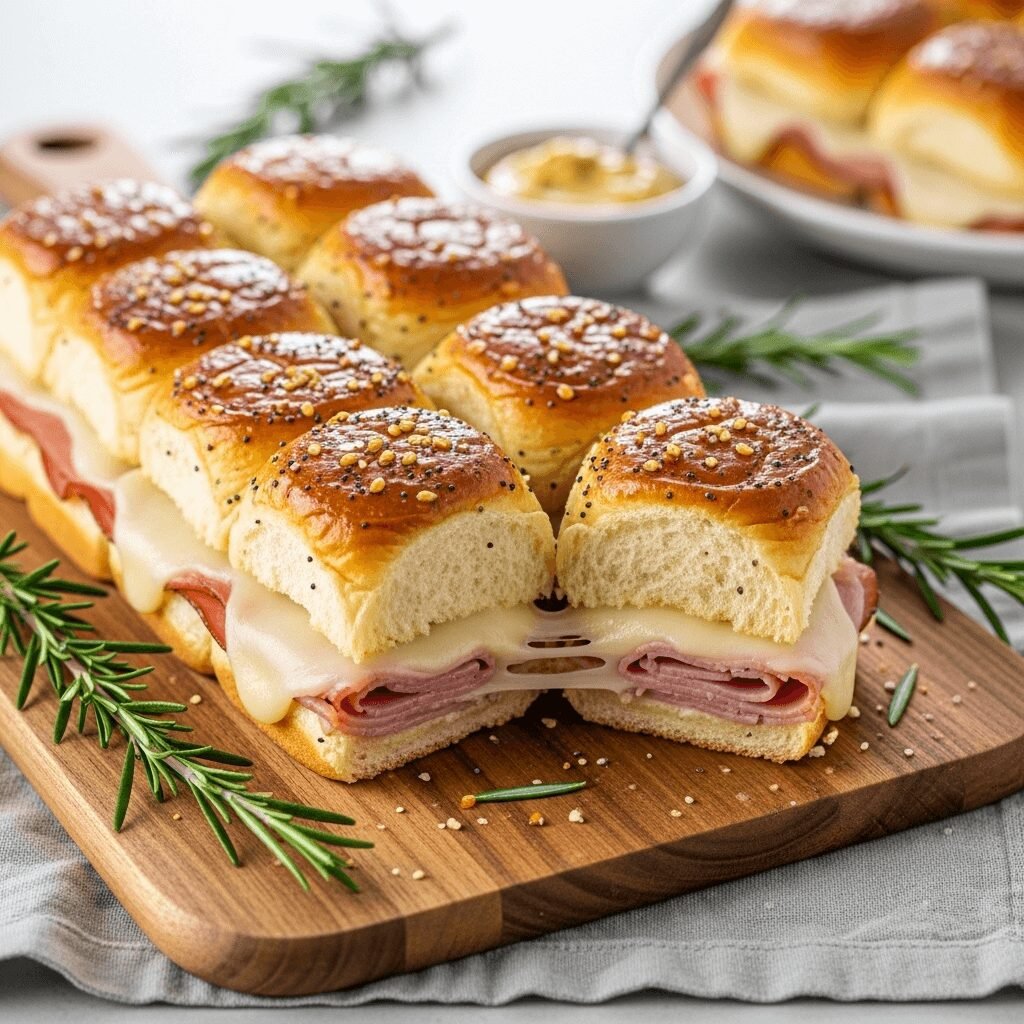
The Best Hawaiian Ham and Cheese Sliders (King’s Hawaiian Recipe!)

There’s something absolutely irresistible about warm, buttery Ham and Cheese Sliders fresh from the oven—melted cheese oozing between layers of savory ham, all tucked into soft, sweet rolls and brushed with a garlic-butter glaze that creates the most addictive golden crust. These baked ham and cheese sliders are the ultimate crowd-pleaser that works for literally every occasion, from game day gatherings and potlucks to holiday brunches and quick weeknight dinners.
What makes these Hawaiian roll ham sliders so incredibly popular is their perfect balance of sweet and savory flavors combined with absolute ease of preparation. We’re talking about assembling an entire pan of sliders without separating the rolls—you slice, layer, top, and bake everything together, then cut into individual sandwiches after baking. The result? Perfectly portioned sliders with connected, pull-apart edges that stay warm longer and look impressively cohesive when you bring them to the table.
These easy ham and cheese sliders have become a staple at Super Bowl parties, baby showers, funeral receptions, graduation celebrations, and family movie nights across America. They’re incredibly versatile—serve them as appetizers, a main course with soup or salad, or even pack them for picnics and tailgates. The best part? You can easily customize the ingredients to suit your taste preferences while maintaining that signature buttery, melty perfection everyone loves.
History / Background
Ham and cheese sliders rose to popularity in the early 2000s as home cooks discovered the magic of using King’s Hawaiian Sweet Rolls as the foundation for hot party sandwiches. While the combination of ham and cheese on bread has existed for generations, the specific concept of baking assembled sandwiches in a connected sheet format transformed this simple pairing into something special.
The recipe’s origins trace back to Hawaiian sweet bread itself, which was introduced to the mainland United States by Robert Taira in the 1950s. His King’s Hawaiian bakery in California began producing those signature slightly sweet, incredibly soft rolls that became an American staple. The bread’s unique texture and subtle sweetness come from the addition of pineapple juice and a hint of honey in the dough, creating the perfect canvas for savory fillings.
The slider trend gained momentum through church potlucks, community cookbooks, and eventually Pinterest and food blogs, where busy home cooks shared their favorite variations. The term “slider” originally referred to small hamburgers that could be eaten in just a few bites, popularized by White Castle in the 1920s. Modern sliders have evolved beyond burgers to include any small sandwich, and these baked ham and cheese versions represent the home-cooking adaptation of the concept.
What distinguishes these from regular sandwiches is the communal baking method and the signature poppy seed butter sauce that gets brushed over the top before baking. This technique—borrowed from similar recipes like funeral sandwiches (popular in the Midwest) and party sandwiches (Southern tradition)—creates a unified, pull-apart presentation that’s both practical and visually appealing.
Today, ham and cheese sliders represent American convenience cooking at its finest: accessible ingredients, minimal preparation, maximum flavor, and guaranteed crowd satisfaction. They’ve become so beloved that countless variations exist, but the classic version remains the most requested recipe at gatherings nationwide.
Why You’ll Love This Recipe
These aren’t just any sandwiches—they’re the recipe you’ll make over and over again because they deliver restaurant-quality results with minimal effort and ingredients you probably already have on hand. Whether you’re an experienced home cook or just learning your way around the kitchen, these sliders will make you look like a culinary genius.
Here’s why these ham and cheese sliders will become your new go-to recipe:
- Incredibly Simple – Just 10 minutes of hands-on prep work, then your oven does the rest
- No Individual Assembly – Assemble everything as one large sheet, then slice after baking
- Budget-Friendly – Uses affordable deli ham, Swiss cheese, and a package of rolls to feed a crowd
- Perfect for Meal Prep – Make ahead and bake when needed, or freeze for future gatherings
- Crowd-Pleaser Guaranteed – Appeals to both kids and adults with familiar, comforting flavors
- Easily Customizable – Swap meats, cheeses, or add different toppings to suit preferences
- Stays Warm Longer – The connected format retains heat better than individual sandwiches
- Minimal Cleanup – Just one baking pan and a small bowl for the butter mixture
- Scales Beautifully – Double or triple the recipe easily for larger gatherings
- Impressive Presentation – Looks like you spent hours when it took just minutes
Ingredient Notes
Every component in these sliders plays an important role in creating that irresistible flavor and texture combination:
King’s Hawaiian Sweet Rolls – These soft, slightly sweet rolls are the signature base that makes these sliders special. The 12-count package is perfect for this recipe. Their sweetness balances the salty ham and cheese beautifully, while their soft texture absorbs the butter glaze without getting soggy. If you can’t find King’s Hawaiian brand, substitute with any sweet dinner rolls or potato rolls, though the flavor won’t be quite the same.
Deli Ham – Use quality honey ham, smoked ham, or black forest ham from your grocery store deli counter or pre-packaged sliced ham. Avoid overly processed or watery ham varieties. The thinner the slices, the better they layer—ask for it sliced medium-thin. You’ll need about 3/4 to 1 pound for a full pan. Honey ham adds extra sweetness that complements the rolls perfectly.
Swiss Cheese – The traditional choice that melts beautifully and has mild, nutty flavor. Use sliced Swiss rather than shredded for better coverage and melting. Each slider typically needs one full slice. You can substitute with provolone for milder taste, Gruyère for sophistication, cheddar for sharpness, or Havarti for extra creaminess.
Butter – Real butter (not margarine) is essential for that rich, golden glaze. It creates the signature crispy, flavorful top crust. You’ll need to melt it before mixing with the seasonings. Use unsalted butter so you can control the salt level.
Dijon Mustard – Adds tangy depth and helps the butter mixture adhere to the rolls. Regular yellow mustard works in a pinch, but Dijon provides more sophisticated flavor. Just a tablespoon or two makes a difference.
Worcestershire Sauce – This secret ingredient adds savory umami depth that makes people wonder what makes your sliders taste so amazing. Just a small amount goes a long way.
Poppy Seeds – These tiny seeds add visual appeal and a subtle nutty flavor while creating texture on the buttery top crust. They’re traditional but optional—you can substitute with sesame seeds or omit entirely.
Garlic Powder & Onion Powder – These aromatics infuse the butter glaze with savory flavor. Use powder rather than fresh garlic, which can burn during baking.
Equipment Needed
You’ll need minimal kitchen equipment for this straightforward recipe:
- 9×13-inch Baking Dish – The standard size that perfectly fits a 12-count package of Hawaiian rolls
- Aluminum Foil – For covering the pan during initial baking to prevent over-browning
- Sharp Serrated Knife – Essential for slicing through the connected rolls cleanly
- Small Mixing Bowl – For combining the butter glaze ingredients
- Pastry Brush – For applying the butter mixture evenly over the rolls (or use a spoon)
- Cutting Board – For preparing the roll “slab” before transferring to the baking dish
- Measuring Spoons – For accurate seasoning proportions
- Small Saucepan or Microwave-Safe Bowl – For melting the butter

Hawaiian Ham and Cheese Sliders
These irresistibly delicious Ham and Cheese Sliders feature layers of honey ham and melted Swiss cheese tucked into soft Hawaiian sweet rolls, all topped with a buttery garlic glaze and baked until golden. Perfect for parties, game day, or easy weeknight dinners!
- Total Time: 30 minutes
- Yield: 12 sliders (6 servings) 1x
Ingredients
For the Sliders:
- 1 package (12 count) King’s Hawaiian Sweet Rolls
- 3/4 pound deli honey ham, sliced medium-thin
- 12 slices Swiss cheese
For the Butter Glaze:
- 1/2 cup (1 stick) unsalted butter, melted
- 1 1/2 tablespoons Dijon mustard
- 1 tablespoon Worcestershire sauce
- 1 tablespoon poppy seeds
- 1 teaspoon garlic powder
- 1 teaspoon onion powder
- 1/2 teaspoon salt
- 1/4 teaspoon black pepper
Instructions
- Preheat and Prep – Preheat your oven to 350°F (175°C). Lightly spray a 9×13-inch baking dish with non-stick cooking spray or line with parchment paper for easier cleanup.
- Slice the Rolls – Without separating the individual rolls, use a large serrated knife to carefully slice the entire sheet of connected rolls horizontally in half. Think of it like opening a book—you want to create a top and bottom “slab” while keeping each layer connected. Place the bottom layer in your prepared baking dish.
- Layer the Ham – Arrange the sliced honey ham evenly over the bottom layer of rolls, folding slices as needed to fit. Cover the entire surface with ham, making sure every roll will have a generous amount.
- Add the Cheese – Layer the Swiss cheese slices over the ham, ensuring each roll section gets one full slice. You can overlap slightly for maximum cheesy coverage.
- Top with Roll Layer – Carefully place the top half of the rolls over the cheese layer, aligning it with the bottom. Press down gently to compress the layers slightly.
- Make the Butter Glaze – In a small bowl, combine the melted butter, Dijon mustard, Worcestershire sauce, poppy seeds, garlic powder, onion powder, salt, and pepper. Whisk until well combined and the seasonings are evenly distributed.
- Brush with Glaze – Using a pastry brush (or spoon), generously brush the entire butter mixture over the top of the rolls, making sure to cover all surfaces. The butter will pool slightly around the edges—this is perfect and will create delicious crispy spots.
- Cover and Bake – Cover the baking dish tightly with aluminum foil. Bake for 15 minutes, allowing the cheese to melt and the rolls to warm through without over-browning.
- Uncover and Finish – Remove the foil and continue baking for an additional 5-7 minutes, or until the tops are golden brown and the butter glaze has created a beautiful, slightly crispy crust.
- Slice and Serve – Remove from oven and let rest for 2-3 minutes. Using a sharp knife, slice along the original roll divisions to create 12 individual sliders. Serve warm and watch them disappear!
Notes
- Make-Ahead: Assemble completely through step 7, cover tightly with foil, and refrigerate up to 24 hours before baking. Add 5 minutes to covered baking time if starting from cold.
- Cheese Options: Swiss is traditional, but provolone, cheddar, Gruyère, or Havarti all work beautifully.
- Ham Substitutes: Try turkey, roast beef, or even rotisserie chicken for variations.
- Extra Flavor: Add thin slices of dill pickle or a layer of caramelized onions before adding cheese.
- Crispier Top: For extra crunch, broil for 1-2 minutes at the very end, watching carefully to prevent burning.
- Prep Time: 10 minutes
- Cook Time: 20 minutes
- Category: Appetizer
- Method: Baking
- Cuisine: American
- Diet: Vegetarian
Nutrition
- Serving Size: 2 sliders
- Calories: 465
- Sugar: 12g
- Sodium: 920mg
- Fat: 24g
- Saturated Fat: 13g
- Unsaturated Fat: 9g
- Trans Fat: 0g
- Carbohydrates: 38g
- Fiber: 2g
- Protein: 22g
- Cholesterol: 80mg
Tips & Variations
Italian Style: Use salami or pepperoni instead of ham, mozzarella instead of Swiss, and add Italian seasoning to the butter mixture. Serve with marinara for dipping.
Cuban Sliders: Layer ham with roast pork, Swiss cheese, pickles, and add yellow mustard to the butter glaze for Cuban sandwich-inspired sliders.
Turkey Club: Substitute turkey for ham, add crispy bacon, and layer with cheddar cheese. Top with lettuce and tomato after baking.
BBQ Pulled Pork: Replace ham with leftover pulled pork, use cheddar cheese, and mix BBQ sauce into the butter glaze for smoky sweetness.
Buffalo Chicken: Use shredded rotisserie chicken tossed in buffalo sauce, pepper jack cheese, and add ranch seasoning to the butter mixture.
Breakfast Sliders: Fill with scrambled eggs, bacon or sausage, and cheddar cheese. Reduce baking time slightly since eggs are already cooked.
French Dip Style: Use roast beef and provolone, add fresh thyme to the butter, and serve with au jus for dipping.
Vegetarian Option: Layer roasted vegetables (bell peppers, zucchini, eggplant) with mozzarella and add Italian herbs to the butter mixture.
Spicy Kick: Add sliced jalapeños, use pepper jack cheese, and mix cayenne pepper into the butter glaze for heat lovers.
Pro Chef Tips
Don’t Skimp on the Butter Glaze: That butter mixture is what transforms these from ordinary sandwiches into something special. Make sure you brush it generously over every inch of the top surface, letting it pool slightly around the edges where it will create deliciously crispy, flavorful spots.
Slice While Connected: The key technique that makes these truly special is slicing the entire sheet of rolls horizontally before separating them. This keeps everything aligned and creates that signature pull-apart presentation. Use a long serrated bread knife and a gentle sawing motion.
Room Temperature Ingredients: If your ham and cheese have been refrigerated, let them sit at room temperature for 15-20 minutes before assembling. Cold ingredients won’t melt as evenly and can increase baking time.
Press Down Before Baking: After placing the top layer of rolls, press down firmly with your hands to compress everything together. This helps the layers meld during baking and prevents the tops from sliding around.
The Foil Matters: Covering with foil for the first portion of baking is crucial—it traps steam that melts the cheese perfectly while keeping the tops from browning too quickly. Remove it at just the right time for golden perfection.
Let Them Rest: Resist the urge to cut immediately after removing from the oven. A 2-3 minute rest allows the cheese to set slightly, making cleaner cuts and preventing all the cheese from sliding out.
Butter Quality Counts: Use real butter (not margarine or spreads) for the best flavor and texture. European-style butter with higher fat content creates an even more luxurious glaze.
Common Mistakes to Avoid
Separating the Rolls Before Slicing: The biggest mistake is pulling apart individual rolls before assembling. Always keep them connected and slice horizontally as one large slab. This is what creates that perfect pull-apart presentation and ensures even cooking.
Using Too Much Filling: Overstuffing with ham and cheese seems generous but actually works against you. Excessive filling prevents the bread layers from connecting properly and makes the sliders difficult to eat. Stick to the recommended amounts—they’re perfectly proportioned.
Skipping the Foil Cover: Baking uncovered the entire time will over-brown the tops before the cheese melts and the centers warm through. Always cover for the initial baking, then remove foil only for the final browning phase.
Not Using Enough Butter Mixture: Some people try to make these “healthier” by reducing the butter. Unfortunately, that glaze is essential for flavor and texture. Without enough, the tops stay pale and lack that signature taste. If you want lighter sliders, use turkey and reduce-fat cheese instead.
Cutting Too Soon: Slicing immediately after baking causes all the melted cheese to ooze out and makes messy, falling-apart sandwiches. Those few minutes of rest time make a significant difference in presentation and ease of eating.
Wrong Pan Size: Using a pan that’s too large leaves gaps that dry out the edges. Too small and the sliders won’t fit properly. A 9×13-inch pan is perfect for a 12-count package of King’s Hawaiian rolls—don’t improvise here.
Storage & Meal Prep
Refrigerator Storage: Store leftover sliders in an airtight container or wrap tightly with plastic wrap and aluminum foil. Refrigerate for up to 3 days. The butter glaze will solidify when cold but melts again beautifully when reheated.
Reheating from Refrigerator: The best method is reheating in a 300°F oven, covered with foil, for 10-15 minutes until warmed through. This preserves the texture better than microwaving. For individual sliders, microwave for 30-45 seconds, though the bread won’t be as crispy.
Reheating for Best Results: For crispy tops like freshly baked, reheat in the oven uncovered for the last 2-3 minutes. You can also reheat in an air fryer at 320°F for 5-7 minutes for extra crispy exterior while keeping the inside moist.
Room Temperature Storage: These sliders can sit at room temperature for up to 2 hours during parties, making them ideal for buffet-style serving. Keep covered loosely with foil to maintain warmth if serving within an hour.
Portable Serving: These transport beautifully for potlucks and picnics. Keep warm by wrapping the entire pan in aluminum foil and towels, or transport in an insulated casserole carrier. They’ll stay warm for 1-2 hours this way.
Individual Wrapping: Wrap cooled individual sliders in foil or plastic wrap for lunch boxes or grab-and-go meals. They keep well and can be eaten cold or reheated.
Make-Ahead & Freezer Notes
Assembling in Advance: These are perfect for make-ahead entertaining. Assemble completely through the butter glaze step, cover tightly with aluminum foil, and refrigerate for up to 24 hours before baking. When ready to bake, add 5 extra minutes to the covered baking time since you’re starting from cold.
Freezing Assembled Unbaked: You can freeze the completely assembled sliders before baking! Wrap the entire pan tightly with plastic wrap, then aluminum foil. Freeze for up to 2 months. To bake from frozen, remove plastic wrap, re-cover with foil, and bake at 350°F for 30 minutes covered, then 8-10 minutes uncovered.
Freezing After Baking: Cooked sliders freeze well too. Let them cool completely, wrap individual sliders or the entire pan tightly in plastic wrap and foil, and freeze for up to 3 months. This method is great for having quick meals ready to reheat.
Thawing Instructions: For unbaked frozen sliders, thaw overnight in the refrigerator before baking according to recipe instructions (add 5 minutes to covered time). For baked frozen sliders, thaw in the refrigerator overnight, then reheat in a 300°F oven for 12-15 minutes.
Partial Batch Prep: Make multiple pans and freeze some for later. This is incredibly convenient—you’ll always have an easy appetizer or dinner option ready in your freezer for unexpected guests or busy weeknights.
Butter Glaze Prep: You can make the butter mixture 2-3 days ahead and store it in the refrigerator. Just reheat gently until melted before brushing onto the rolls.
Serving Suggestions
These versatile sliders work beautifully in numerous serving scenarios:
As Party Appetizers:
- Arrange on a large platter with decorative garnishes
- Provide small plates and napkins for easy grabbing
- Serve alongside other finger foods and dips
- Keep warm in a chafing dish for extended parties
As a Main Course:
- Pair with classic potato chips or French fries
- Serve with creamy coleslaw for textural contrast
- Add fresh fruit salad for color and brightness
- Include pickles and olives on the side
Soup Pairings:
- Tomato soup for a elevated grilled cheese-style meal
- French onion soup for sophisticated comfort food
- Creamy potato soup for hearty satisfaction
- Broccoli cheddar soup for vegetable goodness
Salad Combinations:
- Simple green salad with vinaigrette
- Caesar salad for classic pairing
- Pasta salad for potluck-style meals
- Cucumber and tomato salad for freshness
Beverage Pairings:
- Iced tea (sweet or unsweetened) for casual meals
- Lemonade for afternoon gatherings
- Beer or hard cider for game day
- Sparkling water with fruit for elegant occasions
Side Dish Ideas:
- Baked beans for BBQ-style meals
- Macaroni and cheese for ultimate comfort
- Roasted vegetables for balance
- Sweet potato fries for something different
FAQs Section
Can I use regular dinner rolls instead of Hawaiian rolls?
Yes, you can substitute any soft dinner rolls, though the flavor and texture won’t be quite the same. Hawaiian rolls provide that signature slight sweetness and incredibly soft texture that makes these sliders special. If using regular rolls, look for soft varieties like potato rolls or brioche. Avoid crusty rolls or baguettes, which don’t work well for this recipe. You may want to add a teaspoon of honey to the butter mixture if your rolls aren’t sweet.
Do I have to use Swiss cheese, or can I use other types?
Swiss cheese is traditional and melts beautifully, but feel free to experiment! Provolone offers mild, smooth flavor; cheddar adds sharpness; Gruyère provides sophistication; Havarti melts incredibly well; mozzarella works for Italian variations; and pepper jack adds spicy kick. The key is using sliced cheese rather than shredded—it provides better coverage and melts more evenly across each slider.
Can these be made in a smaller batch?
Absolutely! You can easily halve this recipe using a 6-count package of rolls and a smaller 8×8-inch baking dish. Reduce the butter mixture proportionally (use 4 tablespoons butter and half the seasonings). Baking time remains approximately the same. For larger crowds, double the recipe and use two 9×13-inch pans.
My tops are browning too quickly—what should I do?
If the tops are getting too dark before the cheese melts fully, your oven temperature may be running hot. Make sure you’re covering tightly with foil for the first 15 minutes—this is crucial. If they’re still browning too fast even when covered, reduce temperature to 325°F and extend baking time by 5 minutes. You can also tent with foil for the final uncovered portion if needed.
Can I make these without the poppy seeds?
Definitely! Poppy seeds are traditional and add visual appeal plus subtle texture, but they’re completely optional. You can omit them entirely, substitute with sesame seeds for different flavor, or just leave the butter glaze plain. The sliders will still be delicious—the poppy seeds are more about appearance than essential taste.
What’s the best way to serve these for a party?
Keep them in the baking dish, covered loosely with foil to retain heat. Set out with a spatula or tongs for easy serving. You can cut them all before serving or let guests pull them apart themselves—both work well. For longer parties, consider making multiple pans and keeping extras warm in a low oven (200°F), bringing out fresh batches as needed. They stay warm in the pan for about an hour.
Can I add vegetables like lettuce and tomato?
Fresh vegetables should be added after baking rather than before. Lettuce and tomato release moisture during baking that makes the bread soggy. If you want to include them, bake the sliders as directed, then carefully lift the top layer and add fresh lettuce, tomato, or other crisp vegetables before serving. This works great for lunch or casual dinners but isn’t practical for party serving.
Conclusion
Few recipes deliver such impressive results with so little effort as these Ham and Cheese Sliders. They represent everything wonderful about home cooking—taking simple, accessible ingredients and transforming them into something that brings people together. Whether you’re feeding hungry teenagers after a game, contributing to a potluck, hosting a casual dinner party, or just want an easy weeknight meal the whole family will devour, these sliders never disappoint.
The genius lies in their versatility and foolproof nature. New cooks can make them successfully on the first try, while experienced home chefs appreciate having a reliable crowd-pleaser in their repertoire. The sweet Hawaiian rolls, savory ham and melted cheese, and that irresistible buttery glaze create a flavor combination that appeals to virtually everyone. And let’s be honest—there’s something deeply satisfying about pulling apart warm, connected sliders and watching the cheese stretch between them.
These sliders have earned their place as a modern American classic, showing up at gatherings across the country because they simply work. They’re proof that you don’t need complicated techniques or exotic ingredients to create food that makes people smile.
Ready to make the easiest, most crowd-pleasing recipe ever? Grab a package of Hawaiian rolls and whip up a batch of these incredible sliders! I’d love to hear about your experience—drop a comment below and let me know what variations you tried or what occasion you made them for. Don’t forget to save this recipe to your Pinterest boards so you can find it again for your next party! Tag me in your photos—I genuinely love seeing your delicious creations. Happy baking, friends! 🥪