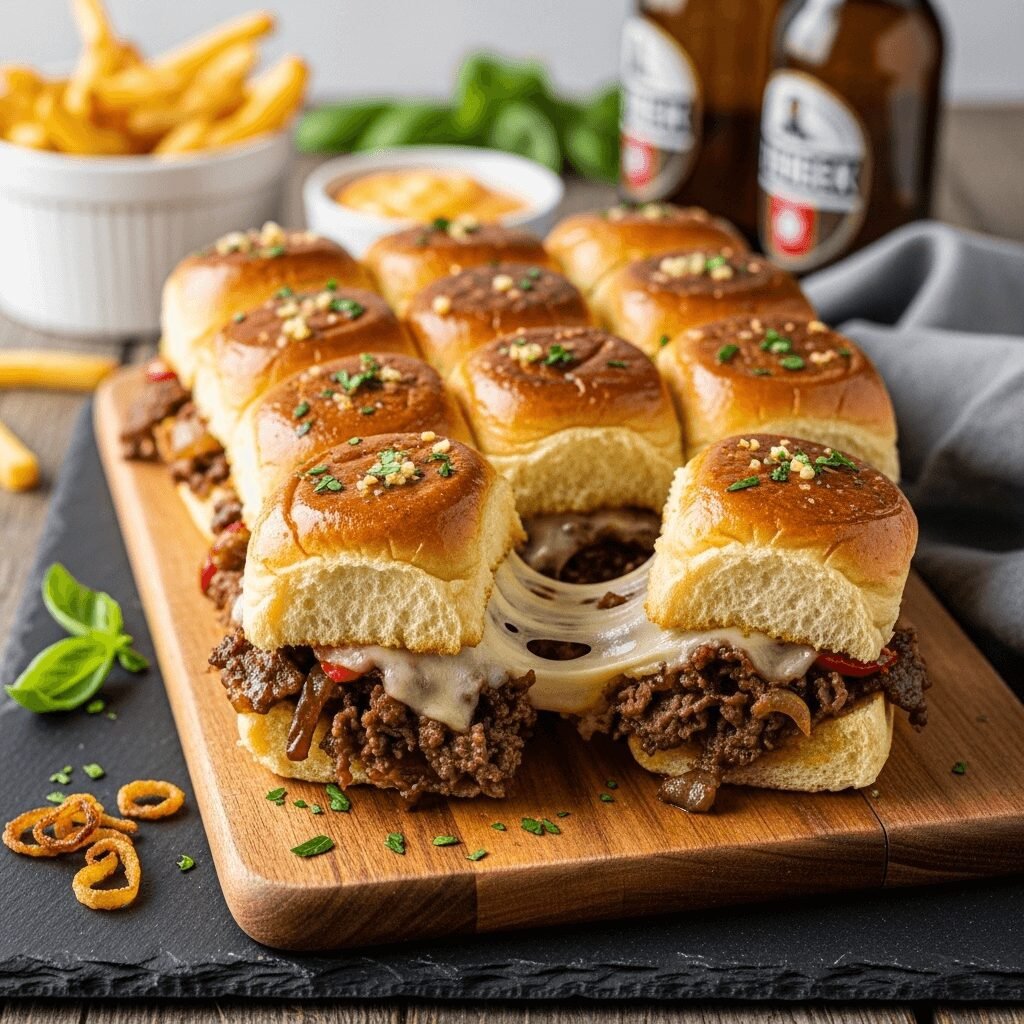
Philly Cheesesteak Sliders (Game Day Party Favorite!)

Get ready to fall in love with these incredible Philly Cheesesteak Sliders—a brilliant mashup of the iconic Philadelphia sandwich and convenient party-style sliders that delivers all the flavor of an authentic cheesesteak in perfect, pop-able portions! These easy cheesesteak sliders feature tender, seasoned beef, sautéed peppers and onions, gooey melted provolone cheese, all nestled in soft Hawaiian rolls and brushed with a savory garlic butter that bakes into a golden, crispy top crust.
What makes these Philly cheesesteak party sliders so incredibly popular is their perfect combination of crowd-pleasing flavors with stress-free preparation. Instead of making individual sandwiches, you assemble everything as one connected sheet, then bake and slice—creating those irresistible pull-apart edges that stay warm longer and look impressively cohesive. The result? All the satisfaction of a classic Philly cheesesteak without the mess, in perfectly portioned bites that disappear fast at any gathering.
These baked Philly cheesesteak sliders have become essential at Super Bowl parties, tailgates, game nights, birthday celebrations, and casual family dinners across America. They’re versatile enough to serve as appetizers for a crowd or as a main course alongside soup or salad. Best of all, you can customize the ingredients to match your preferences while keeping that authentic Philly flavor everyone craves. Whether you’re feeding hungry teenagers, entertaining friends, or just want an easy weeknight dinner that feels special, these sliders deliver every single time.
History / Background
The Philly cheesesteak is an American culinary icon with deep roots in Philadelphia’s working-class neighborhoods. The original sandwich was created in the 1930s by Pat Olivieri, a hot dog vendor in South Philadelphia. Legend says that one day in 1930, Pat decided to grill some beef from the butcher and put it on an Italian roll. A passing cab driver smelled the delicious aroma and wanted to try it—he was so impressed that he suggested Pat stop selling hot dogs and focus on this beef sandwich instead.
Pat and his brother Harry opened Pat’s King of Steaks in 1930 at the Italian Market in South Philadelphia, and the sandwich quickly became a local sensation. The cheese element came later—in the 1940s or 1950s, depending on which story you believe—when a manager at Pat’s or a rival establishment decided to add cheese to the sandwich. The result was pure magic: the combination of thinly sliced, seasoned beef, melted cheese, and a soft hoagie roll created one of America’s most beloved sandwiches.
Traditional Philly cheesesteaks are made with thinly sliced ribeye steak, cooked on a flat-top griddle with onions, then topped with cheese (traditionally Cheez Whiz, provolone, or American cheese) and served on an Amoroso roll—a specific type of Italian hoagie roll baked in Philadelphia. The proper preparation involves chopping and mixing the meat and onions together on the griddle, creating that signature texture.
The slider adaptation emerged much more recently, in the 2010s, as home cooks discovered the convenience of baking connected sandwiches using Hawaiian sweet rolls. This method—borrowed from other popular slider recipes—transforms the individual sandwich experience into a shareable, party-friendly format. While purists might debate the authenticity, these Philly cheesesteak sliders capture the essential flavors of the original while offering practical advantages for home entertaining and family meals.
Today, the Philly cheesesteak represents Philadelphia pride and remains one of America’s favorite sandwiches, while these slider adaptations have earned their own devoted following among home cooks who love the combination of authentic flavor with easy preparation.
Why You’ll Love This Recipe
These aren’t just another slider recipe—they’re the perfect solution when you want big, bold flavors without complicated techniques or individual sandwich assembly. Whether you’re an experienced home cook or just starting your culinary journey, these cheesesteak sliders will make you feel like a party-hosting pro.
Here’s why these Philly cheesesteak sliders will become your new go-to recipe:
- Authentic Flavor, Easy Method – All the taste of a classic Philly cheesesteak without the mess or fuss
- No Individual Assembly – Build everything as one sheet, then slice after baking for perfect portions
- Crowd-Pleaser Guaranteed – Appeals to everyone from picky kids to adventurous adults
- Budget-Friendly – Uses affordable ingredients to feed a crowd without breaking the bank
- Make-Ahead Friendly – Assemble hours ahead and bake when guests arrive
- Versatile Serving – Works as appetizers, main course, or game day snacks
- Customizable – Easy to adjust vegetables, cheese, or seasonings to taste
- Minimal Cleanup – Just one skillet and one baking pan to wash
- Scales Perfectly – Double the recipe easily for larger gatherings
- Kid-Approved – Familiar flavors that even selective eaters enjoy
Ingredient Notes
Each component plays an important role in creating that authentic Philly cheesesteak experience:
Hawaiian Sweet Rolls – The 12-count package of King’s Hawaiian rolls provides the perfect soft, slightly sweet base that complements the savory filling. Their texture holds up well to the meat and cheese without getting soggy, while their subtle sweetness balances the rich, salty flavors. If you can’t find Hawaiian rolls, substitute with any soft dinner rolls or slider buns, though the flavor profile will differ slightly.
Ribeye Steak or Deli Roast Beef – Authentic Philly cheesesteaks use thinly sliced ribeye, which provides incredible flavor and tender texture. For easier home preparation, you can use pre-sliced deli roast beef (about 1 to 1.5 pounds), which saves time and effort. If using fresh steak, freeze it for 30 minutes first—this makes slicing paper-thin much easier. Sirloin works as a more economical alternative to ribeye.
Bell Peppers – Green bell peppers are traditional in Philadelphia, though many people prefer the sweeter flavor of red, yellow, or orange peppers. Use one large pepper or a mix of colors for visual appeal. The peppers add sweetness, crunch, and authentic flavor. If you’re not a pepper fan, you can reduce the amount or omit them entirely.
Onions – Yellow or white onions work best, providing that essential savory-sweet flavor when sautéed. The onions caramelize slightly during cooking, adding depth to the filling. You’ll need one large onion, sliced thin. Sweet onions like Vidalia offer milder flavor if you prefer.
Provolone Cheese – This is the traditional cheese choice for authentic Philly cheesesteaks, offering mild, creamy flavor that melts beautifully. Use sliced deli provolone rather than pre-shredded for better melting and coverage. You’ll need 8-12 slices depending on their size. American cheese or Cheez Whiz are also authentic options, while white cheddar or mozzarella work for variations.
Butter & Seasonings – Real butter creates that signature golden, flavorful crust on top. The garlic powder, Worcestershire sauce, and Italian seasoning in the butter mixture add savory depth. Don’t skip this step—it’s what transforms these from ordinary to extraordinary.
Optional Additions:
- Mushrooms – Sliced and sautéed with the peppers and onions
- Hot Peppers – Banana peppers or jalapeños for heat
- Cheese Sauce – Drizzle of prepared cheese sauce for extra richness
Equipment Needed
You’ll need standard kitchen equipment for this straightforward recipe:
- Large Skillet or Frying Pan – For sautéing the meat, peppers, and onions (12-inch works best)
- 9×13-inch Baking Dish – The standard size that fits a 12-count package of rolls perfectly
- Sharp Knife – For slicing vegetables and the connected rolls
- Cutting Board – For prep work
- Spatula or Wooden Spoon – For stirring the filling ingredients
- Small Mixing Bowl – For combining the butter mixture
- Pastry Brush – For applying butter glaze (or use a spoon)
- Aluminum Foil – For covering during initial baking
- Measuring Cups and Spoons – For accurate ingredient amounts

These mouthwatering Philly Cheesesteak Sliders pack all the flavors of an iconic Philadelphia sandwich into easy, pull-apart portions! Tender seasoned beef, sautéed peppers and onions, melted provolone cheese, and a buttery garlic topping baked until golden—perfect for game day or any gathering.
- Total Time: 40 minutes
- Yield: 12 sliders (6 servings) 1x
Ingredients
For the Filling:
- 1.5 pounds ribeye steak, thinly sliced (or deli roast beef)
- 1 large green bell pepper, thinly sliced
- 1 large onion, thinly sliced
- 2 tablespoons olive oil or vegetable oil
- 2 cloves garlic, minced
- 1 teaspoon salt
- 1/2 teaspoon black pepper
- 1/2 teaspoon garlic powder
- 1/2 teaspoon onion powder
For Assembly:
- 1 package (12 count) King’s Hawaiian Sweet Rolls
- 8-12 slices provolone cheese
For the Butter Topping:
- 4 tablespoons (1/2 stick) unsalted butter, melted
- 1 teaspoon garlic powder
- 1 teaspoon Italian seasoning
- 1 tablespoon Worcestershire sauce
- 1/4 teaspoon salt
Instructions
- Preheat Oven – Preheat your oven to 350°F (175°C). Lightly spray a 9×13-inch baking dish with cooking spray or line with parchment paper.
- Cook the Vegetables – Heat 1 tablespoon of oil in a large skillet over medium-high heat. Add the sliced peppers and onions, season with a pinch of salt and pepper, and sauté for 5-7 minutes until softened and beginning to caramelize. Add the minced garlic and cook for 1 more minute until fragrant. Transfer vegetables to a plate and set aside.
- Cook the Beef – In the same skillet, add the remaining tablespoon of oil. Add the thinly sliced beef (or deli roast beef) and season with salt, pepper, garlic powder, and onion powder. Cook for 3-5 minutes, breaking up the meat and stirring occasionally, until the beef is cooked through and no longer pink. If using deli roast beef, just heat through and break into smaller pieces.
- Combine Filling – Return the cooked vegetables to the skillet with the beef. Stir everything together and cook for 1-2 minutes to combine flavors. Remove from heat and set aside.
- Prepare the Rolls – Without separating the individual rolls, use a sharp serrated knife to slice the entire connected sheet of rolls horizontally in half, creating a top and bottom layer. Place the bottom half in your prepared baking dish.
- Layer the Filling – Spread the beef, pepper, and onion mixture evenly over the bottom layer of rolls, covering the entire surface. Make sure the filling is distributed evenly so each slider gets a good amount.
- Add Cheese – Layer the provolone cheese slices over the filling, overlapping as needed to cover everything completely. Use as much cheese as you like—8-12 slices typically covers the surface well.
- Top with Roll Layer – Carefully place the top half of the rolls over the cheese layer, aligning it with the bottom. Press down gently to compress everything together.
- Make Butter Topping – In a small bowl, combine the melted butter, garlic powder, Italian seasoning, Worcestershire sauce, and salt. Whisk until well combined.
- Brush with Butter – Using a pastry brush or spoon, generously brush the entire butter mixture over the top of the rolls, making sure to cover all surfaces. The butter will pool slightly around the edges—this creates delicious crispy spots.
- Cover and Bake – Cover the baking dish tightly with aluminum foil. Bake for 15 minutes to allow the cheese to melt and the rolls to warm through.
- Uncover and Finish – Remove the foil and continue baking for an additional 8-10 minutes, until the tops are golden brown and the butter has created a beautiful glazed crust.
- Slice and Serve – Remove from oven and let rest for 2-3 minutes. Slice along the original roll divisions to create 12 individual sliders. Serve warm and enjoy!
Notes
- Using Fresh Steak: Freeze ribeye for 30 minutes before slicing—this makes cutting paper-thin slices much easier
- Time-Saver: Deli roast beef eliminates the slicing step and works perfectly for this recipe
- Make-Ahead: Assemble completely through step 10, cover, and refrigerate up to 24 hours before baking
- Cheese Options: Try American cheese, white cheddar, or even Cheez Whiz for variations
- Add Heat: Include sliced jalapeños or banana peppers with the vegetables for spicy kick
- Extra Crispy: Broil for 1-2 minutes at the end, watching carefully to prevent burning
- Prep Time: 15 minutes
- Cook Time: 25 minutes
- Category: Appetizer
- Method: Stovetop and Baking
- Cuisine: American
Nutrition
- Serving Size: 2 sliders
- Calories: 485
- Sugar: 10g
- Sodium: 950mg
- Fat: 26g
- Saturated Fat: 12g
- Unsaturated Fat: 12g
- Trans Fat: 0g
- Carbohydrates: 35g
- Fiber: 2g
- Protein: 28g
- Cholesterol: 85mg
Tips & Variations
Mushroom Cheesesteak: Add 8 ounces of sliced mushrooms to the peppers and onions for earthy flavor and extra vegetables. Cook until golden brown.
Spicy Philly Sliders: Mix sliced jalapeños into the vegetable mixture and use pepper jack cheese instead of provolone for serious heat lovers.
Pizza Cheesesteak Fusion: Add a thin layer of marinara sauce, use mozzarella cheese, and sprinkle with Italian seasoning for pizza-inspired sliders.
Chicken Philly Sliders: Substitute thinly sliced chicken breast for the beef for a lighter version with the same great flavors.
Bacon Cheesesteak: Add crispy crumbled bacon to the filling for smoky, indulgent goodness that takes these over the top.
Low-Carb Version: Skip the rolls and serve the filling in lettuce wraps or over cauliflower rice for a keto-friendly option.
Breakfast Sliders: Add scrambled eggs to the filling and use cheddar cheese for a hearty breakfast or brunch version.
Extra Veggie: Include sliced mushrooms, banana peppers, or even spinach with the peppers and onions for more vegetables.
Cheese Sauce Drizzle: Top finished sliders with warm cheese sauce (or Cheez Whiz) for authentic Philly-style richness.
Pro Chef Tips
Slice Your Own Steak for Best Results: While deli roast beef is convenient, slicing your own ribeye gives you control over thickness and texture. Put the steak in the freezer for 30-45 minutes—it firms up just enough to slice paper-thin without being frozen solid. Cut against the grain for maximum tenderness.
Don’t Overcook the Vegetables: You want the peppers and onions softened and slightly caramelized, but still with some texture. Overcooking makes them mushy and watery, which can make your sliders soggy. Aim for tender-crisp with golden edges.
Season Every Layer: Don’t just season the meat—season the vegetables too while they cook. This builds flavor throughout the dish. The seasoned butter topping adds another flavor layer that makes these truly exceptional.
The Cheese Coverage Matters: Make sure you overlap the cheese slices so there are no gaps. Every bite should have melted cheese—it’s what holds everything together and provides that signature gooey texture.
Press Down Before Baking: After assembling all the layers, press down firmly on the top with your hands. This compresses everything together, helping the layers meld during baking and preventing the tops from sliding around.
Don’t Skip the Foil Cover: Covering for the first 15 minutes traps steam that melts the cheese perfectly and warms everything through without over-browning the tops. Remove it at the right time for that golden, crispy finish.
Let Them Rest: Those 2-3 minutes after baking allow the cheese to set slightly and the rolls to firm up, making cleaner cuts and preventing everything from sliding out when you slice.
Butter to the Edges: When brushing on the butter mixture, make sure you coat all the way to the edges and even down the sides slightly. This creates maximum flavor and those irresistible crispy edges everyone fights over.
Common Mistakes to Avoid
Cutting the Rolls Apart Before Assembly: The biggest mistake is separating individual rolls before building your sliders. Always keep them connected and slice horizontally as one complete sheet. This creates that signature pull-apart presentation and ensures even cooking throughout.
Not Draining Excess Liquid: If your meat and vegetables release a lot of liquid during cooking, drain it before assembling. Excess moisture will make the bottom rolls soggy and prevent them from toasting properly. Pat the filling with paper towels if needed.
Using Too Much Filling: It’s tempting to pile on the good stuff, but overfilling prevents the bread layers from connecting and makes the sliders difficult to eat. Stick to the recommended amounts—they’re perfectly proportioned for great flavor in every bite without overwhelming the rolls.
Wrong Pan Size: Using a pan that’s too large leaves gaps that dry out the edges; too small and the sliders won’t fit properly. A standard 9×13-inch baking dish is specifically sized for a 12-count package of King’s Hawaiian rolls—don’t improvise here.
Skipping the Butter Mixture: Some people think they can make these “healthier” by reducing or eliminating the butter topping. Unfortunately, that glaze is essential for both flavor and texture—it’s what creates the golden, savory crust. Without it, you just have plain rolls with filling.
Cutting Too Soon: Slicing immediately after removing from the oven causes all the cheese to ooze out everywhere and creates messy, falling-apart sandwiches. Be patient—those few minutes of resting time make a dramatic difference in both presentation and ease of eating.
Storage & Meal Prep
Refrigerator Storage: Store leftover sliders in an airtight container or wrap the entire pan tightly with plastic wrap and aluminum foil. Refrigerate for up to 3 days. The butter glaze solidifies when cold but melts beautifully when reheated.
Reheating from Refrigerator: The best method is reheating in a 300°F oven, covered with foil, for 10-15 minutes until warmed through. This preserves the texture much better than microwaving. For the last 2-3 minutes, remove the foil to re-crisp the tops.
Microwave Reheating: For individual sliders when you’re short on time, microwave for 45-60 seconds until warmed through. The bread won’t be as crispy, but the flavor remains delicious. Wrap in a paper towel to absorb excess moisture.
Air Fryer Reheating: Reheat at 320°F for 5-7 minutes for extra crispy tops and perfectly warmed filling. This method revives the texture beautifully.
Room Temperature Serving: These sliders can sit at room temperature for up to 2 hours during parties, making them ideal for buffet-style serving. Keep loosely covered with foil to maintain warmth.
Portable for Potlucks: These transport beautifully to gatherings. Wrap the entire pan in foil and towels, or use an insulated casserole carrier. They’ll stay warm for 1-2 hours, perfect for bringing to events.
Make-Ahead & Freezer Notes
Assembling in Advance: These are perfect for stress-free entertaining! Assemble completely through the butter-brushing step, cover tightly with foil, and refrigerate for up to 24 hours before baking. When ready to bake, add 5 minutes to the covered baking time since you’re starting from cold.
Prepare Filling Ahead: You can cook the meat and vegetables up to 2 days ahead. Store in an airtight container in the refrigerator, then reheat slightly before assembling to make spreading easier.
Freezing Assembled Unbaked: Wrap the completely assembled (but unbaked) sliders tightly in plastic wrap, then aluminum foil. Freeze for up to 2 months. To bake from frozen, remove plastic wrap, re-cover with foil, and bake at 350°F for 30 minutes covered, then 10-12 minutes uncovered.
Freezing After Baking: Cooked sliders freeze well too. Let them cool completely, wrap individual sliders or the entire pan tightly in plastic wrap and foil, and freeze for up to 3 months. This is great for having quick meals ready to reheat.
Thawing Instructions: For unbaked frozen sliders, thaw overnight in the refrigerator before baking according to recipe instructions (add 5 minutes to covered time). For baked frozen sliders, thaw in the refrigerator overnight, then reheat in a 300°F oven for 12-15 minutes.
Batch Cooking Strategy: Make multiple pans and freeze some for later. You’ll always have an easy dinner or party appetizer ready—just pull from the freezer and bake when needed.
Butter Mixture Prep: Make the butter mixture 3-4 days ahead and store in the refrigerator. Reheat gently until melted before brushing onto rolls.
Serving Suggestions
These versatile Philly cheesesteak sliders work beautifully in numerous serving scenarios:
As Game Day Appetizers:
- Arrange on a large platter with toothpicks
- Serve with dipping sauces like cheese sauce or garlic aioli
- Pair with chips, pretzels, and other finger foods
- Keep warm in the baking dish for extended serving
As a Main Course:
- Serve with classic French fries or potato wedges
- Pair with crispy onion rings for indulgent satisfaction
- Add coleslaw for creamy, crunchy contrast
- Include pickles and hot peppers on the side
Soup Pairings:
- Tomato soup for a comforting combination
- French onion soup for sophisticated pairing
- Loaded baked potato soup for heartiness
- Creamy broccoli cheddar soup for vegetables
Salad Combinations:
- Simple garden salad with ranch dressing
- Caesar salad for classic steakhouse vibes
- Wedge salad with blue cheese dressing
- Greek salad for fresh, bright flavors
Side Dish Ideas:
- Baked beans for BBQ-style meals
- Mac and cheese for ultimate comfort
- Sweet potato fries for something different
- Roasted vegetables for balance
Beverage Pairings:
- Ice-cold beer for casual gatherings
- Lemonade or iced tea for family meals
- Soda or sports drinks for game day
- Red wine like Cabernet for dinner parties
FAQs Section
Can I use a different type of roll besides Hawaiian?
Yes, you can substitute any soft dinner rolls or slider buns. Regular white dinner rolls, potato rolls, or brioche all work well. Hawaiian rolls provide that signature slight sweetness and incredibly soft texture that makes these special, but other options will still be delicious. Just make sure whatever you choose comes in a connected 12-count package for the pull-apart presentation.
What’s the best type of cheese for Philly cheesesteak sliders?
Provolone is the most traditional choice and melts beautifully with mild, creamy flavor. American cheese is also authentic and melts incredibly smoothly. White American cheese is what many Philadelphia cheesesteak shops use. For something different, try mozzarella for stretchy melting, cheddar for sharper flavor, or even Cheez Whiz for the most authentic (though controversial) Philly experience.
Can I make these without peppers?
Absolutely! While peppers are common in cheesesteak variations, a traditional “wit” (with onions) cheesesteak in Philadelphia actually doesn’t include peppers. You can make these with just onions, or even skip the vegetables entirely and use only the seasoned beef and cheese. The sliders will still be delicious—customize to your family’s preferences.
Do I have to use ribeye, or can I use cheaper meat?
Ribeye provides the most authentic flavor and tender texture, but it’s definitely not required. Deli roast beef is the easiest and most economical option—just heat and shred it. Sirloin is a good middle-ground option that’s more affordable than ribeye but still flavorful. Even ground beef works in a pinch, though it changes the texture significantly. Choose based on your budget and time constraints.
Why are my sliders soggy on the bottom?
Soggy bottoms usually result from excess liquid in the filling. Make sure you drain any liquid from the cooked meat and vegetables before assembling. Also, don’t add the filling while it’s piping hot—let it cool for a few minutes. Using too much filling can also trap moisture. Finally, make sure your oven is properly preheated so the bottoms start cooking immediately.
Can I double this recipe for a larger crowd?
Definitely! This recipe doubles perfectly. Use two 9×13-inch baking dishes and two packages of rolls. You’ll need to work with two skillets or cook the filling in batches. The baking time remains the same—just rotate the pans’ positions in the oven halfway through if baking both at once. This is perfect for parties and large family gatherings.
How do I keep these warm for a party?
After baking, you can keep them in the pan, loosely covered with foil, for up to an hour at room temperature. For longer parties, keep the oven on its lowest setting (around 200°F) and store covered pans there, bringing out fresh batches as needed. You can also use a warming tray or chafing dish. Another option is to make multiple batches and bake fresh throughout your event.
Conclusion
Few recipes combine authentic flavor, crowd-pleasing appeal, and stress-free preparation quite like these Philly Cheesesteak Sliders. They capture everything we love about the iconic Philadelphia sandwich—the tender, seasoned beef, the melted cheese, the sautéed vegetables—while offering the practical advantages of easy assembly and perfect portions that make entertaining effortless.
What makes these easy cheesesteak sliders truly special is their universal appeal. I’ve served them at Super Bowl parties where they vanished within minutes, at family dinners where even picky kids asked for seconds, and at casual gatherings where food-loving friends raved about the authentic flavors. Whether your guests are die-hard Philly natives or have never tried a cheesesteak before, these sliders win everyone over with that irresistible combination of savory meat, gooey cheese, and buttery, golden rolls.
The make-ahead convenience means you can prep everything when it fits your schedule, then bake fresh when guests arrive—filling your home with those mouthwatering aromas while you relax and enjoy the party. And knowing you have a foolproof, crowd-pleasing recipe that delivers restaurant-quality results gives you confidence for any entertaining situation, from casual weeknights to special celebrations.
Ready to make the sliders that’ll have everyone asking for seconds? Grab some Hawaiian rolls, your favorite cheese, and quality beef, and prepare to become everyone’s favorite cook! I’d love to hear about your experience—drop a comment below and let me know what occasion you made these for or what variations you tried. Don’t forget to pin this recipe to your Pinterest boards for your next gathering! Tag me in your photos—seeing your delicious creations always makes my day. Happy cooking, friends!