Crispy Keto Cheese Crackers – Only 4 Ingredients for the Perfect Low-Carb Snack!

Get ready to discover the ultimate keto-friendly snack that’s about to revolutionize your low-carb lifestyle – homemade keto cheese crackers! These crispy, golden, buttery crackers are made with just four simple ingredients and taste incredibly similar to those iconic orange cheese crackers we all grew up with, but without all the carbs, processed ingredients, and questionable additives. Each bite delivers that satisfying crunch and rich, cheesy flavor you’ve been craving on your keto journey.
These easy keto cheese crackers are a game-changer for anyone following a ketogenic, low-carb, or gluten-free diet. They’re made primarily with real cheese and almond flour, creating a protein-rich, low-carb snack that won’t kick you out of ketosis. With only 2-3 net carbs per serving (compared to 20+ grams in regular crackers), these homemade crackers let you enjoy that satisfying crunch without the guilt or blood sugar spike.
What makes these low-carb cheese crackers so special is their incredible versatility and how genuinely good they taste. They’re perfect for snacking straight out of the container, pairing with cheese boards and charcuterie, dunking in dips, crushing over salads for croutons, or even giving to your non-keto family members who won’t even realize they’re eating a healthy alternative. They taste like real cheese crackers – not some sad, cardboard-like diet substitute.
Whether you’re packing school lunches, prepping snacks for the week, entertaining guests, traveling, or just need something crunchy to satisfy that afternoon snack attack, these keto crackers deliver. They’re shelf-stable, portable, kid-approved, and so easy to make that you’ll wonder why you ever bought store-bought crackers again. Plus, making them yourself means you control exactly what goes into your body – no weird preservatives, artificial colors, or hidden sugars. Just real food that tastes incredible!
History / Background
Keto cheese crackers are a modern invention born from the ketogenic diet movement and the creative home cooking community that seeks to recreate beloved comfort foods in low-carb, healthier versions. To understand this recipe, we need to look at both the history of cheese crackers and the ketogenic diet revolution.
Traditional cheese crackers as we know them today – those bright orange, bite-sized snacks – were popularized in the United States in the mid-20th century. While cheese and crackers have been enjoyed together for centuries across many cultures, the concept of baking cheese directly into a cracker dough was a relatively modern American innovation. Various companies created their versions of cheese crackers, with the most iconic becoming a household staple by the 1960s and 1970s. These mass-produced crackers were convenient, shelf-stable, and addictively tasty, though they were made primarily from refined wheat flour, processed cheese products, and various additives.
The ketogenic diet, meanwhile, has medical origins dating back to the 1920s when it was developed as a treatment for epilepsy. However, it didn’t become a mainstream dietary approach until the late 1990s and early 2000s, exploding in popularity in the 2010s as people discovered its effectiveness for weight loss, blood sugar control, and various health benefits. The keto diet is a high-fat, moderate-protein, very low-carbohydrate eating plan that shifts the body into a metabolic state called ketosis, where it burns fat for fuel instead of glucose.
As the keto diet gained millions of followers, a significant challenge emerged: how do you recreate familiar comfort foods and snacks without all the carbs? Traditional crackers, made primarily from wheat flour, are essentially off-limits on keto (a serving can contain 15-25 grams of carbs). This created a demand for creative alternatives, and the food blogging and keto recipe development community rose to the challenge.
The concept of making crackers primarily from cheese is genius in its simplicity. Cheese is naturally very low in carbohydrates, high in fat and protein, and when baked, it can become wonderfully crispy. Early versions of keto cheese crackers were often just cheese baked until crispy (essentially fancy cheese crisps or “frico”). However, recipe developers soon discovered that combining cheese with almond flour – a popular keto-friendly flour made from ground almonds – created a more traditional cracker-like texture that could be rolled, cut into shapes, and baked into proper crackers with structure.
The keto cheese cracker recipe as we know it today emerged from the collaborative nature of the online keto community, with countless home cooks, food bloggers, and recipe developers sharing their versions and improvements on Pinterest, Instagram, YouTube, and recipe websites throughout the 2010s. The basic formula – shredded cheese, almond flour, butter, and seasonings – became the standard template, with endless variations emerging based on cheese types, seasonings, and add-ins.
Today, keto cheese crackers represent the best of modern dietary adaptation: taking beloved traditional foods and reimagining them to fit healthier eating patterns without sacrificing flavor or satisfaction. They’re proof that following a restrictive diet doesn’t mean giving up the foods you love – it just means getting creative in the kitchen!
Why You’ll Love This Recipe
These homemade keto cheese crackers are about to become your go-to snack, and here’s exactly why you’ll make them on repeat: they’re incredibly simple to make, require only four basic ingredients, taste remarkably like traditional cheese crackers, and keep you firmly in ketosis while satisfying those crunchy, savory cravings that can derail your low-carb lifestyle.
The magic of these easy keto crackers lies in how they deliver authentic cracker texture and flavor without any of the carbs. The combination of real cheddar cheese and almond flour creates a dough that’s easy to work with and bakes into genuinely crispy, snackable crackers with that satisfying crunch you’ve been missing. They taste like real food – because they are real food! – not some weird diet substitute that leaves you feeling deprived.
Here’s what makes this recipe absolutely unbeatable:
- Only 4 simple ingredients – Cheese, almond flour, butter, and salt. That’s it! No complicated ingredient list or specialty items
- Ready in 30 minutes – From mixing to munching, these come together faster than a grocery store run
- Just 2-3 net carbs per serving – Compare that to 15-25 grams in regular crackers. Game changer!
- Seriously tasty – Non-keto family members won’t even know these are “diet” food. They’re just good crackers
- Naturally gluten-free – Perfect for those with celiac disease or gluten sensitivity
- High in protein and healthy fats – Actually nutritious snacking that keeps you satisfied
- Kid-approved – Great for school lunches (if your school allows nuts) and after-school snacks
- Budget-friendly – Costs less per serving than store-bought keto crackers, which are expensive!
- No weird ingredients – You can pronounce everything in these crackers. Just real food!
- Customizable flavors – Add your favorite seasonings, herbs, or spices for endless variety
- Meal prep friendly – Make a big batch and have snacks ready for the entire week
- Stable at room temperature – Perfect for packing in lunches, road trips, or keeping at your desk
- Better than store-bought keto crackers – Most commercial keto crackers are either expensive, don’t taste great, or have questionable ingredients
Ingredient Notes
Let’s break down the simple ingredients that make these keto cheese crackers so delicious:
Shredded Cheddar Cheese – The star of the show! Sharp cheddar provides the best flavor with its tangy, bold taste, but mild cheddar works too if you prefer less intensity. The cheese provides the structure, flavor, fat, and protein in these crackers. It’s crucial to use freshly shredded cheese from a block rather than pre-shredded. Pre-shredded cheese contains anti-caking agents (usually cellulose or potato starch) that prevent the cheese from melting properly and can add unwanted carbs. Freshly shredded cheese melts smoothly and creates better dough. Room temperature cheese mixes more easily into the dough. Substitution: Any hard cheese works – try Gruyère, Gouda, Parmesan (use half Parmesan with another cheese as it’s very salty and strong), or a Mexican blend. Pepper jack adds nice spice!
Almond Flour – This is what gives these crackers their structure and traditional cracker-like texture. Almond flour is made from finely ground blanched almonds and is naturally low-carb, gluten-free, and high in healthy fats and protein. Use superfine blanched almond flour (not almond meal, which is coarser and includes skins). The fine texture is crucial for smooth dough and proper texture. Bob’s Red Mill, Kirkland (Costco), or Anthony’s are good brands. Almond flour keeps these crackers keto-friendly while providing structure and a slight nutty flavor. Substitution: Technically you can use other nut flours like hazelnut or pecan flour, though texture will vary. Do NOT substitute with coconut flour – the ratios are completely different and it won’t work.
Butter – Adds richness, helps bind the dough, and contributes to that classic buttery cracker flavor we all love. Unsalted butter is best so you can control the salt level. The butter should be cold when added to the dough – this helps create a flakier texture similar to traditional crackers. The fat in butter also keeps these crackers keto-compliant. Substitution: Ghee works great and adds a slightly nuttier flavor. Coconut oil can work in a pinch but will add a subtle coconut taste.
Salt – Essential for bringing out the cheese flavor and making these crackers taste like “real” crackers rather than bland diet food. Don’t skip it! Fine sea salt or regular table salt works best – coarse salt doesn’t distribute evenly. The amount can be adjusted based on how salty your cheese is (some cheddars are saltier than others). Addition: Many people add garlic powder, onion powder, or cayenne pepper for extra flavor.
Optional Seasonings – While not required, adding ½ teaspoon garlic powder, ½ teaspoon onion powder, or a pinch of cayenne pepper can take these crackers to the next level. Everything bagel seasoning on top is also amazing!
Equipment Needed
You’ll need very minimal equipment to make these keto cheese crackers:
- Food processor – The easiest method for combining the dough quickly and evenly. Makes the process nearly foolproof. If you don’t have one, a stand mixer or hand mixer works too.
- Box grater – For shredding cheese from a block (much better than pre-shredded!)
- Rolling pin – For rolling the dough into a thin, even sheet
- Parchment paper – Essential for rolling the dough and lining baking sheets. Prevents sticking!
- Baking sheet – Standard rimmed baking sheet (also called a half-sheet pan)
- Pizza cutter or sharp knife – For cutting the dough into cracker squares
- Measuring cups and spoons – For accurate ingredient amounts
- Fork – For pricking holes in the crackers (helps them bake evenly and prevents bubbling)
- Wire cooling rack – For cooling the crackers completely so they crisp up properly
- Spatula – For transferring crackers
Optional but helpful:
- Pastry brush – For brushing the tops with melted butter or egg wash
- Small cookie cutters – For fun shapes instead of squares

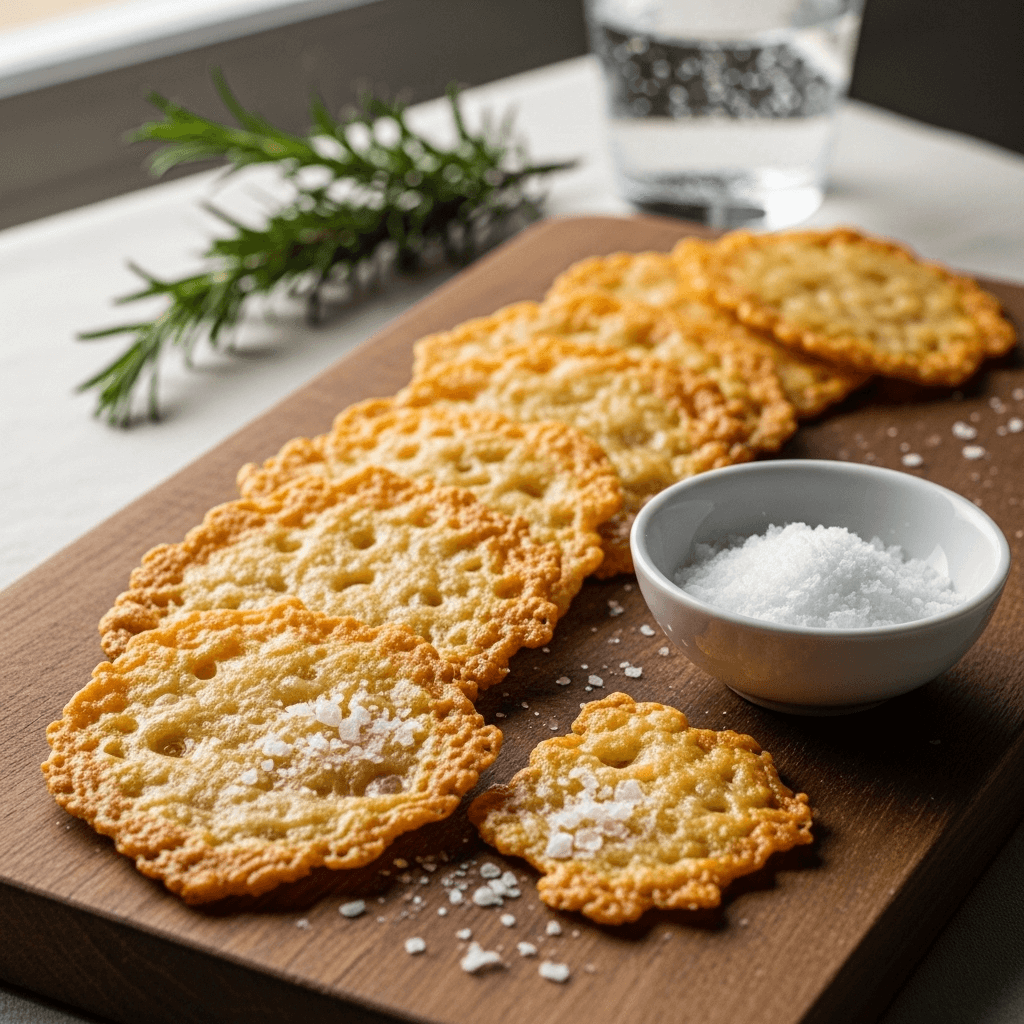
Keto Cheese Crackers
These crispy, golden keto cheese crackers taste just like your favorite childhood cheese crackers but with only 2-3 net carbs per serving! Made with just 4 simple ingredients – cheddar cheese, almond flour, butter, and salt – these easy low-carb crackers are perfect for snacking, lunch boxes, or serving with dips. They’re naturally gluten-free and absolutely addictive!
- Total Time: 27 minutes
- Yield: About 60 crackers (15 servings) 1x
Ingredients
For the Crackers:
- 2 cups (8 oz) sharp cheddar cheese, freshly shredded
- 1½ cups (168g) superfine blanched almond flour
- 3 tablespoons cold unsalted butter, cut into small cubes
- ½ teaspoon fine sea salt
- ½ teaspoon garlic powder (optional but recommended)
- ¼ teaspoon onion powder (optional)
- Pinch of cayenne pepper (optional, for a tiny kick)
For Topping (Optional):
- 1 tablespoon melted butter or 1 beaten egg white
- Flaky sea salt, everything bagel seasoning, or sesame seeds
Instructions
- Preheat your oven to 350°F (175°C). Line a large baking sheet with parchment paper and set aside. This temperature is perfect for crisping the crackers without burning.
- Make the dough by combining the shredded cheddar cheese, almond flour, cold butter cubes, salt, and any optional seasonings (garlic powder, onion powder, cayenne) in a food processor. Pulse 15-20 times until the mixture resembles coarse crumbs and starts to clump together when pressed. The butter should be well distributed throughout. The mixture might look a bit crumbly at first, but it will come together.
- Form the dough ball by continuing to pulse, or switch to running the food processor continuously for 10-15 seconds, until the mixture forms a cohesive ball of dough. It should stick together when pressed but not be overly sticky. If it seems too dry and won’t come together, add 1 teaspoon of cold water and pulse again. If too sticky, add 1 tablespoon more almond flour.
- Roll out the dough by placing the dough ball on a large piece of parchment paper. Place another piece of parchment paper on top of the dough (this prevents sticking and eliminates the need for extra flour). Using a rolling pin, roll the dough into a large rectangle or square about ⅛ inch thick (thin is key for crispy crackers!). The thinner you roll, the crispier your crackers will be. Aim for even thickness throughout.
- Cut into crackers by removing the top piece of parchment paper. Using a pizza cutter, sharp knife, or pastry wheel, cut the dough into small squares (about 1-inch squares work well, similar to commercial cheese crackers). You can also use small cookie cutters for fun shapes if desired.
- Add toppings and prick by lightly brushing the tops with melted butter or beaten egg white if using (this helps toppings stick and adds shine). Sprinkle with flaky sea salt, everything bagel seasoning, or sesame seeds if desired. Using a fork, gently prick each cracker 1-2 times to prevent air bubbles and puffing during baking.
- Separate the crackers by carefully pulling them apart slightly, leaving about ¼ inch of space between each cracker. This allows air to circulate and helps them crisp evenly. Don’t worry if they’re still close together – they won’t spread.
- Bake for 10-14 minutes, rotating the pan halfway through, until the crackers are golden brown around the edges and crispy-looking on top. The centers should be golden but not brown. Watch carefully during the last few minutes – they can go from perfect to burnt quickly! Crackers will continue to crisp as they cool.
- Cool completely by sliding the parchment paper with the crackers onto a wire cooling rack. Let them cool for at least 15-20 minutes. The crackers MUST cool completely to reach full crispiness – they’ll still be slightly soft when warm but will crisp up beautifully as they cool. Don’t stack them while warm or they’ll steam and stay soft.
- Break apart and enjoy! Once completely cool and crispy, break or cut the crackers apart along the score lines. Store in an airtight container and enjoy your homemade keto cheese crackers!
Notes
- Thickness matters: Roll the dough as thin as possible (⅛ inch or even thinner) for the crispiest crackers. Thicker crackers will be chewier.
- Cheese temperature: Let cold cheese sit at room temperature for 15-20 minutes before making the dough for easier mixing.
- Use fresh-shredded cheese: Pre-shredded cheese has anti-caking agents that prevent proper melting and can add carbs.
- Cooling is crucial: Crackers won’t be crispy until completely cool. Be patient!
- Even baking: Make sure your crackers are uniform thickness for even cooking. Check often during the last few minutes of baking.
- Burnt edges: If the edges brown too quickly while centers are still pale, reduce oven temperature to 325°F and bake a bit longer.
- Net carbs: Each serving (about 4 crackers) contains approximately 2-3g net carbs.
- Nut-free option: Unfortunately, these can’t easily be made nut-free since almond flour is essential to the structure. Sunflower seed flour might work but will have a different texture and taste.
- Prep Time: 15 minutes
- Cook Time: 12 minutes
- Category: Appetizer
- Method: Baking
- Cuisine: American
- Diet: Gluten Free
Nutrition
- Serving Size: About 4 crackers (¼ cup)
- Calories: 145
- Sugar: 0.5g
- Sodium: 180mg
- Fat: 12g
- Saturated Fat: 4g
- Unsaturated Fat: 6g
- Trans Fat: 0g
- Carbohydrates: 4g
- Fiber: 1g
- Protein: 6g
- Cholesterol: 2.5g per serving
Tips & Variations
The basic keto cheese cracker recipe is delicious, but here are creative ways to customize them:
Cheese Variations:
- Sharp white cheddar – For a more sophisticated flavor
- Gruyère or Swiss – Nutty, complex flavor, amazing with everything bagel seasoning
- Pepper jack – Adds a nice spicy kick
- Smoked Gouda – Incredible smoky flavor
- Parmesan blend – Use ½ cup Parmesan + 1½ cups mozzarella for an Italian twist
- Mexican blend – Cheddar, Monterey Jack, and a bit of jalapeño cheese
- Combination cheeses – Mix two or three varieties for more complex flavor
Flavor Variations:
- Everything bagel crackers – Top with everything bagel seasoning before baking
- Ranch crackers – Add 2 teaspoons ranch seasoning mix to the dough
- Pizza crackers – Add Italian seasoning, garlic powder, and top with grated Parmesan
- Spicy crackers – Add ½ teaspoon cayenne pepper and ¼ teaspoon chipotle powder
- Herb crackers – Mix in 1 tablespoon fresh herbs (rosemary, thyme, or chives) or 1 teaspoon dried herbs
- Smoky crackers – Add ½ teaspoon smoked paprika to the dough
- Garlic Parmesan – Add extra garlic powder and top with grated Parmesan before baking
- Za’atar crackers – Top with za’atar seasoning for Middle Eastern flair
Texture Variations:
- Extra crispy – Roll thinner (about 1/16 inch) and bake a minute or two longer
- Chewy crackers – Roll slightly thicker (about ¼ inch) and reduce baking time by 2 minutes
- Cheese crisps style – Roll super thin and bake until very crispy and almost lacy
Shape Variations:
- Use small cookie cutters for fun shapes (stars, hearts, circles)
- Cut into rectangles instead of squares for variety
- Make “oyster cracker” style by cutting into tiny pieces
- Create long strips for dipping
Add-Ins:
- Sesame seeds (1-2 tablespoons) for nutty flavor and crunch
- Poppy seeds for visual appeal
- Dried herbs like rosemary or oregano
- A pinch of dried mustard powder for tang
- Nutritional yeast for extra cheesy, umami flavor (use 2 tablespoons)
Pro Chef Tips
Want to make your keto cheese crackers absolutely perfect? Here are professional techniques:
Temperature is everything: Work with cold butter but room temperature cheese. The cold butter creates flakier texture (like pie crust), while room-temp cheese mixes more easily and smoothly. If your kitchen is very warm, chill the dough for 15 minutes before rolling to prevent the butter from melting prematurely.
Roll between parchment: Always roll your dough between two sheets of parchment paper. This prevents sticking without adding extra flour (which would add carbs and make crackers tough). It also makes transferring to the baking sheet effortless – just slide the bottom parchment paper right onto your pan!
Uniformity is key: Use a ruler or straightedge when cutting crackers to ensure they’re all the same size. Uniform crackers bake evenly – no burnt small ones or underdone large ones. A pizza cutter or pastry wheel makes perfectly straight cuts quickly.
Don’t skip the fork pricks: Pricking holes in each cracker (called “docking” in professional baking) prevents air bubbles from forming and causing uneven puffing. This keeps crackers flat and ensures even crisping. Just one or two gentle pricks per cracker is enough.
Watch the edges carefully: The edges will brown faster than the centers due to the thin, exposed dough. If edges are getting too dark while centers are still pale, your oven is too hot or crackers are too thick. Reduce temperature to 325°F and roll thinner next time.
The cooling trick: Don’t rush the cooling! Crackers are still slightly soft when hot and reach peak crispiness only after cooling completely. Transfer the entire parchment sheet to a wire rack (don’t stack crackers!) and let air circulate around them. This ensures maximum crispiness.
Season assertively: Cheese crackers need good seasoning to taste like “real” crackers rather than bland diet food. Don’t be shy with salt and garlic powder. Taste your dough before baking (it’s safe!) and add more seasoning if needed. Under-seasoned crackers are disappointing.
The re-crisp method: If crackers lose their crispness after a day or two in storage, spread them on a baking sheet and bake at 300°F for 3-5 minutes. This drives off any absorbed moisture and restores crispiness. Let cool completely again.
Batch rolling: If making multiple batches, roll all the dough at once on separate parchment sheets, stack them (with parchment between layers), and refrigerate. Bake one sheet at a time while the others stay chilled. This speeds up the process significantly.
The cheese matters: Use good-quality cheese for the best flavor! Cheap cheese has less flavor and often contains more fillers and moisture. A block of quality sharp cheddar makes a noticeable difference in the final taste.
Don’t overcrowd: Bake one sheet at a time in the center of your oven for most even results. If you must bake two sheets, rotate their positions halfway through cooking.
Common Mistakes to Avoid
Even though keto cheese crackers are relatively simple, a few common errors can affect results:
Using pre-shredded cheese – This is the #1 mistake! Pre-shredded cheese contains anti-caking agents (usually cellulose derived from wood pulp or potato starch) that prevent the cheese from melting smoothly. These additives create grainy texture, prevent proper binding, and add unnecessary carbs. They can also prevent the dough from coming together properly. Always shred your own cheese from a block – it takes two extra minutes but makes a world of difference in texture and flavor.
Rolling the dough too thick – Thick crackers (over 3/16 inch) will be chewy rather than crispy, more like cheese shortbread cookies than crackers. For that signature cracker crunch, you need to roll thin – ideally ⅛ inch or even slightly thinner. Use a ruler to check thickness if you’re unsure. Remember: thin = crispy, thick = chewy.
Not letting crackers cool completely before storing – Warm crackers are still releasing steam/moisture. If you store them while warm, they’ll trap that moisture and become soft and stale-tasting instead of staying crispy. Always let crackers cool completely on a wire rack (this allows air circulation on all sides) for at least 20 minutes before storing. Patience here is rewarded with long-lasting crispiness!
Skipping the parchment paper – Trying to roll this dough directly on a counter (even floured) or baking without parchment leads to sticking nightmares and frustration. The cheese makes the dough naturally sticky. Parchment paper is your friend – use it for both rolling and baking. It’s non-negotiable for success with this recipe.
Inconsistent thickness – If some areas of your rolled dough are thick and others are thin, you’ll have uneven baking – burnt thin crackers and underdone thick ones all on the same sheet. Take time to roll evenly, checking the thickness across the entire sheet. Rotate your rolling pin direction and apply even pressure.
Overbaking or underbaking – There’s a narrow window between perfect golden-brown and burnt, especially with cheese-based recipes. Set a timer and check at 10 minutes, then watch closely. Crackers should be golden brown at the edges with lightly golden centers. Remember they’ll crisp more as they cool, so don’t wait for them to be completely crispy in the oven or they’ll be overdone. Conversely, underbaked crackers will be soft and chewy even after cooling.
Not separating cut crackers before baking – If you leave the cut crackers touching each other, they’ll bake into one giant sheet and won’t get crispy edges. After cutting, gently pull the squares apart slightly (about ¼ inch space) so air can circulate and each cracker crisps individually.
Storage & Meal Prep
These keto cheese crackers are fantastic for meal prep and store beautifully when handled correctly!
Room Temperature Storage: Store completely cooled crackers in an airtight container at room temperature for up to 1 week. Layer them with parchment paper if stacking to prevent them from sticking together. The key to maintaining crispiness is keeping moisture out – use a truly airtight container (not just covered with plastic wrap). Adding a food-safe silica gel packet (like those that come in vitamin bottles) to the container helps absorb any moisture and keeps crackers extra crispy.
Refrigerator Storage: You can refrigerate crackers for up to 2 weeks, though it’s not necessary. Store in an airtight container. Refrigeration can sometimes make crackers slightly less crispy due to moisture in the fridge, but they can be re-crisped easily (see below).
Restoring Crispiness: If crackers lose their crisp after a few days (especially in humid climates), spread them on a baking sheet and bake at 300°F for 3-5 minutes. Let cool completely. This drives off absorbed moisture and restores that fresh-baked crispiness.
Portion Control: Divide crackers into snack-sized portions (15-20 crackers) in small containers or zip-top bags for grab-and-go convenience. This is perfect for work lunches, school snacks, or portion-controlled snacking.
Shelf Life: Properly stored keto crackers stay fresh and crispy for 5-7 days at room temperature, sometimes longer in low-humidity environments. If they start to taste stale or lose crispness, re-crisp them in the oven rather than discarding them.
Signs They’ve Gone Bad: Discard crackers if they develop an off smell, show any signs of mold, or taste rancid (nuts can go rancid over time, though this is rare within a week). Fresh crackers should smell cheesy and buttery.
Make-Ahead & Freezer Notes
Keto cheese crackers are excellent for advance preparation!
Make-Ahead Dough: Prepare the dough completely, form it into a disk, wrap tightly in plastic wrap, and refrigerate for up to 3 days. When ready to bake, let the dough sit at room temperature for 10-15 minutes to soften slightly (cold dough is hard to roll), then roll, cut, and bake as directed. The dough actually becomes easier to work with after chilling!
Pre-Cut and Refrigerate: Roll out the dough, cut into crackers, and arrange on parchment-lined baking sheets. Cover tightly with plastic wrap and refrigerate for up to 24 hours. When ready, remove plastic wrap and bake straight from the fridge, adding 1-2 minutes to baking time.
Freezing Unbaked Dough: Form the dough into a disk or log, wrap tightly in plastic wrap then aluminum foil, and freeze for up to 3 months. Thaw overnight in the refrigerator, let come to room temperature for 15 minutes, then roll and bake as directed. This is perfect for always having cracker dough ready!
Freezing Cut, Unbaked Crackers: Roll, cut, and arrange crackers on parchment-lined baking sheets. Freeze until solid (about 1 hour), then transfer frozen crackers to a freezer bag or container, separating layers with parchment. Freeze for up to 3 months. Bake directly from frozen, adding 2-3 minutes to baking time. This is incredibly convenient – fresh crackers anytime you want them!
Freezing Baked Crackers: Fully baked, cooled crackers can be frozen in airtight containers or freezer bags for up to 3 months. Thaw at room temperature for 20-30 minutes, then re-crisp in a 300°F oven for 3-5 minutes if desired. While the texture is slightly different from fresh, they’re still very good.
Best Freezing Method: Freezing the dough (either as a disk or already rolled and cut) gives you the best results – you get fresh-baked texture and flavor when you’re ready to bake. Baking from frozen dough is almost as good as baking fresh dough.
Serving Suggestions
These versatile keto cheese crackers work in so many delicious ways:
Snacking:
- Straight from the container for afternoon snacks or movie night
- Packed in lunch boxes or snack bags
- Desk drawer stash for work snacking
- Post-workout snack (good protein!)
- Late-night munchies that won’t ruin your macros
With Dips:
- Guacamole or avocado dip
- Sugar-free salsa
- Spinach artichoke dip
- Buffalo chicken dip
- Queso dip (keto-friendly version)
- Ranch dressing or ranch dip
- Hummus (in moderation on keto)
- Tuna or salmon salad
- Cream cheese-based dips
Charcuterie and Cheese Boards:
- Perfect addition to keto-friendly cheese boards
- Serve with cured meats (salami, prosciutto, pepperoni)
- Pair with nuts, olives, pickles, and cheese cubes
- Add to antipasto platters
- Great for party appetizer spreads
Meal Additions:
- Crush and use as “breadcrumb” topping for casseroles
- Crumble over salads instead of croutons
- Serve alongside keto soups and stews
- Use as a base for keto “nachos” with toppings
- Pair with chili or low-carb taco soup
Sandwich and Wrap Sides:
- Serve alongside lettuce wrap sandwiches
- Perfect side for deli meat rollups
- Great with egg salad or chicken salad
- Accompany cheese and charcuterie wraps
Beverage Pairings:
- Iced or hot tea
- Coffee (yes, savory with coffee works!)
- Sparkling water with lime
- Dry red or white wine (in moderation on keto)
- Unsweetened iced tea
- Keto-friendly cocktails
Creative Uses:
- Make “sandwich crackers” with cream cheese filling
- Top with cheese and broil for mini nachos
- Use as a pizza base (top with sauce and cheese)
- Serve with keto-friendly soup shooters at parties
- Create an appetizer by topping with smoked salmon and cream cheese
FAQs Section
1. Can I use different types of cheese for this recipe?
Yes! While cheddar gives the best flavor and crispiness, you can try mozzarella, parmesan, or a mix of cheeses. Just make sure they’re full-fat and shredded for the perfect melt.
2. How do I make these crackers extra crispy?
Bake them a few minutes longer and let them cool completely on the baking sheet. As they cool, they’ll crisp up even more — no soggy crackers here!
3. Are these cheese crackers gluten-free?
Absolutely! These keto cheese crackers are 100% gluten-free since they’re made without any flour or grains.
4. Can I store these crackers for later?
Yes — once cooled, store them in an airtight container at room temperature for up to 3 days, or refrigerate for a week. Re-crisp them in the oven for a minute or two before serving.
5. What can I serve with these keto crackers?
They’re perfect with dips like guacamole, sour cream, ranch dressing, or even low-carb salsa. You can also enjoy them as a crunchy side with soups or salads!
6. Can I make these crackers in an air fryer?
Definitely! Air fry at 350°F (175°C) for about 6–8 minutes, keeping an eye on them to avoid burning — they’ll come out perfectly crisp and golden.
7. Are these suitable for strict keto diets?
Yes, they’re extremely low in carbs — just cheese, almond flour, and a few seasonings. Perfect for anyone following keto or low-carb diets.
Conclusion
These Crispy Keto Cheese Crackers prove that healthy snacking doesn’t have to be boring! 🧀✨
With just 4 simple ingredients, you get a crunchy, flavorful, and guilt-free snack that satisfies all your cravings. Whether you’re on a keto diet, cutting carbs, or just love cheesy goodness — these crackers are a total win.
Bake a batch, store them for later, and enjoy that addictive crunch anytime you need a quick pick-me-up. 😋
👉 Try them today and taste how simple low-carb snacking can be!