Crispy Baked Kale Chips Recipe – Healthy Homemade Snack in 15 Minutes
If you’ve been scrolling through Pinterest looking for a guilt-free snack that actually tastes amazing, these crispy baked kale chips are about to become your new obsession! Forget those expensive bags of store-bought kale chips that cost $6 and disappear in two bites. This homemade version is ridiculously easy, budget-friendly, and so addictively crunchy, you’ll wonder why you haven’t been making them all along.
Kale chips are the perfect answer when you’re craving something salty and crispy but want to keep things nutritious. They’re fantastic as an afternoon snack, a healthy addition to lunch boxes, a party appetizer that sparks conversation, or even as a crunchy salad topping. The best part? You only need three basic ingredients and about 15 minutes from start to finish. Whether you’re meal-prepping for the week, looking for kid-friendly veggie options, or just want a satisfying crunch without the guilt, these kale chips deliver every single time.
History / Background
Kale chips might seem like a modern health-food trend, but their story is rooted in both ancient cultivation and contemporary wellness movements. Kale itself has been around for over 2,000 years, originally grown in the Mediterranean region and brought to America by European settlers in the 17th century. For centuries, kale was a humble garden staple, appreciated for its hardiness and nutrition but rarely celebrated as a culinary star.
The transformation of kale from basic leafy green to trendy superfood began in the early 2000s, when chefs and health food advocates started experimenting with creative ways to make vegetables more appealing. The kale chip breakthrough is often credited to Sharon Brown of Angelica Kitchen, a mainstay New York City vegan restaurant, who began serving dehydrated kale chips in the late 1990s. However, it wasn’t until celebrity chefs and food bloggers began sharing oven-baked versions around 2007-2010 that kale chips exploded into mainstream consciousness.
By 2011, kale chips had become a Pinterest phenomenon, with home cooks discovering they could create restaurant-quality chips in their own ovens using minimal ingredients. The rise of food blogs, health-conscious eating, and social media transformed this simple preparation into a cultural movement. Today, kale chips represent the democratization of healthy eating – proof that nutritious food doesn’t have to be complicated, expensive, or bland. They’ve inspired countless variations, from ranch-flavored to spicy chili-lime, and have helped introduce an entire generation to the joys of eating dark leafy greens.
Why You’ll Love This Recipe
These homemade kale chips are a total game-changer for healthy snacking. Unlike their store-bought counterparts that can taste stale or overly salty, these chips come out of your oven perfectly crispy, fresh, and customizable to your taste preferences. The transformation from raw kale to crispy chip is almost magical – the leaves shrink down, the edges get wonderfully crispy, and the flavor concentrates into something surprisingly addictive.
Here’s why this recipe deserves a permanent spot in your rotation:
- Incredibly Easy – Just toss, spread, and bake. No special skills or fancy equipment required.
- Budget-Friendly – A bunch of kale costs $2-3 and yields multiple servings, compared to $6+ for a tiny bag at the store.
- Ready in 15 Minutes – From fresh kale to crispy chips in a quarter of an hour.
- Customizable Flavors – Season them any way you like: classic sea salt, cheesy nutritional yeast, spicy cayenne, or garlic parmesan.
- Guilt-Free Snacking – Packed with vitamins A, K, and C, plus fiber and antioxidants, with minimal calories.
- Kid-Approved – Even picky eaters love the crunch factor. It’s an excellent way to sneak greens into their diet.
- Perfect for Meal Prep – Make a big batch and store them for healthy snacking all week long.
- Naturally Gluten-Free & Vegan – Fits most dietary preferences without modification.
- Replaces Unhealthy Snacks – Satisfies that chip craving without processed ingredients or excessive sodium.
Ingredient Notes
The beauty of kale chips lies in their simplicity. You only need three core ingredients, but understanding each one ensures perfect results every time.
Fresh Kale (1 large bunch, about 8-10 cups) – The star of the show! I recommend curly kale for maximum crispiness, as its ruffled edges create more surface area that gets wonderfully crunchy. Lacinato kale (also called dinosaur or Tuscan kale) works too and offers a slightly more delicate texture. Look for fresh, vibrant green leaves without yellowing or wilting. Substitution tip: You can use Swiss chard or collard greens, though the texture will be slightly different. Avoid using baby kale or pre-cut bagged kale, as they’re often too small and can burn easily.
Olive Oil (1-2 tablespoons) – This is what helps the kale crisp up in the oven and carries the seasoning. Extra virgin olive oil adds a subtle flavor that complements the kale beautifully. The key is using just enough to lightly coat the leaves without making them soggy. Substitution tip: Avocado oil is excellent for a neutral flavor and high smoke point. You can also use melted coconut oil for a slightly sweet undertone, or cooking spray for an ultra-light coating.
Sea Salt (½-1 teaspoon) – Simple salt brings out kale’s natural flavor and provides that classic chip taste. Coarse sea salt or kosher salt works best because you can control the distribution better. Substitution tip: Try smoked salt for depth, Himalayan pink salt for minerals, or seasoned salt for extra flavor. You can also skip the salt and use other seasonings entirely.
Optional Seasonings – This is where you can get creative! Garlic powder, onion powder, smoked paprika, cayenne pepper, nutritional yeast (for a cheesy flavor), ranch seasoning, everything bagel seasoning, or even a sprinkle of parmesan cheese can take your kale chips to the next level.
Equipment Needed
You don’t need any special kitchen gadgets to make perfect kale chips. Here’s what you’ll use:
- Large Baking Sheet – A standard 18×13-inch sheet pan works perfectly. For best results, use two baking sheets so you can spread the kale in a single layer without overcrowding.
- Parchment Paper or Silicone Baking Mat – Essential for preventing sticking and ensuring even crisping. Parchment paper is my go-to because it’s disposable and cleanup is a breeze.
- Large Mixing Bowl – For tossing the kale with oil and seasonings. A big bowl gives you room to massage the oil into every leaf without making a mess.
- Salad Spinner or Clean Kitchen Towels – Absolutely critical for drying the kale thoroughly after washing. Wet kale = soggy chips, so this step can’t be skipped!
- Sharp Kitchen Knife or Kitchen Shears – For removing the tough stems from the kale leaves.
- Measuring Spoons – To ensure you’re using the right amount of oil (not too much, not too little).
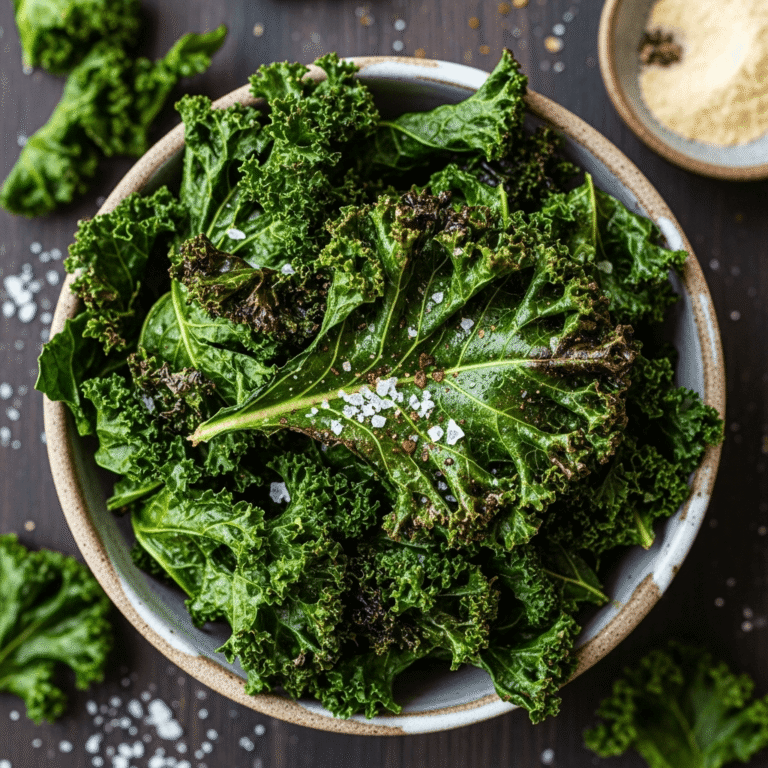
Crispy Baked Kale Chips Recipe
Perfectly crispy homemade kale chips that are healthy, delicious, and ready in just 15 minutes. These addictively crunchy chips make the perfect guilt-free snack and are completely customizable with your favorite seasonings.
- Total Time: 25 minutes
- Yield: 4 servings 1x
Ingredients
- 1 large bunch fresh curly kale (8-10 cups, stems removed)
- 1-2 tablespoons extra virgin olive oil
- ½-1 teaspoon sea salt (to taste)
- Optional: ¼ teaspoon garlic powder
- Optional: ¼ teaspoon onion powder
- Optional: 2 tablespoons nutritional yeast (for cheesy flavor)
Instructions
- Preheat Your Oven: Set your oven to 300°F (150°C). This lower temperature is key for achieving crispy chips without burning. Line two large baking sheets with parchment paper and set aside.
- Wash and Dry the Kale: Rinse the kale thoroughly under cold water to remove any dirt or grit. This is the most important step – use a salad spinner to remove ALL moisture, or pat the leaves completely dry with clean kitchen towels. Any remaining water will prevent the chips from getting crispy and cause them to steam instead of bake.
- Remove the Stems: Using a sharp knife or kitchen shears, cut away the thick center stem from each kale leaf. The stems are too tough and won’t crisp up properly. Tear or cut the leaves into bite-sized pieces, roughly 2-3 inches each. Don’t make them too small, as they’ll shrink considerably during baking.
- Season the Kale: Place the dried kale pieces in a large mixing bowl. Drizzle with olive oil, starting with 1 tablespoon. Using your hands, massage the oil into every leaf, making sure each piece is lightly coated but not dripping. Add the sea salt and any optional seasonings you’re using. Toss thoroughly to distribute evenly. The key word here is “lightly” – too much oil will make them greasy and prevent proper crisping.
- Arrange on Baking Sheets: Spread the kale in a single layer on your prepared baking sheets. This is crucial – the leaves should not overlap or touch each other. Crowded kale steams instead of crisps. If needed, use a third baking sheet or bake in batches.
- Bake to Perfection: Place the baking sheets in the preheated oven. Bake for 12-15 minutes, checking frequently after the 10-minute mark. The chips are done when they’re crispy and the edges are just starting to brown slightly. They should crumble easily when touched. If they’re still soft or flexible, they need a few more minutes. Watch carefully in the final minutes to prevent burning.
- Cool and Serve: Remove from the oven and let the chips cool on the baking sheet for 2-3 minutes. They’ll continue to crisp up as they cool. Once cooled, transfer to a serving bowl and enjoy immediately for maximum crispiness!
Notes
- Oil is Key: Use just enough to lightly coat the leaves. Too much oil = greasy, soggy chips.
- Completely Dry: This cannot be stressed enough – moisture is the enemy of crispy kale chips. Take the extra time to ensure the kale is bone-dry.
- Don’t Overcrowd: Give each piece space on the baking sheet. Overlapping leaves will steam and stay limp.
- Low and Slow: 300°F is the sweet spot. Higher temperatures burn the edges before the centers crisp.
- Timing Varies: Oven temperatures can vary, so start checking at 10 minutes and watch closely.
- Eat Fresh: Kale chips are best enjoyed within a few hours of baking for peak crispiness.
- Seasoning After: For extra-crispy chips, you can season them immediately after baking while they’re still hot.
- Prep Time: 10 minutes
- Cook Time: 15 minutes
- Category: Appetizer
- Method: Baking
- Cuisine: American
- Diet: Vegan
Nutrition
- Serving Size: About 2 cups (¼ of recipe)
- Calories: 85
- Sugar: 1g
- Sodium: 320mg
- Fat: 4.5g
- Saturated Fat: 0g
- Unsaturated Fat: 3g
- Trans Fat: 0g
- Carbohydrates: 10g
- Fiber: 3g
- Protein: 4g
- Cholesterol: 0mg
Tips & Variations
The basic kale chip recipe is just the beginning! Here are some delicious ways to customize your chips:
Flavor Variations:
- Cheesy Kale Chips: Add 2-3 tablespoons of nutritional yeast for a cheese-like, umami-rich flavor that’s completely vegan.
- Spicy Kick: Sprinkle with cayenne pepper, red pepper flakes, or chili powder before baking for a fiery snack.
- Ranch Style: Toss with ranch seasoning mix (dried dill, garlic powder, onion powder, and dried parsley).
- Garlic Parmesan: Mix garlic powder with grated Parmesan cheese and add after baking for a savory Italian twist.
- BBQ Flavor: Dust with your favorite BBQ seasoning or smoked paprika for a smoky, tangy taste.
- Everything Bagel: Use everything bagel seasoning for a fun, trendy flavor profile.
- Lemon Pepper: Add fresh lemon zest and cracked black pepper for a bright, zesty variation.
- Curry Spiced: Mix curry powder, turmeric, and a pinch of cumin for an Indian-inspired snack.
Dietary Modifications:
- Oil-Free Version: For ultra-low-calorie chips, skip the oil entirely and use cooking spray or just season with spices. They’ll still crisp up, though not quite as perfectly.
- Extra Nutrients: Sprinkle with hemp hearts, chia seeds, or sesame seeds before baking for added protein and omega-3s.
Pro Chef Tips
These insider techniques will take your kale chips from good to absolutely restaurant-quality:
- The Massage Matters: Don’t just toss the kale with oil – actually massage it into the leaves with your hands. This breaks down the tough cell walls slightly, making the kale more tender and helping it crisp more evenly. Spend at least 30 seconds working the oil into every crevice.
- Temperature Control is Everything: Resist the urge to crank up the heat to 375°F or 400°F thinking it’ll work faster. High heat burns the delicate edges while leaving the centers limp. The low-and-slow method at 300°F ensures even crisping throughout. If your oven runs hot, drop it to 275°F.
- Rotate for Even Baking: Halfway through baking (around the 7-minute mark), rotate your baking sheets 180 degrees and swap their positions if using two racks. This compensates for hot spots in your oven and ensures every chip crisps evenly.
- The Paper Towel Trick: After washing and spinning, lay the kale on paper towels or a clean kitchen towel for 5-10 minutes to air dry. Then give it one final pat-down. This extra step removes any lingering moisture.
- Size Consistency: Try to tear your kale pieces into similar sizes. Small pieces will burn before large ones finish crisping. Aim for pieces that are roughly 2-3 inches across.
- Cool Completely on the Pan: Don’t transfer the chips to a bowl immediately. Let them cool directly on the baking sheet for 2-3 minutes. They’ll continue to crisp up during this time and will be less likely to break.
- Season in Stages: For maximum flavor, add half the seasoning before baking and the other half immediately after removing from the oven while the chips are still hot. The residual heat helps the seasonings stick.
Common Mistakes to Avoid
Even though kale chips are simple, there are a few pitfalls that can ruin your batch. Here’s what to watch out for:
- Using Wet Kale: This is the #1 mistake! Even a little moisture will steam the kale instead of crisping it, leaving you with limp, chewy leaves. Always dry the kale thoroughly – I can’t stress this enough. When in doubt, dry it again.
- Overcrowding the Pan: Piling kale on top of itself or letting pieces touch creates steam pockets. The leaves need breathing room and direct heat exposure to crisp properly. Use multiple pans if necessary, or bake in batches. Yes, it takes more time, but the results are worth it.
- Too Much Oil: Pouring on the oil with a heavy hand makes chips greasy, soggy, and heavy. Start with just 1 tablespoon for a large bunch and add more only if needed. The leaves should have a light sheen, not be dripping.
- Baking at Too High a Temperature: Anything above 325°F risks burning the delicate edges before the centers crisp. Be patient with the lower temperature – it’s the secret to perfectly crispy chips without any bitter, burnt spots.
- Not Checking Frequently: Kale chips can go from perfect to burnt in less than a minute, especially in the final stages of baking. Start checking at the 10-minute mark and watch like a hawk after that. Every oven is different, so trust your eyes, not just the timer.
- Storing Too Soon: If you seal warm kale chips in a container, condensation forms and makes them soggy immediately. Always let them cool completely to room temperature first. Even better, leave them uncovered for an hour before storing.
Storage & Meal Prep
Kale chips are best enjoyed fresh from the oven when they’re at peak crispiness, but with proper storage, you can keep them crunchy for several days:
Room Temperature Storage: Once completely cooled, store kale chips in an airtight container lined with paper towels to absorb any residual moisture. Place another paper towel on top before sealing. They’ll stay crispy for 2-3 days at room temperature. Avoid plastic bags, as they don’t provide enough protection and allow moisture in.
Avoiding Moisture: The enemy of crispy kale chips is humidity. Store them in the driest area of your kitchen, away from the stove, sink, or any steamy appliances. If you live in a humid climate, consider adding a food-safe silica packet to your storage container.
Refreshing Stale Chips: If your chips lose their crunch after a day or two, you can re-crisp them! Spread them on a baking sheet and warm in a 250°F oven for 3-5 minutes. Let them cool completely and they’ll be crispy again.
Not Recommended: Refrigeration is not recommended, as the moisture in the fridge will make them soggy. Kale chips also don’t freeze well – the texture becomes unpleasantly limp when thawed.
Meal Prep Strategy: For weekly snacking, I recommend baking fresh batches 2-3 times per week rather than making one huge batch. This ensures you always have crispy chips on hand. Prep the kale (wash, dry, remove stems) in advance and store it in the fridge in a sealed bag with paper towels. When you’re ready to snack, just toss with oil and bake.
Make-Ahead & Freezer Notes
Make-Ahead Prep: While the baked chips don’t hold well for more than a few days, you can absolutely prep the raw kale in advance. Wash, thoroughly dry, and remove the stems from your kale up to 2 days ahead. Store the prepared leaves in an airtight container or large zip-top bag with paper towels to absorb moisture. Keep refrigerated until you’re ready to season and bake. This makes it incredibly easy to whip up a fresh batch in just 5 minutes of active work.
Freezing Not Recommended: Unfortunately, kale chips don’t freeze well. The delicate, crispy texture becomes soggy and limp when frozen and thawed, even if you try to re-crisp them. The moisture from freezing and defrosting destroys the structure that makes them so appealing.
Best Approach: Because kale chips are so quick to make (only 15 minutes from start to finish), it’s best to bake them fresh when you want them rather than trying to store large quantities. Think of them like popcorn – best enjoyed immediately after preparation.
Portioning for Success: If you want to have kale chips available throughout the week, consider portioning out your raw, prepped kale into smaller bags (enough for one batch each). Then you can quickly bake a fresh batch every 2-3 days, ensuring optimal crispiness without waste.
Serving Suggestions
Kale chips are incredibly versatile and can be enjoyed in numerous ways beyond simple snacking:
As a Standalone Snack: Serve kale chips in a bowl for movie nights, afternoon snacking, or whenever the munchies strike. They’re perfect for those moments when you want something crunchy and satisfying but don’t want to derail your healthy eating goals.
Lunchbox Addition: Pack kale chips in small containers for school or work lunches. They add a satisfying crunch without the guilt of traditional chips. Kids especially love the novelty of “chips” that are actually vegetables.
Salad Topper: Crumble kale chips over soups, salads, or grain bowls for added texture and nutrition. They’re particularly delicious on creamy tomato soup, roasted vegetable salads, or Buddha bowls.
Party Appetizer Platter: Create a healthy snack board featuring kale chips alongside hummus, fresh vegetables, nuts, and fruits. Offer different flavored kale chips (plain, cheesy, spicy) for variety. Your guests will be impressed by this creative, nutritious option.
Pair With:
- Dips: Hummus, guacamole, ranch dip, tzatziki, or French onion dip
- Sandwiches: They add great crunch to wraps, grilled cheese, or veggie sandwiches
- Soup: Tomato soup, butternut squash soup, or creamy broccoli soup
- Cheese Board: Alongside cheeses, crackers, and fruits for an elevated appetizer spread
- Beverages: Sparkling water with lemon, iced green tea, fresh vegetable juice, or even a cold beer
Creative Uses:
- Crush them and use as a coating for baked chicken or fish
- Sprinkle over pasta dishes for added texture
- Layer into grain bowls with quinoa, roasted vegetables, and tahini dressing
- Use as a garnish for avocado toast
FAQs Section
Q: Why are my kale chips not getting crispy?
A: The most common culprit is moisture. Make sure your kale is completely dry before adding oil. Also check that you’re not overcrowding the pan (leaves need space to crisp), not using too much oil (should be just a light coating), and baking at the right temperature (300°F, not higher). If you live in a humid climate, you may need to add a few extra minutes to the baking time.
Q: Can I use a different type of kale?
A: Absolutely! Curly kale gives the crispiest results because of its ruffled texture, but lacinato (dinosaur) kale works wonderfully too – it just produces flatter, more delicate chips. Baby kale is too small and tends to burn easily, so I’d avoid it. Red Russian kale is another excellent option with a slightly sweeter flavor.
Q: How do I store leftover kale chips?
A: Let them cool completely first, then store in an airtight container with paper towels to absorb moisture. They’ll stay crispy for 2-3 days at room temperature. Don’t refrigerate them, as the moisture will make them soggy. If they lose their crunch, you can re-crisp them in a 250°F oven for a few minutes.
Q: Can I make kale chips in an air fryer?
A: Yes! Air fryers work beautifully for kale chips. Prep the kale the same way (wash, dry thoroughly, remove stems, toss with minimal oil). Cook at 300°F for 5-7 minutes, shaking the basket every 2 minutes to ensure even crisping. The air fryer method is even faster and can produce excellent results.
Q: Are kale chips actually healthy?
A: Absolutely! Kale is a nutritional powerhouse loaded with vitamins A, C, and K, plus calcium, iron, and antioxidants. When baked with just a touch of oil and salt, kale chips provide all those nutrients in a satisfying, crunchy form with minimal calories. They’re infinitely healthier than potato chips or most processed snacks. One serving gives you nearly 200% of your daily vitamin A needs!
Q: What’s the best oil to use?
A: Extra virgin olive oil is my go-to for its flavor and health benefits, but avocado oil is excellent for a more neutral taste and higher smoke point. Coconut oil works if you don’t mind a subtle coconut flavor. Some people even use sesame oil for Asian-inspired seasonings. In a pinch, cooking spray works too, though you’ll get slightly less flavor.
Q: Can I season them after baking instead of before?
A: Yes, and this can actually be a great technique! Some delicate seasonings (like nutritional yeast or fresh herbs) benefit from being added after baking so they don’t burn. Remove the chips from the oven, immediately sprinkle with your seasonings while they’re still hot, and toss gently. The residual heat helps the seasonings adhere perfectly.
Conclusion
There you have it – everything you need to know to make absolutely perfect, irresistibly crispy kale chips right in your own kitchen! What started as a simple health-food trend has become one of the most satisfying and guilt-free snacks you can make at home. Whether you’re batch-prepping for the week, looking for a fun activity to do with kids, or just craving something crunchy without the guilt, these kale chips deliver every single time.
The beauty of this recipe lies in its simplicity and versatility. With just three basic ingredients and 15 minutes, you can transform humble kale into something truly special. And once you’ve mastered the basic technique, the flavor possibilities are endless – from classic sea salt to adventurous spice blends, there’s a kale chip variation for every palate.
Remember, the keys to success are washing and drying the kale thoroughly, using just enough oil to coat (not drench), giving each leaf space on the baking sheet, and baking low and slow at 300°F. Follow these principles, and you’ll be rewarded with perfectly crispy, delicious chips that rival anything you’d find at a fancy health food store – for a fraction of the price!
I’d love to hear how your kale chips turn out! Drop a comment below sharing your favorite flavor combinations, any tips you discovered, or photos of your crispy creations. And if you loved this recipe, please pin it to your favorite Pinterest board so you can find it again – and help other home cooks discover how easy and delicious homemade kale chips can be.
Now grab that bunch of kale and get baking – your new favorite healthy snack is just 15 minutes away!