Cheesy Garlic Crack Bread – The Ultimate Pull-Apart Appetizer Everyone Devours
If you’ve ever experienced the pure joy of pulling apart warm, buttery bread stuffed with melted cheese and aromatic garlic, then you already know why Cheese and Garlic Crack Bread has earned its addictive name. This irresistible pull-apart garlic bread is called “crack bread” for one simple reason: once you start eating it, you literally cannot stop. It’s that dangerously delicious.
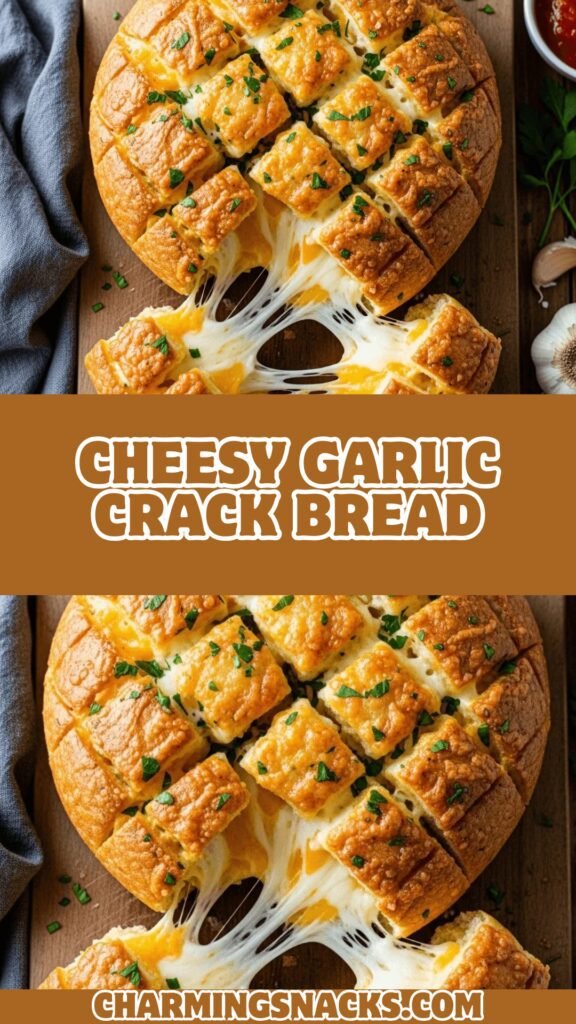
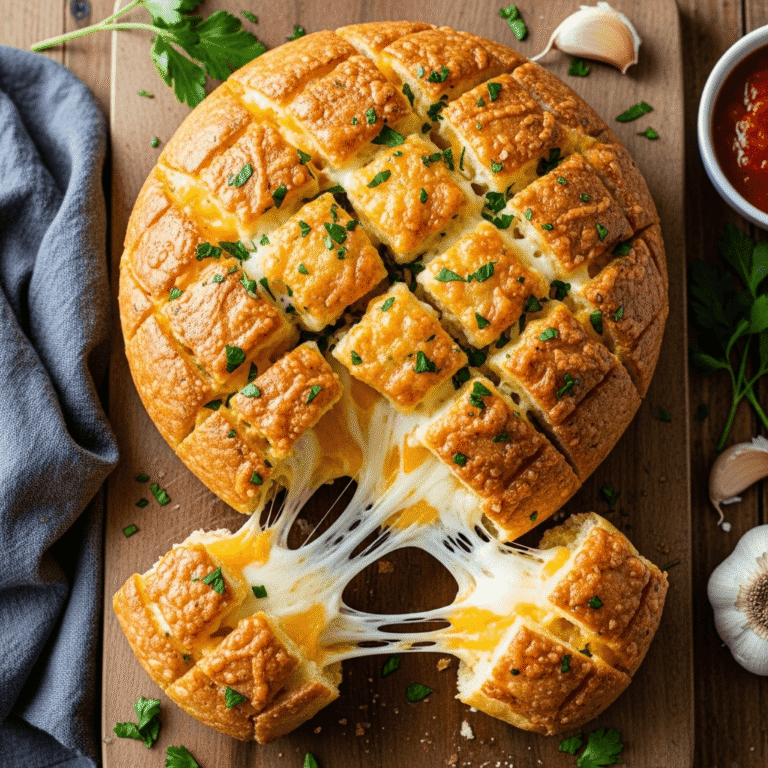
Cheese and Garlic Crack Bread combines crusty artisan bread (typically a sourdough or Italian loaf) with a heavenly mixture of melted butter, fresh garlic, herbs, and copious amounts of gooey melted cheese. The bread is strategically cut in a crosshatch pattern without slicing all the way through, creating perfect little squares that pull apart easily while keeping the loaf intact. Every crevice gets filled with the garlic butter mixture and cheese, then the whole thing is wrapped in foil and baked until the cheese melts into every crack and the bread develops a crispy, golden exterior.
This crowd-pleasing appetizer is perfect for game day gatherings, holiday parties, barbecues, casual dinners, or any time you need something impressive that requires minimal effort. It’s become a Pinterest sensation and social media star because it looks absolutely stunning, photographs beautifully, and delivers on every level – flavor, texture, and pure comfort food satisfaction. Serve this cheesy garlic pull-apart bread at your next gathering, and prepare for it to disappear within minutes while everyone asks for the recipe.
History / Background
While the exact origins of “crack bread” are difficult to pinpoint, this recipe emerged from the broader tradition of pull-apart breads and stuffed garlic breads that have been popular across various cultures for decades. The term “crack bread” itself is a playful, modern internet-era nickname that perfectly captures the addictive quality of this dish.
The concept of pull-apart bread has roots in several culinary traditions. Monkey bread, a sweet pull-apart bread made with dough balls coated in cinnamon sugar, has been popular in American households since the 1950s. European cultures have long enjoyed filled breads, from Italian focaccia stuffed with cheese to French pain à l’ail (garlic bread). Australian food bloggers and home cooks are often credited with popularizing the savory “crack bread” version that went viral on social media platforms around 2013-2015.
The viral nature of this recipe can be traced back to food blogs and Pinterest, where stunning photos of golden, cheese-oozing bread captured the imagination of home cooks everywhere. The visual appeal is undeniable – those perfect crosshatch cuts, the melted cheese bubbling up through the cracks, and the promise of buttery, garlicky goodness made it instantly shareable.
What makes this particular version special is the perfect marriage of garlic bread and cheese bread into one spectacular dish. It takes the best elements of both classics and combines them in a format that’s both impressive-looking and incredibly easy to make. The crosshatch cutting technique ensures every single bite contains bread, butter, garlic, and cheese – nothing is left to chance.
Why You’ll Love This Recipe
This Cheesy Garlic Crack Bread isn’t just another appetizer – it’s the appetizer that will make you the star of every gathering. It delivers restaurant-quality results with surprisingly simple techniques that any home cook can master, and the wow factor is absolutely unmatched.
Here’s why this pull-apart garlic cheese bread will become your go-to party recipe:
- Insanely addictive flavor – The combination of butter, garlic, herbs, and melted cheese creates an irresistible taste that lives up to the “crack bread” name
- Impressive presentation – Looks like you spent hours in the kitchen when it actually takes just 15 minutes of prep
- Perfect for sharing – The pull-apart format encourages communal eating and creates a fun, interactive dining experience
- Minimal ingredients – Uses simple pantry staples and one good quality bread loaf
- Ready in 30 minutes – From start to finish, this appetizer comes together quickly for last-minute entertaining
- Customizable to taste – Easily adjust garlic intensity, cheese varieties, and add-ins to suit your preferences
- Budget-friendly – Costs just a few dollars to make but tastes like a premium restaurant appetizer
- Crowd-pleaser guarantee – Appeals to kids and adults alike; even picky eaters love it
- No complicated techniques – If you can cut bread and melt butter, you can make this recipe
- Great for any occasion – Works as an appetizer, side dish, party snack, or game day food
- Keeps hands clean – Unlike messy dips, each piece pulls away cleanly for easy, napkin-friendly eating
- Freezer-friendly – Make ahead and bake when needed for stress-free entertaining
Ingredient Notes
Bread Loaf: The foundation of great crack bread is a sturdy, crusty loaf. Look for a round sourdough boule, Italian bread, or French bread with a crispy crust and soft interior. The bread should be unsliced and at least 8-10 inches in diameter. Sourdough adds wonderful tang that complements the garlic, while Italian bread offers a neutral base. Avoid pre-sliced bread or soft sandwich loaves – they won’t hold up to the butter and cheese.
Butter: Use unsalted butter so you can control the salt level in the recipe. Real butter (not margarine) is essential for authentic flavor and proper melting consistency. You’ll need it softened to room temperature for easy mixing with the garlic and herbs. Plan on about ¾ to 1 cup depending on bread size.
Garlic: Fresh garlic is non-negotiable for the best flavor. You’ll need 4-6 large cloves, minced very fine or pressed through a garlic press. Fresh garlic provides that pungent, aromatic quality that makes this bread so irresistible. Jarred minced garlic works in a pinch, but the flavor won’t be quite as vibrant. Don’t use garlic powder – it won’t distribute properly.
Cheese: This recipe shines with good melting cheeses. Mozzarella is the classic choice for its excellent melt and mild flavor, but many recipes use a combination. Cheddar adds sharpness, Monterey Jack brings creaminess, and Gruyère offers nutty sophistication. Shred your own cheese from a block rather than using pre-shredded – it melts much better without the anti-caking additives. Plan on 2-3 cups total.
Fresh Herbs: Parsley is traditional, but you can use chives, green onions, or a combination. Fresh herbs add brightness and color that balances the richness of the butter and cheese. If you must use dried herbs, reduce the amount by half since dried herbs are more concentrated.
Seasonings: Salt and black pepper are essential for enhancing all the flavors. Some recipes include a pinch of red pepper flakes for subtle heat or Italian seasoning for extra herbaceousness.
Optional Additions: Cooked bacon bits, caramelized onions, sun-dried tomatoes, or fresh jalapeños can take this bread to the next level depending on your flavor preferences.
Equipment Needed
- Serrated bread knife (essential for clean cutting without squashing the bread)
- Large cutting board (to safely cut the crosshatch pattern)
- Medium mixing bowl (for preparing the garlic butter mixture)
- Spoon or small spatula (for spreading and stuffing the butter mixture)
- Aluminum foil (heavy-duty works best for wrapping the bread)
- Large baking sheet or roasting pan (to hold the wrapped bread while baking)
- Garlic press or microplane (for mincing garlic finely)
- Measuring cups and spoons
- Box grater or food processor (for shredding cheese)
- Sharp knife (for chopping fresh herbs)
- Oven mitts (for handling the hot foil-wrapped bread)
- Serving board or platter (preferably wooden for rustic presentation)
- Pastry brush (optional, for getting butter into all the crevices)
Cheesy Garlic Crack Bread
Irresistibly addictive pull-apart garlic bread stuffed with melted butter, fresh garlic, herbs, and gooey cheese. This easy cheesy garlic crack bread features a crusty sourdough loaf cut in a crosshatch pattern, filled with garlic butter and cheese, then baked until golden and bubbly. Perfect for parties, game day, or any gathering where you want to impress with minimal effort.
- Total Time: 40 minutes
- Yield: 8-10 servings 1x
Ingredients
For the Garlic Butter Mixture:
- 1 large round sourdough or Italian bread loaf (about 1 pound, 8-10 inches diameter)
- ¾ cup (1½ sticks) unsalted butter, softened to room temperature
- 4-5 large garlic cloves, minced or pressed (about 2 tablespoons)
- ¼ cup fresh parsley, finely chopped
- 2 tablespoons fresh chives, finely chopped (or 2 green onions, sliced thin)
- ½ teaspoon salt
- ¼ teaspoon black pepper
- ¼ teaspoon red pepper flakes (optional, for subtle heat)
For the Cheese Filling:
- 2 cups mozzarella cheese, shredded (about 8 ounces)
- 1 cup sharp cheddar cheese, shredded (about 4 ounces)
- Optional: ¼ cup Parmesan cheese, grated
For Garnish:
- Extra fresh parsley, chopped
- Flaky sea salt
Instructions
Step 1: Prepare Your Workspace and Preheat
Preheat your oven to 350°F (175°C). Line a large baking sheet with aluminum foil, leaving enough excess to fully wrap the bread later. Set aside.
Step 2: Make the Garlic Butter
In a medium bowl, combine softened butter, minced garlic, chopped parsley, chives, salt, black pepper, and red pepper flakes (if using). Mix thoroughly with a spoon until all ingredients are evenly distributed and the mixture is smooth and spreadable. The butter should be soft enough to spread easily but not melted.
Step 3: Cut the Bread in Crosshatch Pattern
Place your bread loaf on a cutting board. Using a sharp serrated knife, make diagonal cuts across the bread about 1 inch apart, cutting down to about ¾ inch from the bottom – don’t cut all the way through the base. Turn the bread 90 degrees and repeat the diagonal cuts in the opposite direction, creating a diamond/crosshatch pattern. You should have a grid of cuts that create pull-apart sections while keeping the loaf intact at the bottom.
Step 4: Stuff with Garlic Butter
Place the cut bread on the foil-lined baking sheet. Using your fingers or a small spatula, gently pull apart the cuts to open up the crevices. Spread the garlic butter mixture generously into every cut, getting deep into each crack. Use about two-thirds of the butter mixture, making sure to coat all the exposed bread surfaces. You can also brush some butter on the top of the loaf.
Step 5: Add the Cheese
Stuff the shredded mozzarella and cheddar cheese into the cuts, distributing it as evenly as possible throughout all the crevices. Push the cheese down into the cuts so it reaches the bottom. Don’t worry if some cheese sits on top – it will melt down during baking. Reserve a small handful of cheese for topping.
Step 6: Add Final Butter and Cheese
Spread the remaining garlic butter over the top of the bread and into any spots you might have missed. Sprinkle the reserved cheese over the top surface of the bread for extra cheesy goodness and a golden finish.
Step 7: Wrap and Bake (Phase 1)
Wrap the bread completely in the aluminum foil, creating a sealed packet. Make sure it’s fully enclosed but not wrapped too tightly – you want to trap steam while allowing some room for heat circulation. Place in the preheated oven and bake for 15 minutes. This allows the butter to melt and soak into the bread while the cheese begins melting.
Step 8: Unwrap and Finish Baking (Phase 2)
Carefully remove the bread from the oven and open the foil, folding it down around the sides to expose the top of the bread. Return to the oven and bake uncovered for an additional 10-15 minutes, until the cheese is fully melted, bubbly, and the top of the bread develops golden-brown crispy edges. Watch carefully during the last few minutes to prevent over-browning.
Step 9: Garnish and Serve
Remove from oven and let rest for 3-5 minutes (this allows the cheese to set slightly and prevents burning mouths). Transfer the bread to a wooden serving board or platter. Sprinkle with extra fresh parsley and a pinch of flaky sea salt if desired. Serve immediately while hot and gooey, encouraging guests to pull apart the pieces with their hands.
Notes
- Cutting tip: Keep the base of the loaf intact by stopping your cuts about ¾ inch from the bottom. This keeps the bread together while allowing easy pull-apart pieces.
- Butter temperature matters: If butter is too cold, it won’t spread; if too melted, it will run off. Room temperature (soft but not melted) is perfect.
- Cheese distribution: Take time to really stuff cheese deep into the cuts for maximum gooeyness. Surface cheese alone won’t give you that full pull-apart experience.
- Foil wrapped baking: The initial covered baking steams the bread and ensures even melting; the uncovered phase creates the crispy top.
- Bread selection: Choose a bread with a sturdy crust and good structure. Soft sandwich bread will become too soggy.
- Make it ahead: Prepare completely through Step 6, wrap tightly, and refrigerate up to 24 hours before baking.
- Prep Time: 15 minutes
- Cook Time: 25 minutes
- Category: Appetizer
- Method: Baking
- Cuisine: American
- Diet: Vegetarian
Nutrition
- Serving Size: 1/10 of loaf (approximately 2-3 pull-apart pieces)
- Calories: 340
- Sugar: 2g
- Sodium: 520mg
- Fat: 22g
- Saturated Fat: 13g
- Unsaturated Fat: 7g
- Trans Fat: 0g
- Carbohydrates: 25g
- Fiber: 1g
- Protein: 11g
- Cholesterol: 60mg
Tips & Variations
Bacon Cheese Crack Bread: Fold 6-8 strips of cooked, crumbled bacon into the cheese mixture before stuffing into the bread. The smoky, salty bacon adds incredible depth and makes it even more addictive.
Jalapeño Popper Version: Add 2-3 diced jalapeños (seeded for less heat) and mix cream cheese with the mozzarella for a spicy, creamy variation that tastes like jalapeño poppers in bread form.
Pizza Crack Bread: Add pizza seasoning to the butter, use mozzarella and Parmesan, and stuff with mini pepperoni slices and diced bell peppers for a pizza-flavored twist.
Herb and Cheese Upgrade: Use a combination of fresh herbs like rosemary, thyme, and oregano along with Gruyère and fontina cheese for a more sophisticated, European-style version.
Spinach Artichoke: Mix thawed, squeezed-dry frozen spinach and chopped artichoke hearts with cream cheese and mozzarella for a spinach artichoke dip-inspired filling.
Loaded Baked Potato Style: Add sour cream to the butter mixture (reduce butter slightly), use cheddar cheese, and top with bacon bits and chives – just like a loaded baked potato.
Pesto Variation: Replace half the garlic butter with basil pesto for a vibrant, herbaceous version. Use mozzarella and Parmesan for authentic Italian flavors.
Buffalo Chicken: Mix shredded cooked chicken with buffalo sauce and blue cheese crumbles along with the mozzarella for a spicy Buffalo chicken bread.
Caramelized Onion and Gruyère: Fold caramelized onions into Gruyère cheese for a French onion soup-inspired version that’s elegant enough for dinner parties.
Lighter Version: Use reduced-fat cheese and replace half the butter with olive oil to reduce calories and saturated fat while maintaining flavor.
Pro Chef Tips
The Double-Butter Technique: For maximum flavor infusion, brush the cuts with melted butter first, then add the garlic herb butter. This creates a base layer that soaks deeper into the bread while the garlic butter provides concentrated flavor on the surface.
Toast the Garlic: For deeper, more complex garlic flavor, briefly sauté the minced garlic in a tablespoon of the butter for 30-60 seconds until fragrant (not browned), then mix with the remaining softened butter. This mellows the raw garlic bite while intensifying the aroma.
Room Temperature Everything: Ensure butter, cheese, and even the bread are at room temperature before assembly. Cold ingredients don’t distribute or melt as evenly, resulting in some bites being much more flavorful than others.
The Parchment Paper Trick: Place a piece of parchment paper under the foil before wrapping. This prevents the bread from sticking to the foil and makes unwrapping and serving much cleaner.
Strategic Cheese Placement: Place cheese with better melt (like mozzarella) deeper in the cuts, and cheese that browns nicely (like cheddar or Parmesan) closer to the top for the best visual appeal and texture contrast.
Don’t Skip the Rest: Letting the bread rest for 3-5 minutes after baking allows the butter and cheese to set slightly, making the pieces easier to pull apart cleanly and preventing cheese from immediately sliding off.
The Broiler Finish: For extra-crispy, golden tops, turn on the broiler for the last 1-2 minutes of baking. Watch it like a hawk to prevent burning – broilers work fast!
Sharp Knife is Key: A sharp serrated knife makes clean cuts without compressing the bread. Dull knives squash the loaf and create uneven cuts that don’t pull apart as nicely.
Common Mistakes to Avoid
Mistake #1: Cutting All the Way Through – If you slice completely through the bottom, your bread falls apart into individual pieces rather than staying together as a pull-apart loaf. Always stop about ¾ to 1 inch from the bottom, leaving the base intact. Use your hand under the bread while cutting to feel when you’re getting close to the bottom.
Mistake #2: Using Cold Butter – Cold butter won’t spread into the cuts properly, leaving some sections dry and flavorless while others get too much. Let your butter sit at room temperature for at least 30 minutes before mixing. It should be soft and spreadable like frosting, not melted or cold and hard.
Mistake #3: Skipping the Foil-Wrapped Stage – Some people try to bake it uncovered the entire time, which causes the top to brown too quickly while the inside stays cold and the cheese doesn’t melt properly. The initial foil-wrapped baking creates steam that ensures even heating, then unwrapping allows the top to crisp up.
Mistake #4: Not Stuffing Deep Enough – Simply brushing butter and cheese on top won’t create that irresistible pull-apart experience. You need to really open up those cuts and get the butter and cheese deep into every crevice, all the way to the bottom, so every piece is fully loaded.
Mistake #5: Using Pre-Shredded Cheese – Pre-shredded cheese contains anti-caking agents (like cellulose) that prevent it from melting smoothly. It often stays slightly grainy and doesn’t create those gorgeous cheese pulls. Always shred your own cheese from a block for the best melt and flavor.
Mistake #6: Choosing the Wrong Bread – Soft, fluffy sandwich bread or thin baguettes don’t have the structure to hold up to all the butter and cheese. The bread becomes soggy and falls apart. Choose a sturdy artisan loaf with a good crust and dense crumb.
Mistake #7: Serving Too Soon – Pulling the bread from the oven and immediately serving it means the butter and cheese are still molten and will run everywhere. That 3-5 minute rest allows everything to set slightly while still remaining hot and melty, making for much neater pull-apart pieces.
Storage & Meal Prep
Refrigerator Storage: Store leftover crack bread in an airtight container or wrapped tightly in aluminum foil in the refrigerator for up to 3 days. The butter will solidify and the bread will firm up, but it reheats beautifully.
Best Reheating Method: For optimal results, reheat in the oven to restore the crispy exterior and melted cheese. Wrap the leftover portions in foil and bake at 325°F for 12-15 minutes until heated through. For the last 3-4 minutes, open the foil to re-crisp the top. Avoid the microwave if possible – it makes the bread rubbery and doesn’t melt the cheese properly.
Individual Portion Reheating: If you’re reheating just a piece or two, use a toaster oven at 325°F for 8-10 minutes wrapped in foil, then unwrapped for 2 minutes to crisp.
Day-After Enjoyment: Honestly, some people prefer crack bread the day after making it because the flavors have had time to meld and the bread soaks up even more of the garlic butter. Don’t be afraid of leftovers – they’re still delicious!
Maintaining Texture: When storing, try to keep the bread intact rather than separating it into pieces. The moisture redistributes better when the loaf stays together.
Make-Ahead & Freezer Notes
Full Make-Ahead (Refrigerator): Prepare the bread completely through Step 6 (cut, stuffed with butter and cheese, but not yet baked). Wrap the entire loaf tightly in plastic wrap, then aluminum foil. Refrigerate for up to 24 hours. When ready to bake, let it sit at room temperature for 15-20 minutes, then bake as directed, potentially adding 5 extra minutes to the covered baking time since it’s starting cold.
Partial Make-Ahead: Prepare the garlic butter mixture up to 3 days in advance and store in an airtight container in the refrigerator. Shred the cheese up to 2 days ahead and store in a sealed bag. Cut and assemble the bread just before baking for best results.
Freezer Instructions (Unbaked): Assemble the bread completely, then wrap tightly in two layers of plastic wrap followed by a layer of heavy-duty aluminum foil. Freeze for up to 2 months. To bake from frozen, let it thaw in the refrigerator overnight, then bring to room temperature for 20 minutes before baking as directed.
Freezing Baked Crack Bread: While it’s better to freeze unbaked, you can freeze leftovers. Cool completely, wrap tightly in plastic wrap then foil, and freeze for up to 1 month. Thaw in the refrigerator overnight, then reheat wrapped in foil at 325°F for 15-20 minutes.
Quick Freeze Emergency Tip: If you need to use frozen bread immediately without thawing, bake it still frozen but increase the covered baking time to 25-30 minutes, then proceed with the uncovered phase as directed.
Serving Suggestions
Cheese and Garlic Crack Bread is incredibly versatile and pairs beautifully with nearly any meal or stands perfectly well on its own as the star appetizer:
Perfect Main Course Pairings:
- Pasta dishes – spaghetti marinara, fettuccine Alfredo, or baked ziti
- Soups and stews – tomato soup, minestrone, beef stew, or French onion soup
- Grilled meats – steaks, barbecue chicken, or Italian sausages
- Salads – Caesar salad, Italian chopped salad, or Caprese salad
- Chili or hearty bean dishes
Party and Entertaining Ideas:
- Game day spreads alongside wings, sliders, and nachos
- Appetizer table with charcuterie boards and veggie platters
- Potluck contribution (always the first dish to disappear!)
- Movie night snack with popcorn and candy
- Tailgating favorite that transports well wrapped in foil
Seasonal Serving Suggestions:
- Summer: Serve with grilled vegetables and a cold pasta salad
- Fall: Perfect alongside roasted butternut squash soup
- Winter: Complement hearty beef stew or pot roast
- Spring: Pair with fresh green salad and lemon chicken
Beverages:
- Beer – light lagers, wheat beers, or IPAs
- Wine – Chardonnay, Pinot Grigio, or light reds like Chianti
- Cocktails – margaritas, mojitos, or Italian spritz
- Non-alcoholic – sparkling water with lemon, iced tea, or lemonade
Dipping Sauces (Optional Extras): While crack bread is delicious on its own, some people enjoy:
- Marinara or pizza sauce for Italian flair
- Ranch dressing for extra richness
- Balsamic reduction for sophisticated sweetness
- Herb-infused olive oil for dipping crusty edges
FAQs Section
Q: Can I use a different type of bread for this recipe?
A: Yes! While round sourdough boules are traditional, you can use Italian bread, French bread, ciabatta, or even a round rye loaf. The key is choosing bread with a sturdy crust and structure that can hold up to the butter and cheese without becoming too soggy. Avoid soft sandwich loaves or thin baguettes. Some people also make this with Hawaiian sweet rolls for individual mini versions.
Q: What if I don’t have fresh garlic? Can I use garlic powder?
A: Fresh garlic is really what makes this recipe shine, but if you absolutely must substitute, use garlic powder sparingly – about 1-1½ teaspoons mixed into the butter. The flavor won’t be quite as vibrant and aromatic, but it will still be tasty. Jarred minced garlic is a better substitute than powder if fresh isn’t available – use the same amount as fresh.
Q: Why is my cheese not melting properly?
A: This usually happens when using pre-shredded cheese (which contains anti-caking agents) or when the oven temperature is too low. Always shred cheese fresh from a block, ensure your oven is properly preheated to 350°F, and make sure you’re baking it covered first to trap heat and steam. Some cheeses also melt better than others – mozzarella, Monterey Jack, and fontina are excellent melters.
Q: Can I make this without butter or make it dairy-free?
A: You can replace the butter with olive oil or vegan butter for a dairy-free garlic mixture, and use dairy-free cheese alternatives. Keep in mind that the texture and flavor will be different – butter provides a specific richness and olive oil creates a different mouthfeel. For best results with dairy-free cheese, look for brands specifically formulated to melt well (like Violife or Miyoko’s).
Q: How do I prevent the bread from getting soggy?
A: Use a sturdy artisan bread with a good crust, don’t use melted butter (it should be soft but not liquid), and make sure your oven is at the correct temperature. The two-stage baking process (covered, then uncovered) helps prevent sogginess by allowing controlled steaming first, then crisping. Also, serve the bread soon after baking – letting it sit too long allows butter to soak in excessively.
Q: Can I make individual servings instead of one large loaf?
A: Absolutely! Use dinner rolls or small individual bread rolls. Cut the crosshatch pattern in each roll (being even more careful not to cut through the bottom since they’re smaller), stuff with butter and cheese, and bake at the same temperature for reduced time – usually 12-15 minutes covered, then 5-8 minutes uncovered. Watch carefully as smaller portions bake faster.
Q: What should I do if the top is browning too quickly?
A: If the top starts getting too dark before the cheese is fully melted inside, simply tent a piece of foil loosely over the top while it continues baking. You can also reduce the oven temperature by 25°F and bake a bit longer. Every oven is different, so adjust as needed for your specific appliance.
Q: Is there a way to make this healthier without sacrificing too much flavor?
A: Yes! Use whole grain or whole wheat artisan bread for added fiber, replace half the butter with olive oil (which has healthier fats), use reduced-fat cheese (though it won’t melt quite as gloriously), and load up on fresh herbs for flavor without calories. You can also use less cheese than called for and compensate with extra garlic and herbs.
Conclusion
This Cheesy Garlic Crack Bread truly lives up to its addictive name – it’s the kind of recipe that creates instant fans and has people begging for more. The combination of crusty artisan bread, aromatic garlic butter, fresh herbs, and gloriously melted cheese creates a pull-apart experience that’s impossible to resist. Whether you call it crack bread, pull-apart garlic bread, or cheesy garlic bread, one thing is certain: it disappears fast and leaves everyone asking for the recipe.
The beauty of this dish lies in its simplicity and versatility. With just a handful of ingredients and about 40 minutes, you can create an impressive appetizer that looks like it came from a gourmet restaurant. The interactive, shareable format makes it perfect for gatherings, while the incredible flavor makes it just as satisfying for a cozy night at home. Plus, with endless variation possibilities, you can customize it to match any flavor profile or dietary preference.
Don’t let the fancy presentation intimidate you – this recipe is genuinely easy and forgiving. The crosshatch cutting technique looks impressive but requires no special skills, and the two-stage baking ensures foolproof results every time. Even kitchen beginners can master this recipe and look like culinary superstars.
Ready to experience the most addictive bread you’ll ever make? Grab a beautiful loaf of bread, gather your butter and cheese, and prepare for compliments to roll in. This is one of those recipes you’ll make again and again, perfect for everything from casual family dinners to elegant entertaining.
Don’t forget to pin this recipe to your Pinterest boards so you can find it easily whenever the craving strikes (which will be often!). And after you’ve made it, I’d absolutely love to hear about your experience – drop a comment below telling me which cheese combination you used, what you served it with, and how fast it disappeared. Did you try any creative variations? Share your photos on social media and tag me so I can see your beautiful creation! Happy baking, and enjoy every cheesy, garlicky, irresistible bite! 🧄